
I will start a new series. Its name is “Great ! The Legendary Equatorial Mount”, East and West, ancient and modern , this is a project to review the “Legendary equatorial mount” in the world.
All of the equatorial mounts introduced here have been used in our editorial department. Where and how is the “Legend”? We will introduce the good points of the equatorial mount and its “sharpness” compared to other products with detailed examples of making and using it.
The first issue of the series is Vixen’s AP Mount (Advanced Polaris). Let’s get started.
Great ! The Legend of AP(Advanced Polaris) -1-
Great! Small System with FL55SS
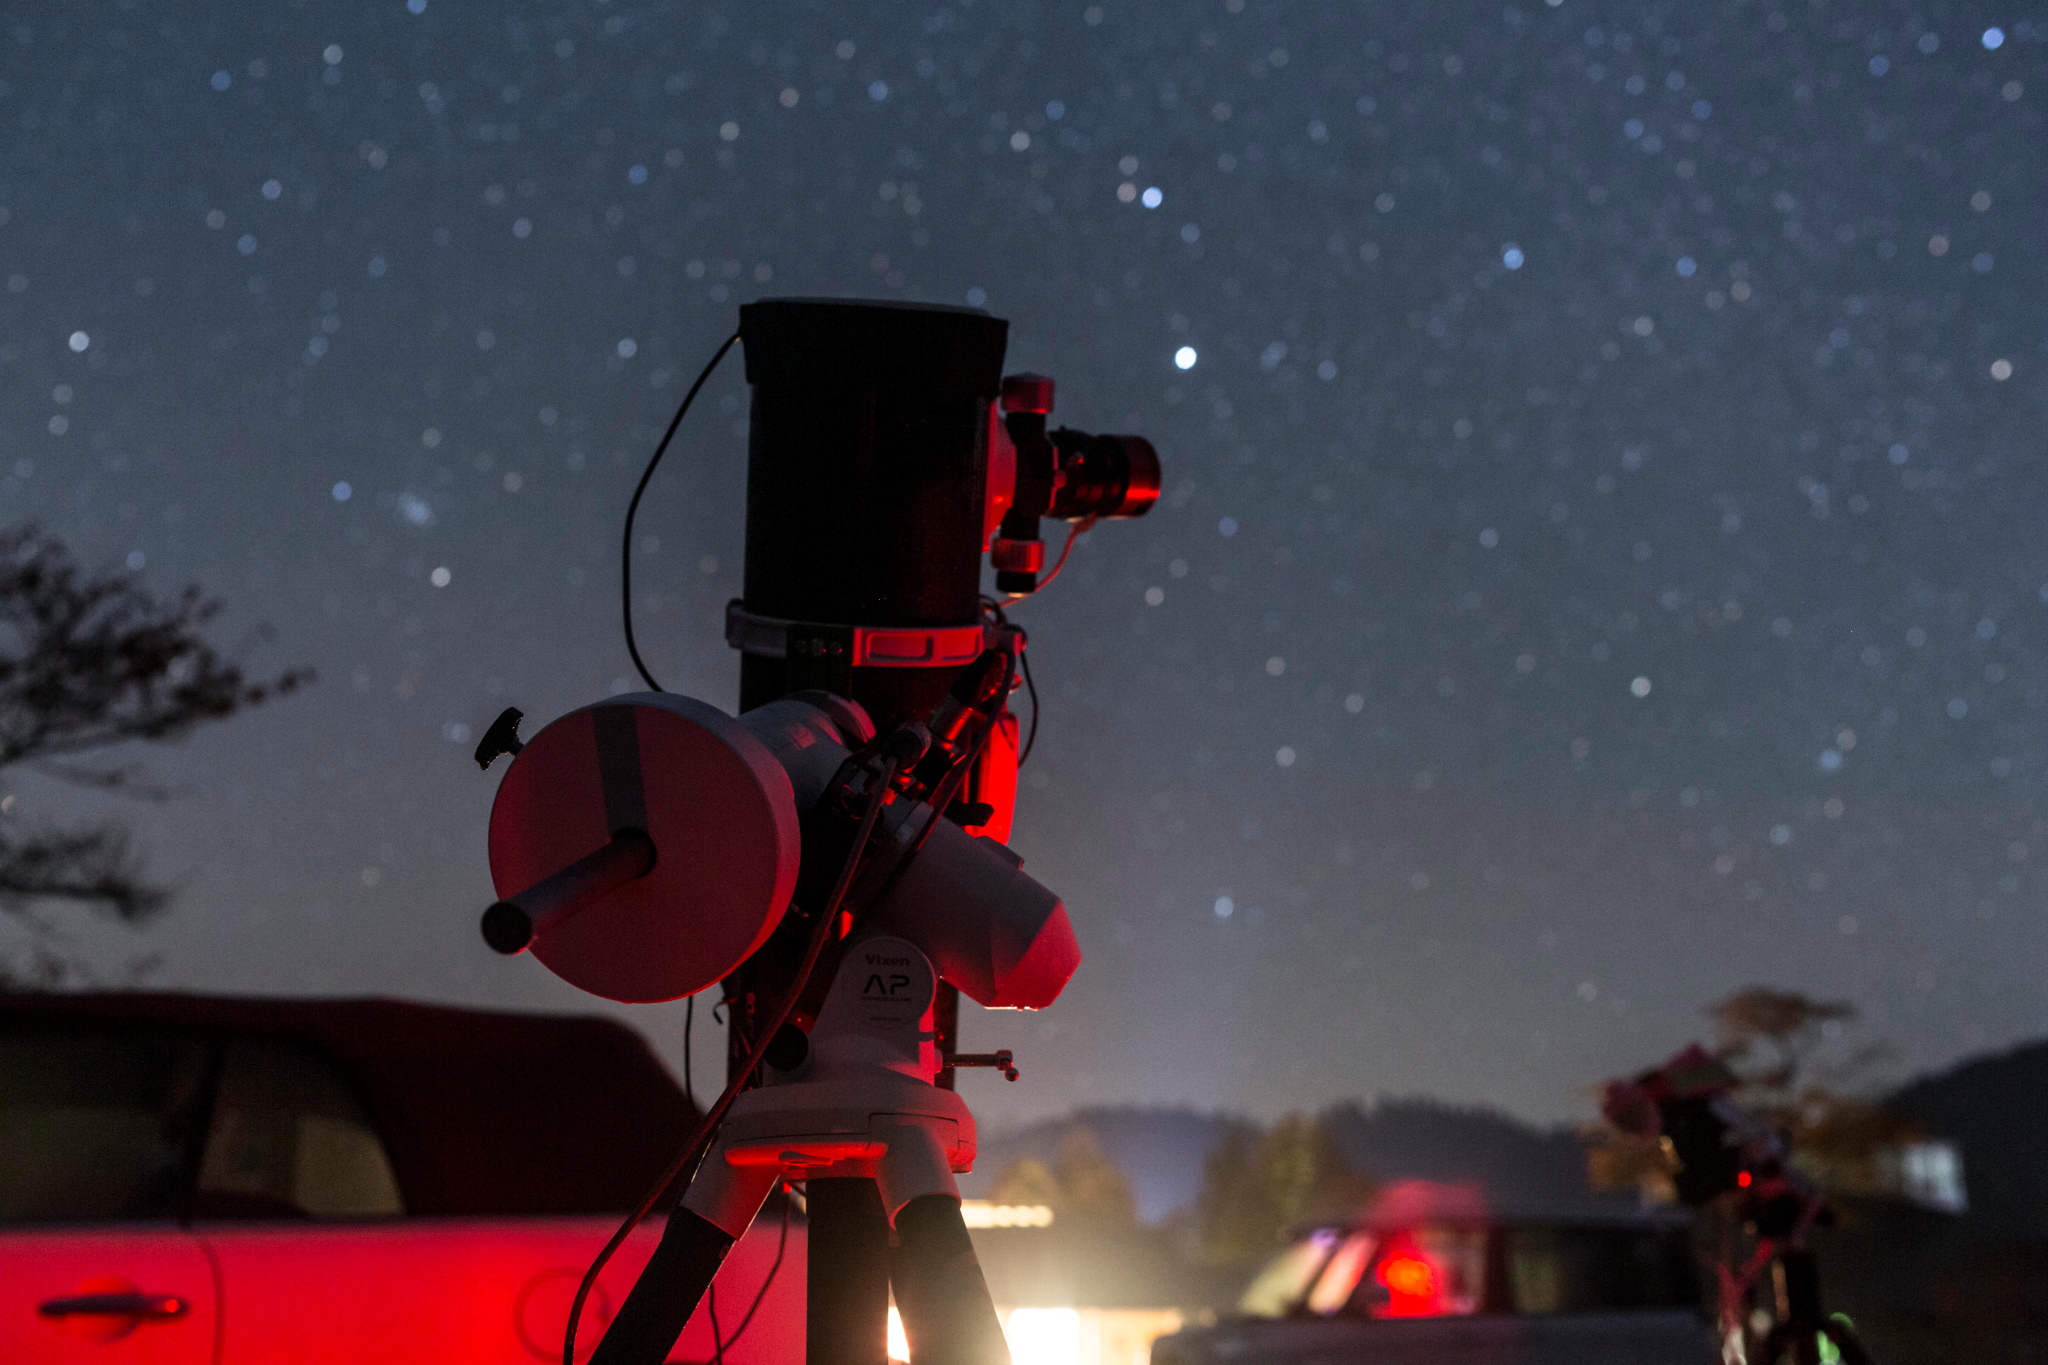
 This image was taken on a moonlit night for equipment photography^^^
The AP mount looks great with light equipment. The combination above is the AP mount and Vixen FL55SS, one of the best pairs for serious photography at 200-300mm focal length. In terms of balance, the equatorial mount slightly outperforms ^^; in that sense, guide error is hardly a concern.
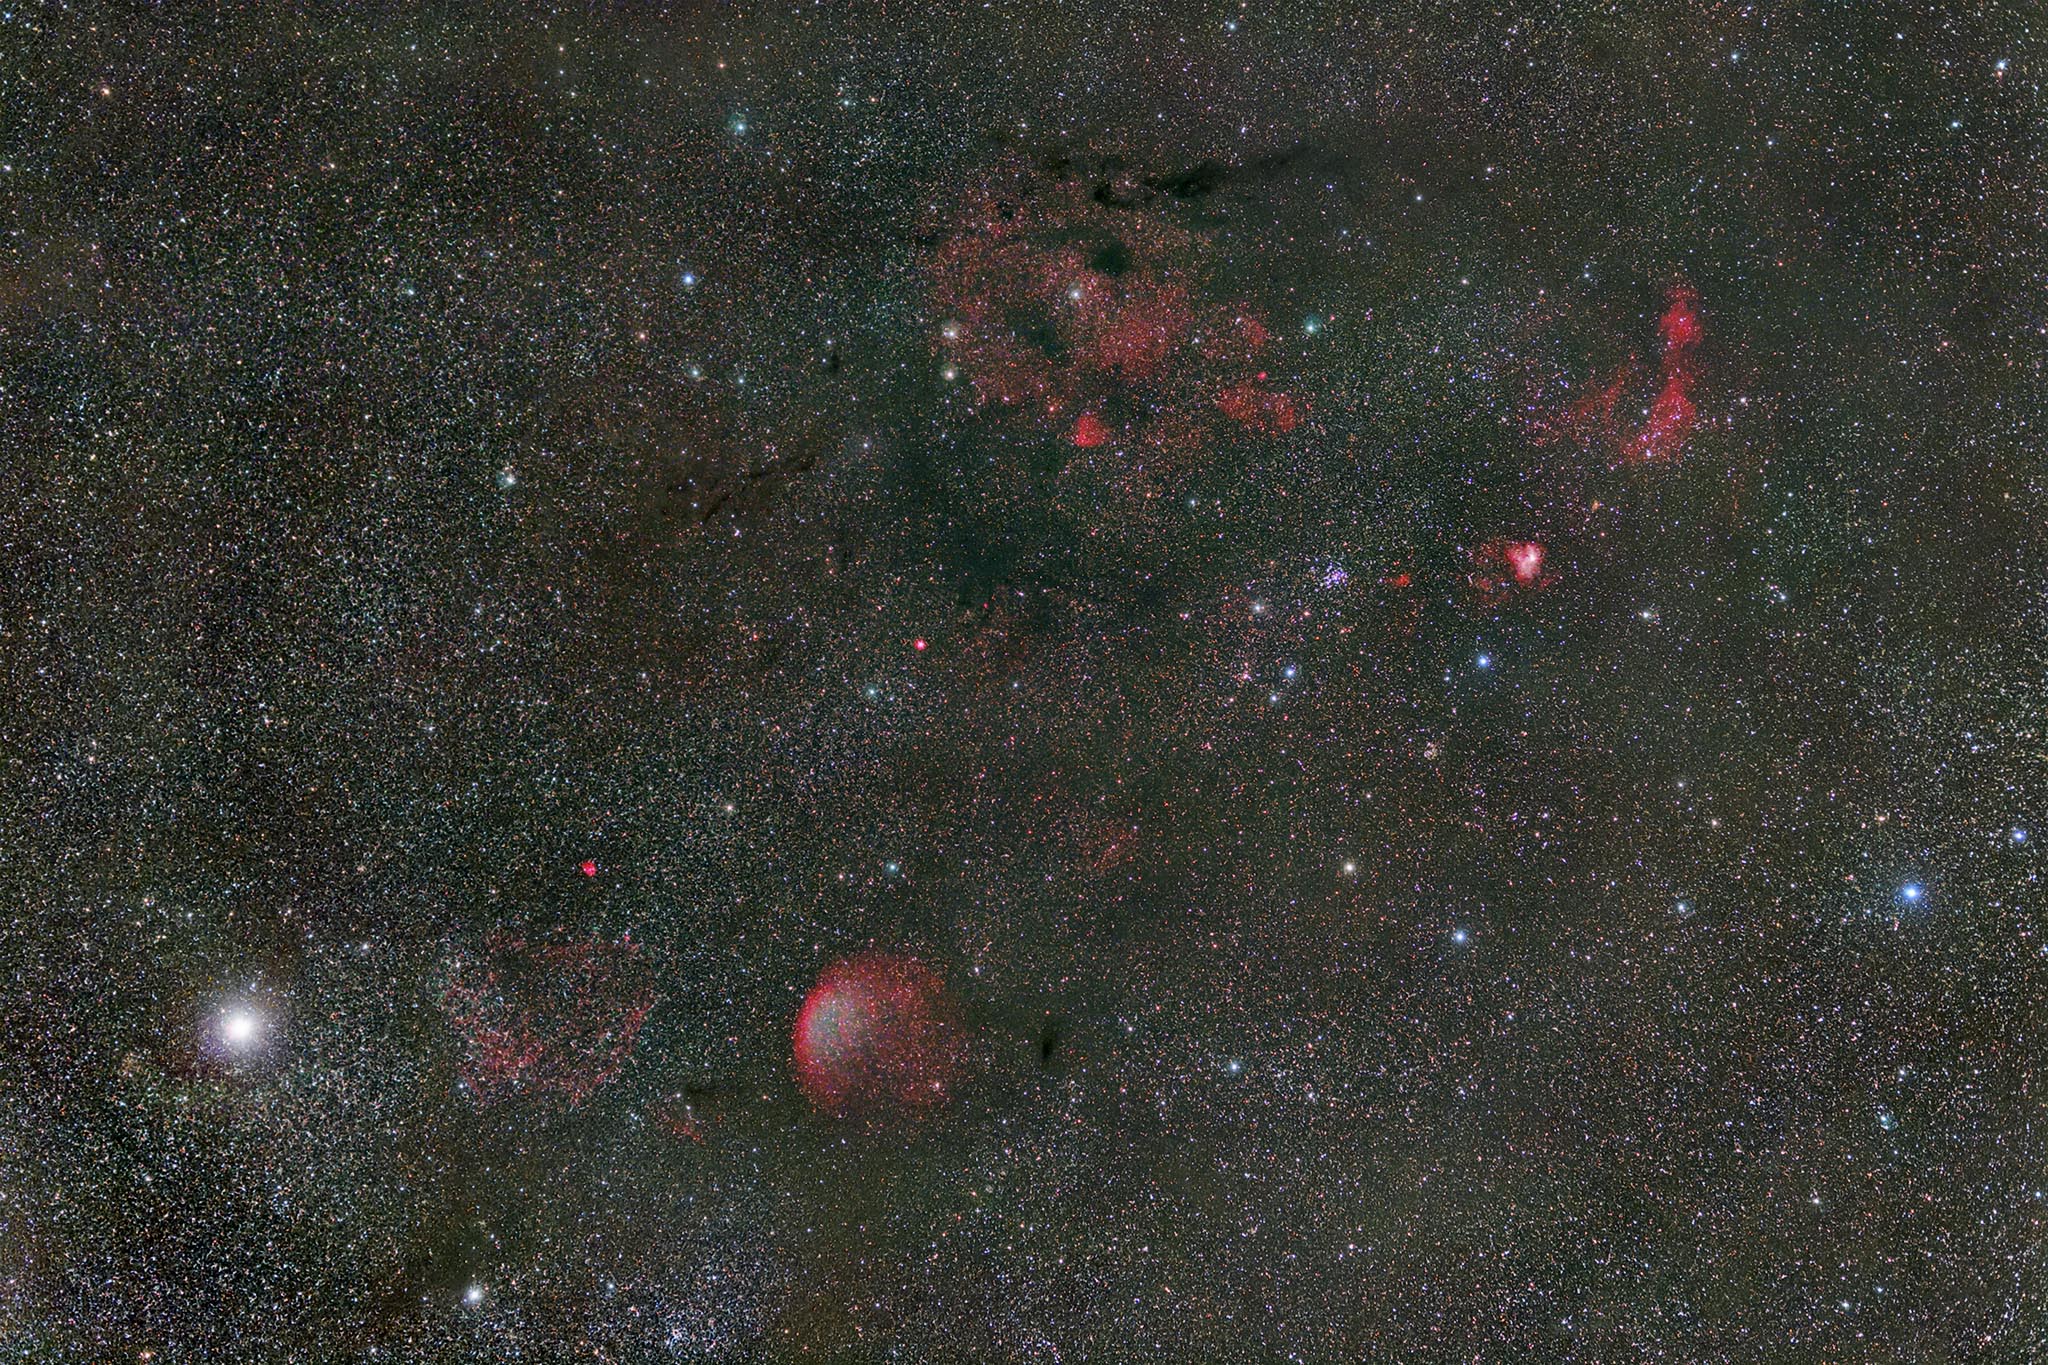
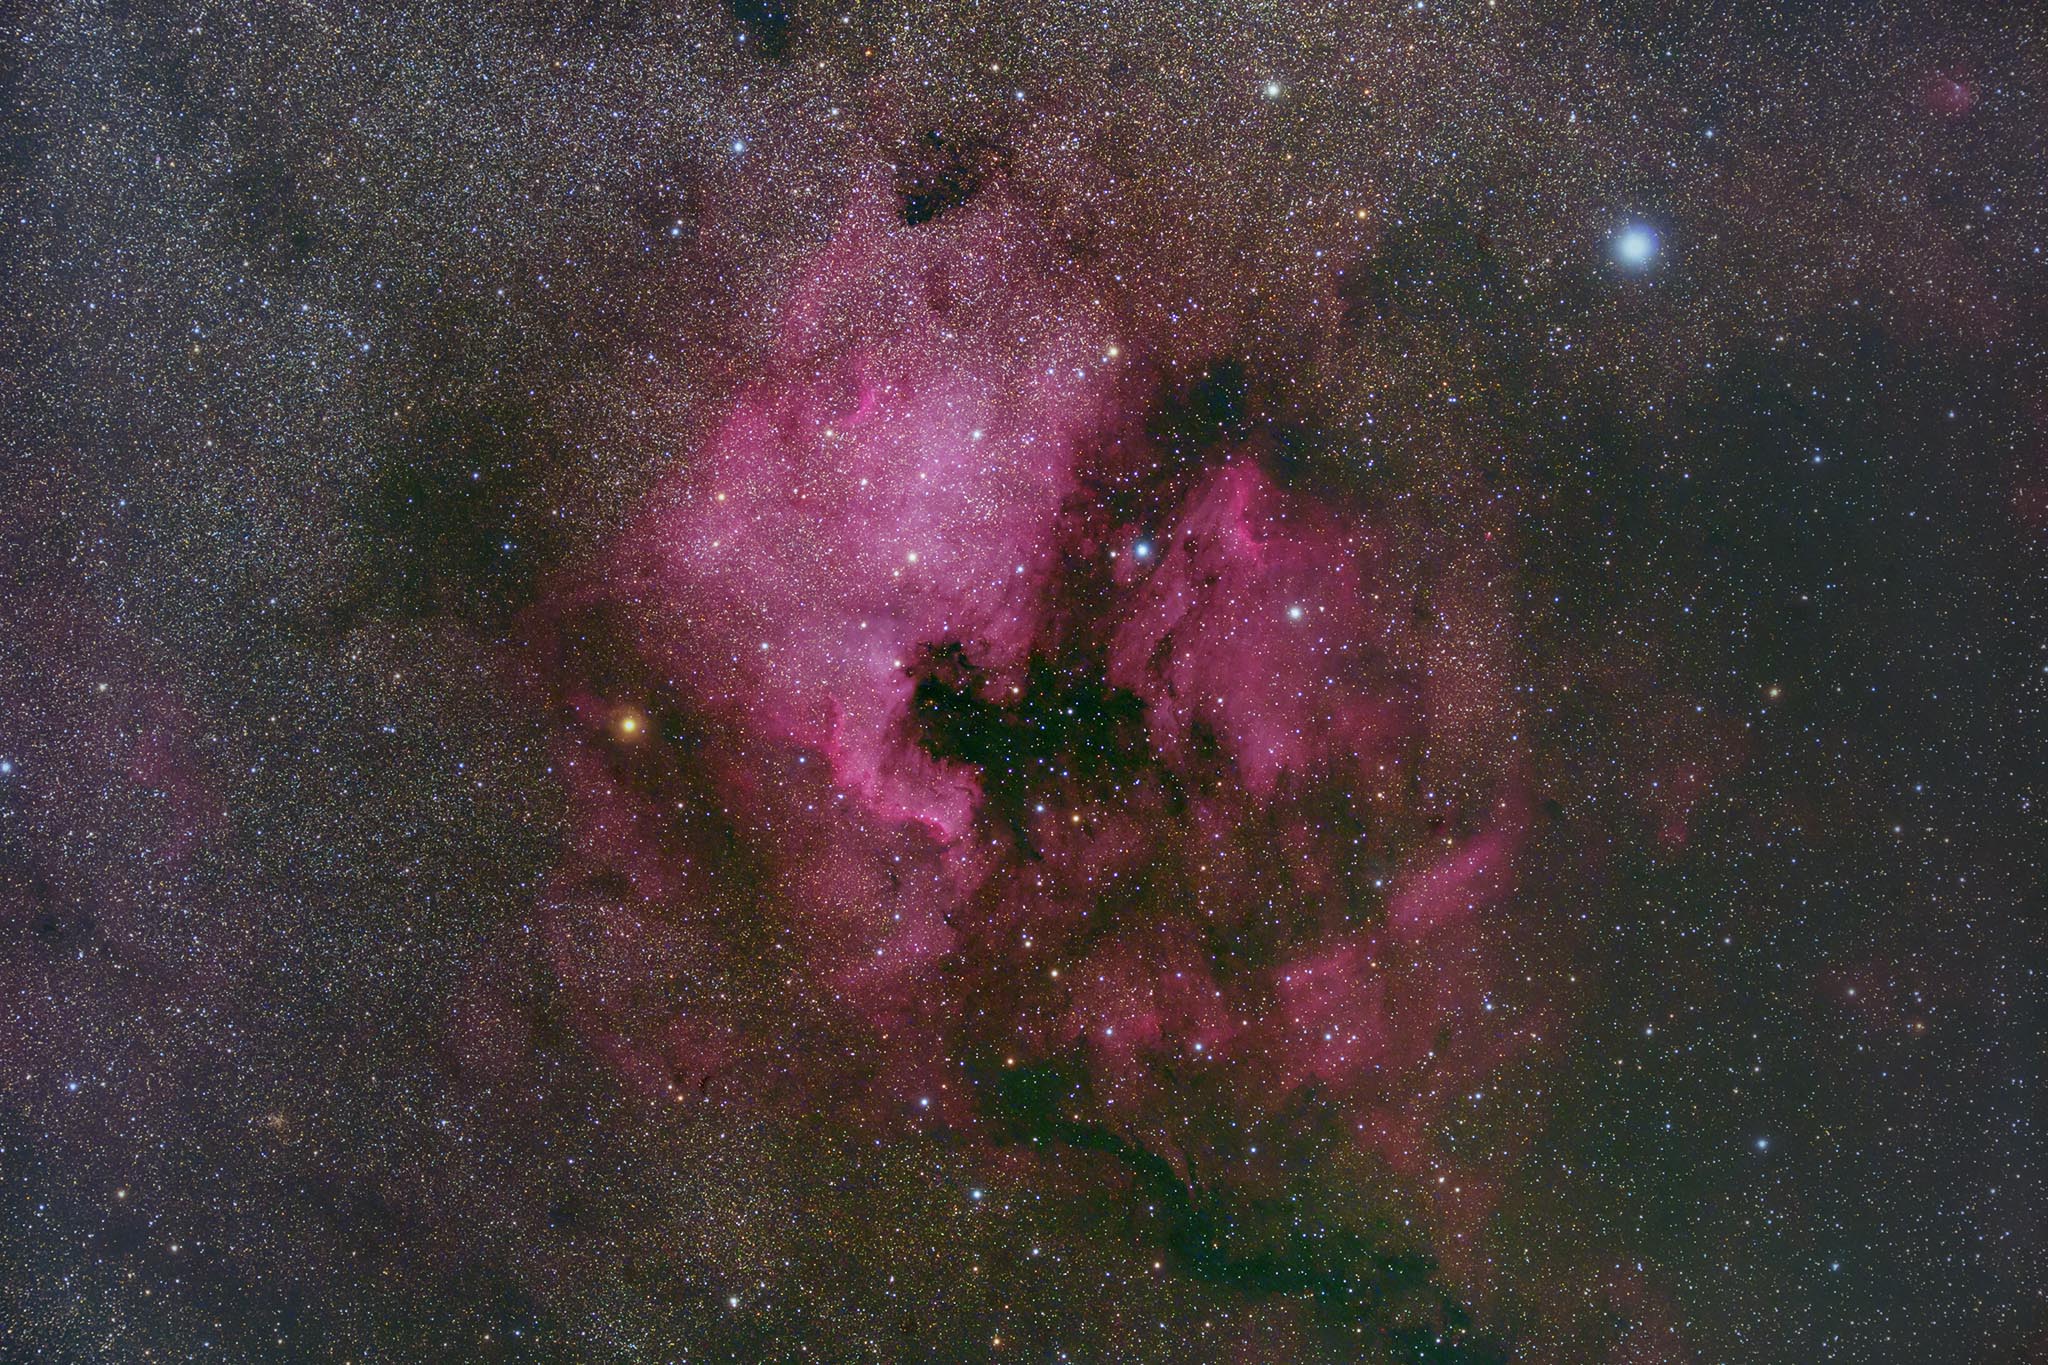 FL55SS SD Reducer HD Kit α7S (modified) 30sec*90 ISO6400 AP Equatorial Mount No-Guide, trimmed only at the most peripheral, no dark, no flat
The North American Nebula, a classic of the regulars, with 90 images in 30 seconds. I used a SONY camera, so I limited the exposure time to 30 seconds per frame, but with the accuracy of an AP mount, 4 minutes exposure time is no problem.
The good thing about the combination of AP + short-focus small lens barrel is that it is sufficient to operate without an autoguide for the most part(*). Take it easy, point the lens barrel at the target, and simply shoot. All that’s left is to do the image processing after going home ^^^
(*)If you want to take a long exposure with a narrow band, or if the effect of low horizon and atmospheric differences is a problem, you might want to have an auto-guide.
 with twin system. taking the North American Nebula with AP+FL55SS.
In addition, the AP mount + FL55SS set is a powerful as second system. If it’s a system that doesn’t require a computer and can be left unattended, it will do a good job on the side of the main system.
Great!for heavy-weight camera lenses
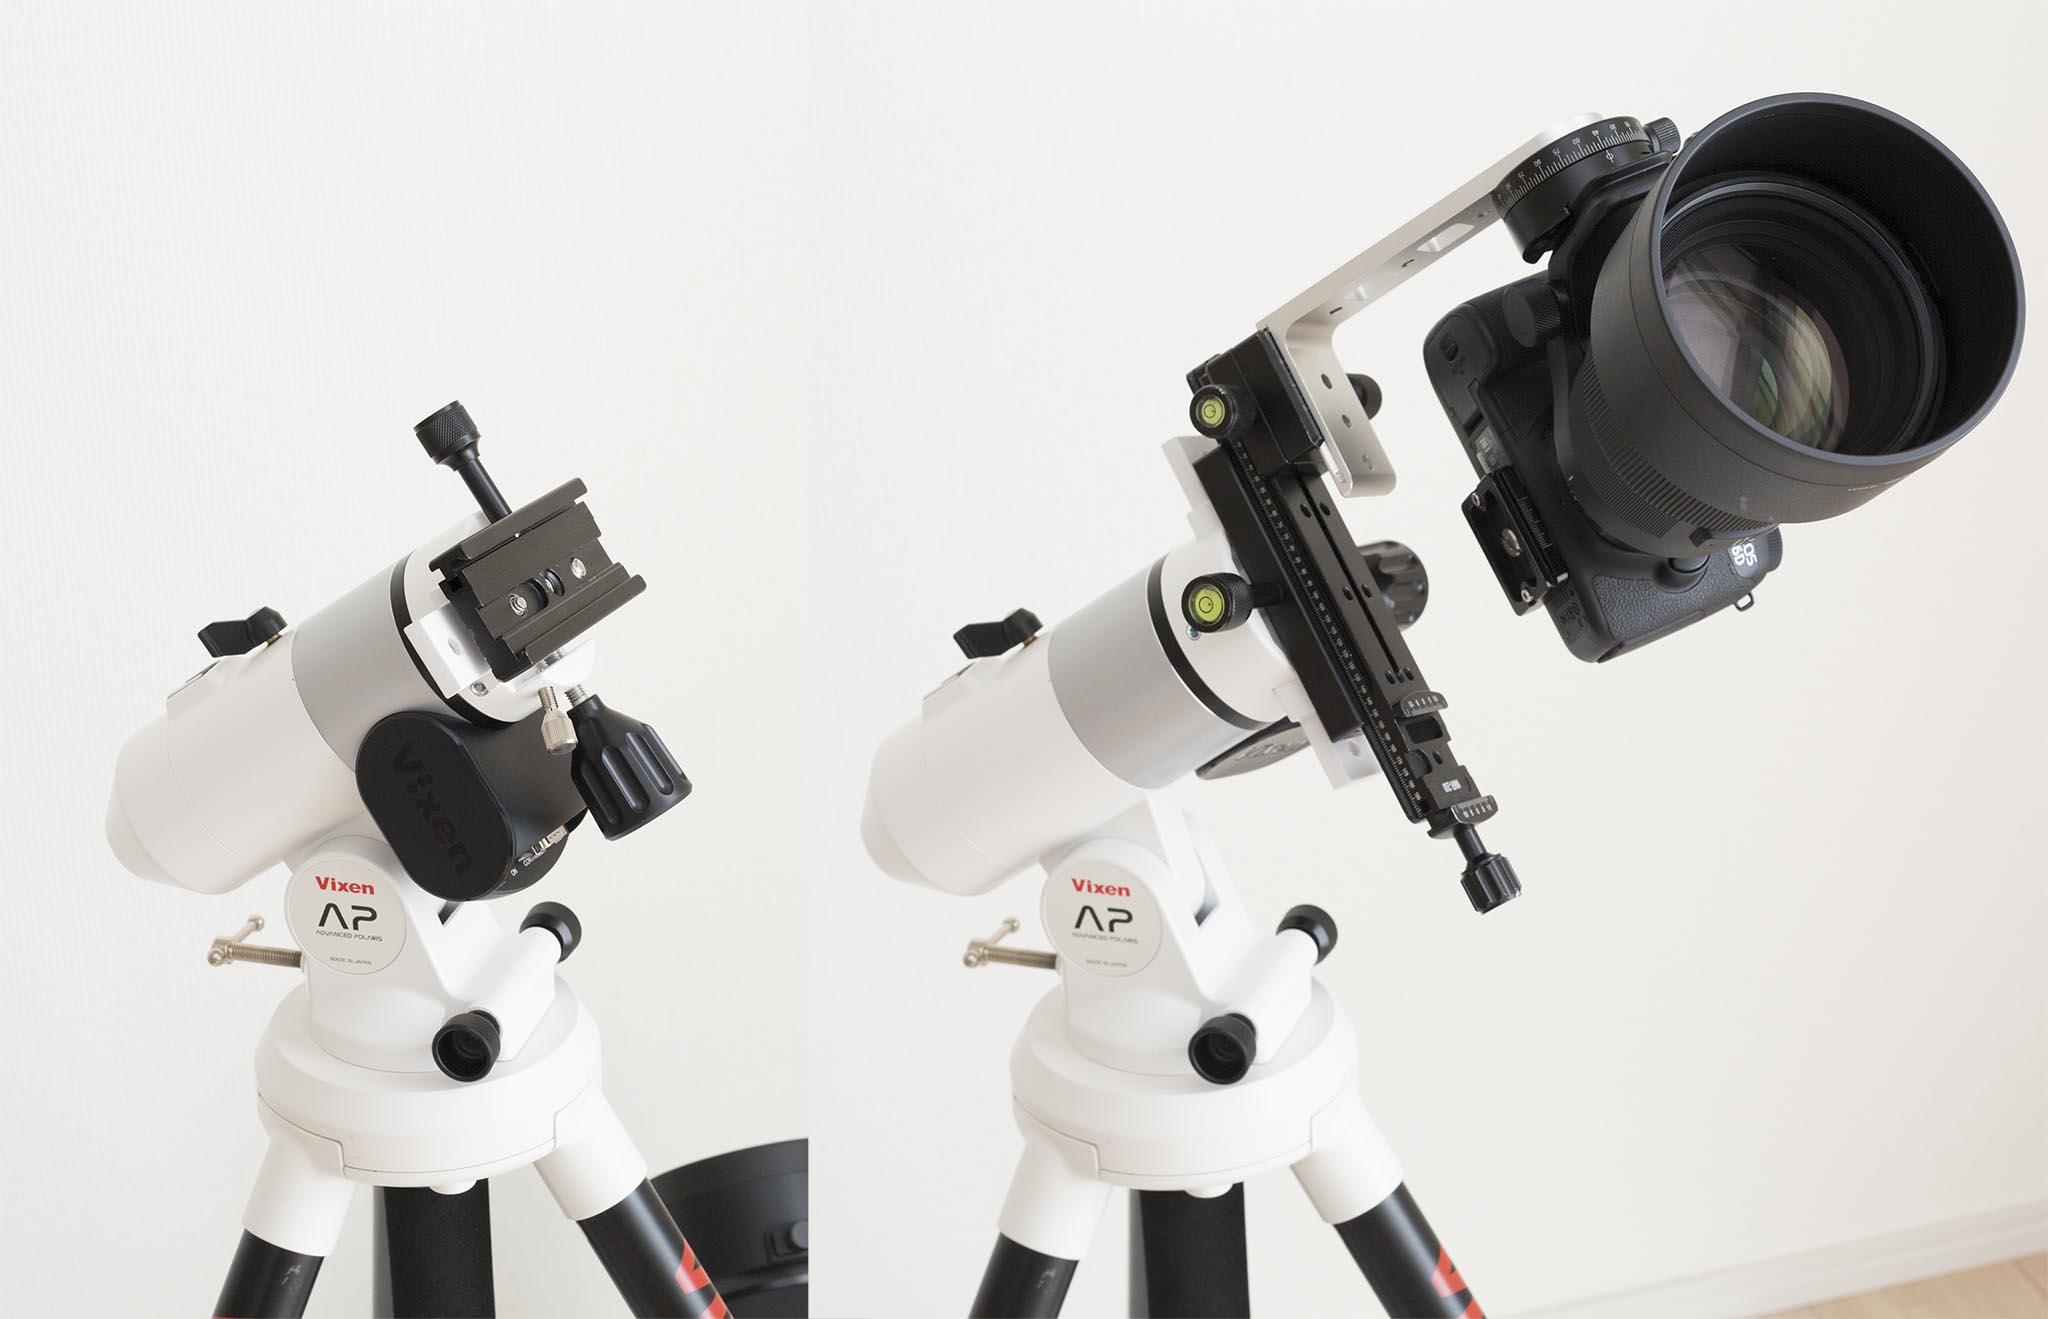
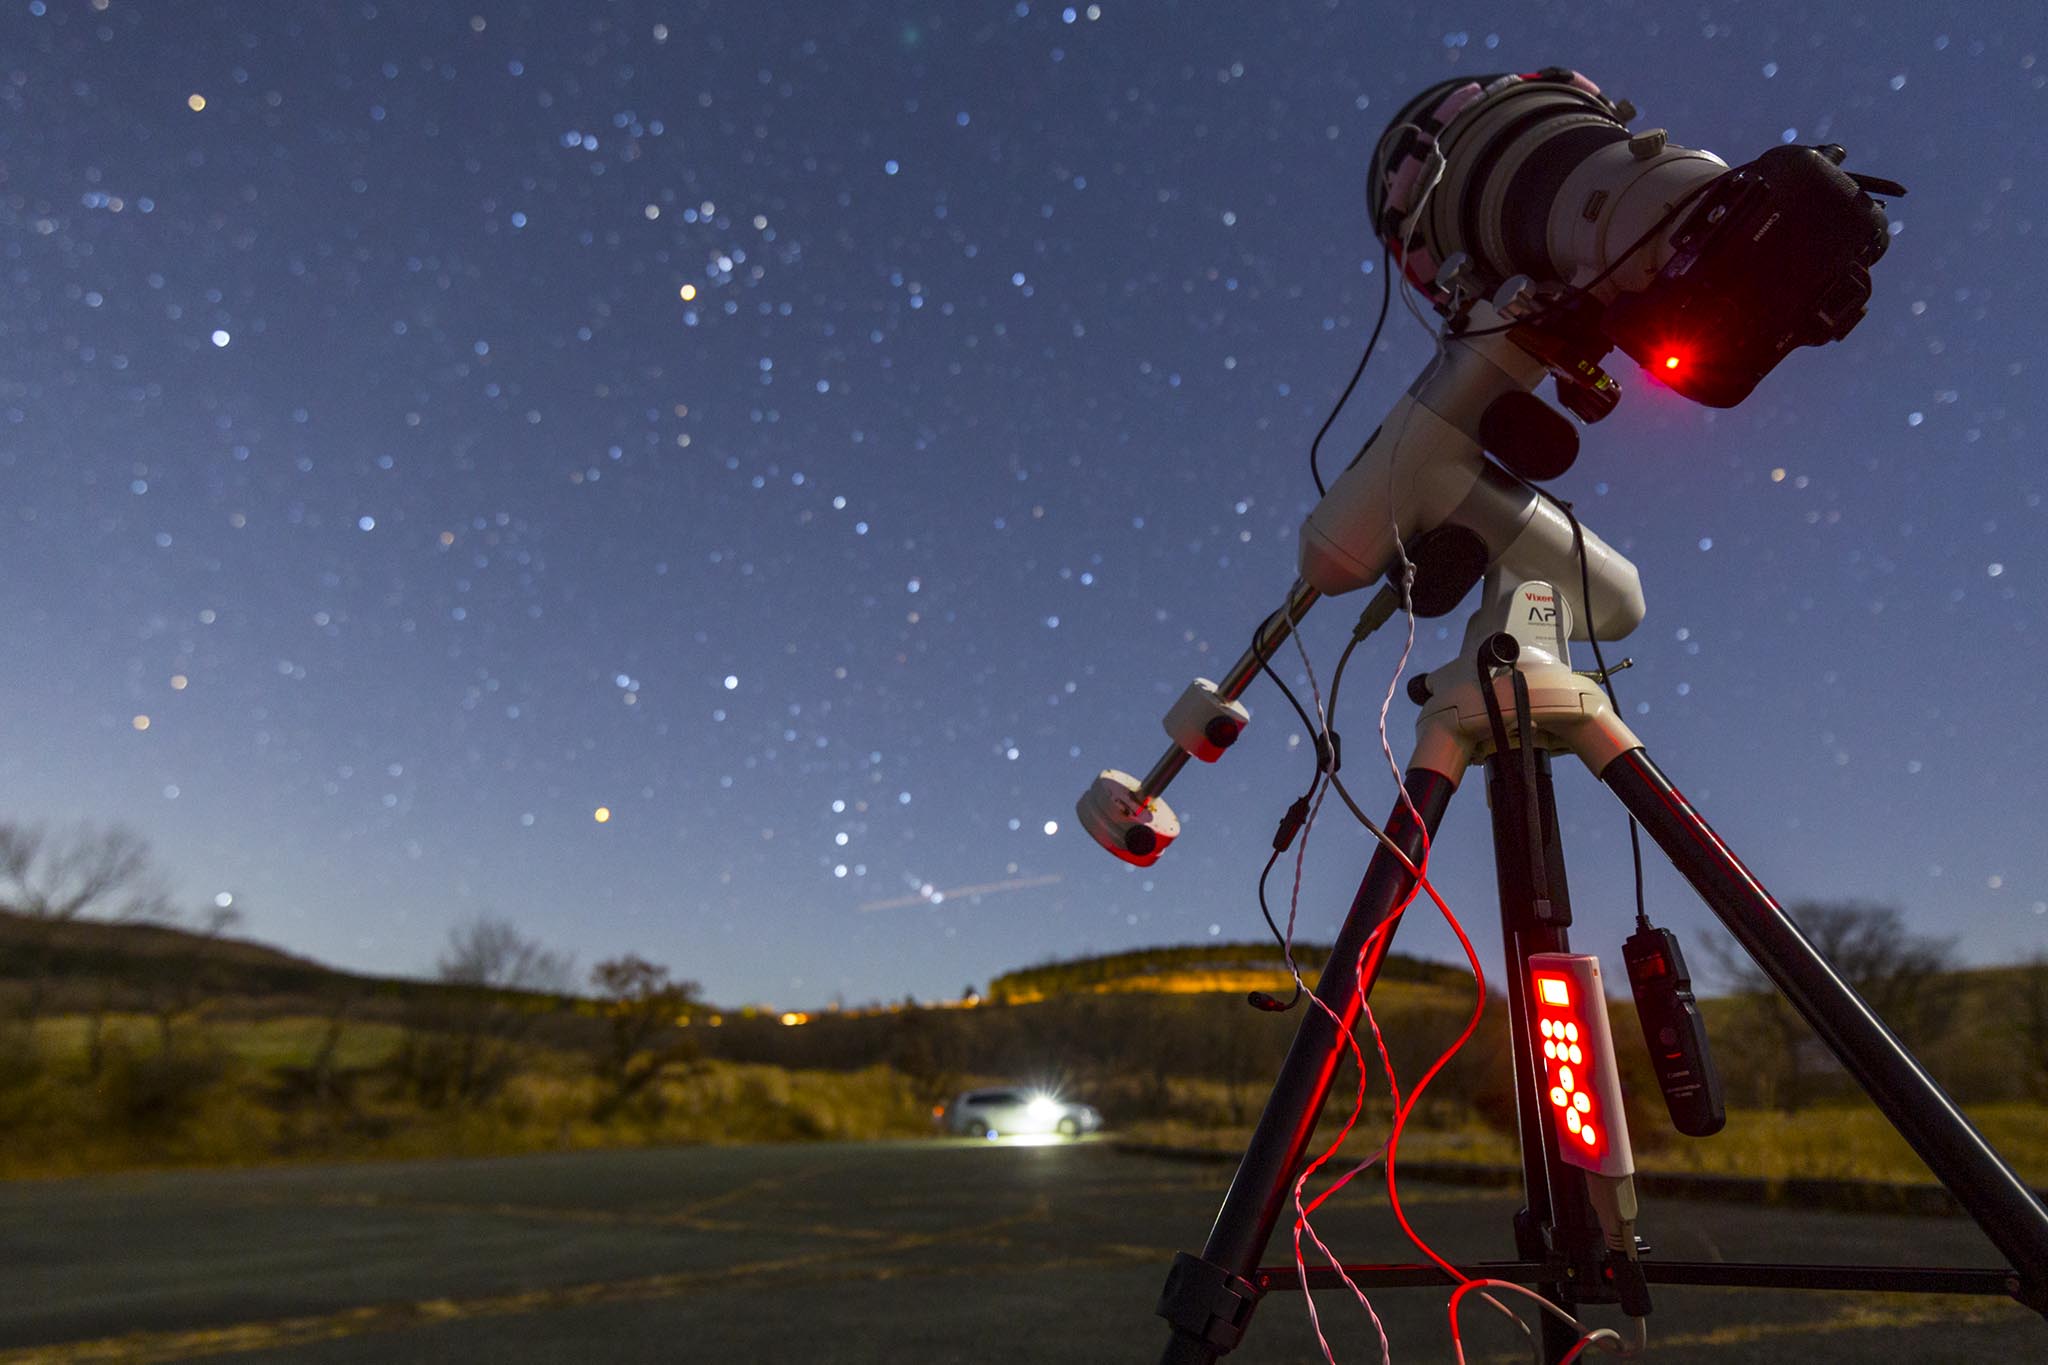 On the evening of December 14, 2018, I was photographing Comet Wirtanen with an AP mount in a German configuration, an Alca clamp mounted on the declination head, and a camera lens (400mm f/2.8).
With the AP mount, it is possible to use an even larger camera than the FL55SS without using the autoguide. The photo shows the use of the 400mm f/2.8 telephoto lens, which is nearly 5kg including the camera. The AP mount can run overnight on a medium-sized USB mobile battery. I also had four AA batteries (*) in reserve, so I could take pictures without worry. It is the AP mount which does not correspond to automatic introduction, but power is consumed accordingly even if it is auto guide even if it is automatic introduction, even more so if PC is used. The ability to operate for long periods of time with little power is a great advantage of the AP mount.
(*)It was also powered by a dry cell battery, but I was able to use it for about 4 hours. The temperature was about -3°C.
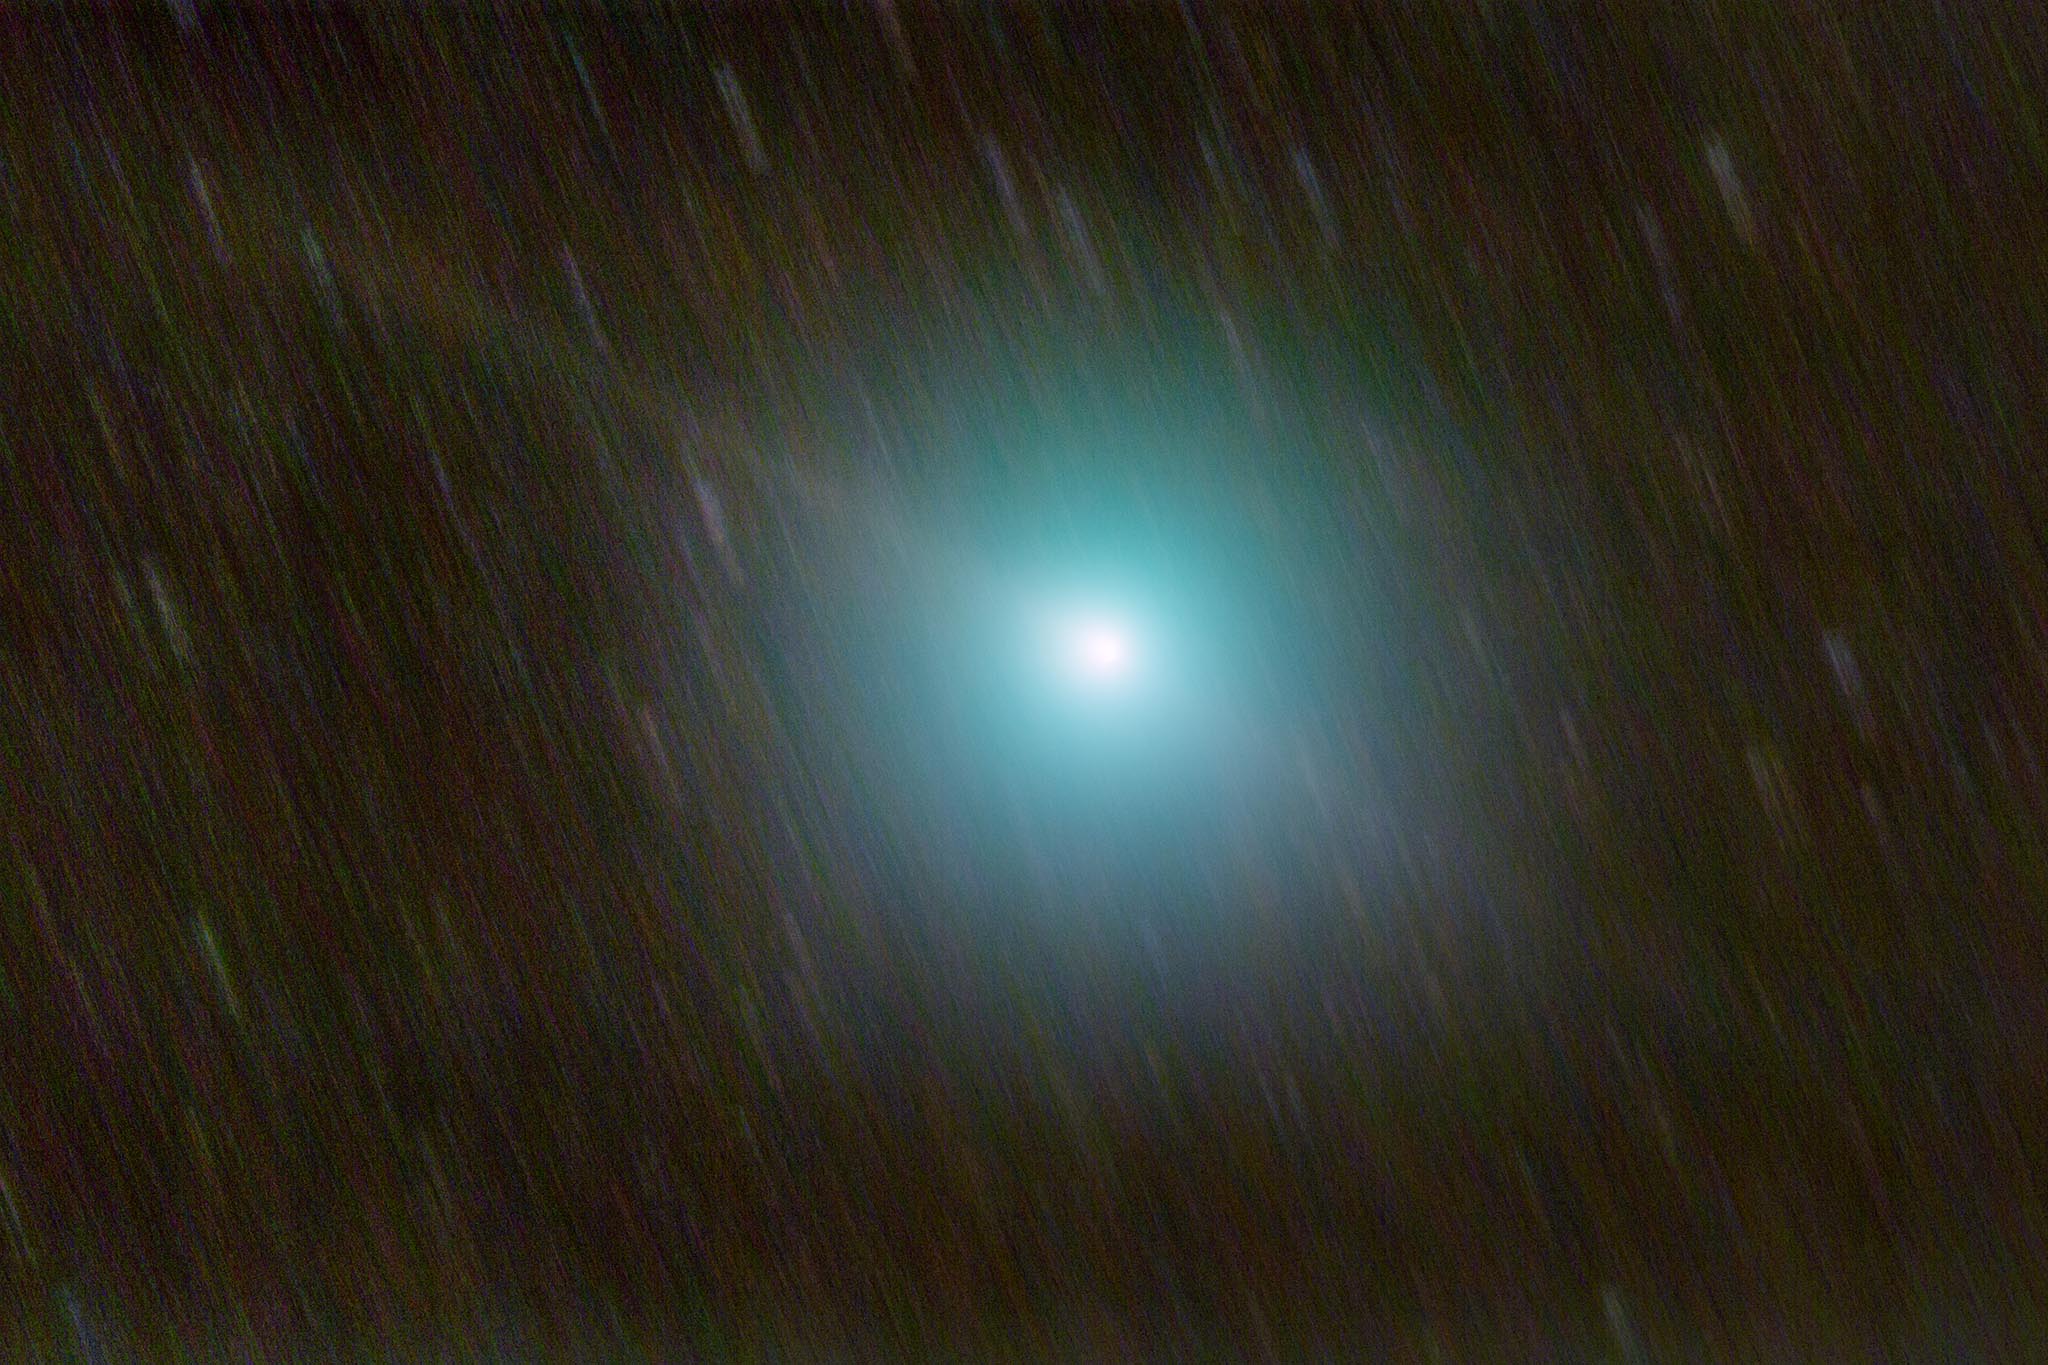 EOS5D3 (Normal) EF400mmF2.8LIS II 15sec*310 ISO6400 AP Equatorial Mount No-Guide, DSS added average, Comet Standard Composite, Higotai Park, Kumamoto
The result of the above system, with a short exposure time of 15 seconds, the guide yield was almost 100%, and I felt that the AP mount could be used up to 400mm focal length without the autoguide by keeping the exposure time appropriately short.
Great ! astro-photography in your garden
If you use an AP mount in your garden or balcony, assuming that you also want to take pictures of the planets and the moon, the most versatile and easy to use German equatorial mount with a normal two-axis drive configuration would be the best. You don’t have to think about anything, just put the lens barrel and camera on it. If you have a short focal length, you don’t even need an autoguide. It was taken by stellar tracking and left alone.
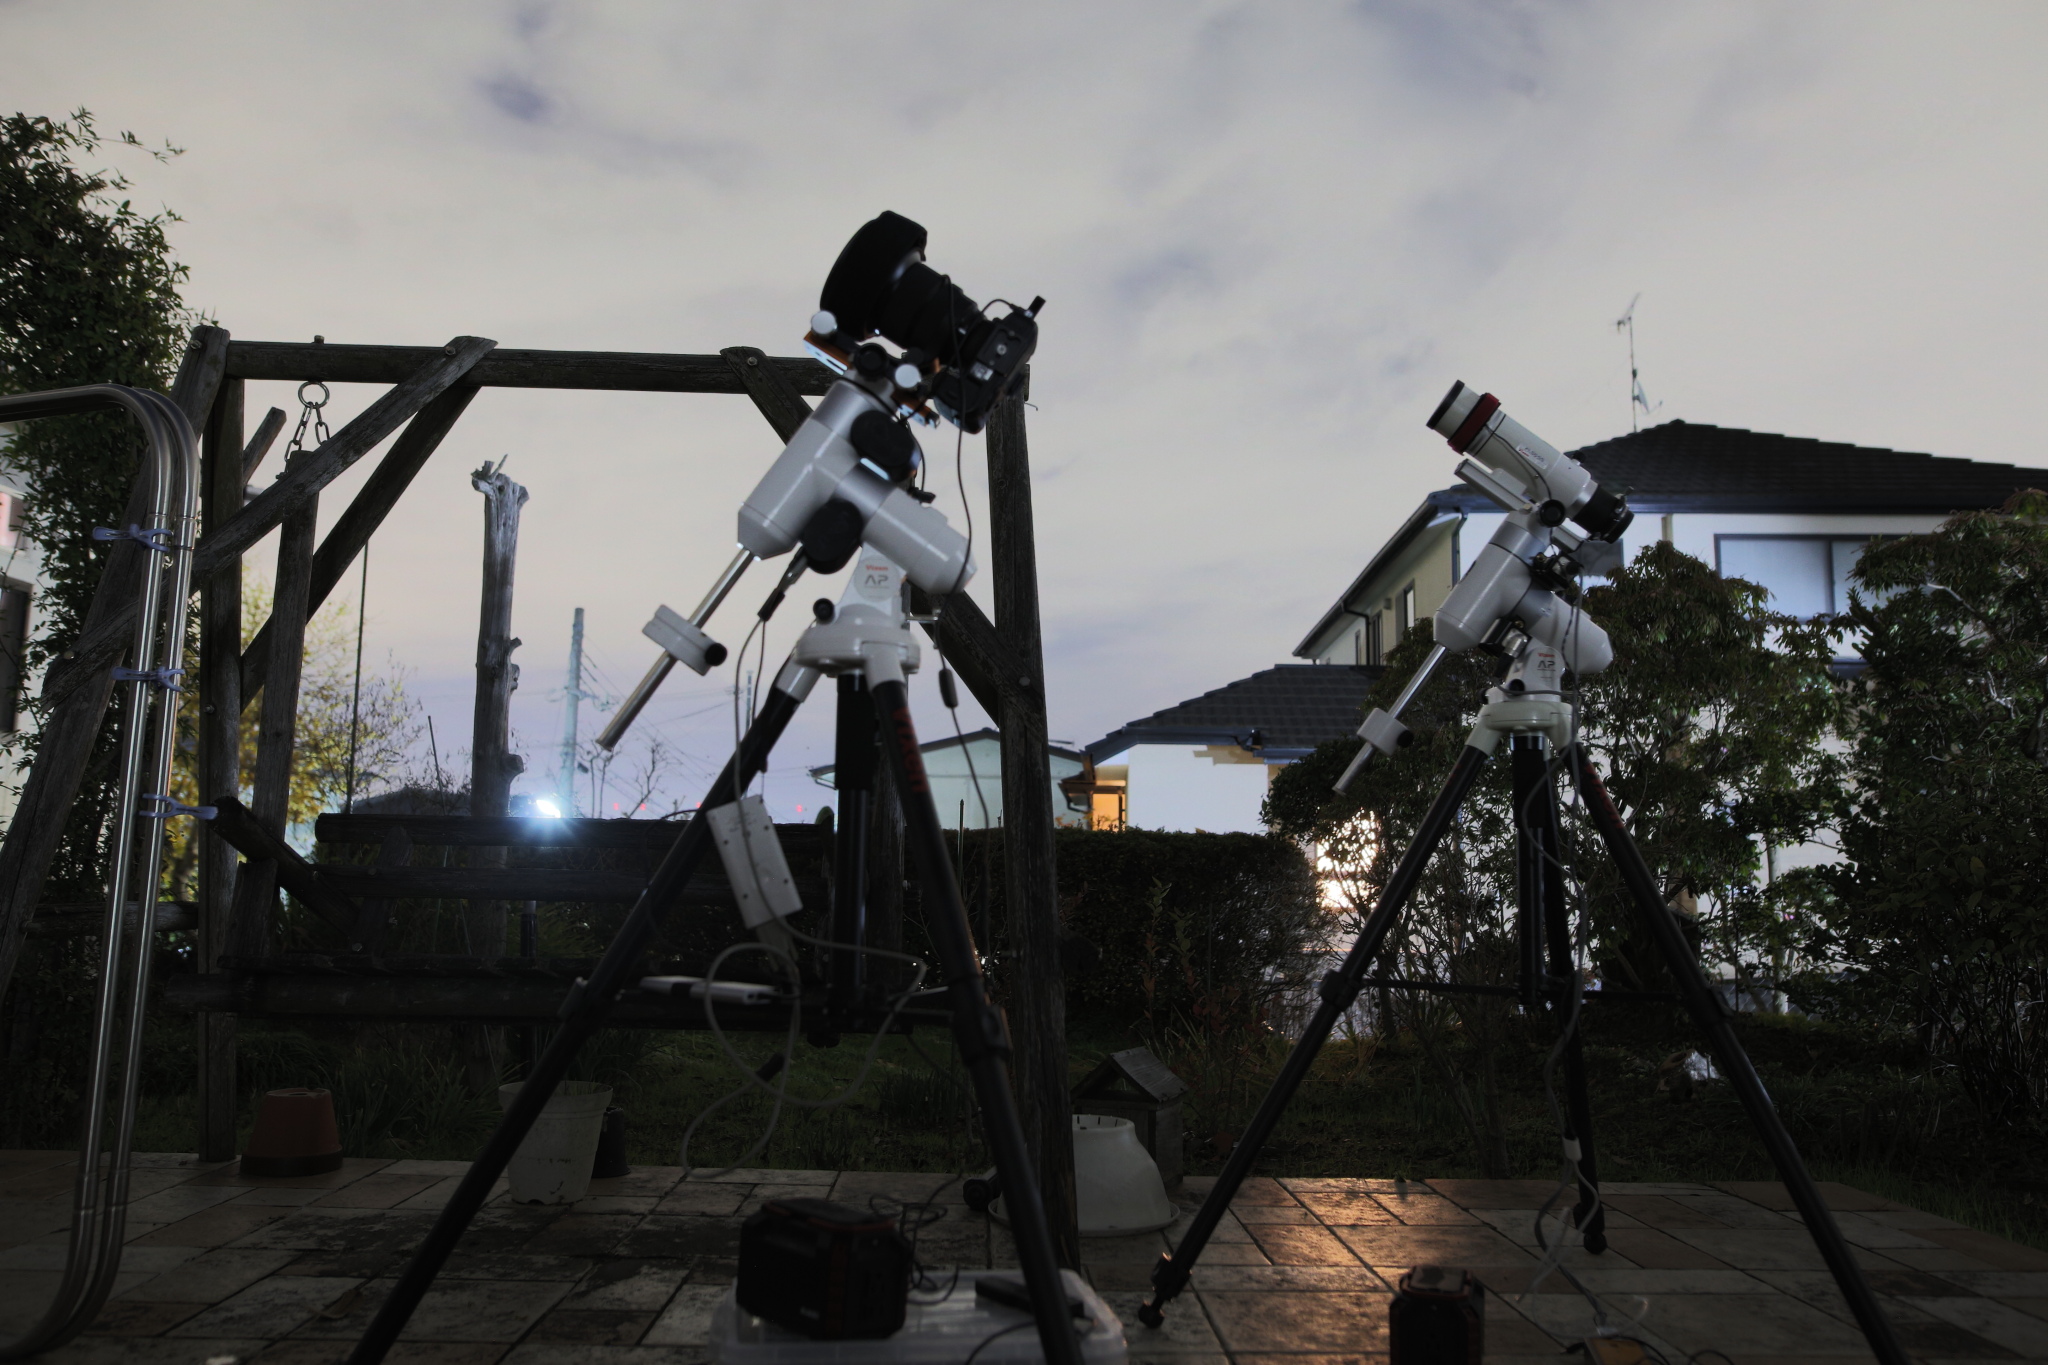
When I returned home, I took a photo with two sets of AP mounts. I used STC’s Astro Duo filter and Sightron-Japan’s QBP filter because it’s a light pollution area.
 FL55SS + Redusa Flattener α7S (modified) QBP filter Dark, no flats ISO6400 30sec*30 AP Equatorial Mount
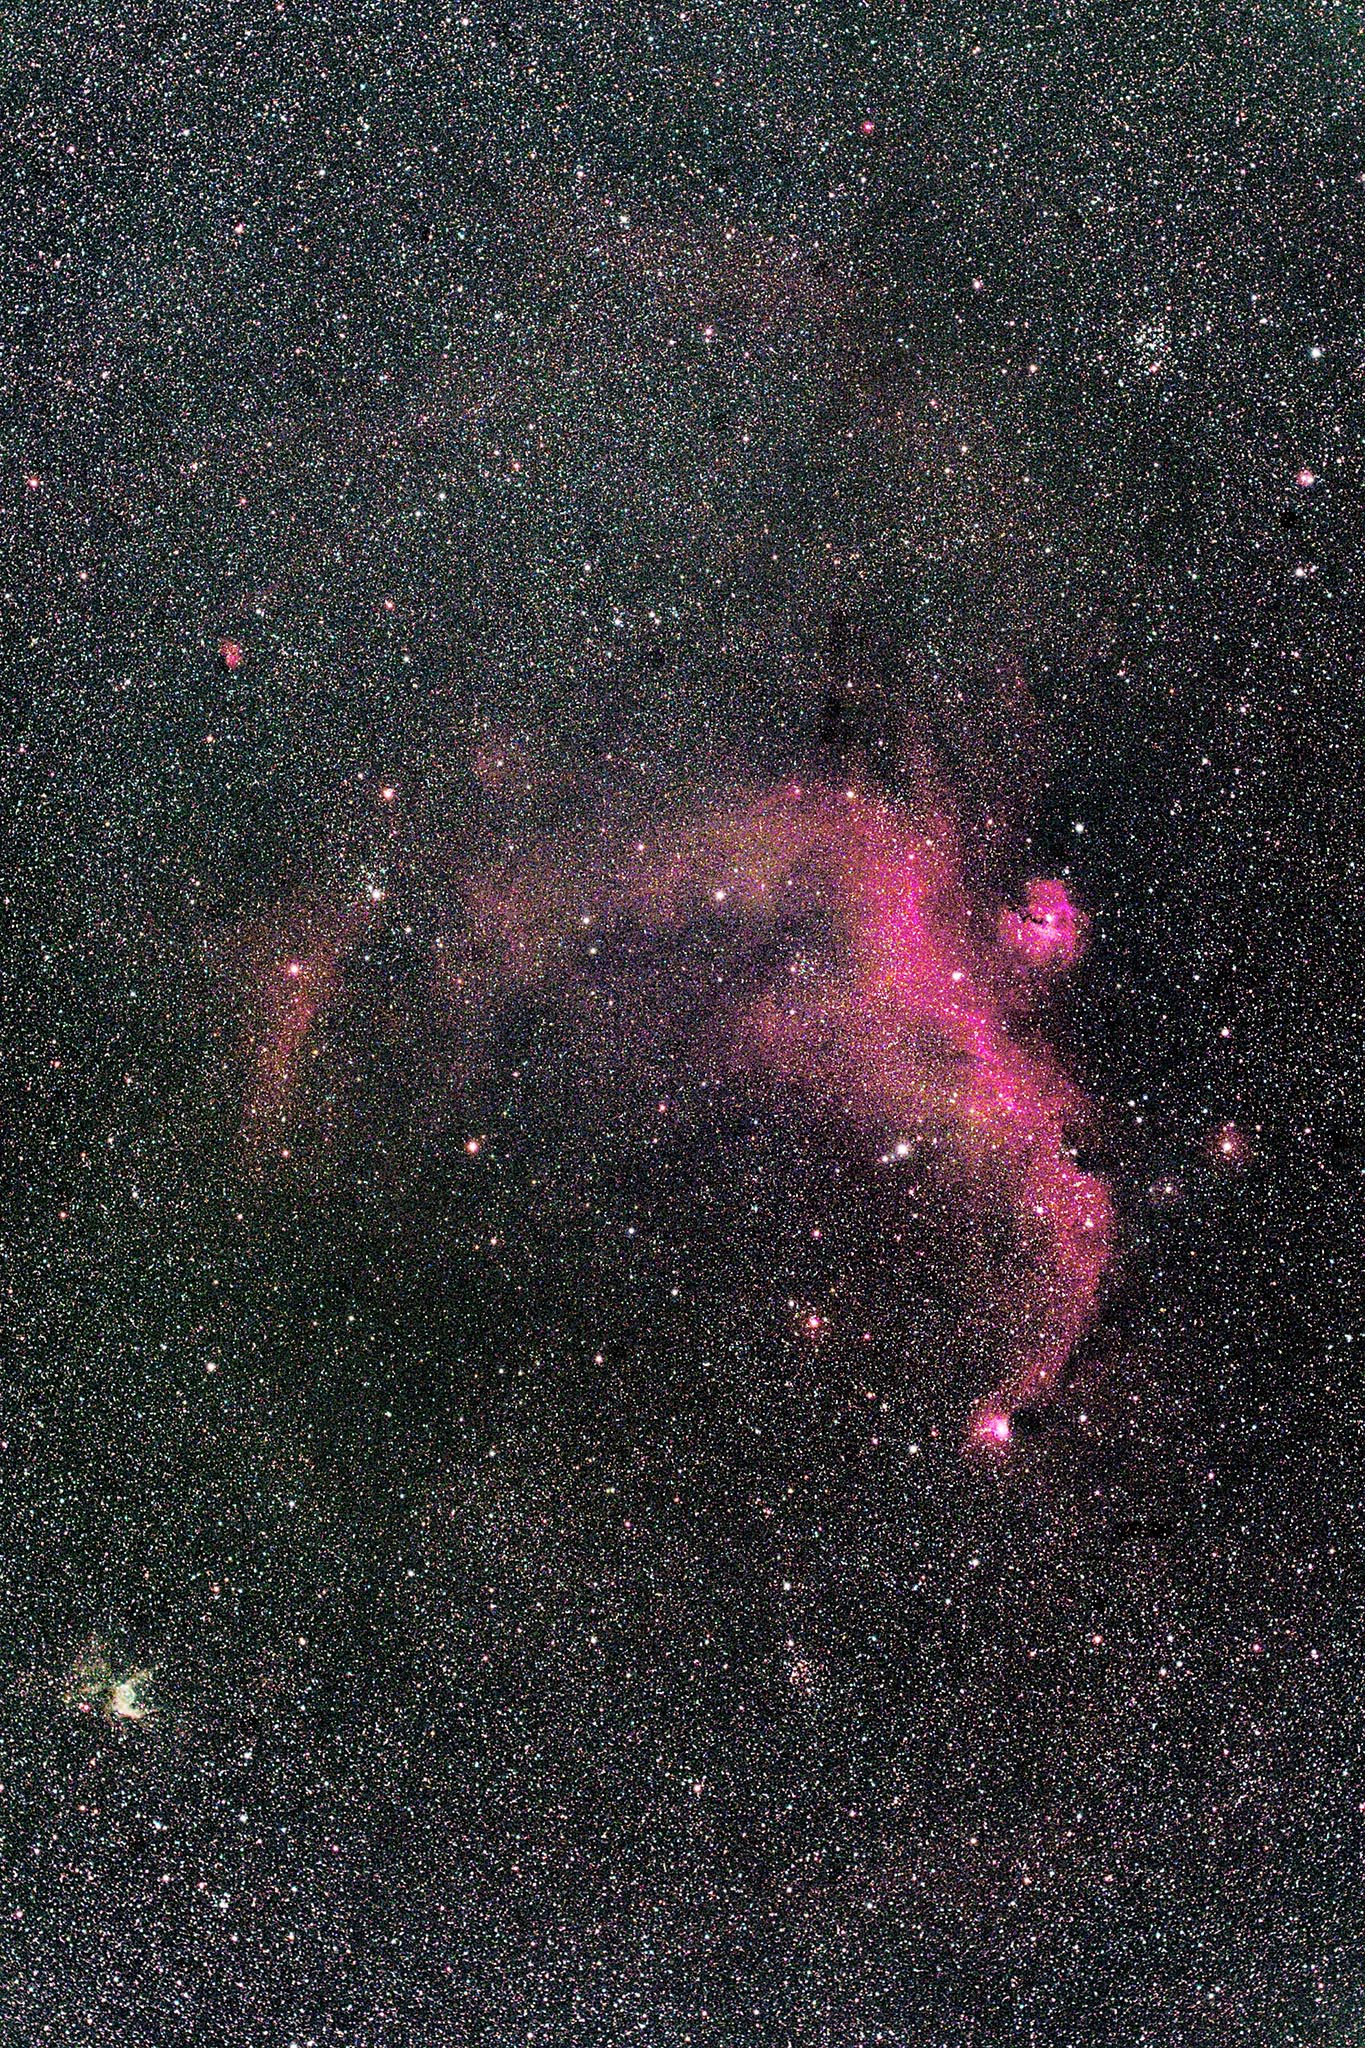
FL55SS with IC2177, which is the best match for AP mount (*). The short and compact lens barrel minimizes interference with a frame and tripod.
(*)As far as balance is concerned, I’m okay with a slightly larger lens barrel. If the FL77SS is released, it might be a true best match^^
 Sigma 105mm F1.4Art F2.0 EOS6D(SEO-SP4) STC AstroDuo filter ISO6400 120sec*16 AP Equatorial Mount Dark, no flats
This is a Sigma 105mm F1.4 Art shot of the Rose Nebula. It looks so good that the center of the picture is saturated. That’s the narrowband Astro Duo.
The AP mount is lightweight, so by shrinking the tripod, the entire configuration can be easily moved in and out of the garden and into the room(*). I was on standby in this configuration the whole time I was back home^^
(*)It’s impossible to carry two sets at the same time, but ^^^
AP Mount Features
It’s been a little over four years since the AP mount was released (December 2014). Now is not the time to make an impression on the features, but I feel that the “systemability” of the AP mount, both good and bad, is actually not well understood.
In this section, I’d like to take a closer look at the features of the AP mount.
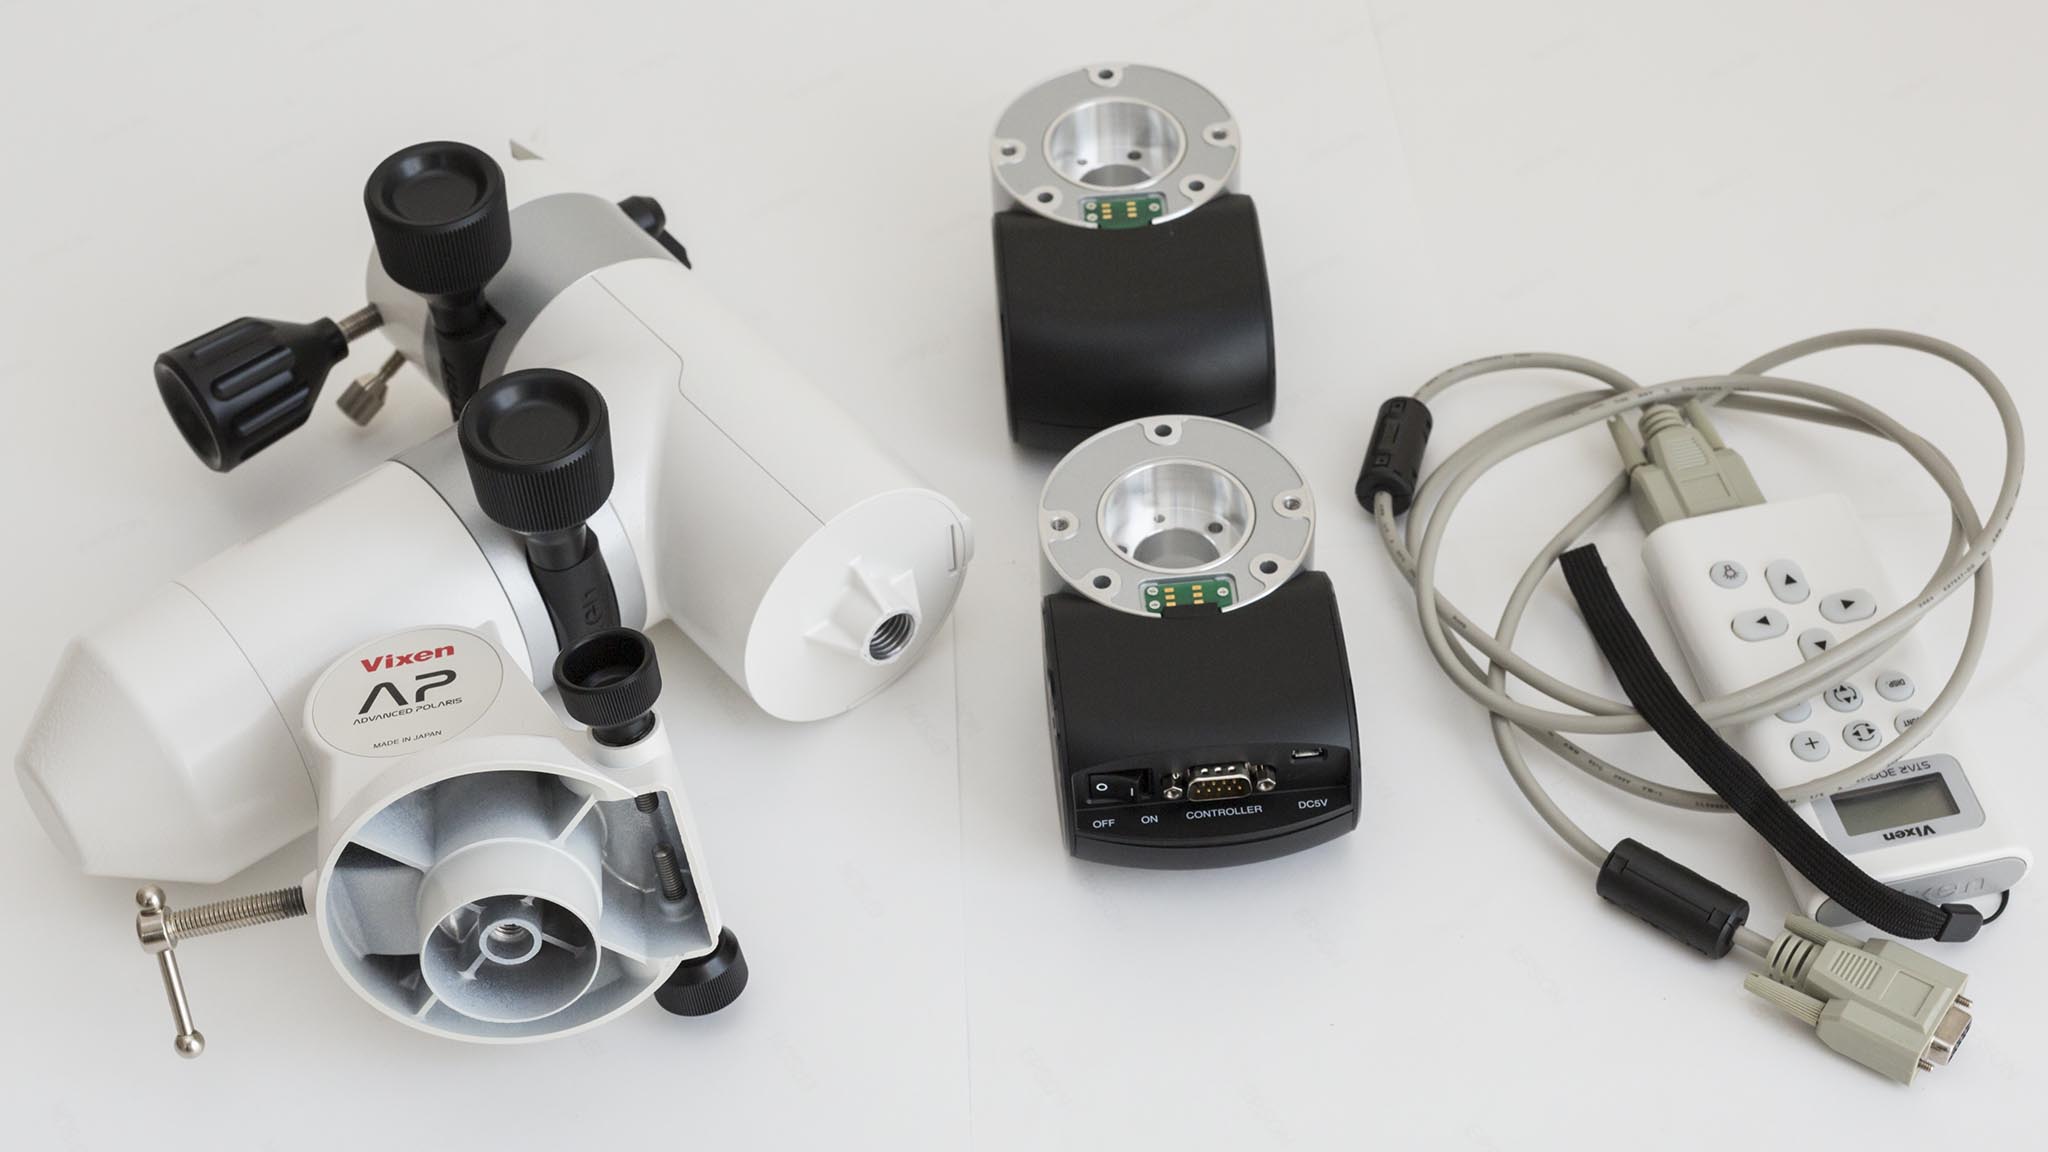
Simple, low-cable configuration
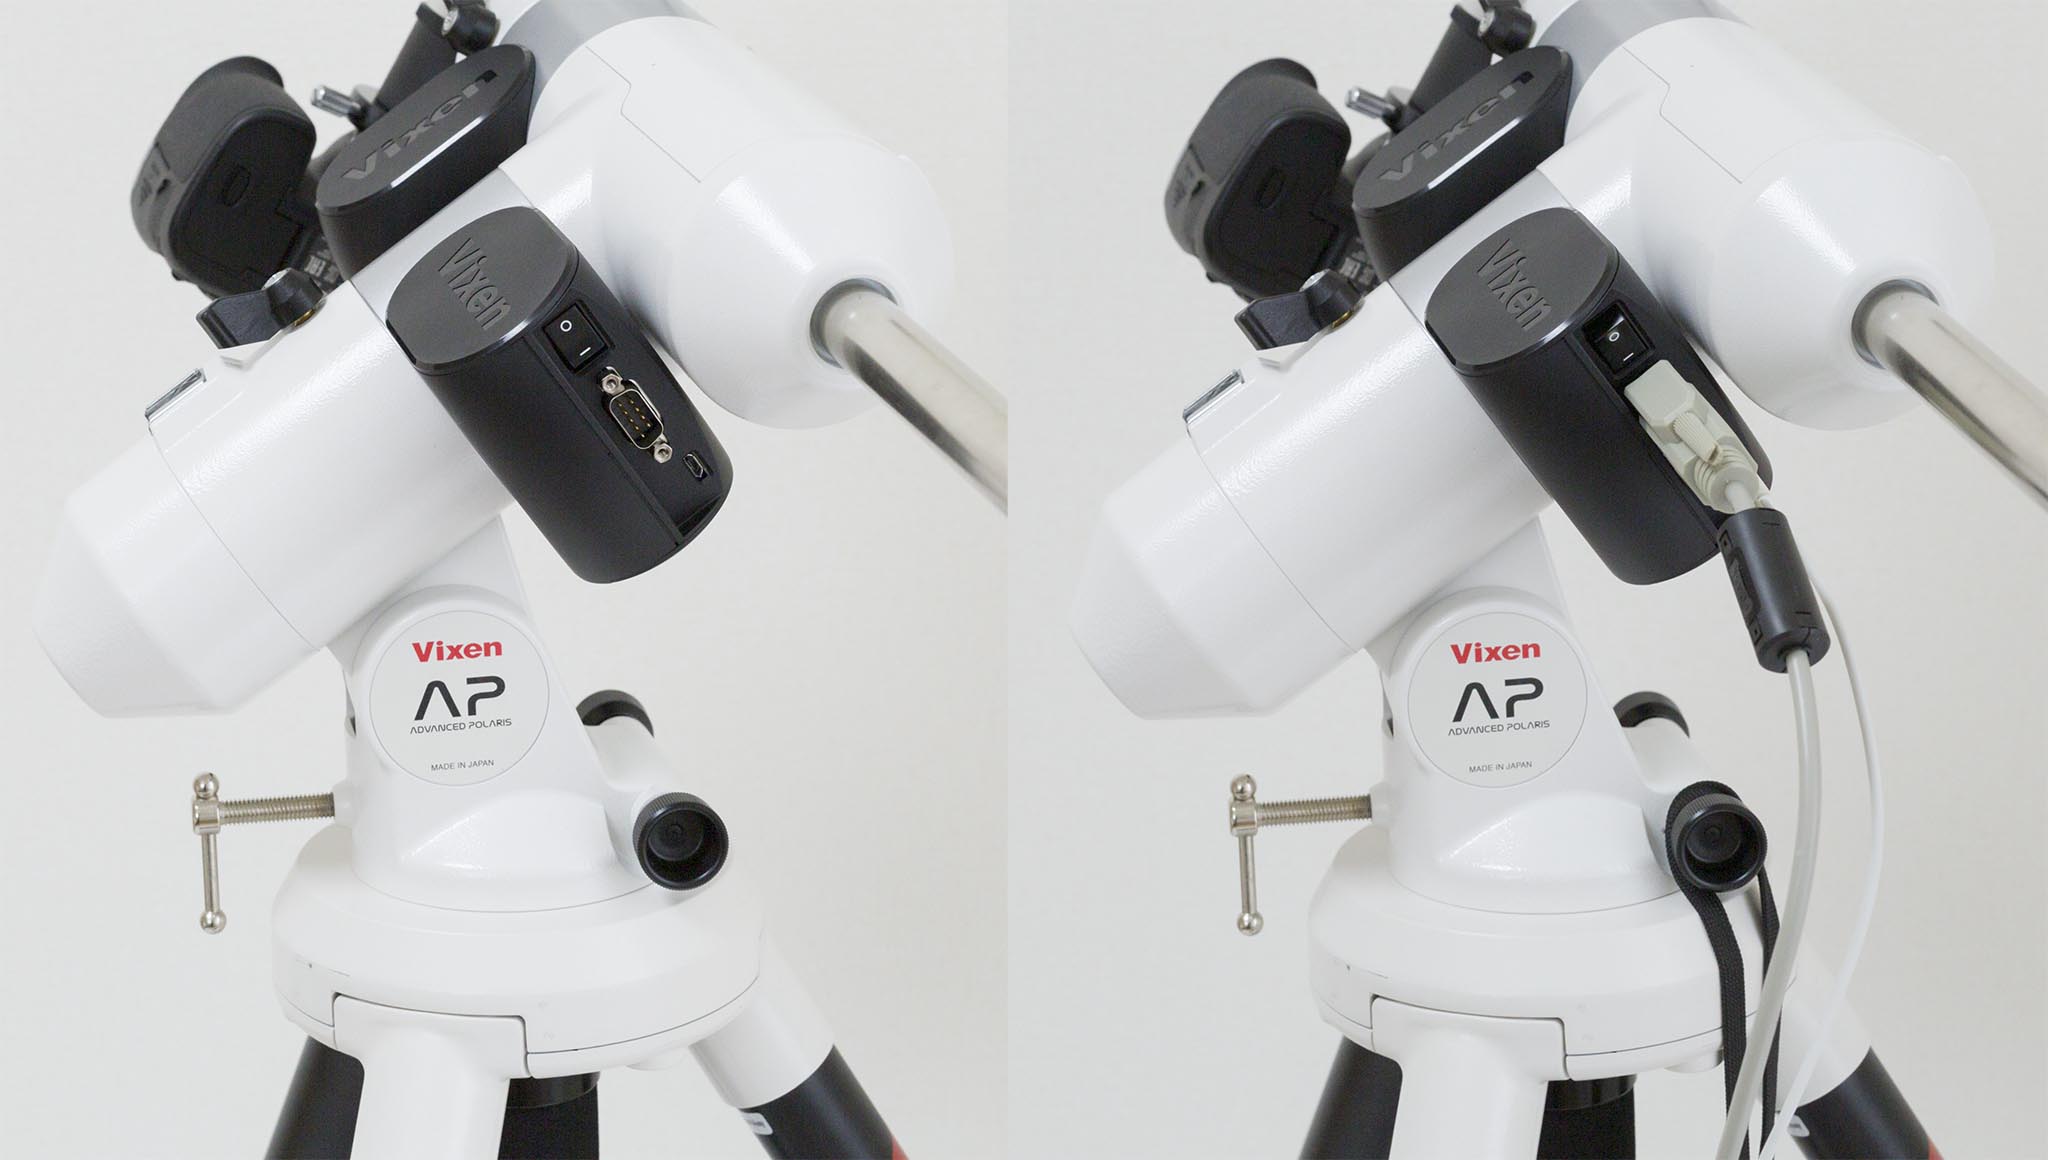
The image above shows the 2-axis motor configuration in E latitude and E longitude. One of the advantages of the AP mount is its neat design and low-cable configuration. The minimum cable required is one serial cable for the controller (Star Book One). One more USB Micro-B cable if you want to supply power from an external USB. These two are plugged into the black housing of the Ecliptic motor as shown above.
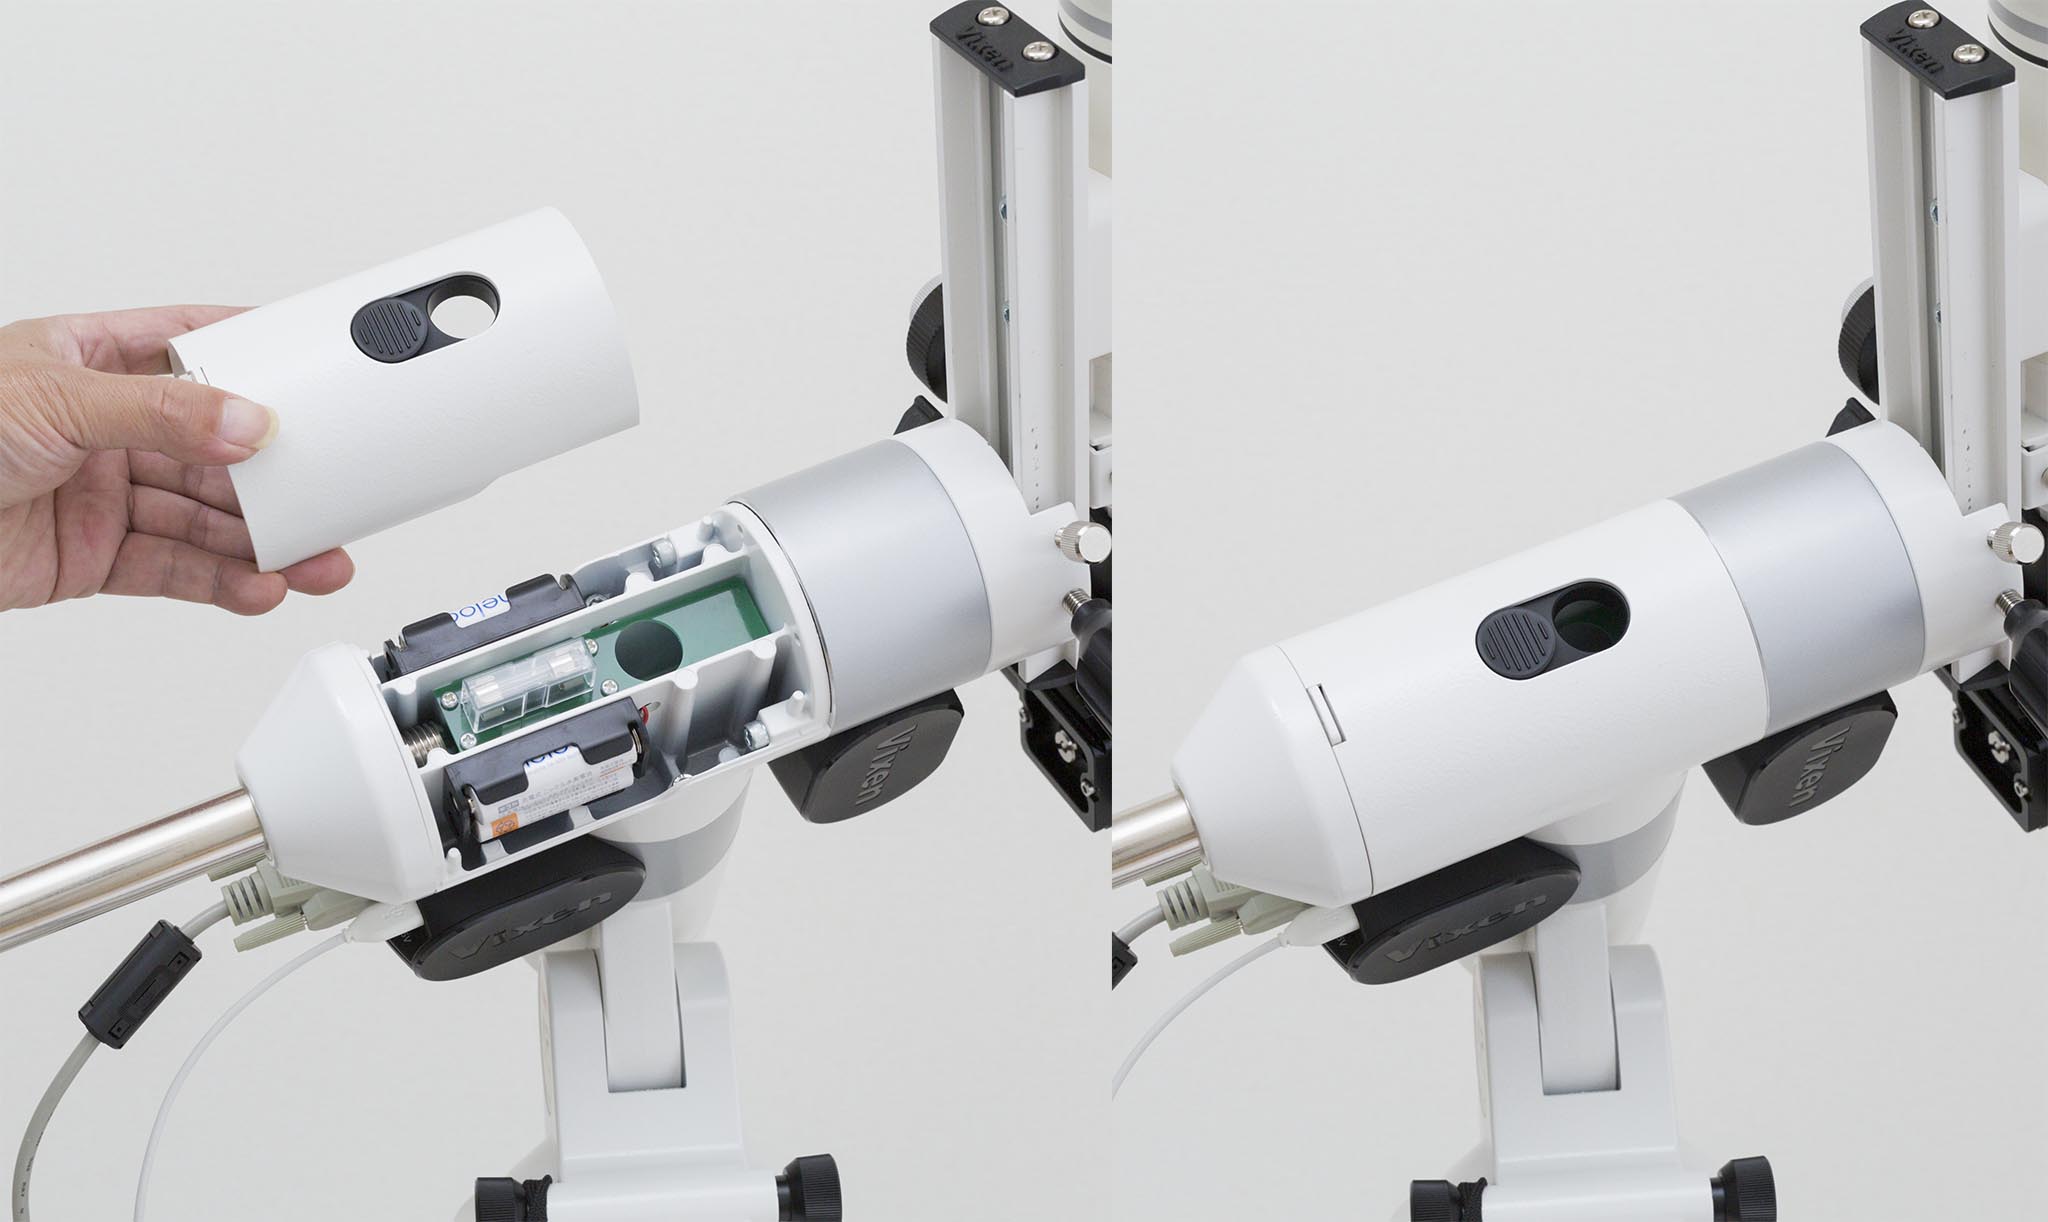
When you open the cover of the decathode, there is a battery box that can hold 4 AA batteries, and when you use this box, you don’t need a USB cable. The declination cover has a window for the polar axis telescope, which can be opened and closed by sliding.
DEC unit
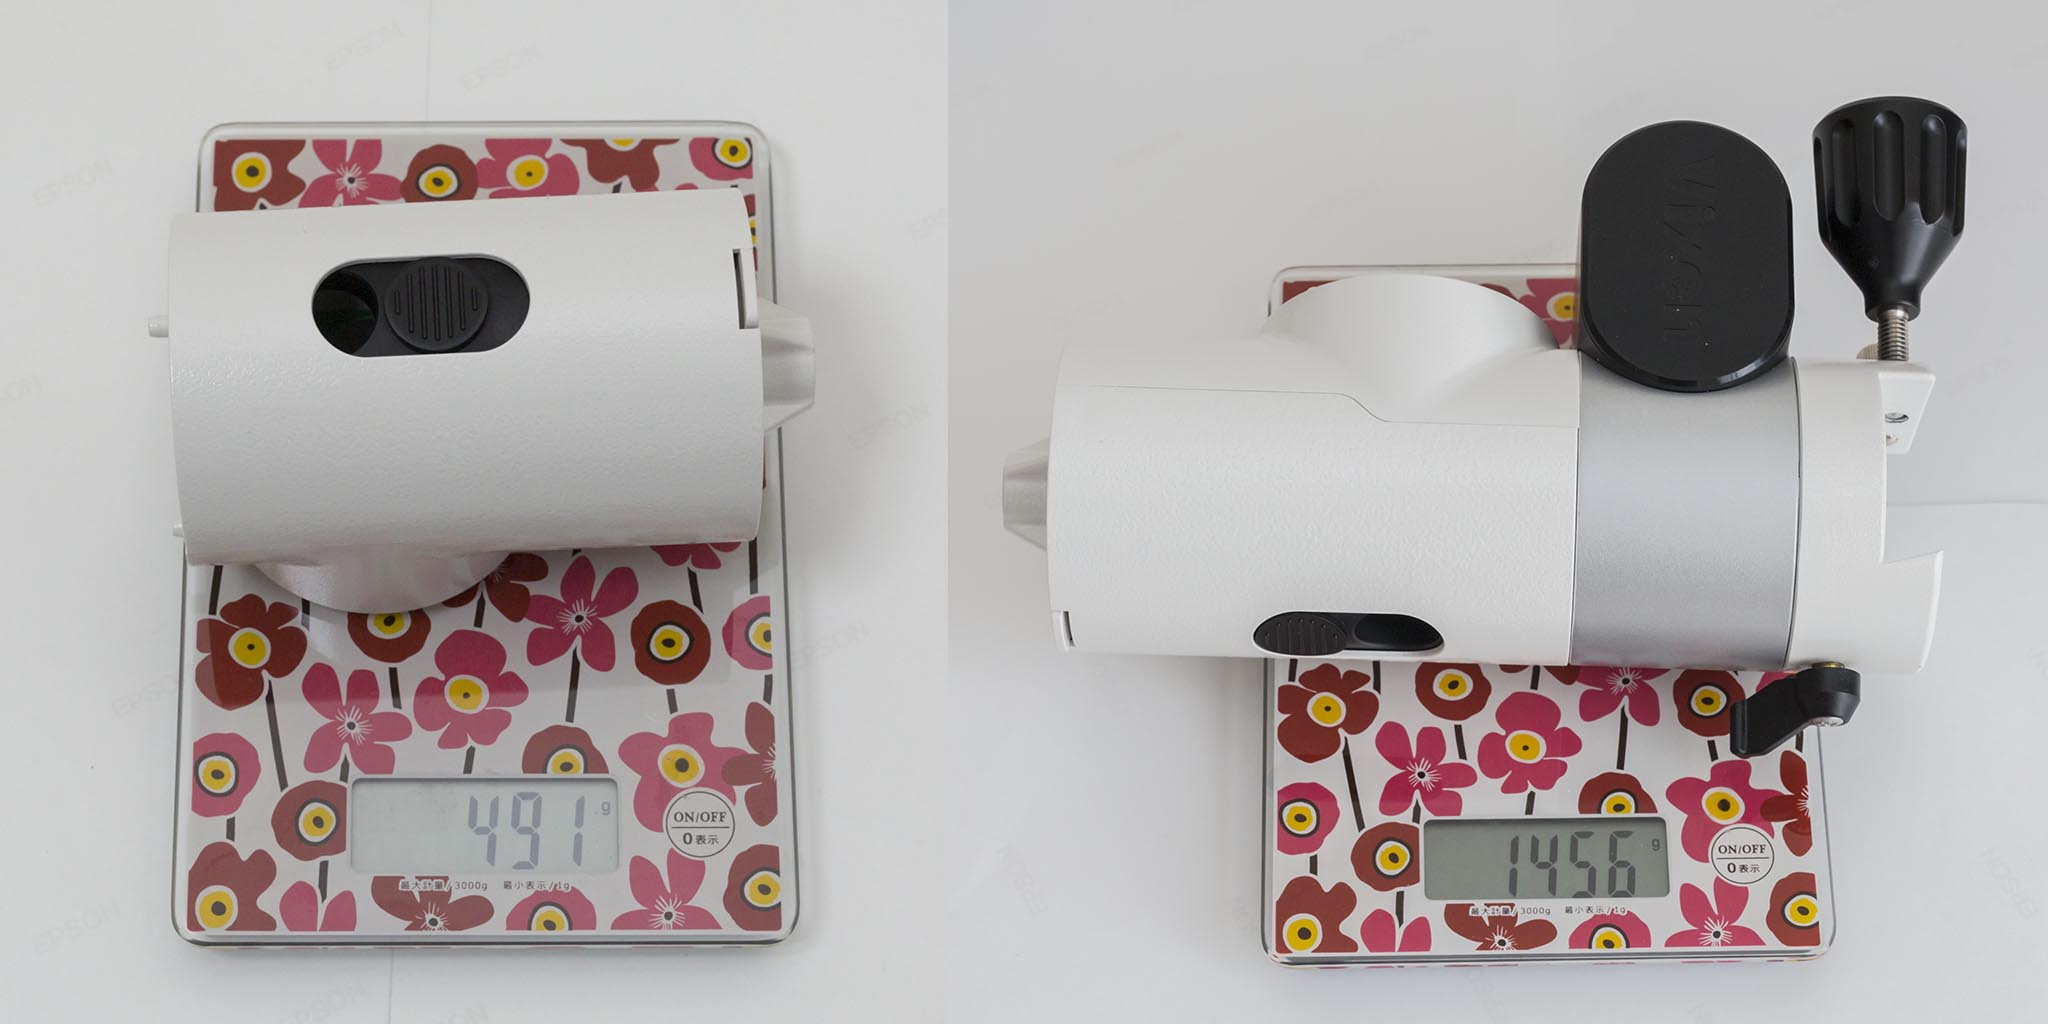
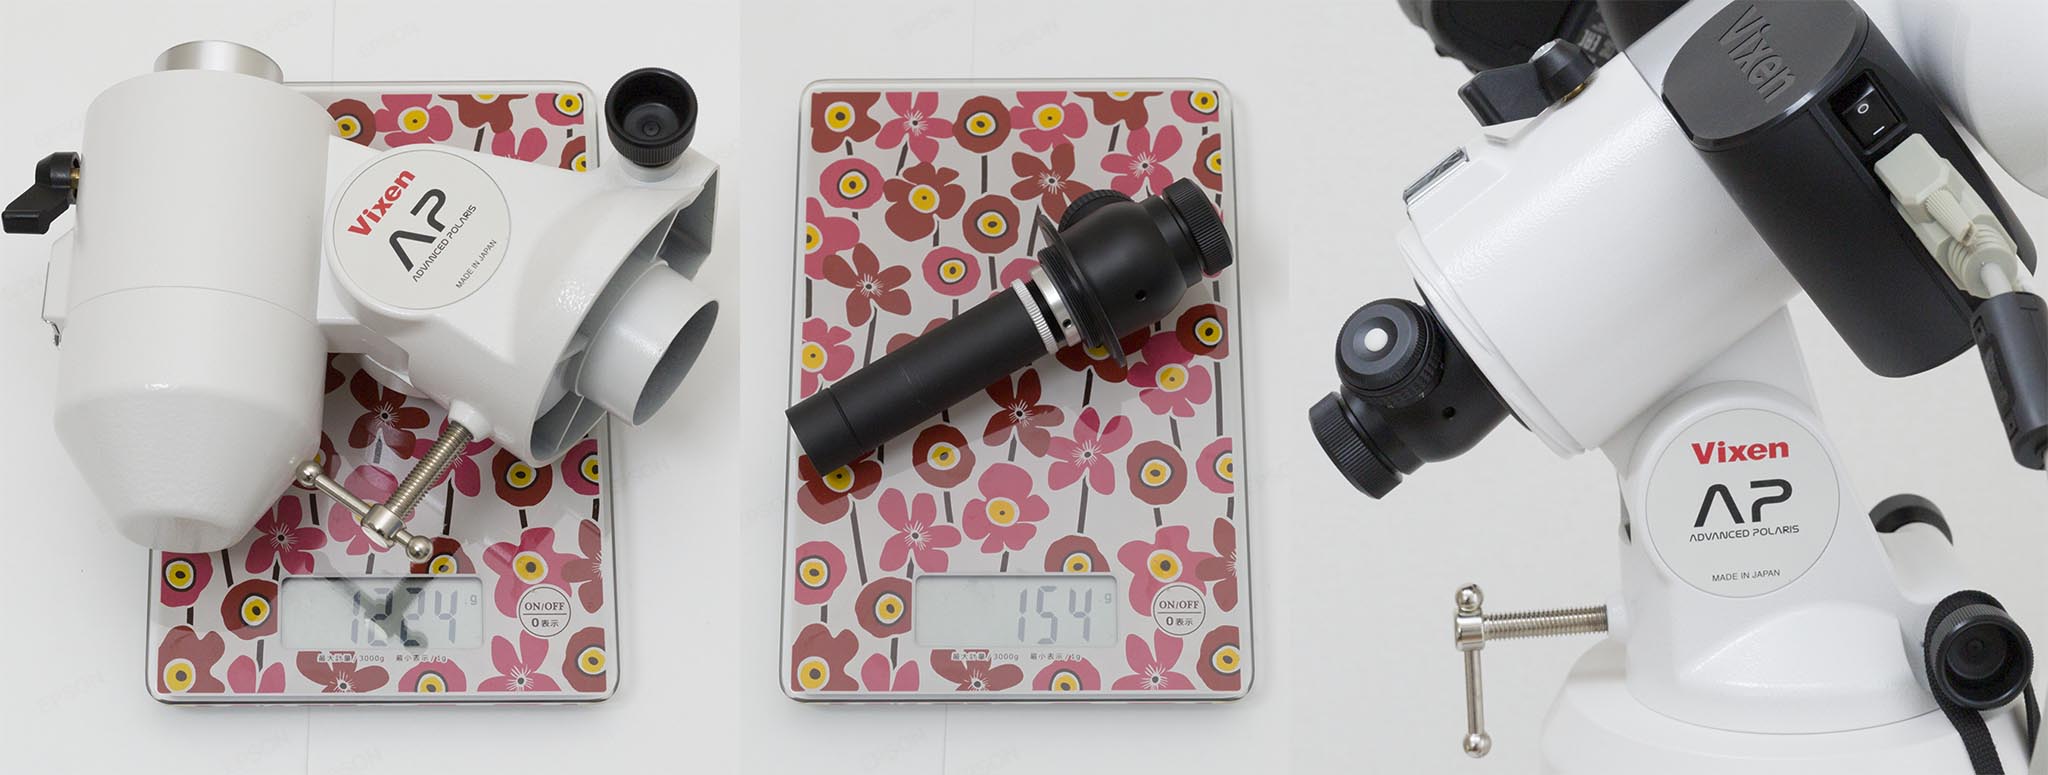
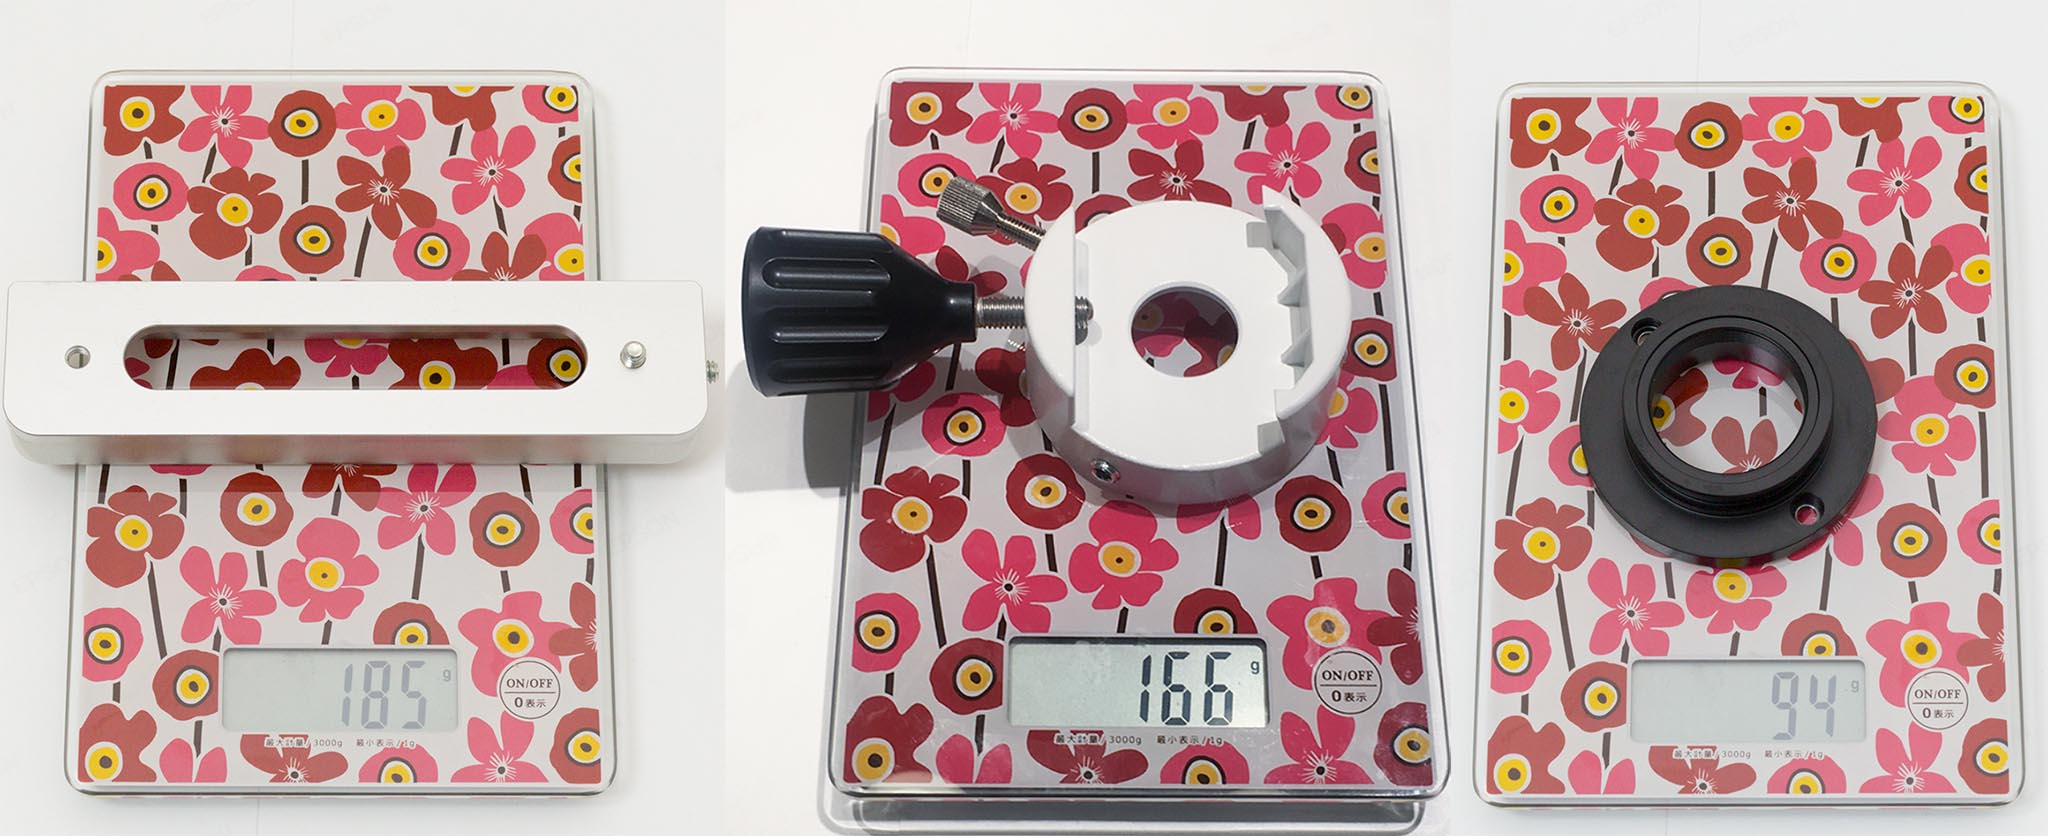
On the left is the AP Declination Unit (13,824 yen direct sales price including tax). The battery box and the electronic contacts of the motor module of the equatorial longitude and declination are added to a simple housing without any moving parts. It weighs only about 500g and is light.

Elevated head on the declination axis. It is a Vixen standard dovetail. Until now, most small astronomical telescopes have been Vixen-Arigatas, but recently there have been more and more Arca-Swiss compatible products. Also, in the case of camera lenses, there is no Vixen standard for all of them, so you’ll want to use an Arca-Swiss compatible plate that better matches the concept of an AP system. I wanted to add more versatility to this part(*), though I could do it if I made the clamp two stories high.
(*)If the overhead head is flattened and the screw holes at 35mm intervals are drilled, I think that not only general-purpose Vixen arimizo such as plate holder SX but also various clamps can be installed and the versatility increases, but on the contrary, this part may become a second story and not be finished thin. I guess there are many trade-offs, but I hope you can come up with a good solution.
Separation of the fine and coarse motion mechanisms
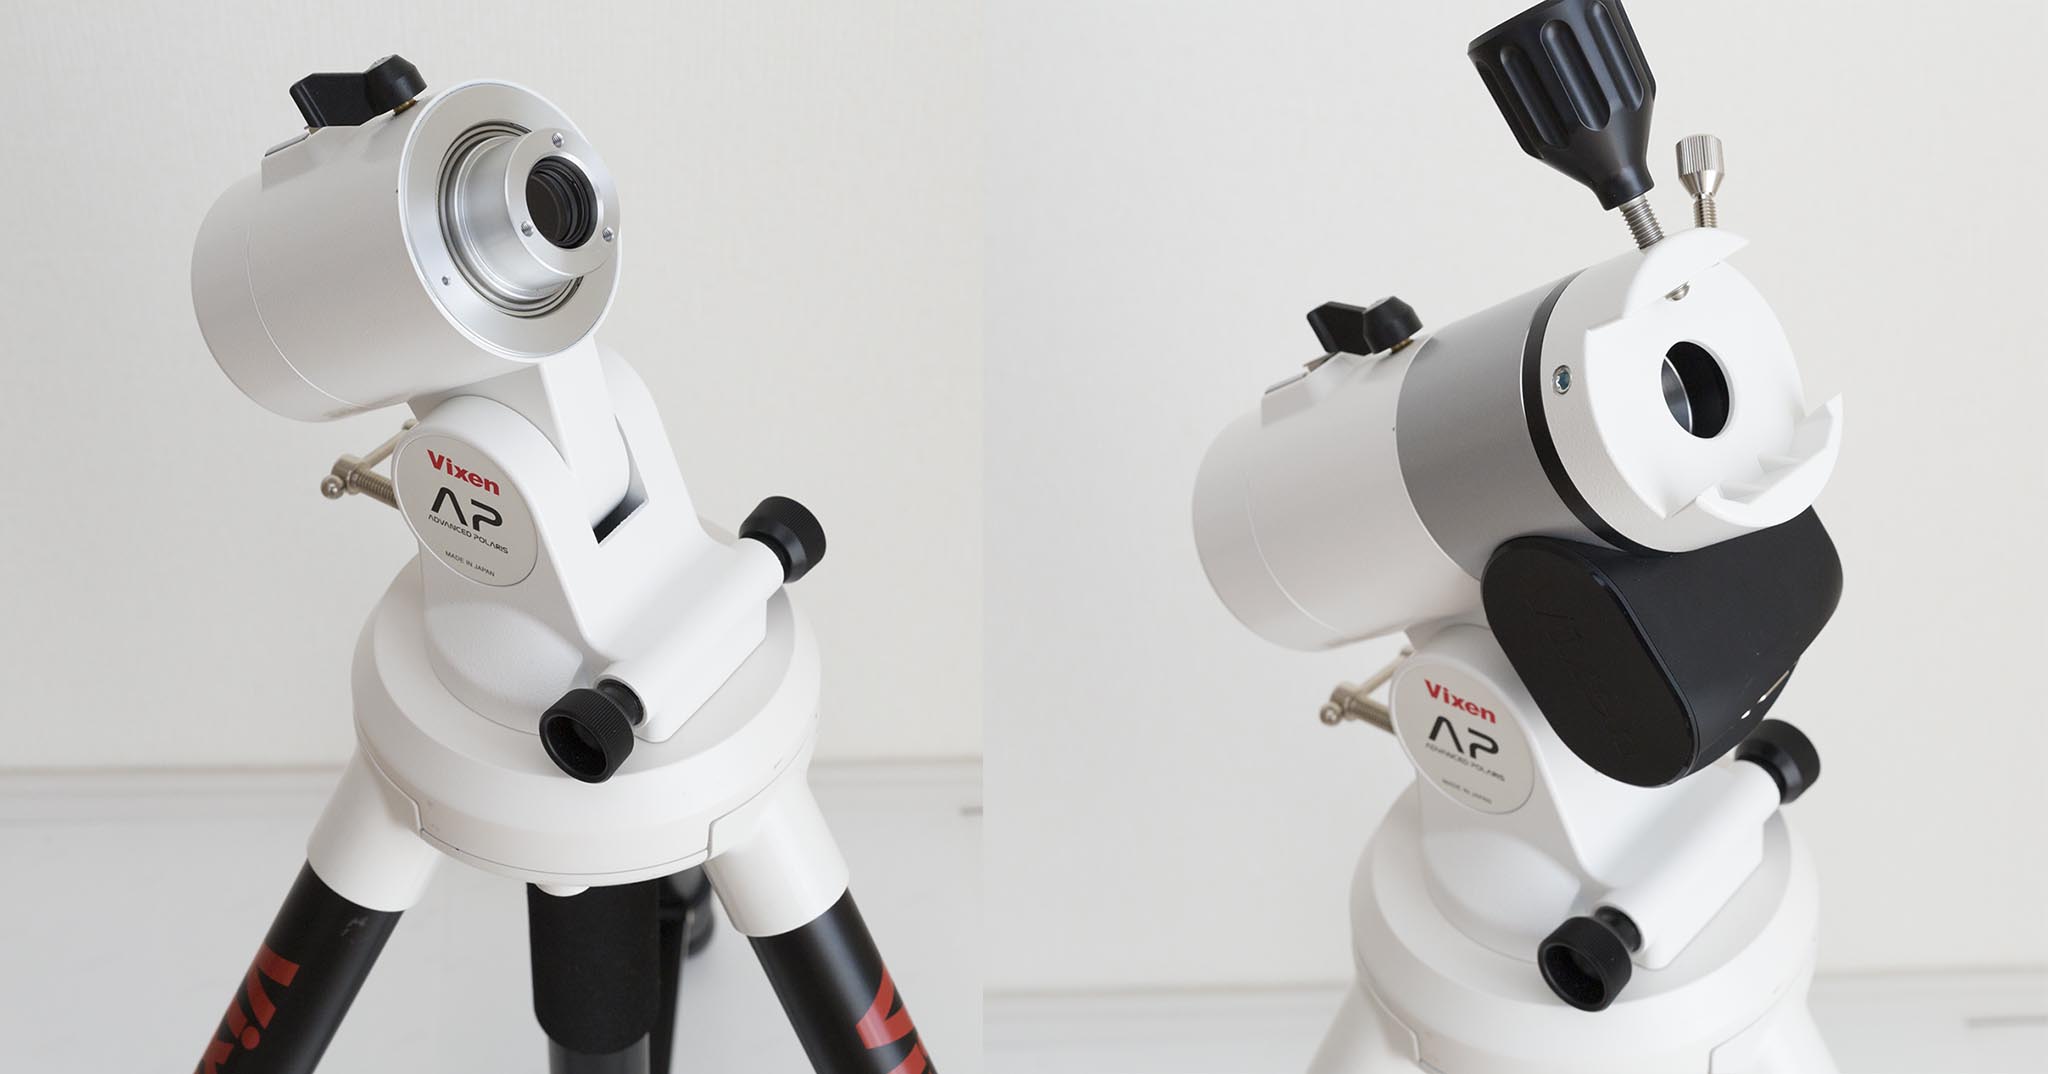
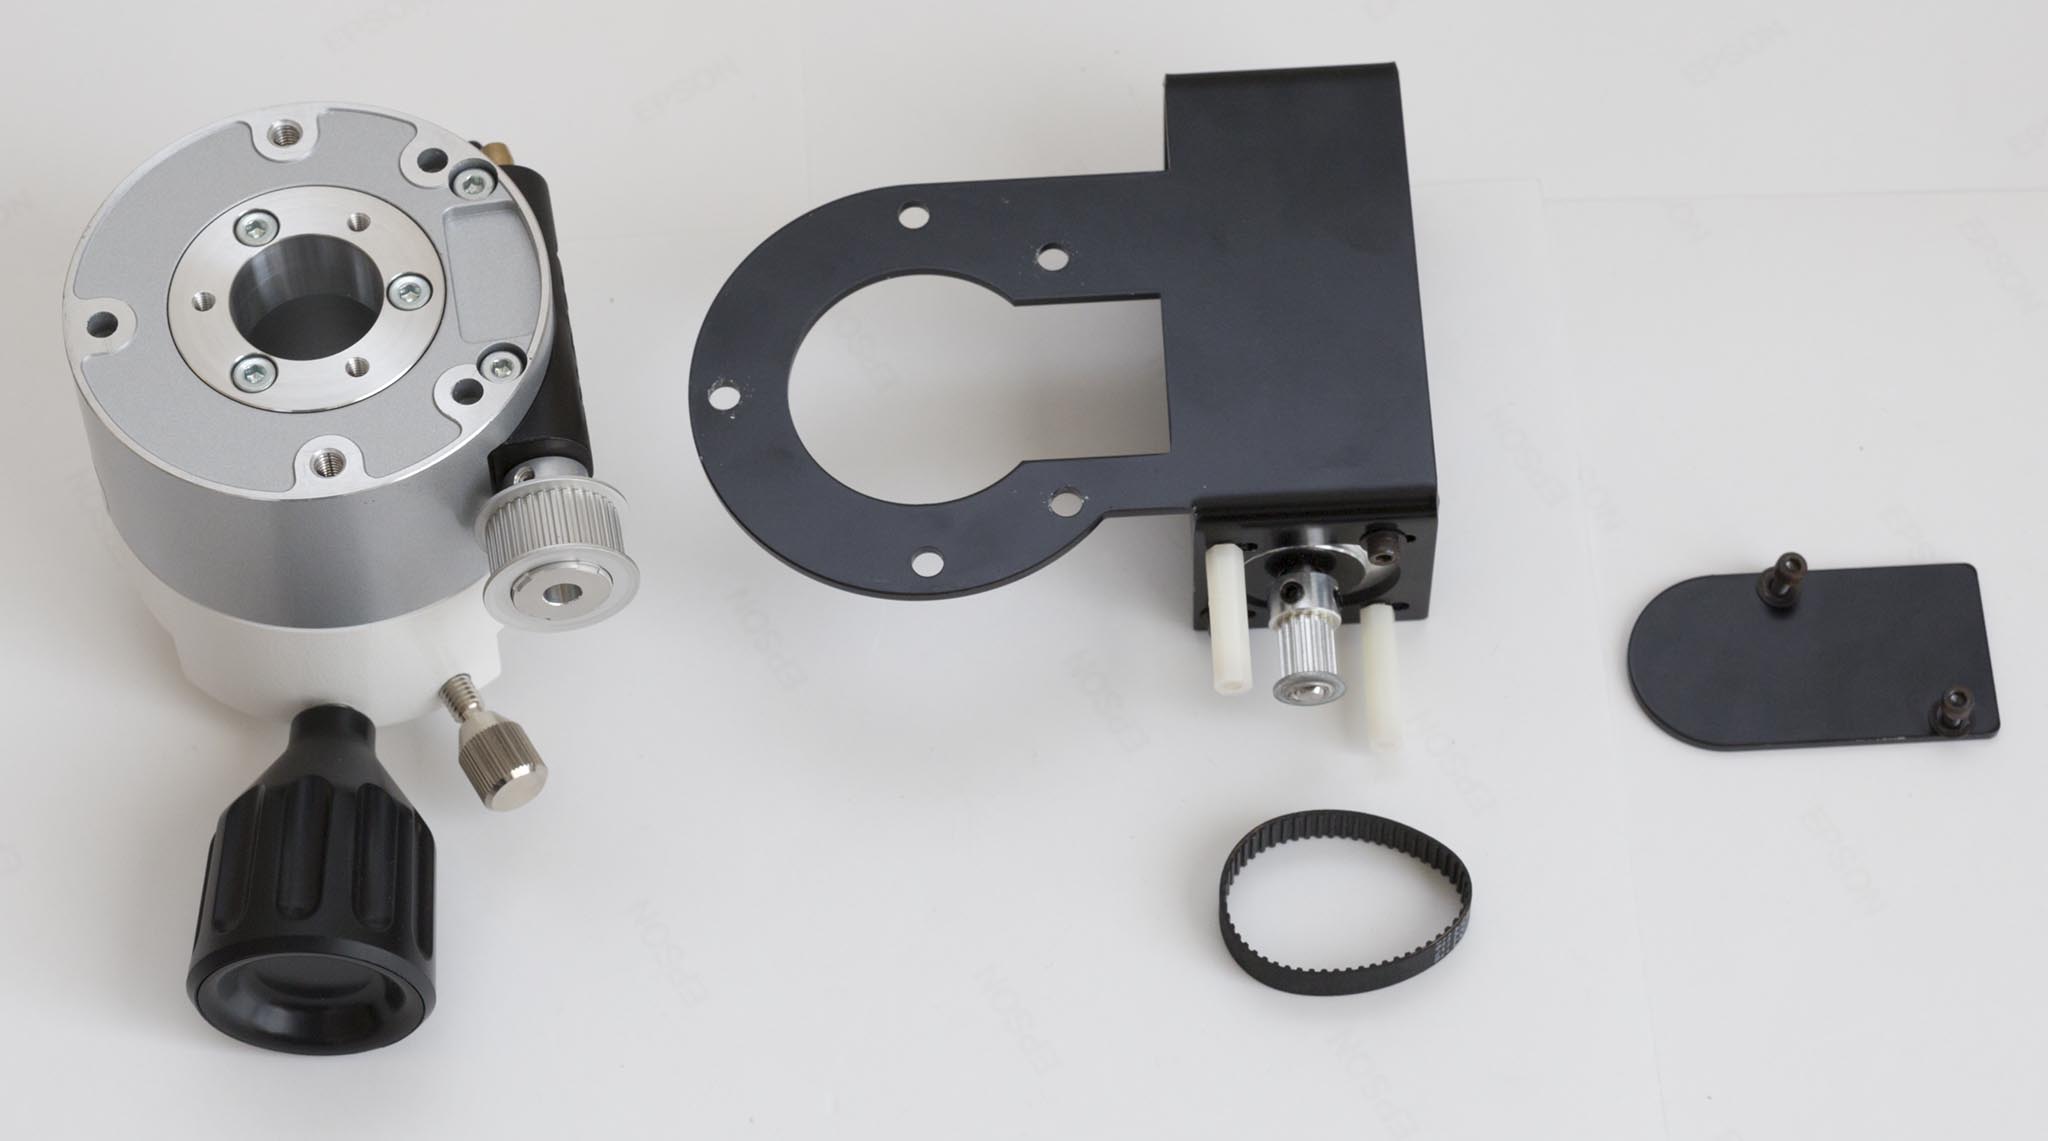
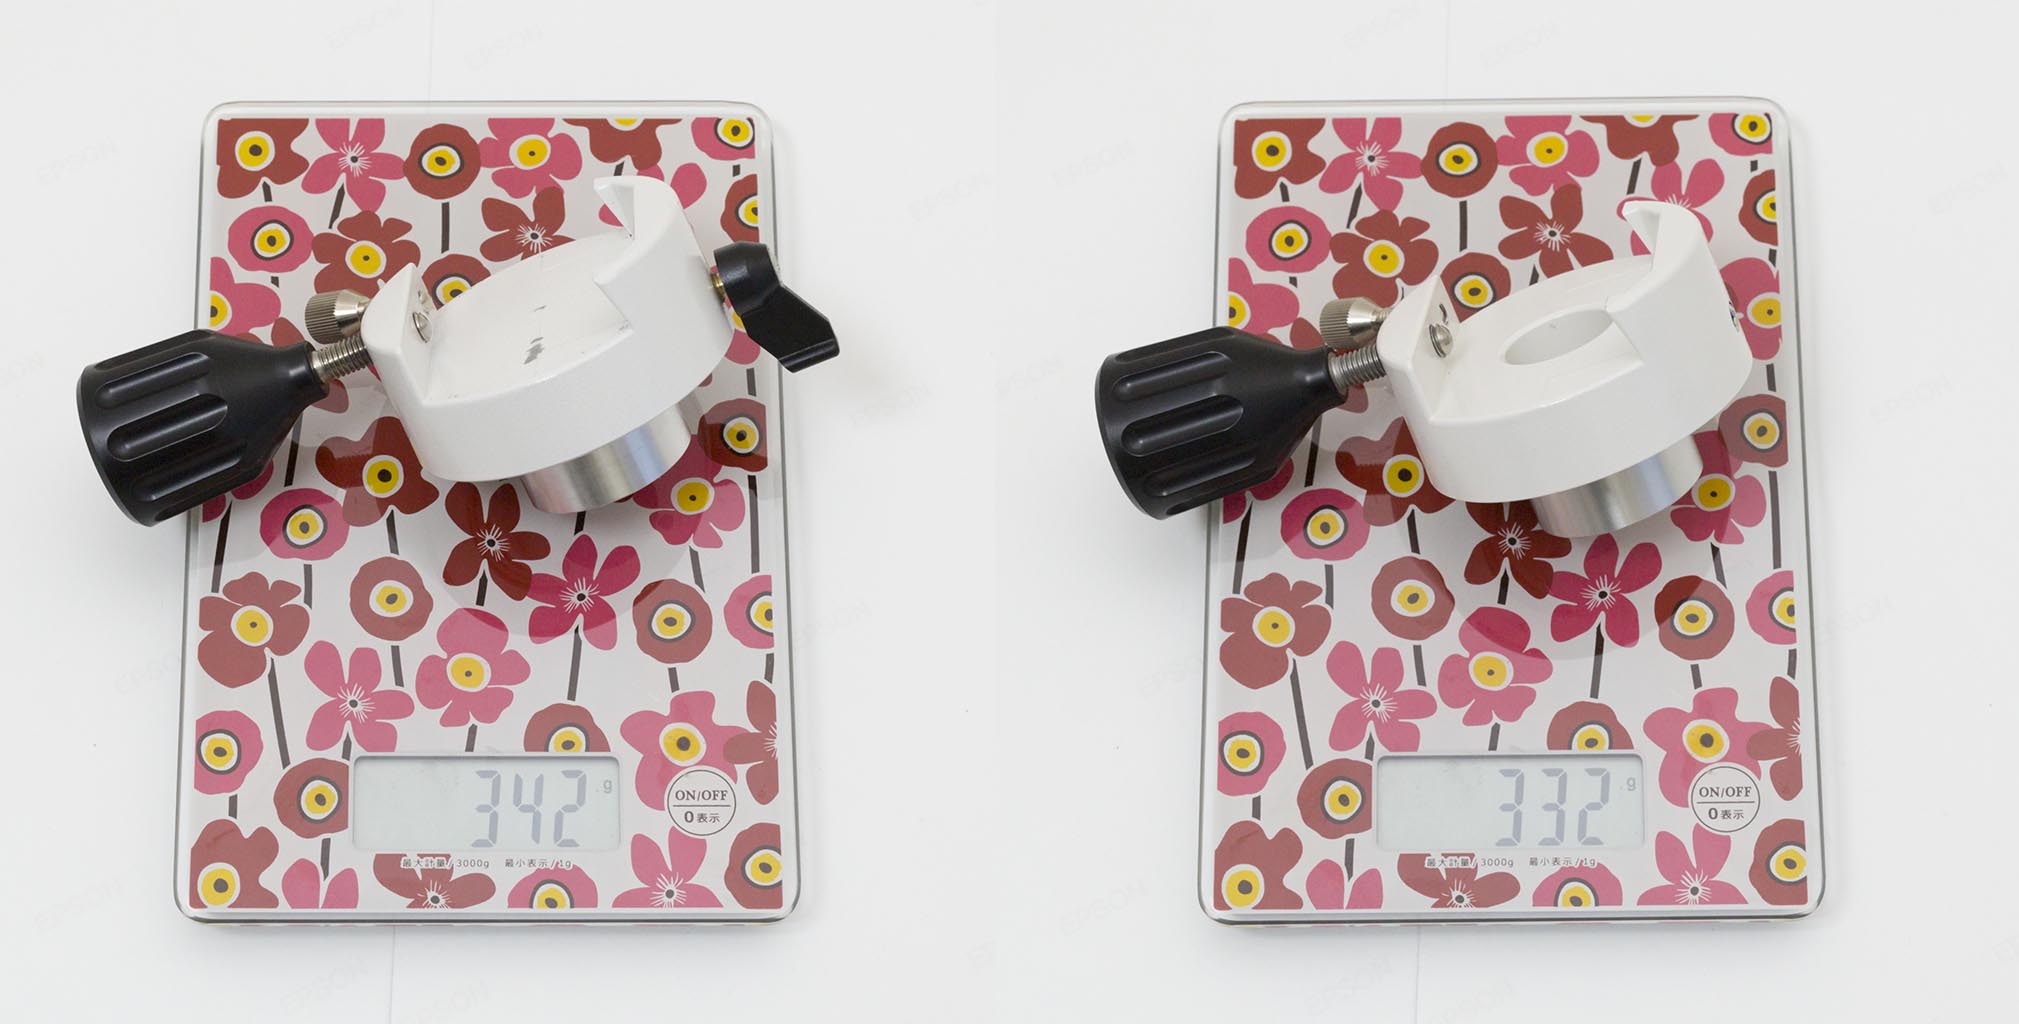 On the right is the AP clamp tube support unit H, and on the left is the AP clamp tube support unit. The difference is whether the hole for the polar axis telescope is drilled or not. The black clamp on the left is sold separately. The “H” in the perforated version is only used in the configuration of the “AP Stars and Clouds”, but I think it would be nice if the “H” in the perforated version could be reused only in the perforated version.
This overhead part is not a simple dovetail, but has a coarse movement mechanism with integrated ball bearings. The excellent point of the AP mount is that the coarse motion mechanism and the fine motion mechanism are physically separated in both the declination and the equinox. This is very important for the accuracy of the trestle in that the tightening of the clamp does not affect the engagement of the worm gear wheel. In that regard, Vixen’s past models GP equatorial mount and inherited its design? It realizes a higher potential than many of the derived models.
The polar axis section and the polar axis telescope
The Polar Axis Support (AP Polar Axis Unit (direct sales price: 27,540 yen including tax) on the left of the photo is a module that makes use of Vixen’s expertise in die-casting. It includes the horizontal and vertical fine movement mechanism of the polar axis and the coarse movement mechanism of the equinox (*).
(*)It would also be more versatile if it could be separated into two parts, the “red meridian part with an alka plate at the bottom” and the “upper and lower fine movement part with an alka clamp at the top…
As with the SX series, the polar axis fine-tuning is the same as the SX series, with the “horn” attached to the tripod side pushed by the left and right screws. The vertical side is the type that pushes and pulls with a single screw on one side, assuming that it is pushed in one direction by the weight of the stand (*).
(*)Both could be operated without any particular problem, but the up-and-down fine movement is slightly asymmetrical in the direction of pushing and pulling. In some cases, such as when the deciduous side is light, the reaction to the movement of the pulling side may be slow. It’s good to use it in a way that pushes you to the end.
The rear end of the polar axis unit is a plastic cover, and you can attach the Polar Axis Telescope PF-L(II)( retail price 25,650 yen including tax). The polar axis telescope has a built-in dark field illumination. The new “II” model was released in December last year, but the old model can be used in the same way. Please refer to the article below for more information(in Japanese).
https://reflexions.jp/tenref/orig/2018/10/15/6666/
Support for high and low latitude areas
The AP Equatorial Mount is often described by enthusiasts as “strongest for overseas expeditions” because of its simplicity and compactness. I tried it out to see how well it could handle high and low latitudes.
 The nominal corresponding latitude of the AP polar axis unit is 0° (equator) to 65°.
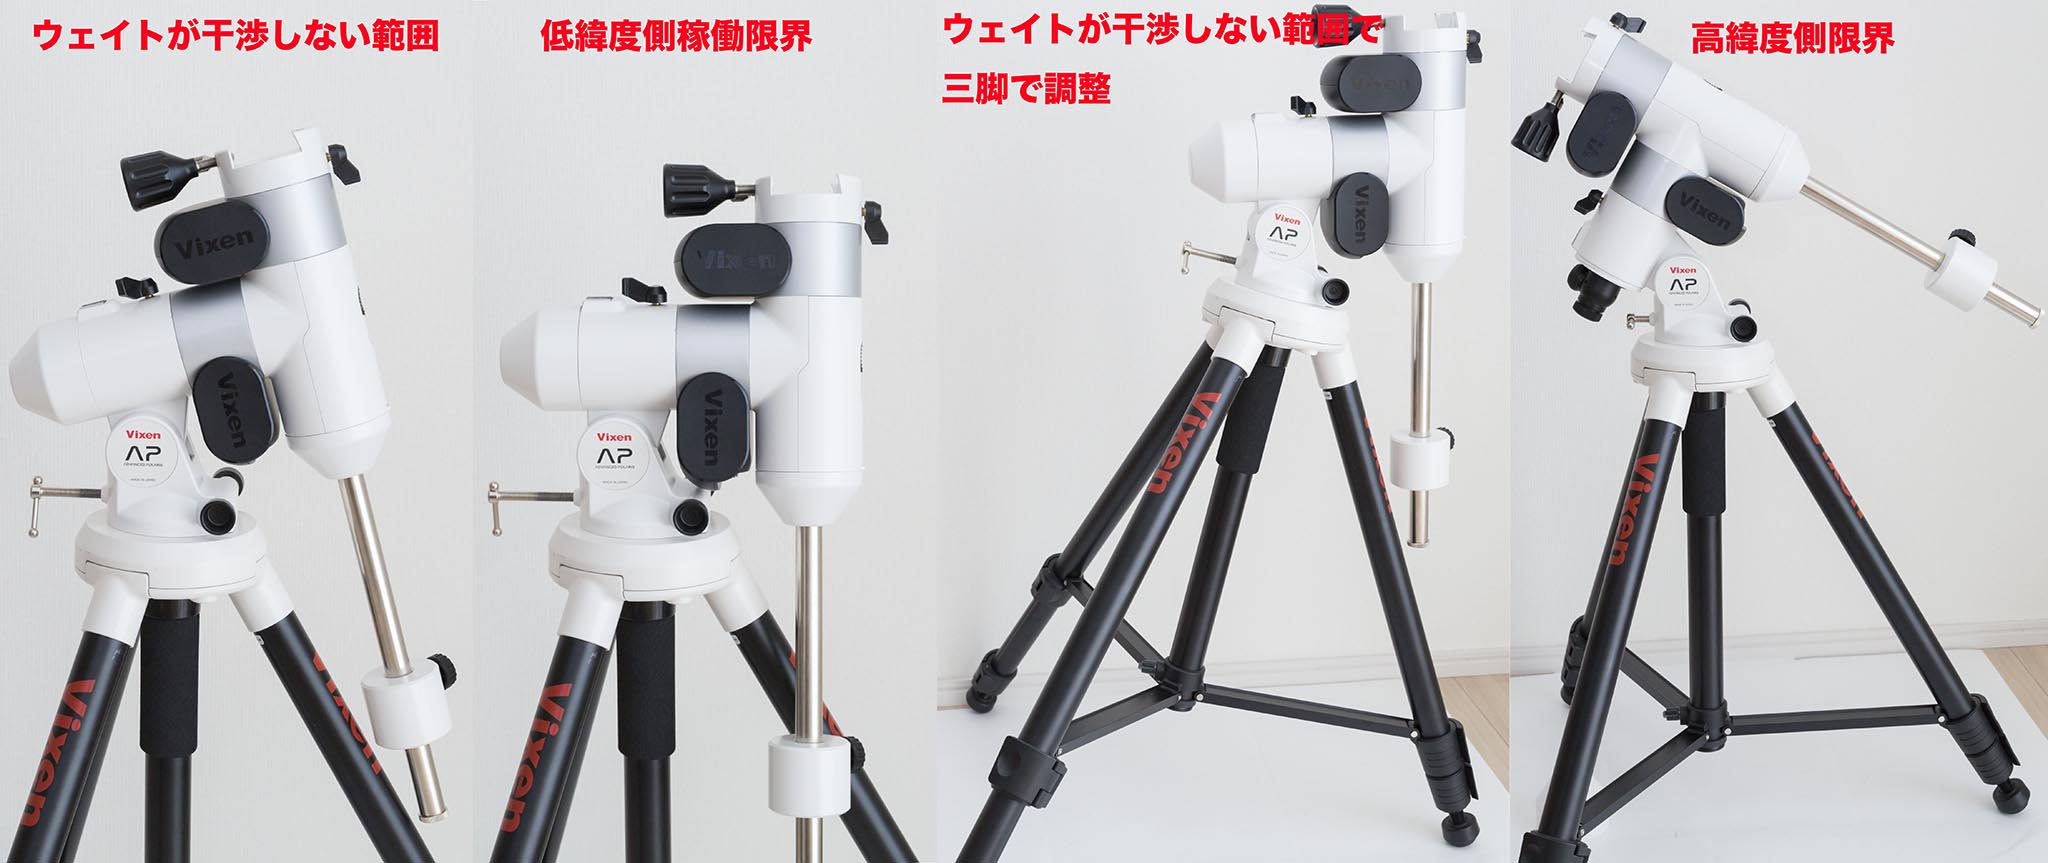
First, the low latitude side. The unit itself can move up to a horizontal position (equivalent to 0 degrees of latitude), but assuming that the weight does not interfere with the tripod, it would be up to about 10 degrees of latitude. It doesn’t interfere with the horizon, so it is OK for practical use as long as you are careful not to hit it when you flip it east-west. There is also a way to adjust it with a tripod as shown in the image above.
At high latitudes, the cover of the polar axis telescope and the adjustment screw interfere with each other near the limit, but it seems to be OK up to 65 degrees latitude. Yellowknife in Canada is about 62 degrees north latitude and Iceland is about 65 degrees north latitude, so as long as you don’t go to the polar regions, you can use it almost anywhere in the world. I felt that the wide latitude range is one of the great advantages of the AP equatorial mount.
High-grade motor modules and fine adjustment modules
 The manual module’s fine movement handle is sold separately.
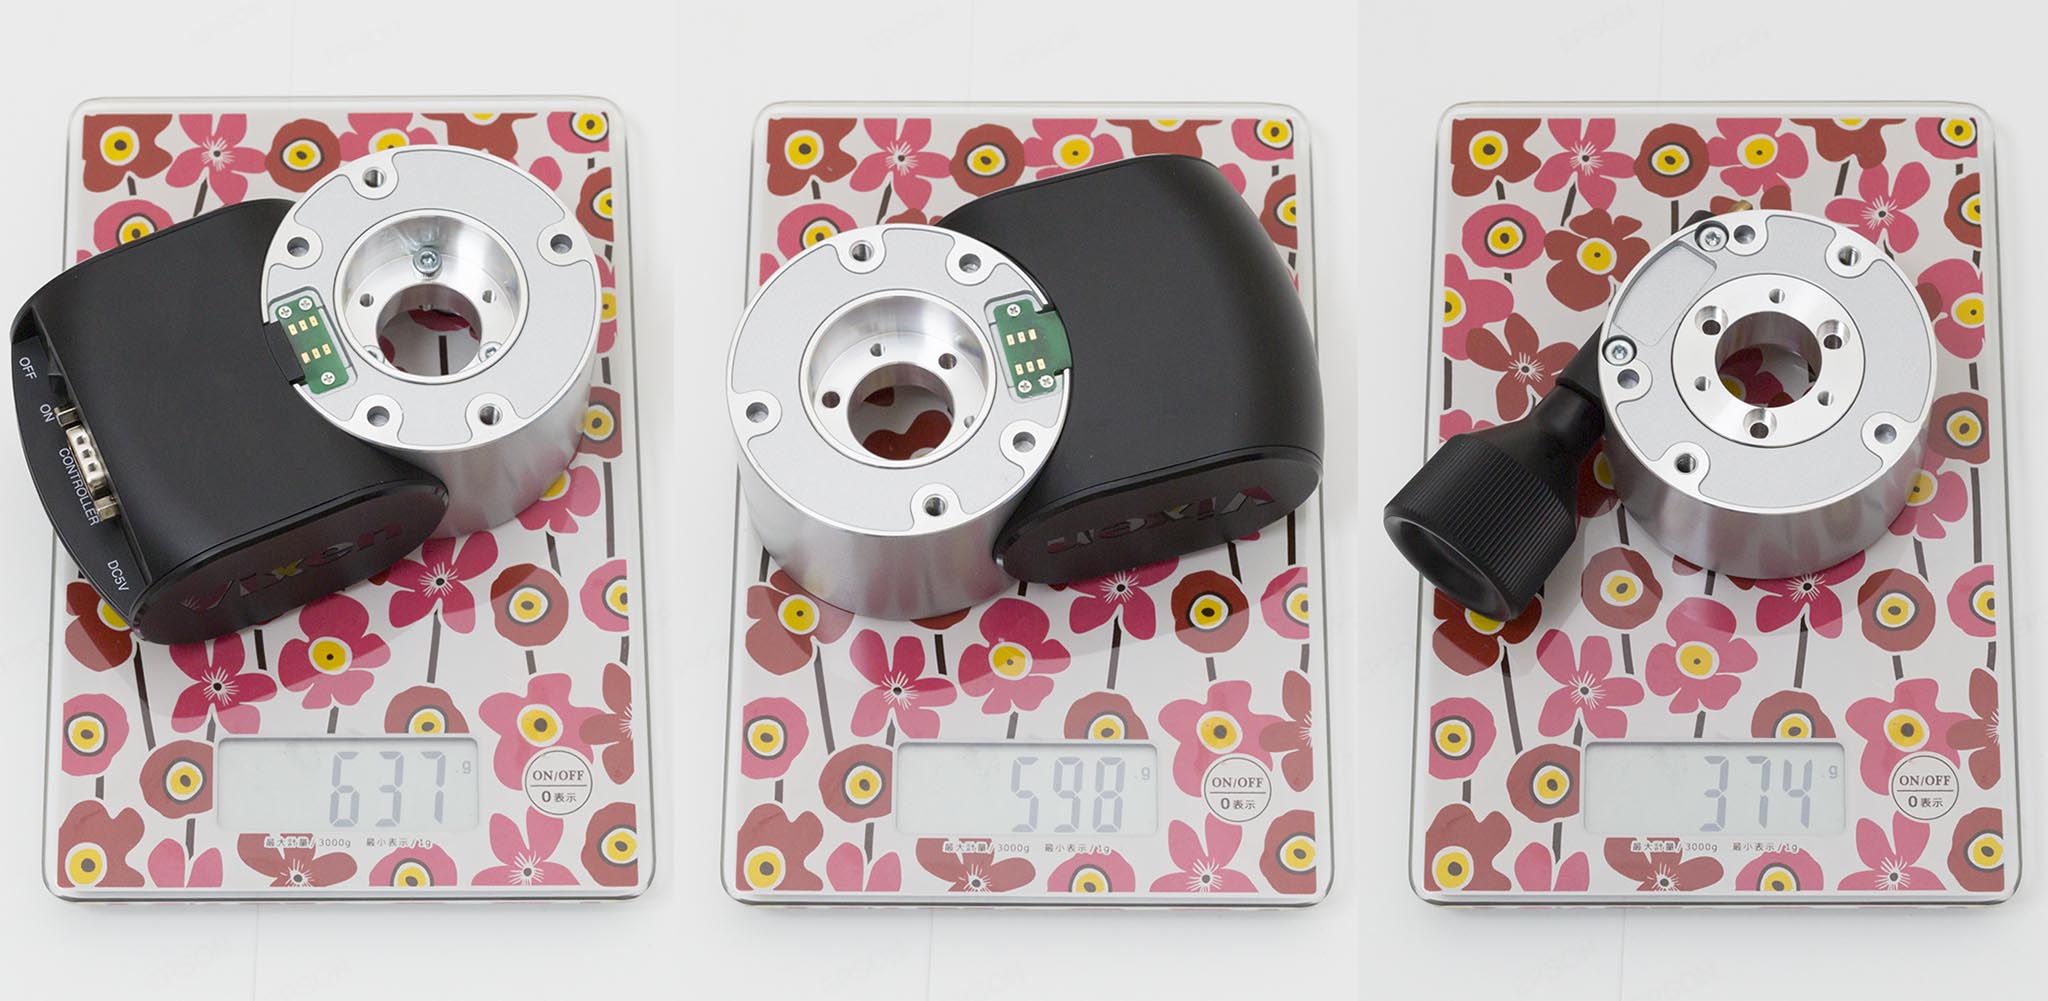
From left to right, “Decapitation Motor Module (direct sales price including Star Book One, 59,940 yen including tax),” “Decapitation Motor Module (direct sales price including tax, 32,130 yen),” and “Manual Module (direct sales price including tax, 18,230 yen). There is no distinction between the manual modules for declination and longitude.
All worm wheels have 144 teeth. It rotates very smoothly with no rattles. When you see these parts in your hands, you can feel the high quality of the AP mount components.
Star Book One
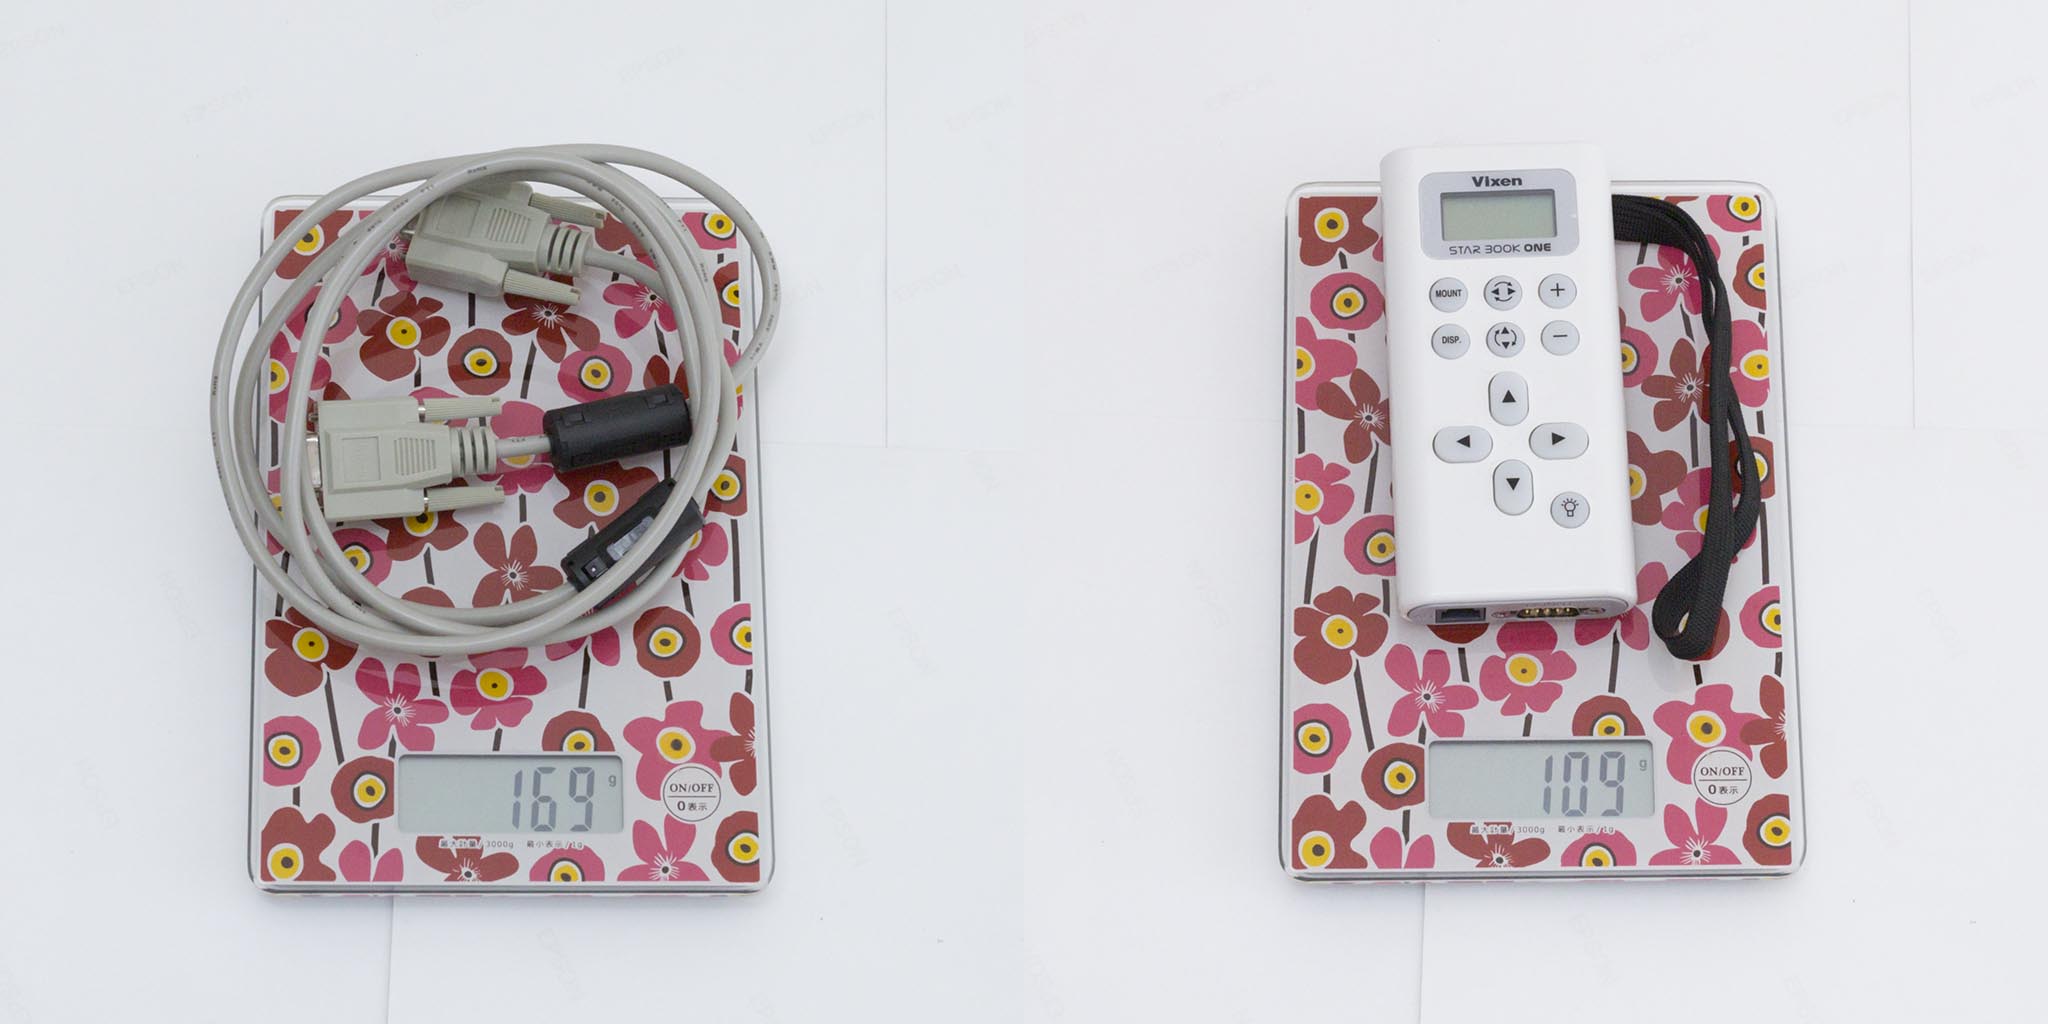 It’s good that it’s simple and compact and easy to use, but it’s a mismatch with the thick, hard and long cable, which is the same as the SX series, but can’t we do something about this cable?
The red meridian motor module comes with the “Star Book One” set. This controller can switch the tracking speed and control it with the cross-keys (up to 60 times faster). In addition, the ST4 autoguide terminal is provided to enable 2-axis or 1-axis autoguide. However, it does not have an automatic introduction feature. (There is a trick to it: see below).
The red meridian motor module does not need to be connected to Star Book One, but can be used for stellar tracking when the power is turned on. This is not necessarily required for single-axis no-guide shooting with a wide-angle camera lens. Couldn’t this be sold separately to lower the entry price?
Weight shaft and attached weights
 In the photo, a motor module is also used for the declination axis, but in the AP-SM mount, which is a set product, only the declination axis is a motor module.
The weight that comes with the package “AP-SM Mount (direct sales price including tax 119,340 yen)” and other AP mount equatorial mount configurations is a small, nominally 1.0kg . The above image shows the equipment (FL55SS + Redusa Flattener, EOS6D) which weighs 2622g and is well balanced in this position. This one weight should be enough for lightweight equipment. I felt it was a good decision to go with this size of standard weight(*).
(*)Of course, if you want to put a nominal loading weight of 6kg, you’ll be short, so you’ll need to buy more optional weights in that case.
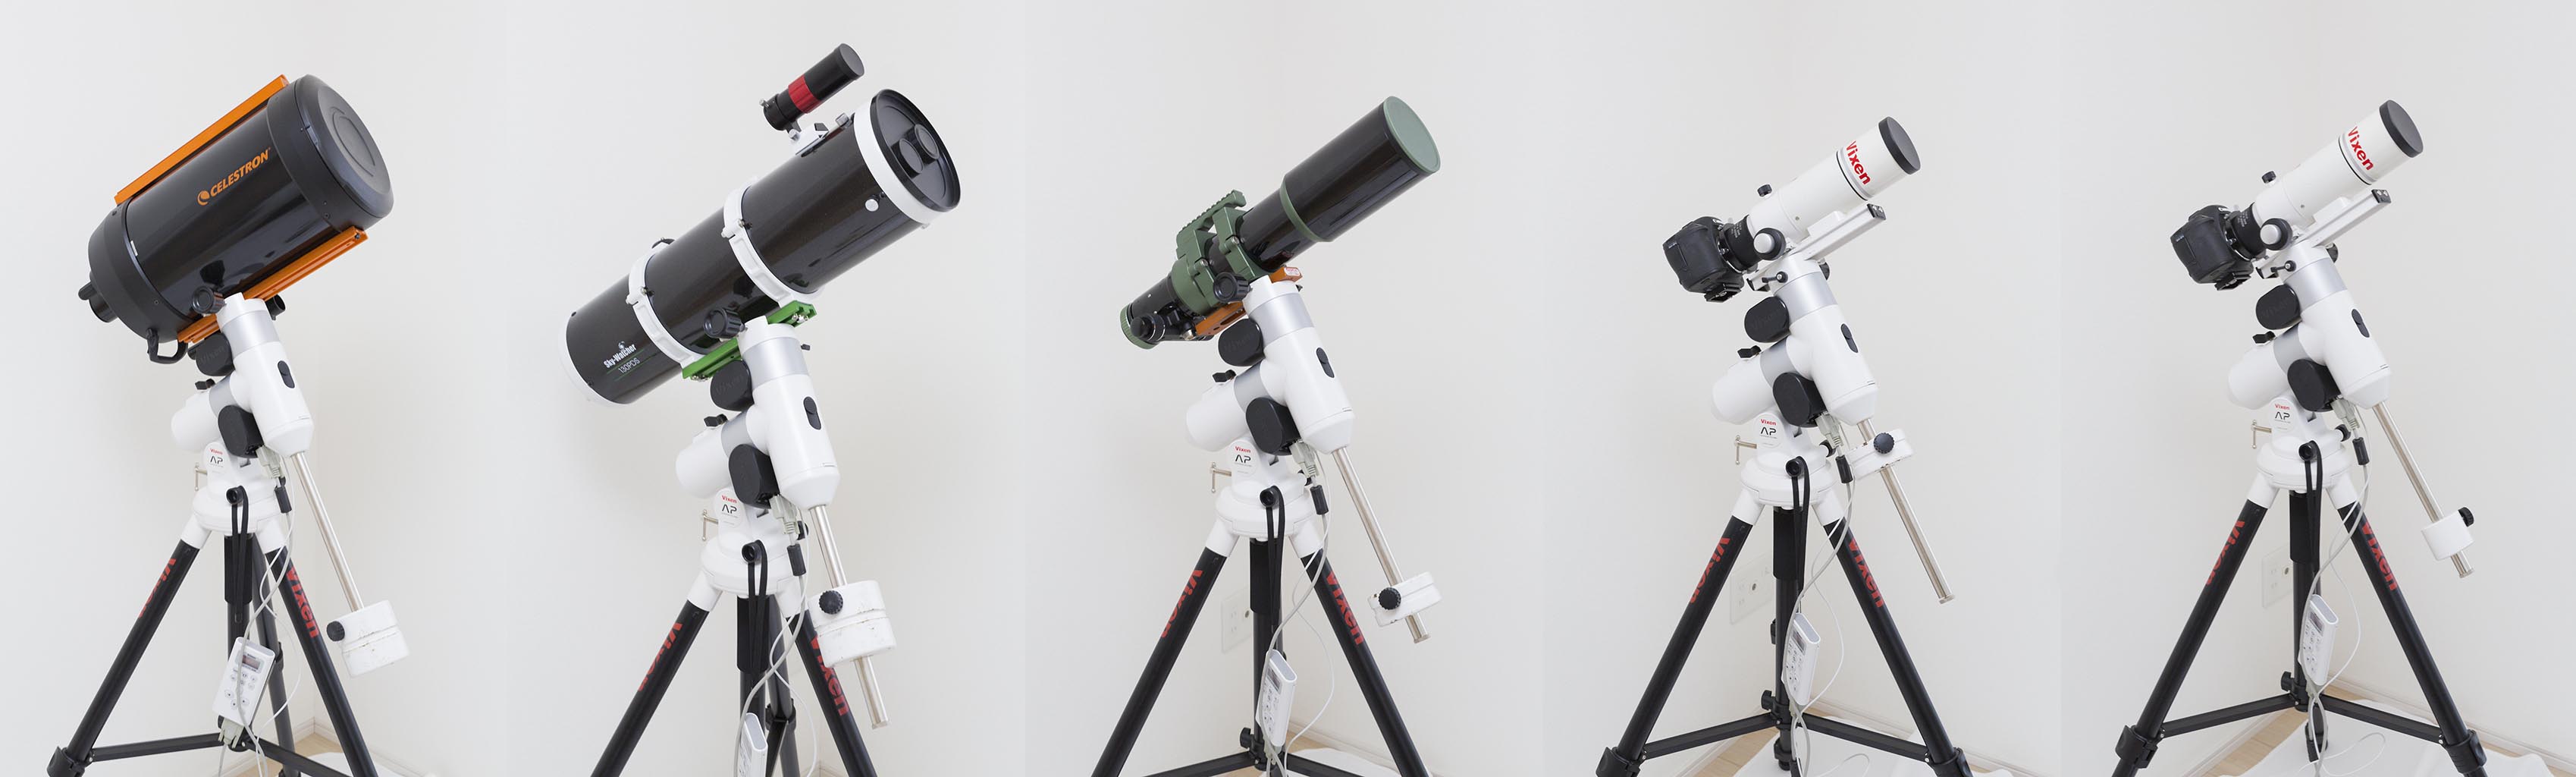 The weights used are 3.7kg, 3.7kg, 1.9kg, 1.9kg and 1.0kg from the left.
I put on a variety of lens tubes. Both are in a balanced state. From left to right are Celestron C8, Sky-Watcher BKP130, Founder Optics FOT85, Vixen FL55SS. the C8 weighs a nominal 5.6kg, roughly the upper limit of the AP mount’s mounting weight.
I actually used all of them in these configurations, but as a sense of use, I have no problem with any of them and it is an impression that I can use them normally. I didn’t shoot with the C8 direct focus, but I had no problem shooting with the BKP130 (focal length 650mm).
However, in terms of overall balance, I felt that the stronger the equipment, the higher the center of gravity, the stronger the tripod would be. In that case, you can put up with the slightly heavier weight and go with the SXG-HAL130, or use the carbon legs ASG-CB90 described later, which are slightly more expensive but weigh about the same and stronger.
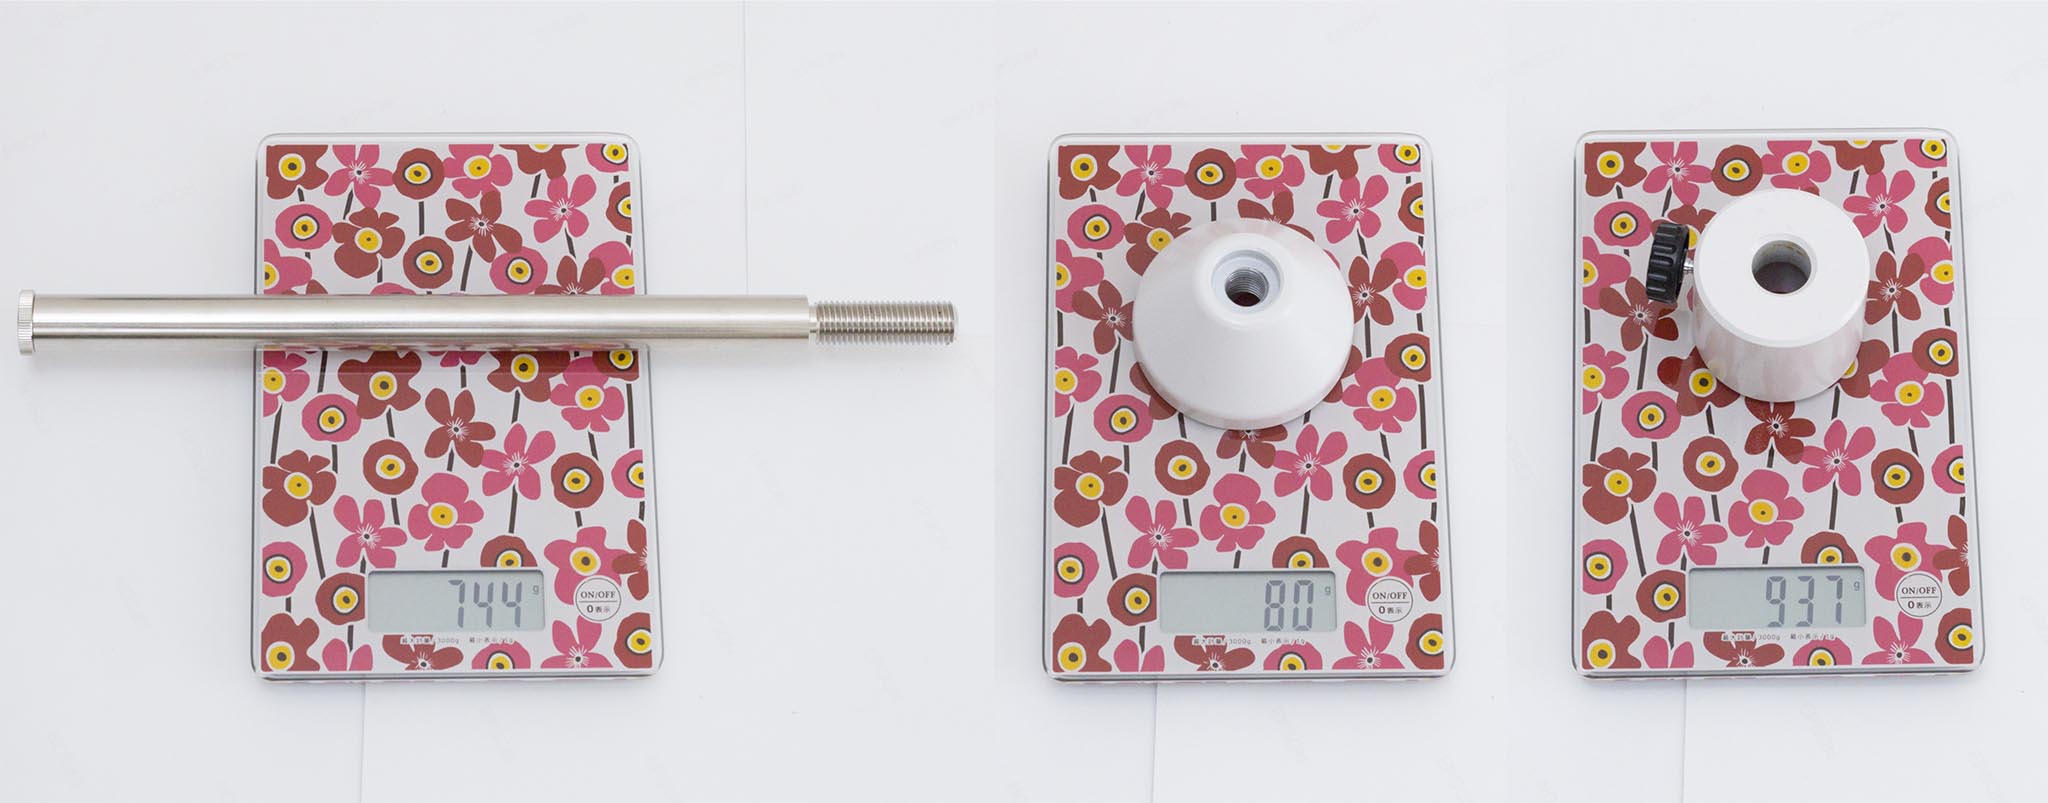 Weight axis, weight axis cover, nominal 1.0kg weight. Surprisingly, you can see that there is a lot of weight on the shaft. Shaft diameter is 20mm, which is compatible with SX series.
AP mount disassembly and assembly
One of the selling points of the AP mount is “systemization”. The mount is made up of a variety of different parts and is flexible to fit the purpose.
The disassembly and assembly of the module group requires some familiarity. As a sample, let’s convert the equatorial mount configuration with manual fine movement to a motor module configuration.
Minimal screw exposure
 The left is the AP mount with manual fine movement specs. On the right is the motor module and controller “Star Book One”
with red longitude and declination.
The left photo above shows the equatorial mount configuration with “manual fine movement” specification, but there are almost no exposed screws (*). Therefore, the assembled form is extremely neat and friendly without any sense of brute force(**).
(*)Both the M10 screw for tripod mounting on the polar axis pair unit and the M10 screw on the deciduous weight axis will eventually be hidden. In any configuration, only a small percentage of the imo screws will be exposed.
(**)It’s a matter of good or bad, but it’s in contrast to the famous Mark-X of yesteryear, where the joints between parts were made with screws exposed to the outside.
Separation of DEC unit
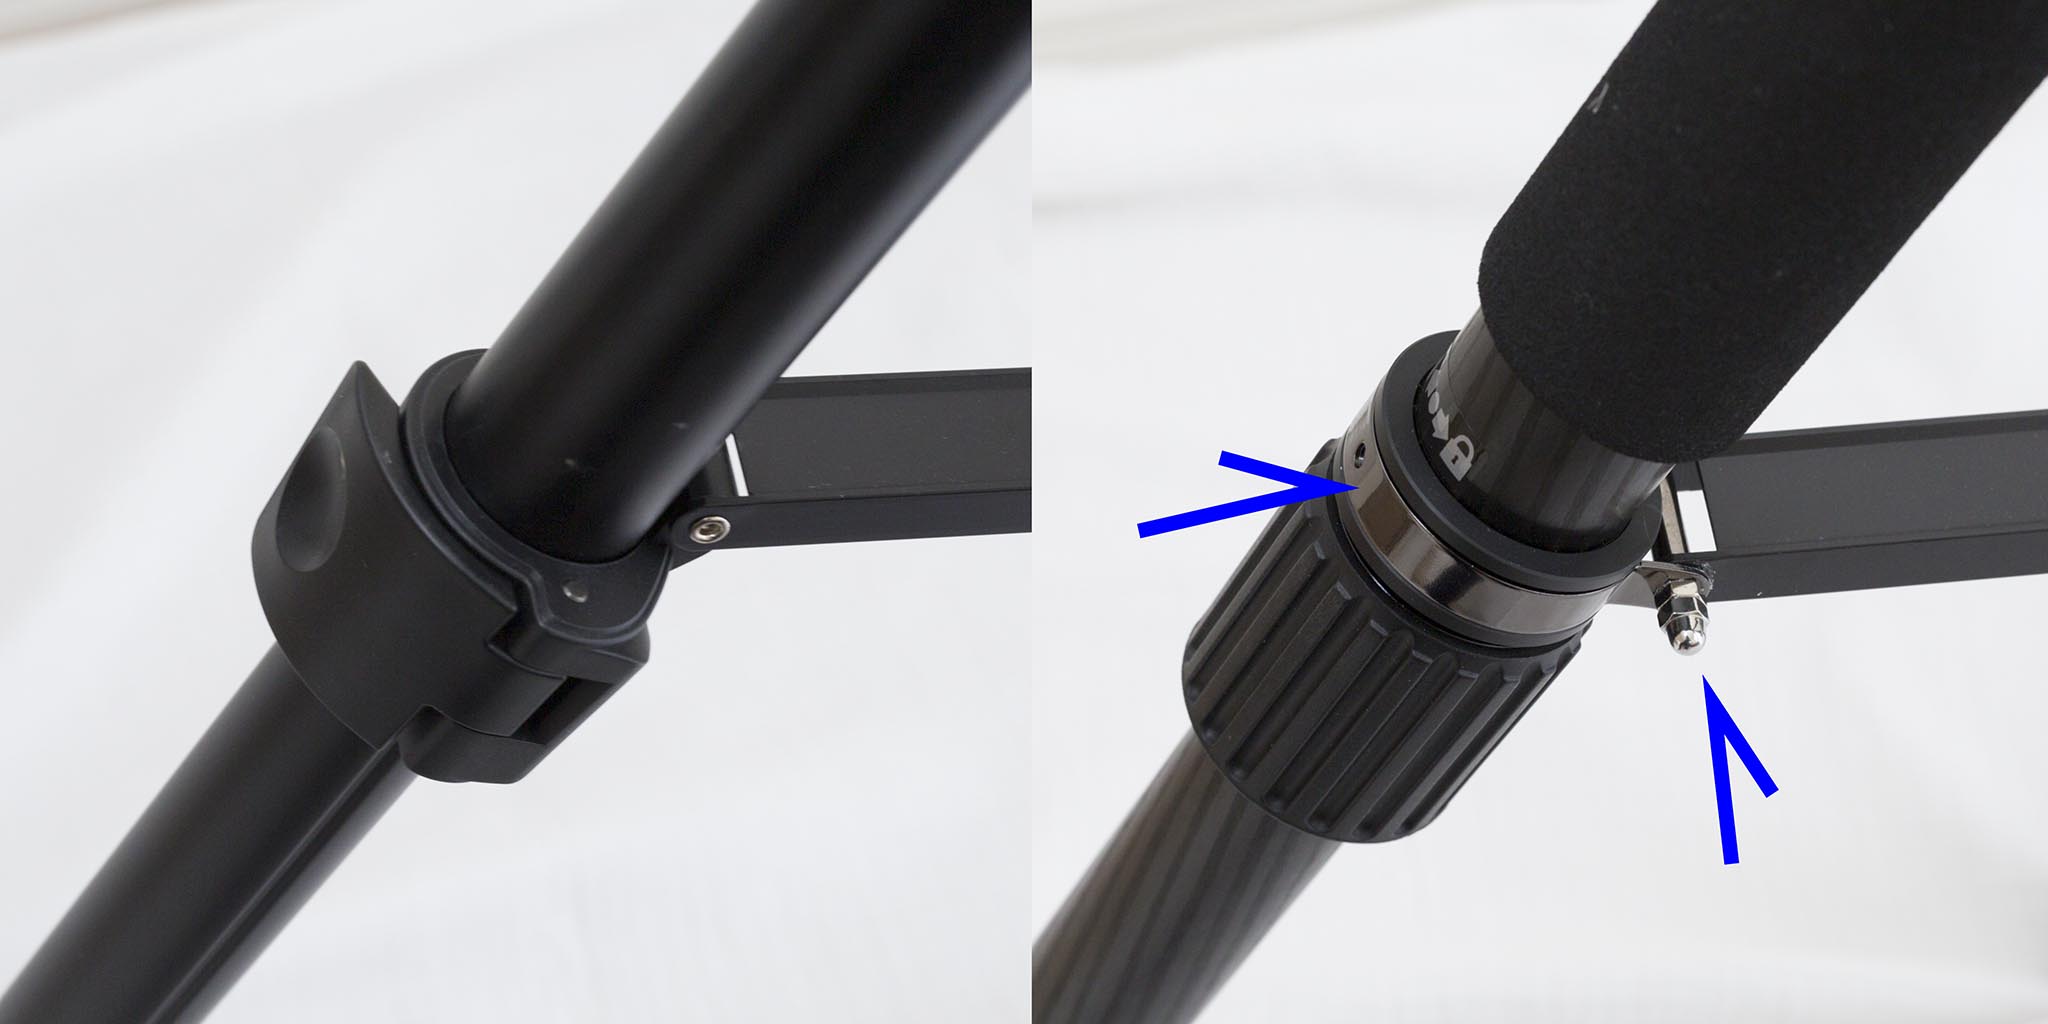
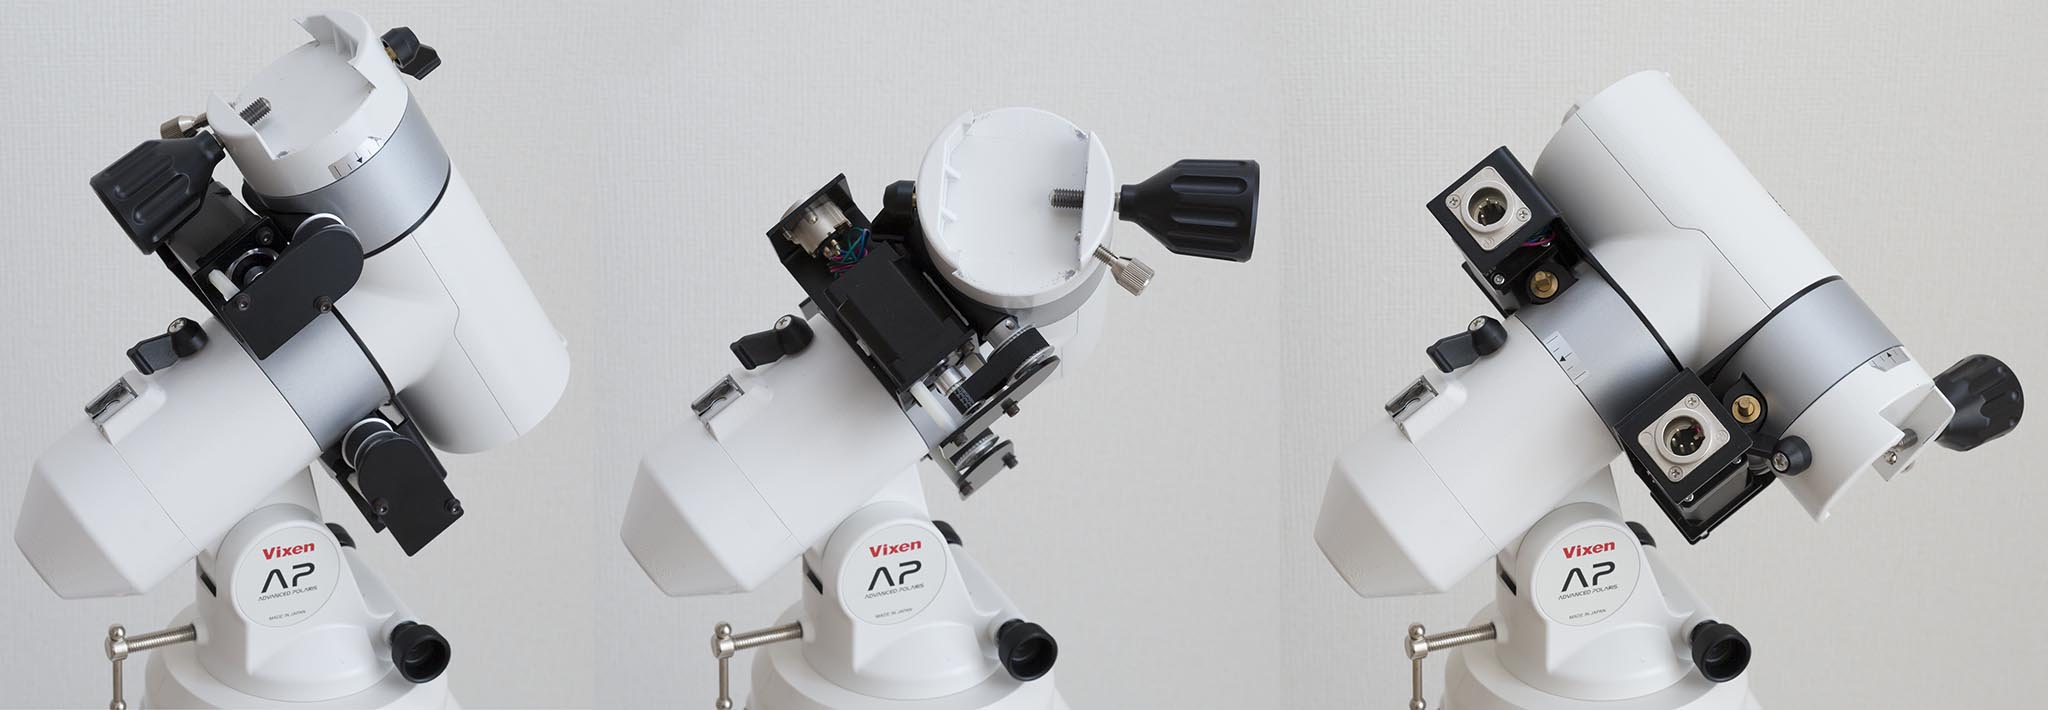
On the contrary, it is hard to know where to start from just by looking at the assembly state^^; but don’t worry. First, remove the cover of the deciduous body (the window for the polar axis telescope).
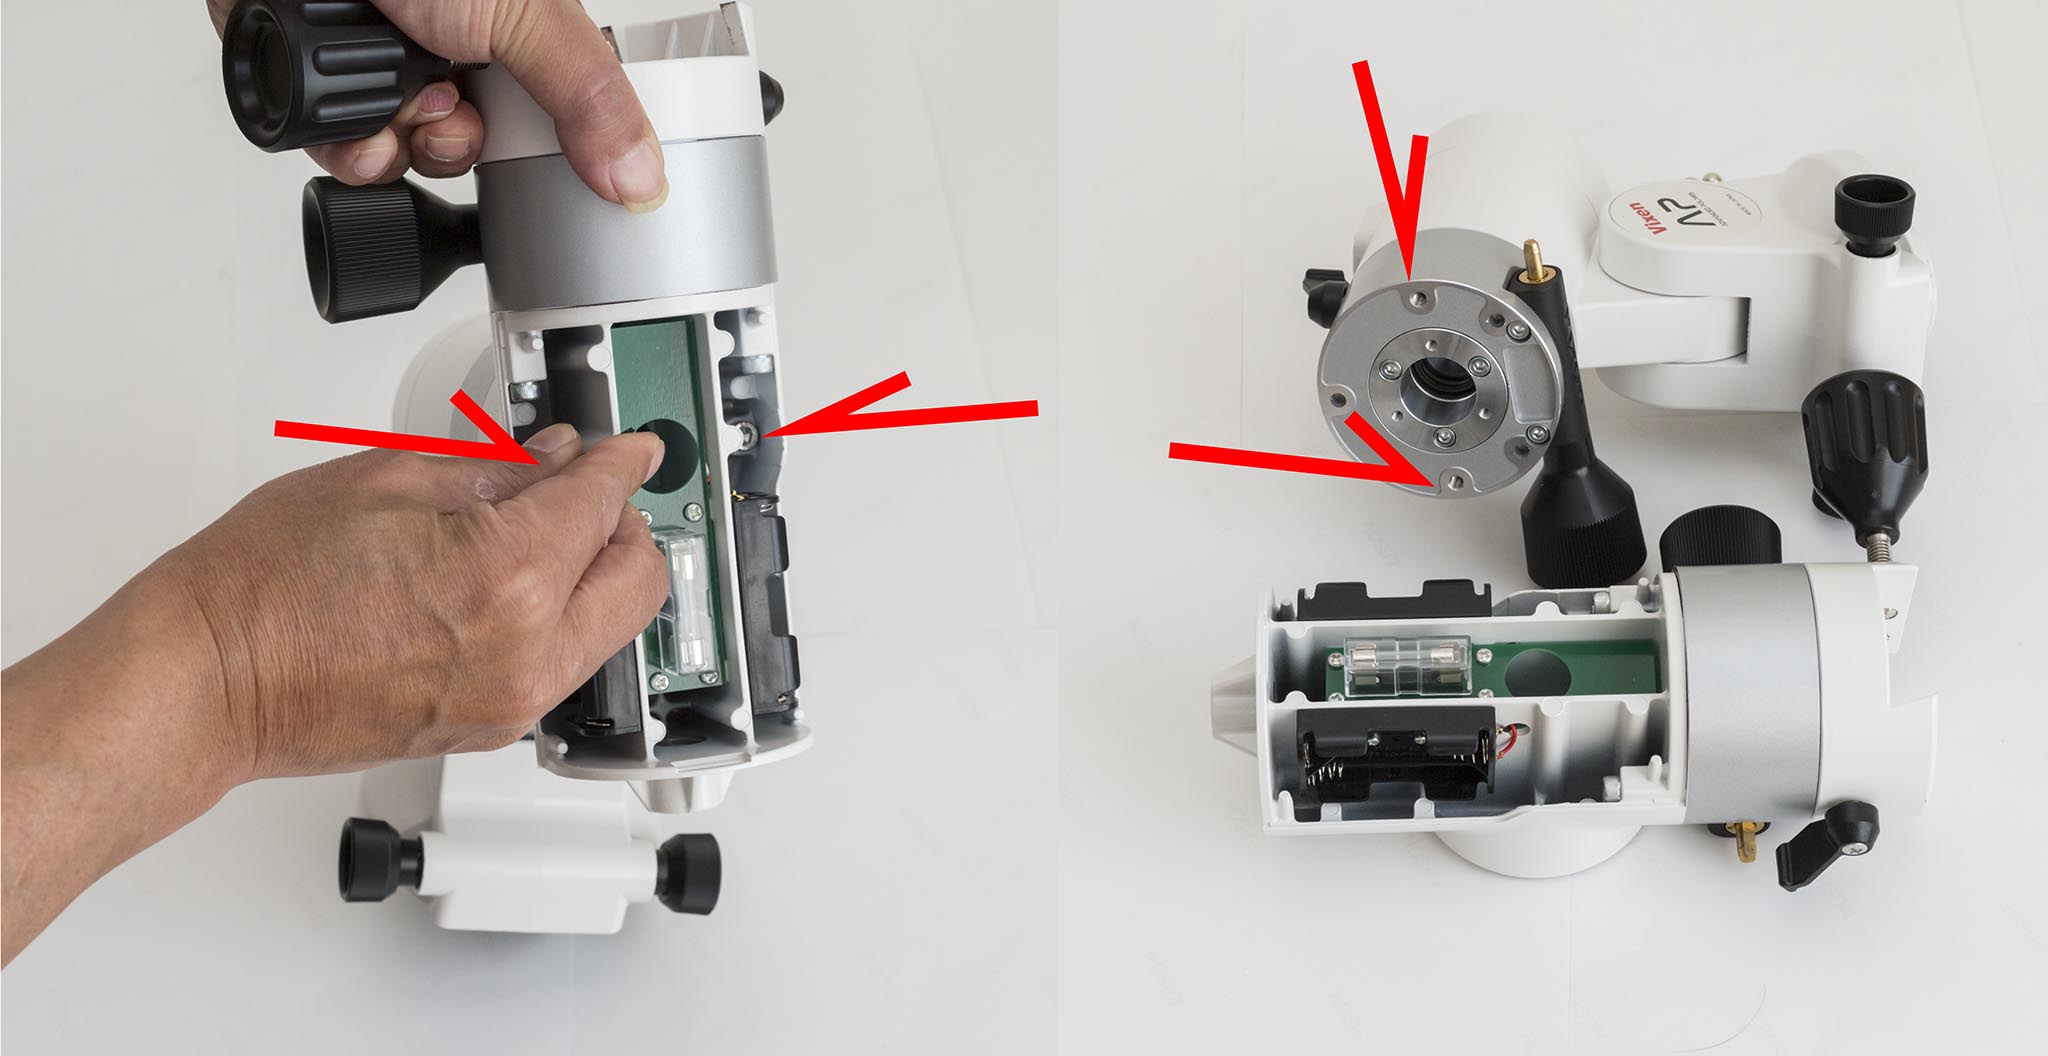
When the cover is removed, the two M5 screws that connect the deciduous body to the deciduous body appear (arrow in the top image). When this is removed with a hex key, the deciduous body can be separated.
The surfaces of the parts joined by these two M5 screws are finished to a high quality and fit snugly together without loosening. In addition, it is shaped to align with the three prongs to prevent misalignment.
Refurbishment of RA unit
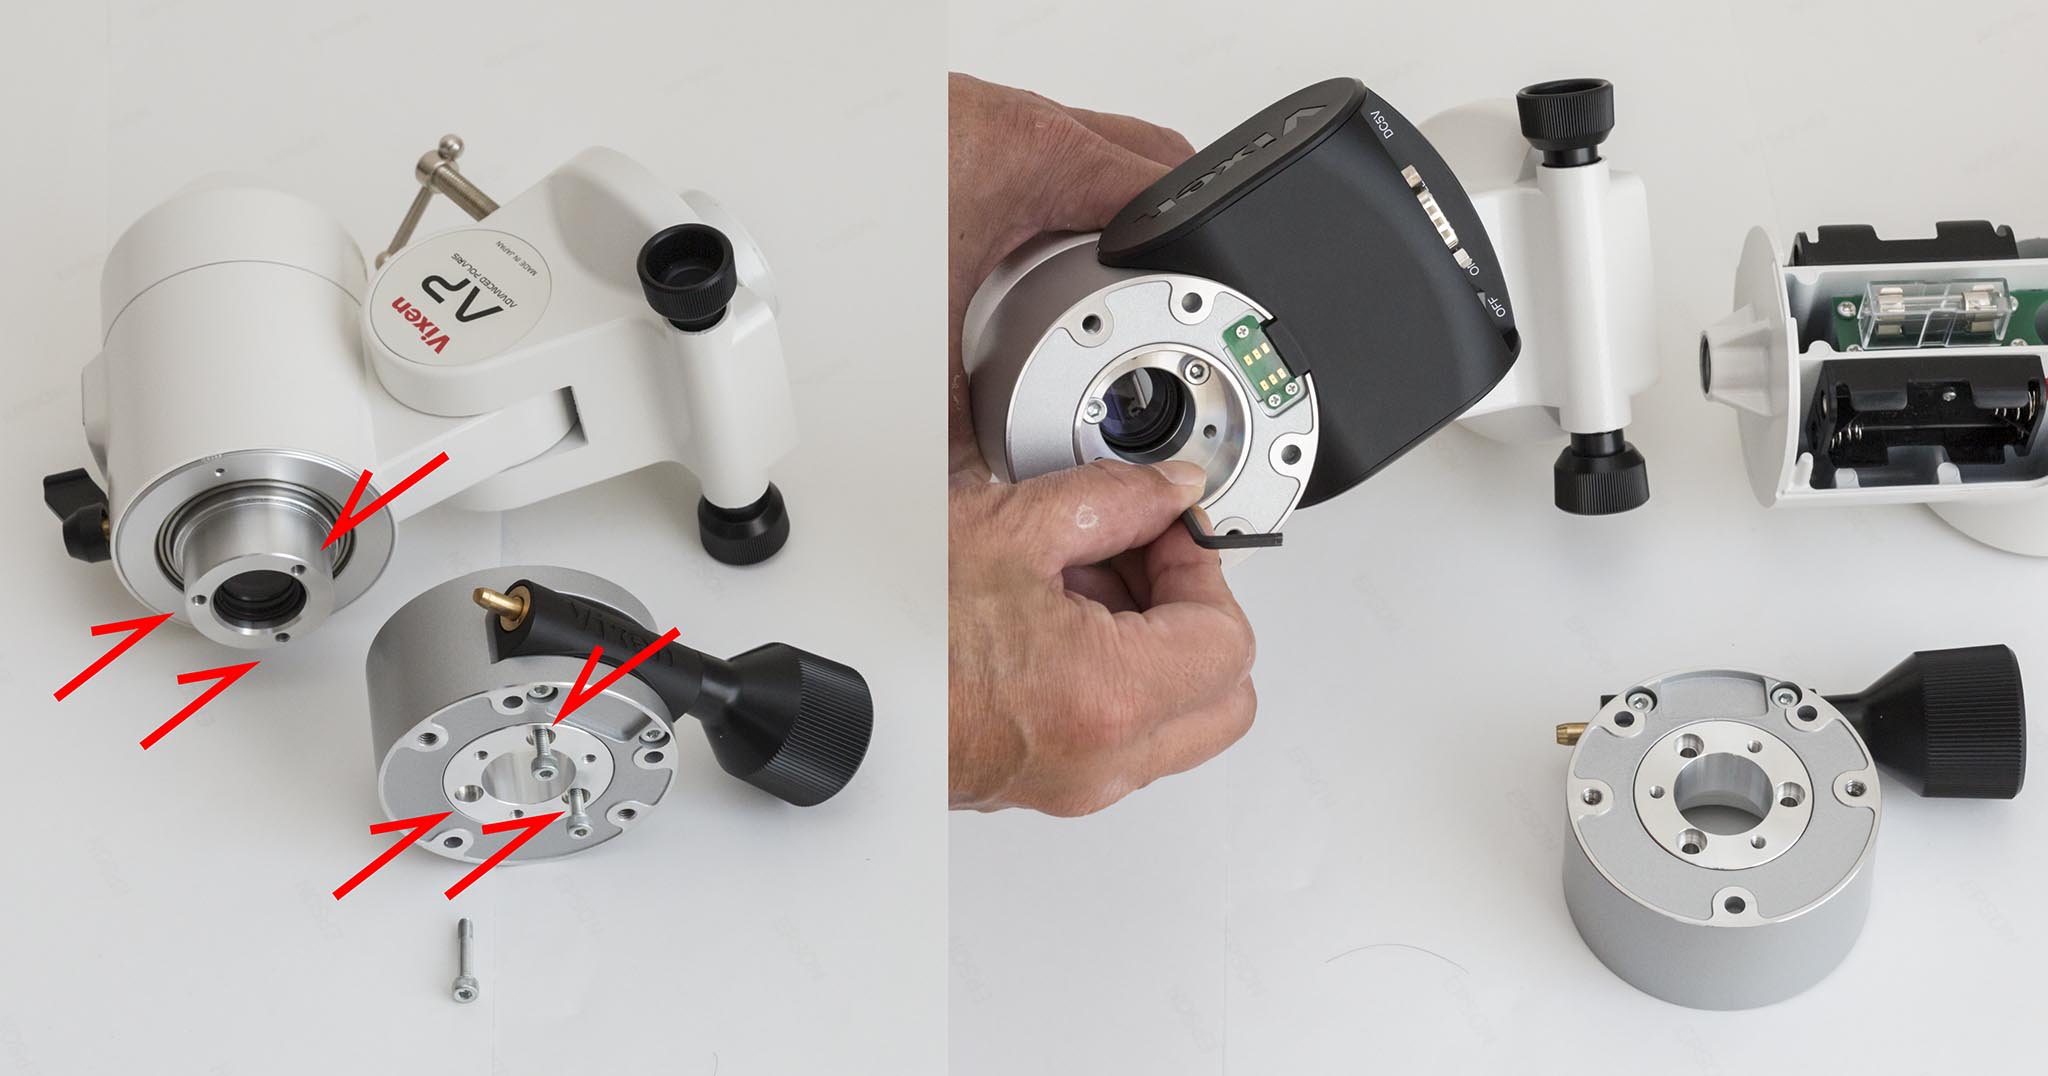
Next, the manual fine-movement module mounted on the pole unit is replaced by an equatorial motor unit by removing the three M4 screws. This three-mount M4 screw joint is not a flat surface, but a high quality cylindrical part that fits smoothly. I have the impression that it is quite elaborate.
Separation of DEC driving part
.
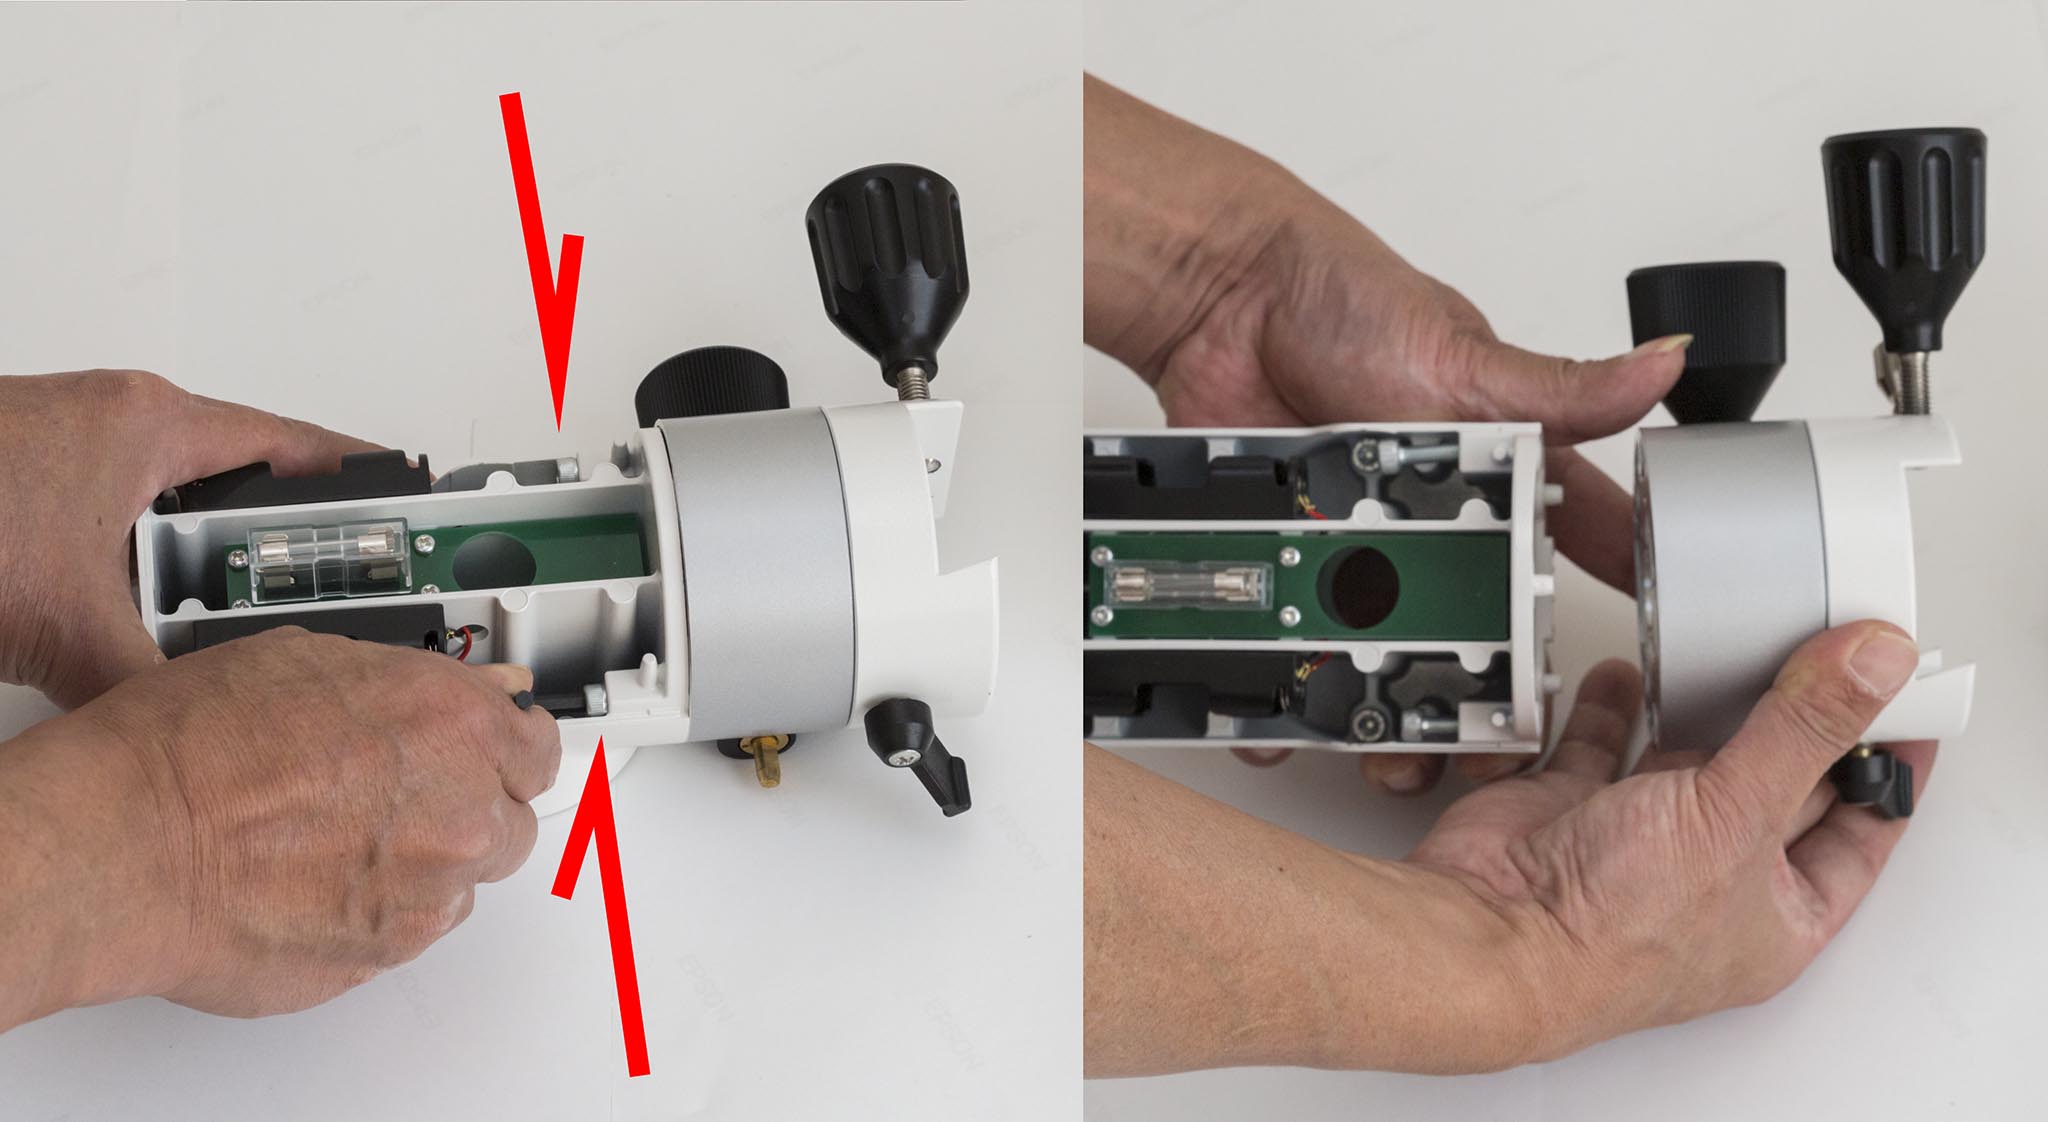
In the same way, remove the deciduous microtremor from the deciduous unit. Two M5 screws are also used to fix this. It is difficult to turn the screw with a hex key due to the angle of the screw, so you should put your finger on the screw and turn it easily or patiently and gradually.
Replacement of the DEC drive part

The manual fine-movement unit is secured to the “AP Clamp Bearing Unit” with three M4 screws. Remove it and replace it with a declination motor module (*).
(*) The “AP Clamp Bearing Unit” looks like just a dovetail, but it’s a pretty elaborate unit with a clamping mechanism with built-in bearings.
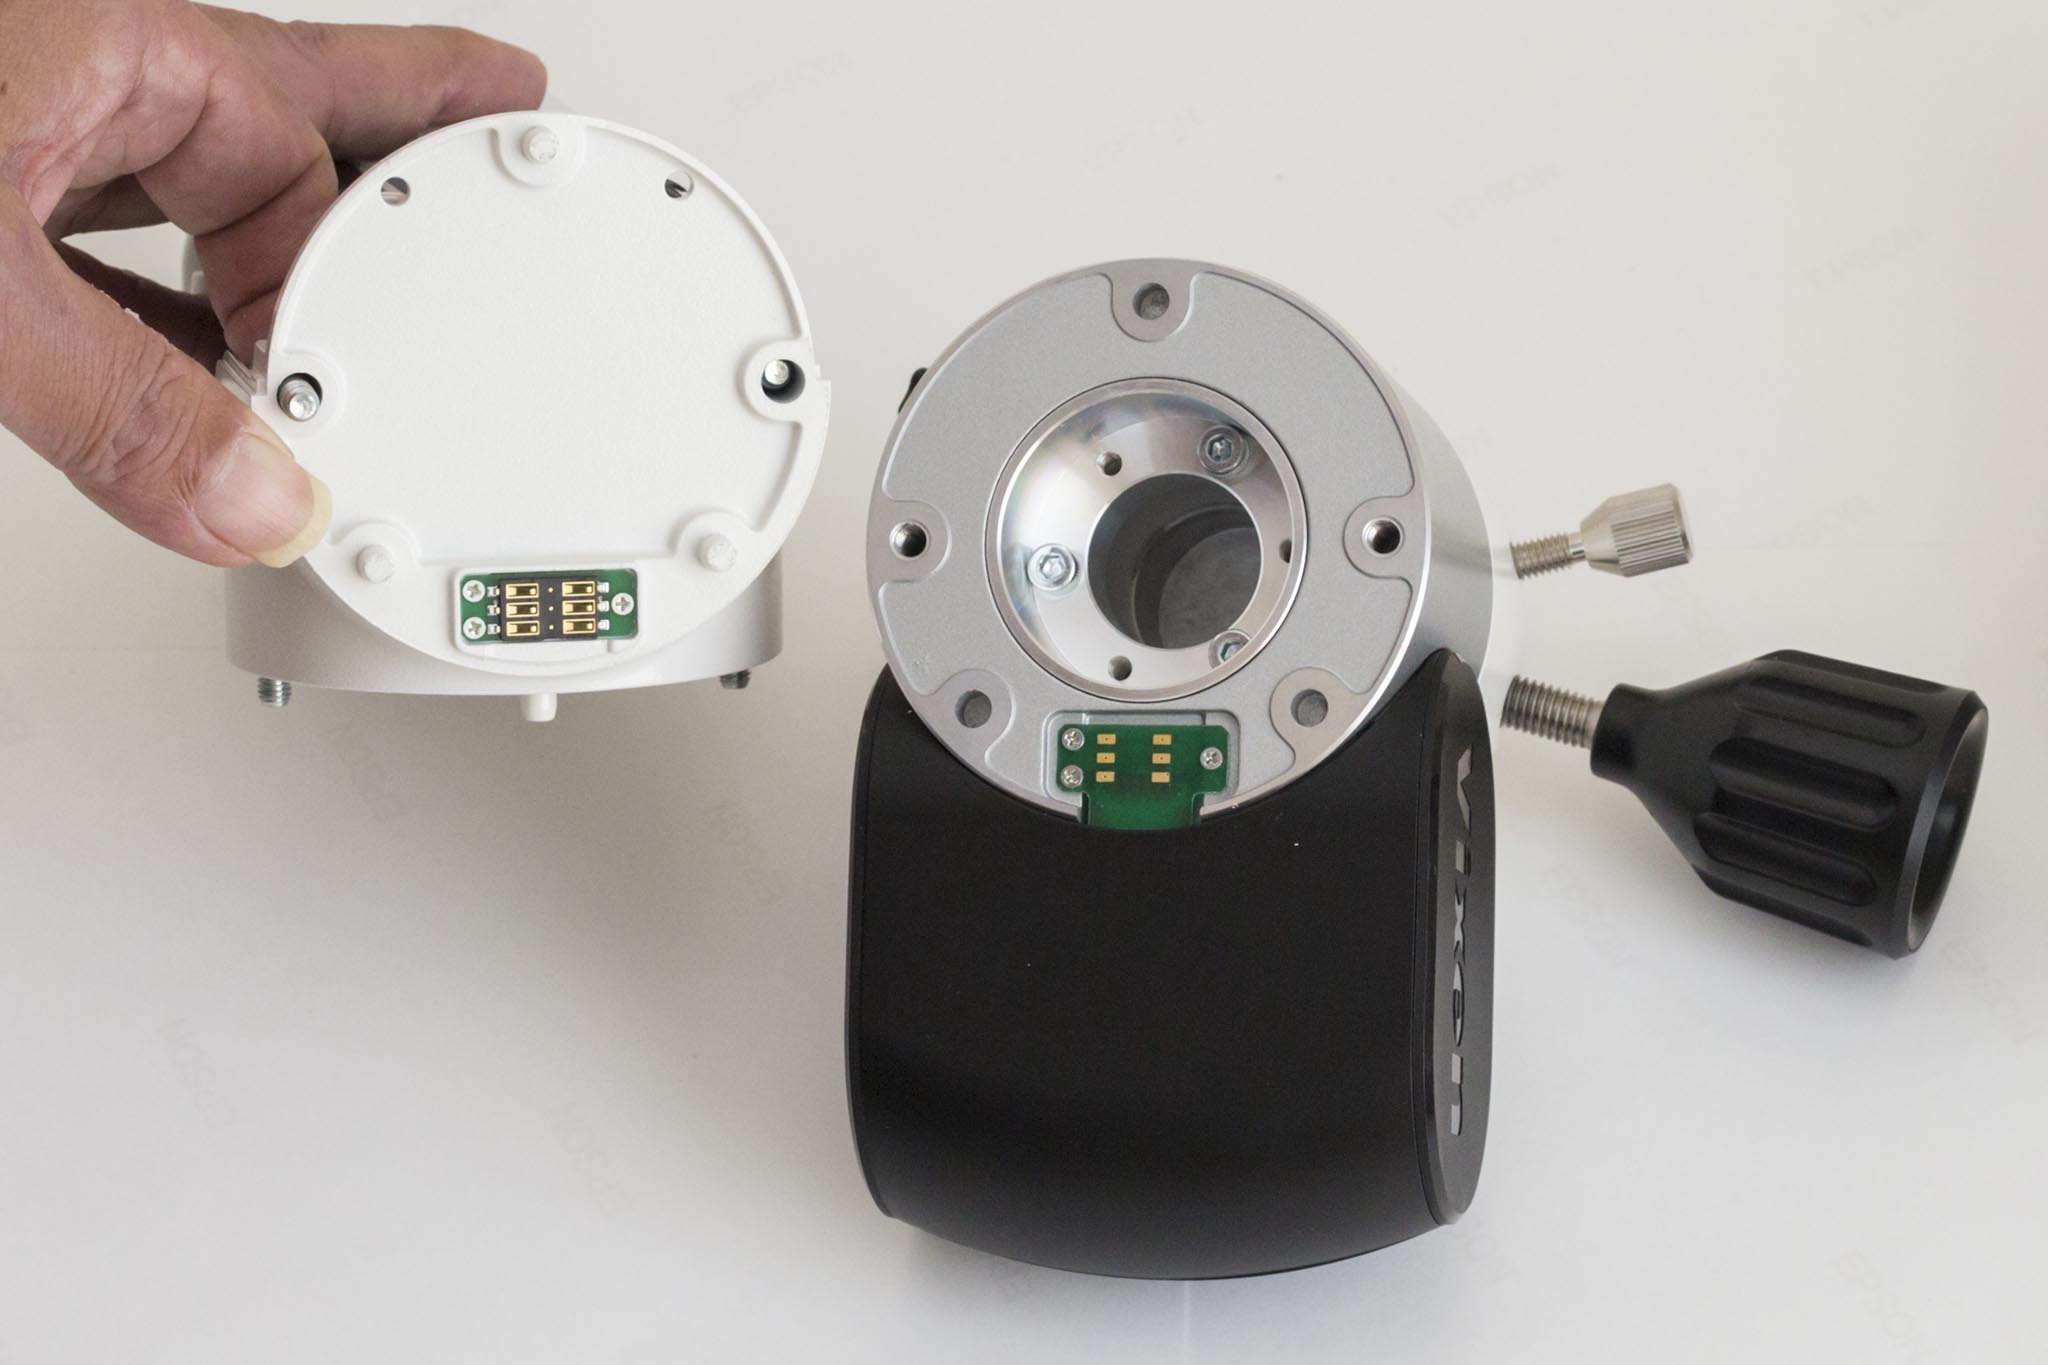
The AP-mounted motor module is cable-less. The power is supplied and controlled from the declination body via electronic contacts.
Manual fine movement is too much for motorization

Finished. The AP mount is now equipped with a 2-axis motor. However, here’s one problem user-wise. It’s a redeemed manual fine movement module leftover.
The manual fine movement module is priced at 18,230 yen (tax included). The cost of the motor module is 32,130 yen for the declination side and 59,940 yen for the longitude side. If you convert the manual configuration to a motor, you are buying the whole thing instead of the difference, and you have an extra manual module. This doesn’t make much sense to me.

Motor module (left) and manual module. The gears of the motor module are larger in diameter and have a higher precision. Is it to accommodate the motor housing or is it just the “thickness” of the housing is different. Shouldn’t this be commonized and only the motor be mounted externally?
AP Mount Tripod
AP tripod (APP-TL130 direct sales price tax included 19,980 yen)” released at the same time as the AP mount, it looks like a camera tripod at a glance (weakly ^^;;), but in fact, it is a tripod of high evaluation that the balance of lightening and strength was taken, also in the serious system. At the end of last year, a higher version of the carbon/aluminum hybrid tripod “ASG-CB90” was released, and at the same time, the tripod heads of AP tripods were shared. This has greatly enhanced Vixen’s product lineup of tripods.
Here are some of these tripods that can be used with AP mounts.
AP tripod (APP-TL130)
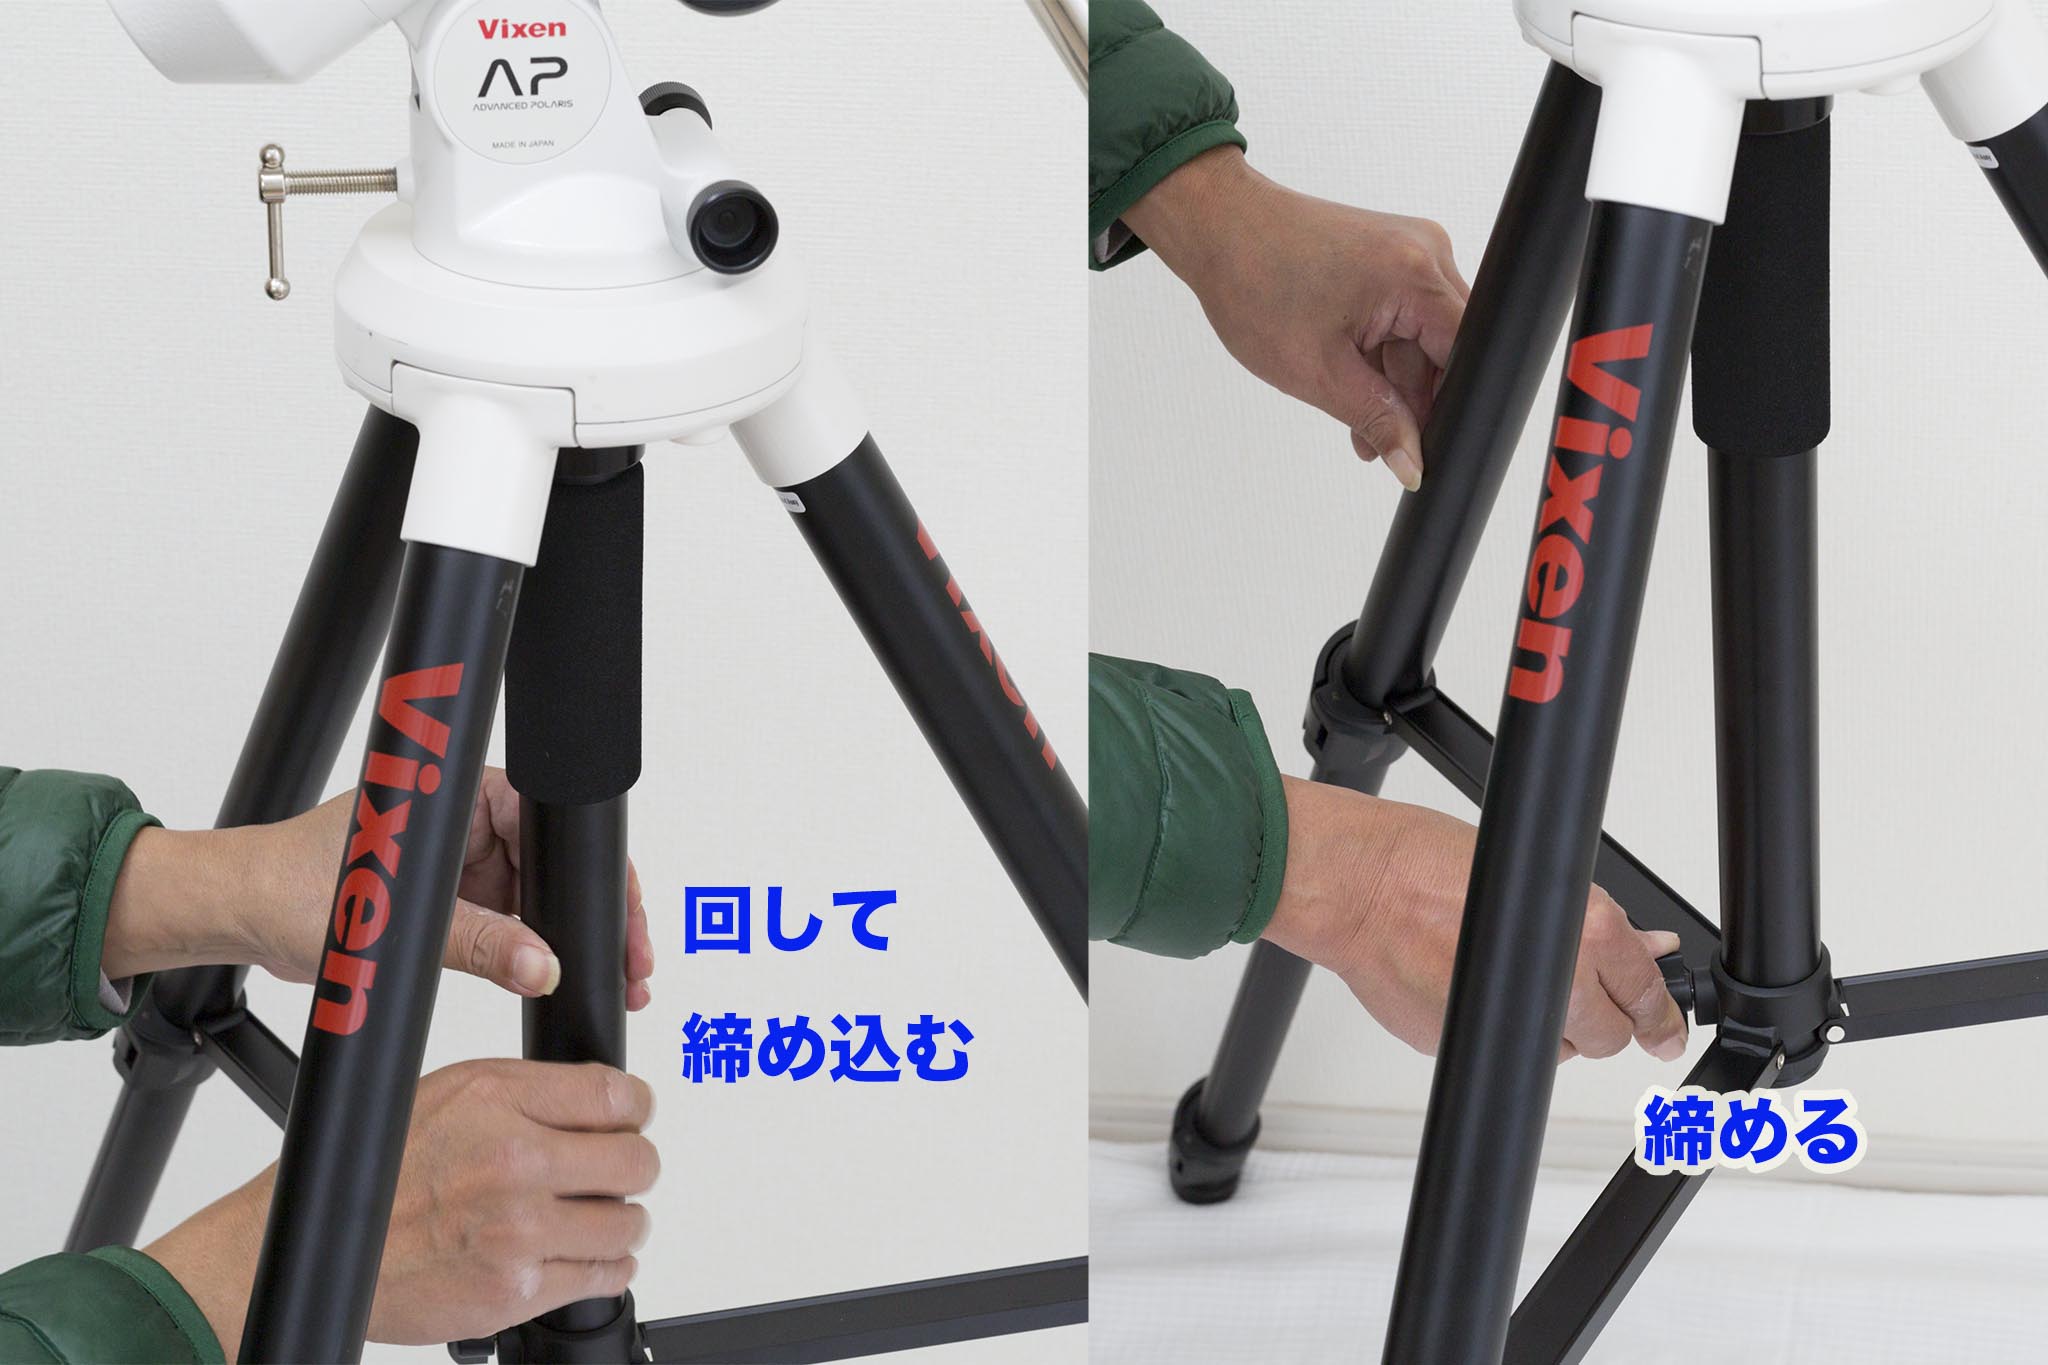 How to assemble the AP tripod (APP-TL130). Turn the central pole with the M10 screw first to secure the frame. The physical specifications of this part are the same as those of the SX series tripods.
The AP tripod is relatively light, weighing only 3kg, and is very compact when folded down with the 3-stage telescoping, and has a good cospa. It doesn’t have the robustness and weight of a camera that you’d expect, but I felt it was the best match for the AP mount.
 Back side of the frame head, which is solidified with 6 screws of M8
Compared to camera tripods of the same weight class, the strength of the head is overwhelmingly different. If you look at the overhead head alone, it’s strong enough to operate even in AXJ class(*).
(*)The upper model of the AP tripod (APP-TL130) ASG-CB90 is also recommended by Vixen as a tripod for “AXJ”, but the specification of the frame head is the same.
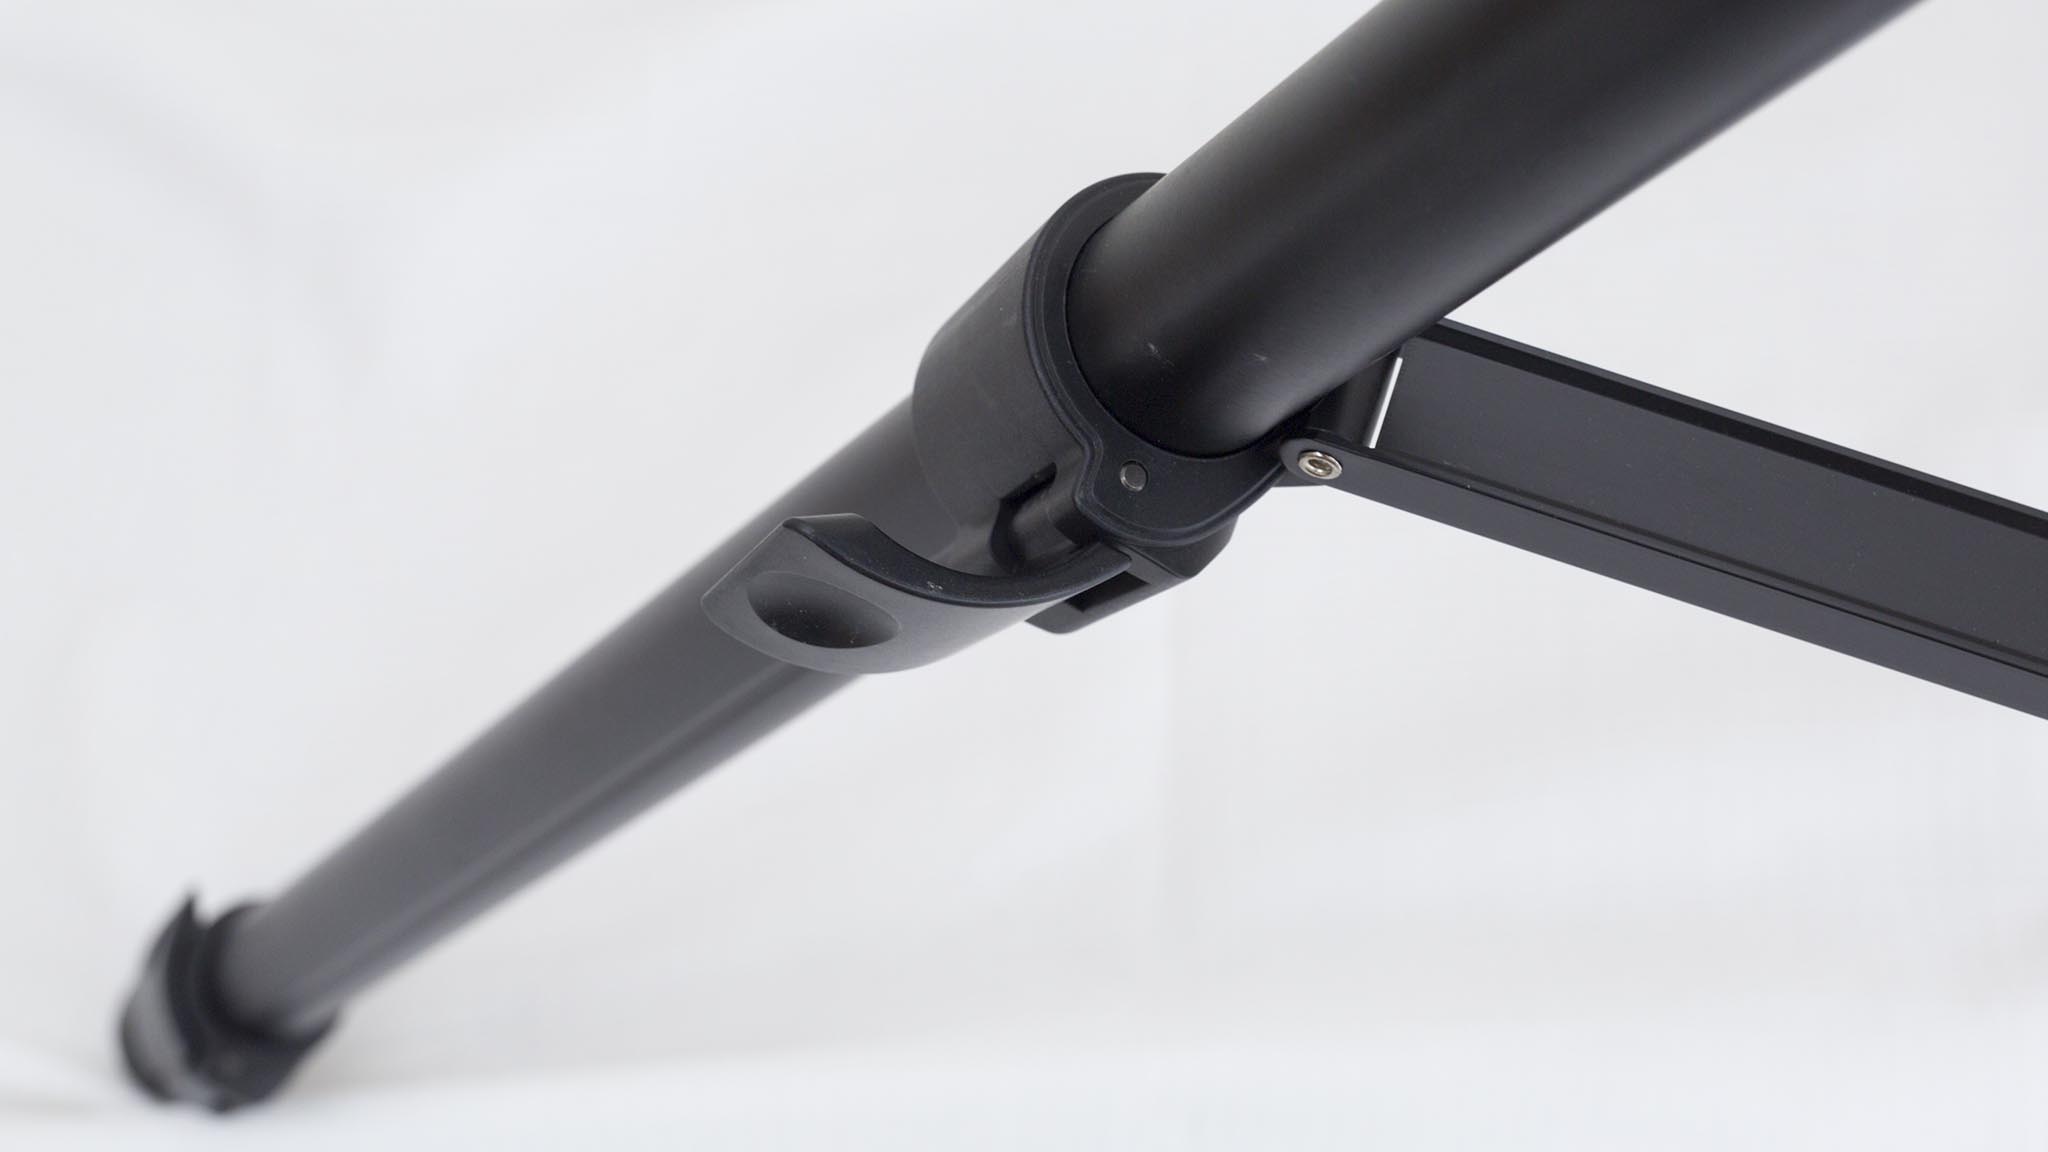
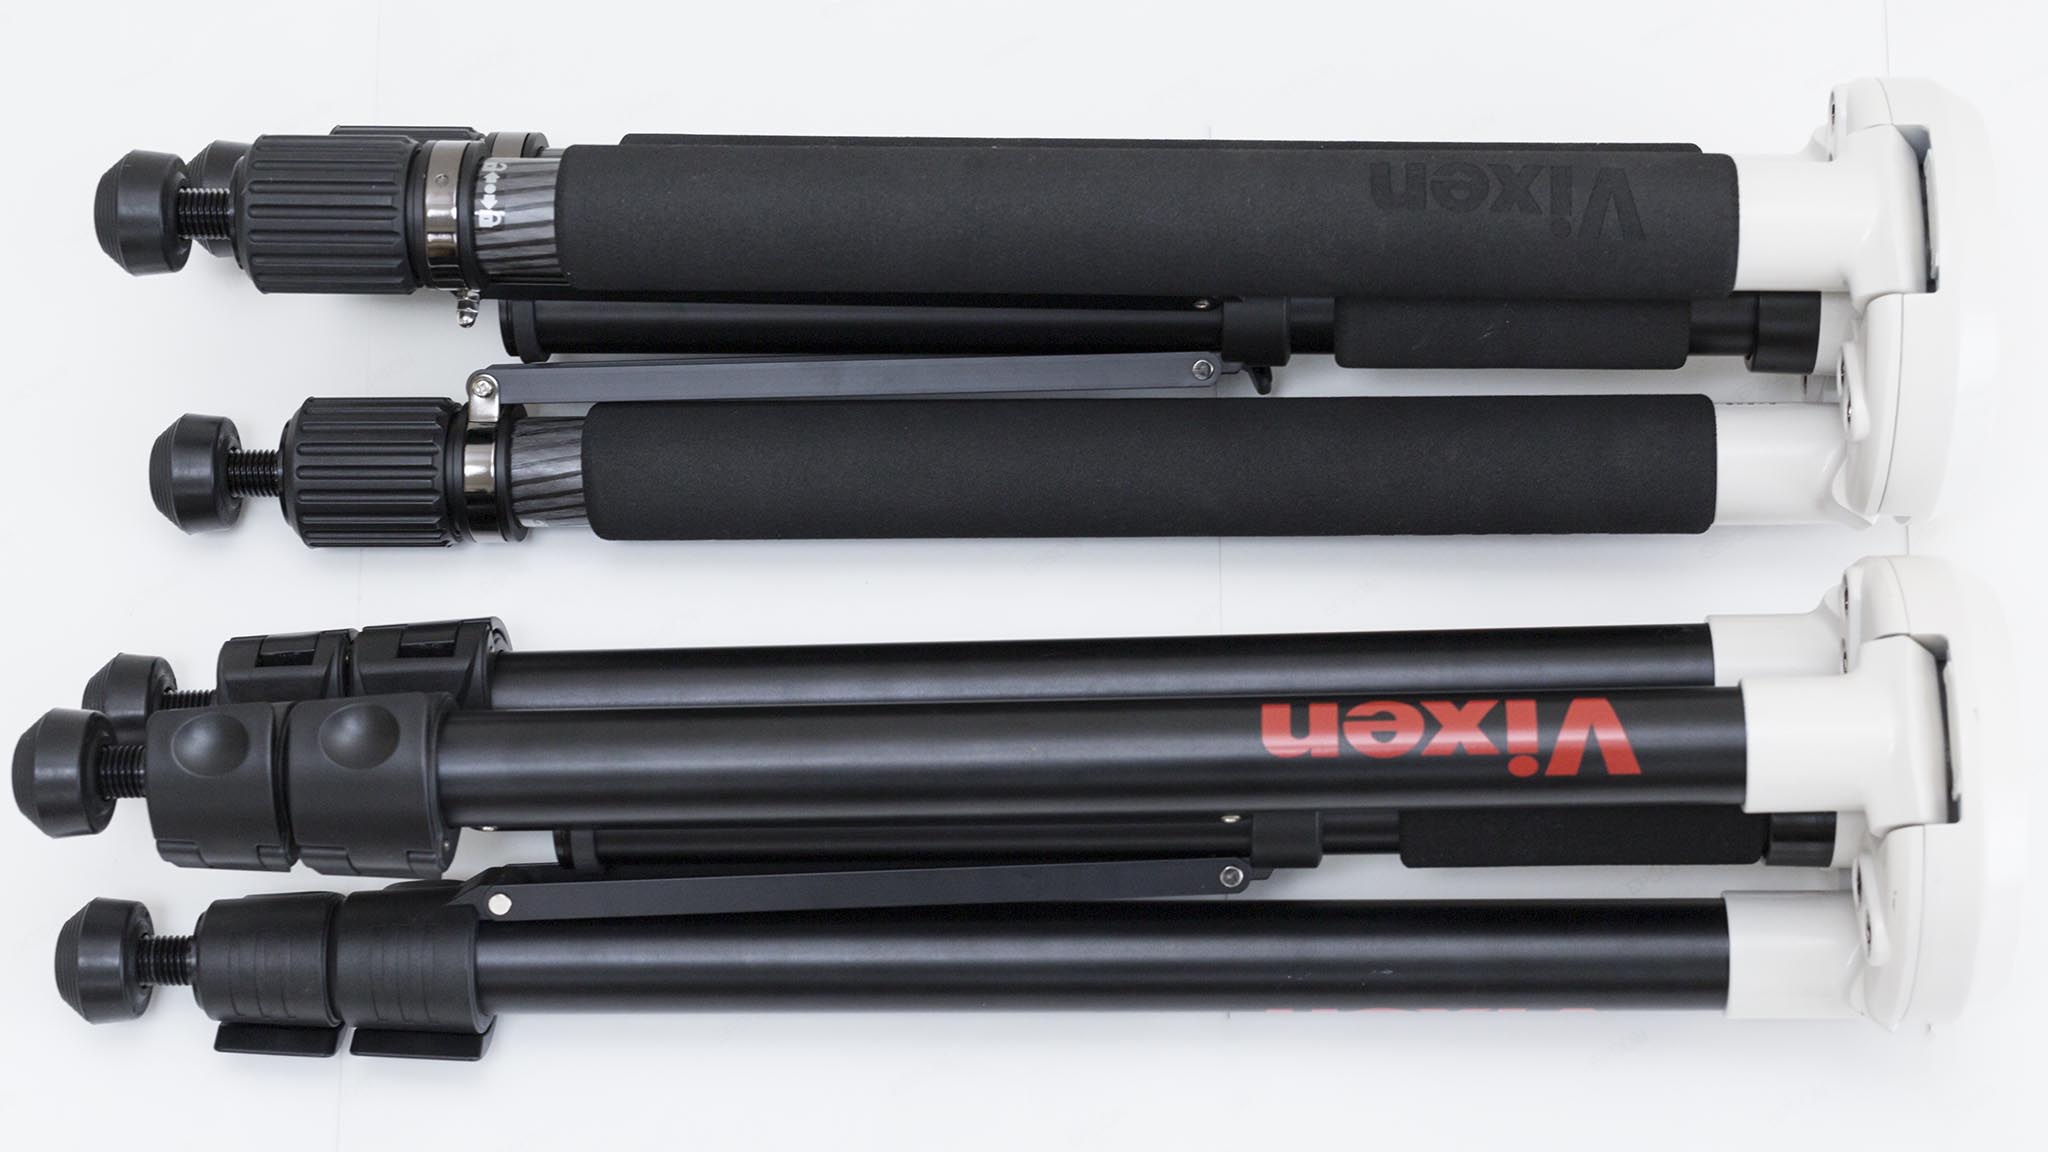
The AP tripod is a lever lock type. The strength is lower than the ring type, but the convenience of being able to expand and contract easily is hard to give up(*), so it may be an appropriate choice for AP mount applications. I am very grateful for the lever type, especially when I take it out to the balcony or in the cold season. The tripod has a truss shape with a stay that prevents the tripod from opening, which adds stability.
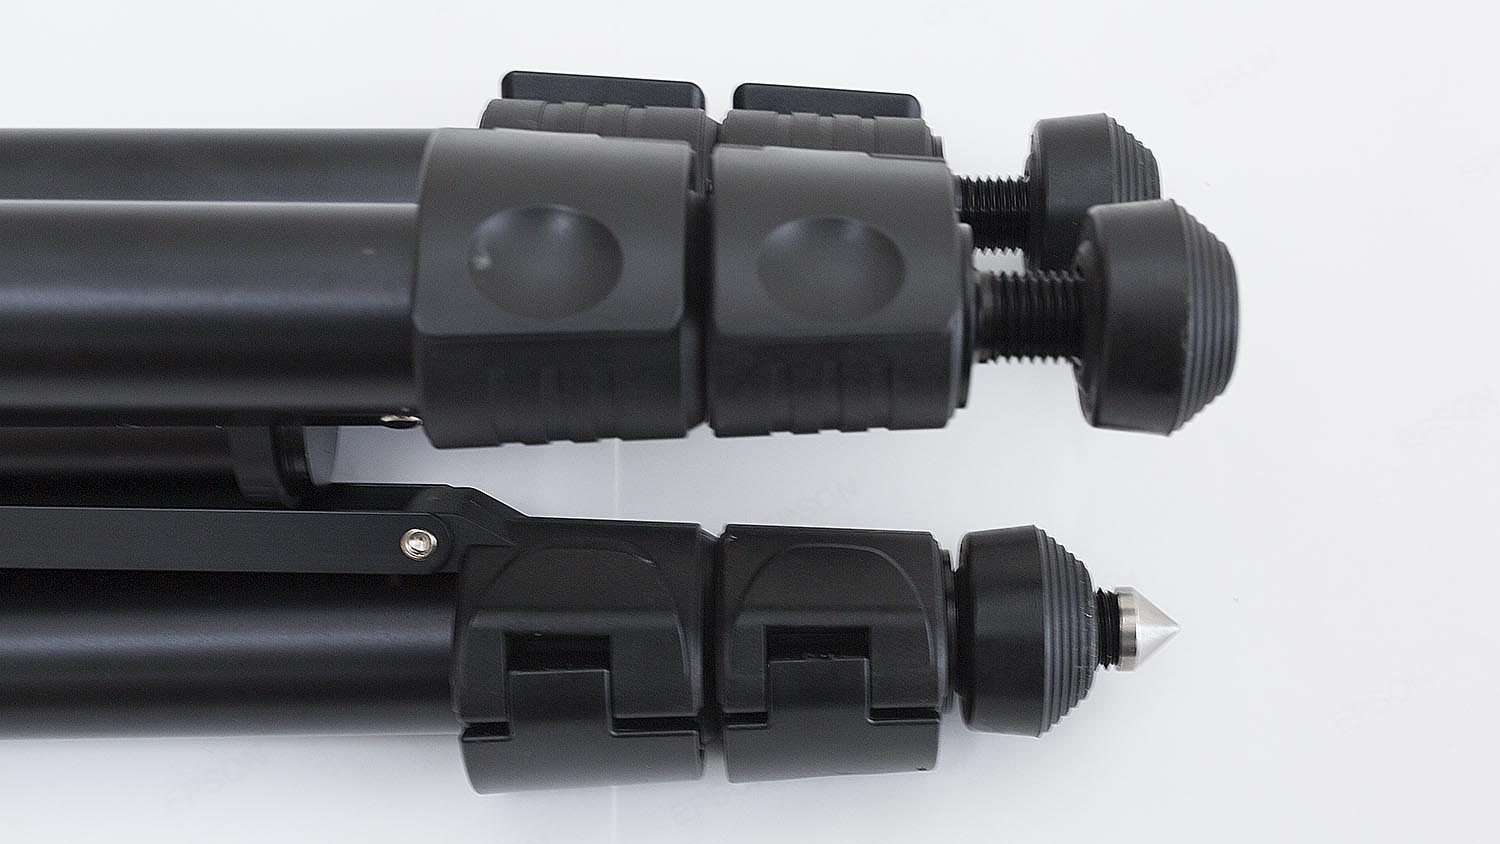
The sticks are made for both spikes and rubber. The spikes come out when you turn the rubber ring. The spikes have a diameter of 16mm, which is twice as big as the 3/8″ standard for camera tripods such as the Zizzo.
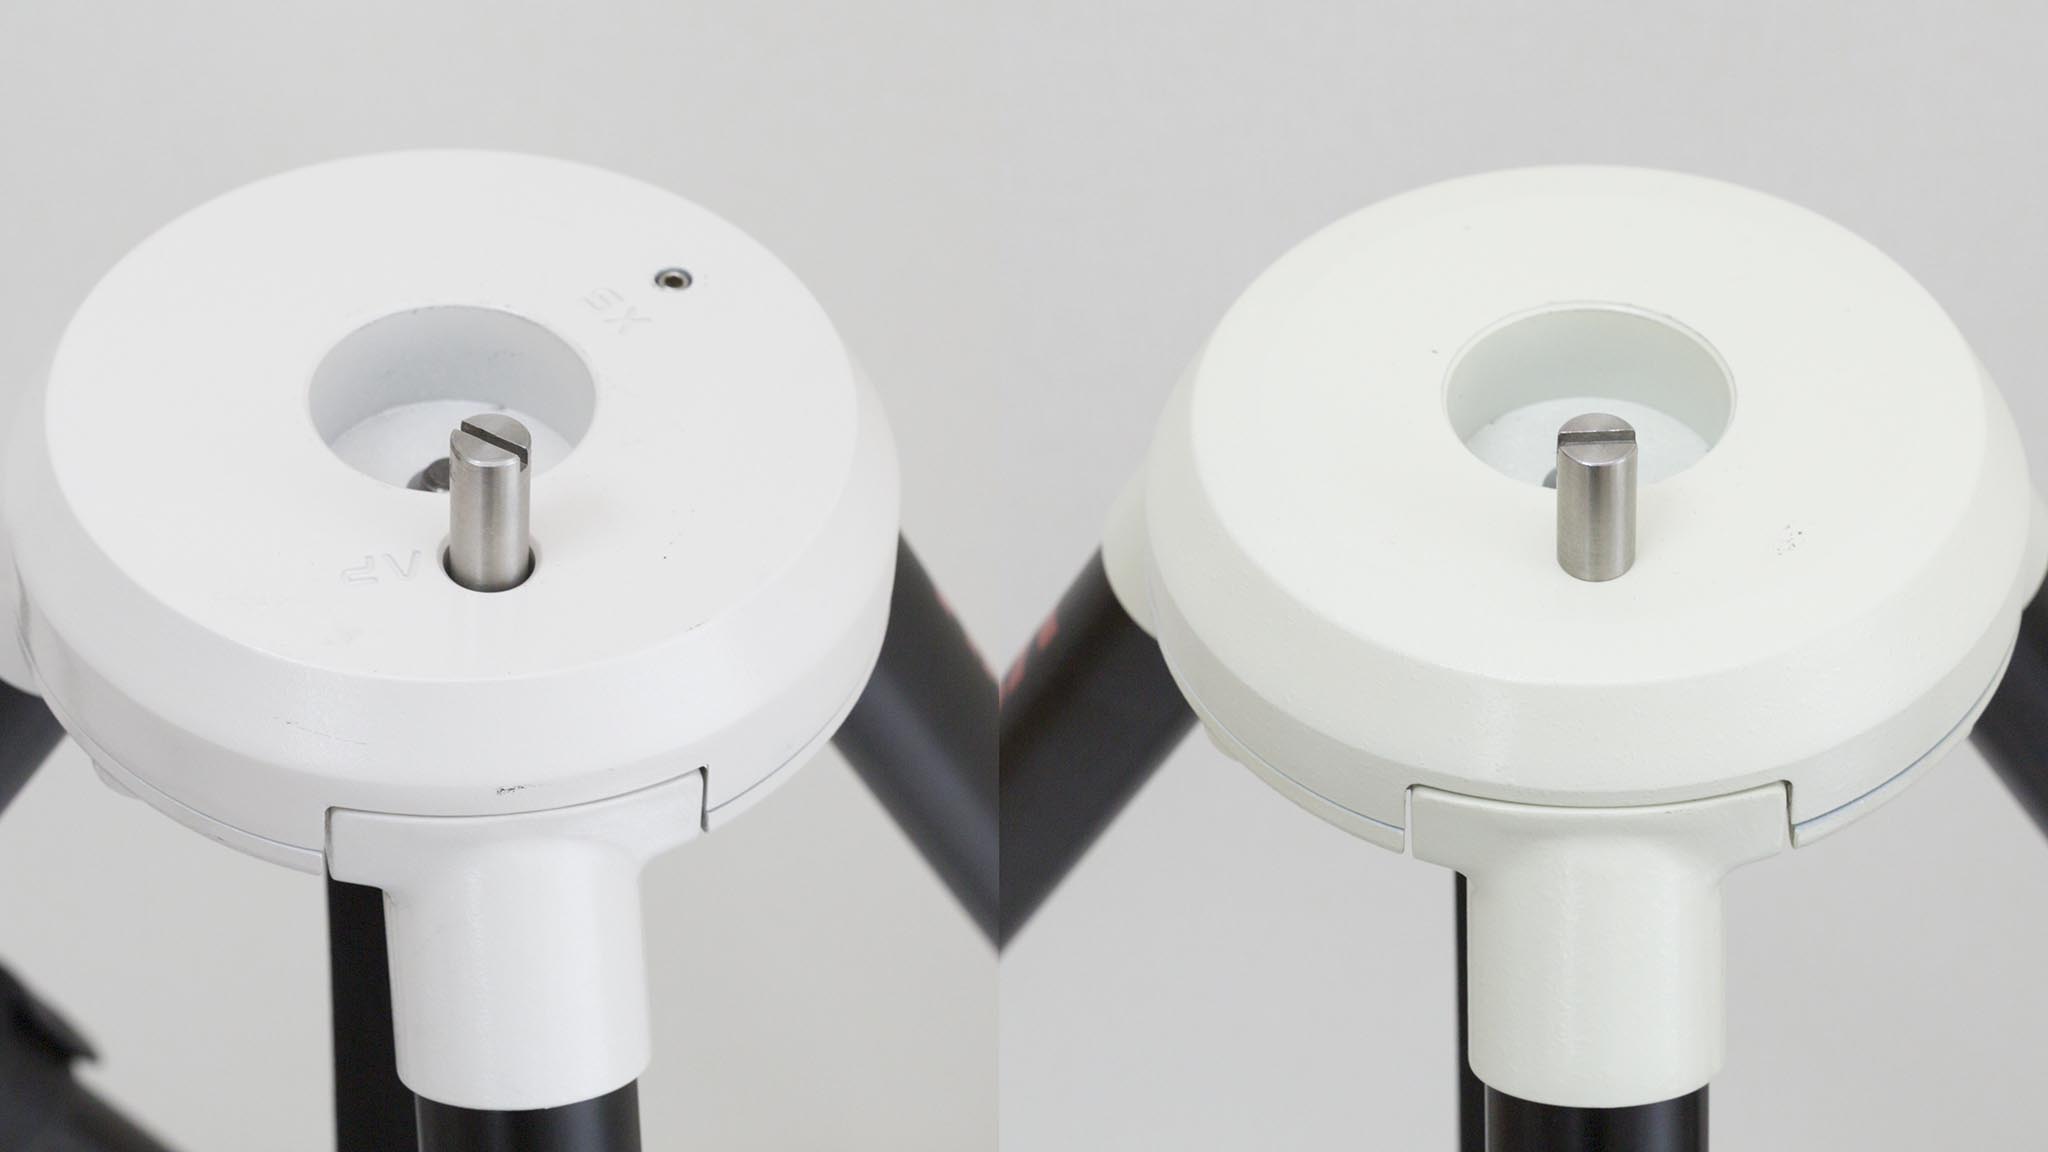
The AP tripod underwent a minor change at the end of 2018, and now has a common overhead head with the SX series tripod. The left is the improved version with two screw holes. The one on the right is before the modification, and it’s for AP only. The color has also been slightly changed to better match the color of the AP mount.
The hidden advantage of the AP mount is the wide choice of tripods. In addition, the SXG-HAL130 for SX series can be used. See also the following article on Vixen tripods(in Japanese).
https://reflexions.jp/tenref/orig/2019/01/18/7710/
ASG-CB90 Tripod
 The top is the ASG-CB90 tripod, and the first leg is covered with sponge, which is a nice consideration in cold weather. The outline is almost the same, but the legs are slightly thicker than the APP-TL130. If you use a tripod case, you may not be able to store it because of this difference.
The upper-end model of the carbon-aluminum hybrid(*) released at the end of last year is “ASG-CB90 (direct sales price 70,800 yen including tax), weighs 3.4 kg, photo above. Vixen’s main target is the AXJ and SXP2, but it can also be used with AP mounts.
(*)The ASG-CB90 tripod is slightly slimmer than the thickest pipe at 36mm in diameter, but it is reinforced with aluminum material in the second thin pipe. I felt that the strength of the tripod was comparable to the 40mm carbon tripod from other companies.
In the ASG-CB90, the telescopic system has been changed from a lever lock system to a rotary system for increased strength, and the tripod stay has been strengthened compared to the APP-TL130 (right image). The stay reinforcement in the image above may seem like a small change, but it’s much more stable than the APP-TL130. I hope that this improvement will be fed back to the APP-TL130.
 Carbon tripod ASG-CB90 + AP equatorial mount with C8. It is slightly overloaded.
I compared the amount of vibration and damping time between the APP-TL130 and the ASG-CB90 by lightly tapping the lens barrel and camera with my hand. If you have the capacity to invest a little more in an AP system and want to use it with long focal length and high magnification, I would definitely recommend the ASG-CB90(**).
(*) I felt that there was a big difference in the decay time of the vibration. We filmed a comparison video, but did not post it because it is not an objective or quantitative measurement. We are looking into whether there is a good way to evaluate “shaking resistance” caused by external factors such as wind.
It’s a great way to get the most out of your photos. It can be raised with a half-pillar, but in that case the vibration will be slightly higher.
Head Adapter
This is not an option for the AP, but a common part for Vixen AP/SX/GP tripods, but I would like to introduce one item that is quite useful. It’s a head adapter (direct sales price 5,184 yen including tax).

This adapter attaches the camera head (1/4″ screw) to a Vixen tripod. The bottom is engraved the step for both 45mm diameter and 60mm diameter, and can be fixed to the tripod with the M10 screw in the state with the horn. 1/4 inch screw is a little short and there is a place a little uncomfortable, but I felt that there was no big problem if it was the mounting of small equipment.
This adapter can be used to attach 1/4″ and 3/8″ parts not only to Vixen tripods but also to other GP-compatible tripods. In the image above, the SWAT equatorial mount is installed via the ALCUSIS clamps. The tripod on the right is a 60mm diameter Sky-Watcher EQ5 tripod of the old GP standard.
(*)This part also has 35mm spaced screw holes so that I can make a firm two-point stop.
Similar adapters are also available from other companies. Unitech’s product is only for 45mm diameter, but with 3/8 thick thread, it is more stable(*). Kasai Trading’s product is a little heavier, but it has a 3/8 thick thread and can be used for both 45/60mm.
These adapters allow you to use Vixen tripods for a wide variety of applications, which are much more astronomical than camera tripods.
Great ! The Legend of AP(Advanced Polaris) -2-
Great! Lightweight 2-axis autoguide system
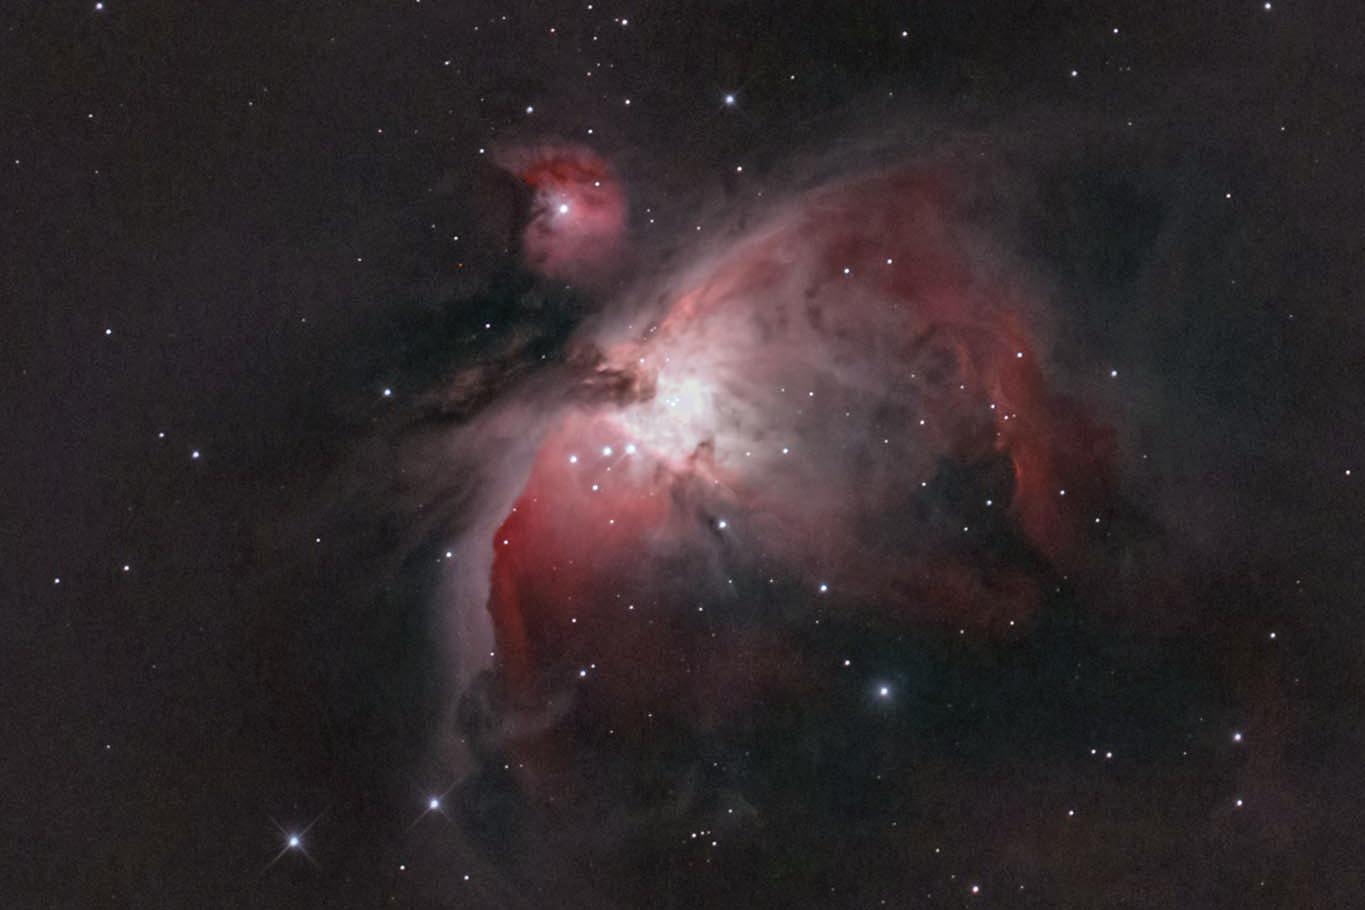
The AP system is a small and lightweight equatorial mount, but I was able to use it with autoguide it to guide up to 600mm without any problem(*). The image above was taken with the Sky-Watcher BKP130 (with a frame collector attached and a focal length of about 630mm) and a CMOS camera, ASI294MC. This is a modified 2-axis drive system (see below) and is autoguided by ASI AIR (**).
(**)AP-mounted stock motor modules are not compatible with ASI AIR. To auto guide, connect the ST4 guide cable to Star Book One.
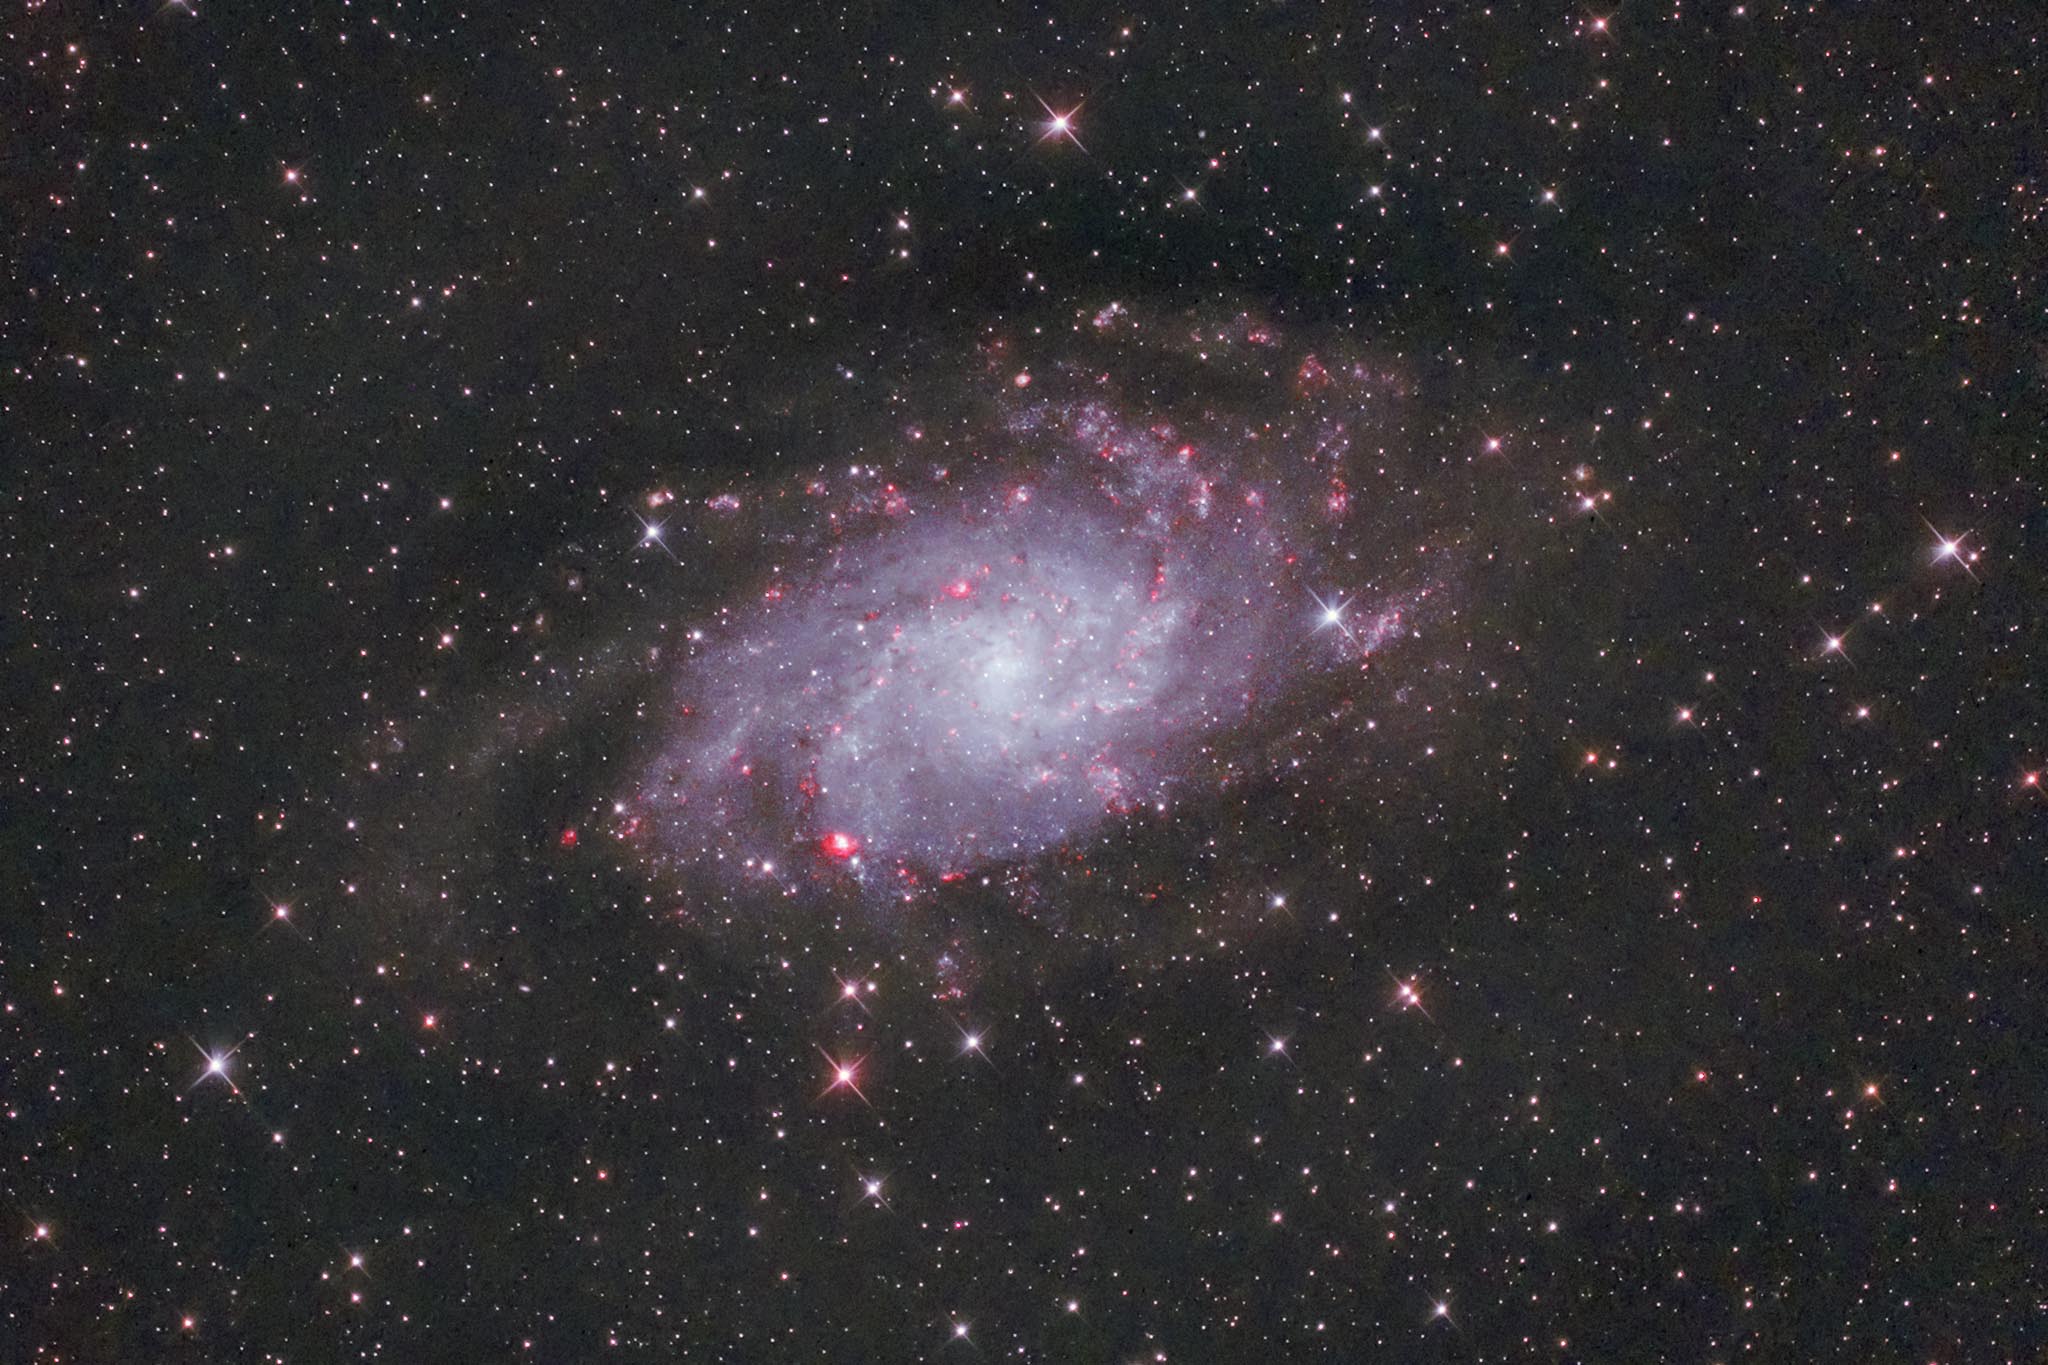 Triangle M33 Sky-Watcher BKP130 F5 frame collector ASI294MC LPS-V4 5min*30 Ha 7nm 5min*21 Total 255min AP Equatorial Mount (modified for automatic introduction) taken by ASI120mm mini ASIAIR Koishiwara, Fukuoka
The result of the above configuration example with a 5-minute exposure per frame, but with no particular flow and good guidance. For faint objects and long exposures with low light levels, such as narrow bands, the Autoguide is a powerful tool.
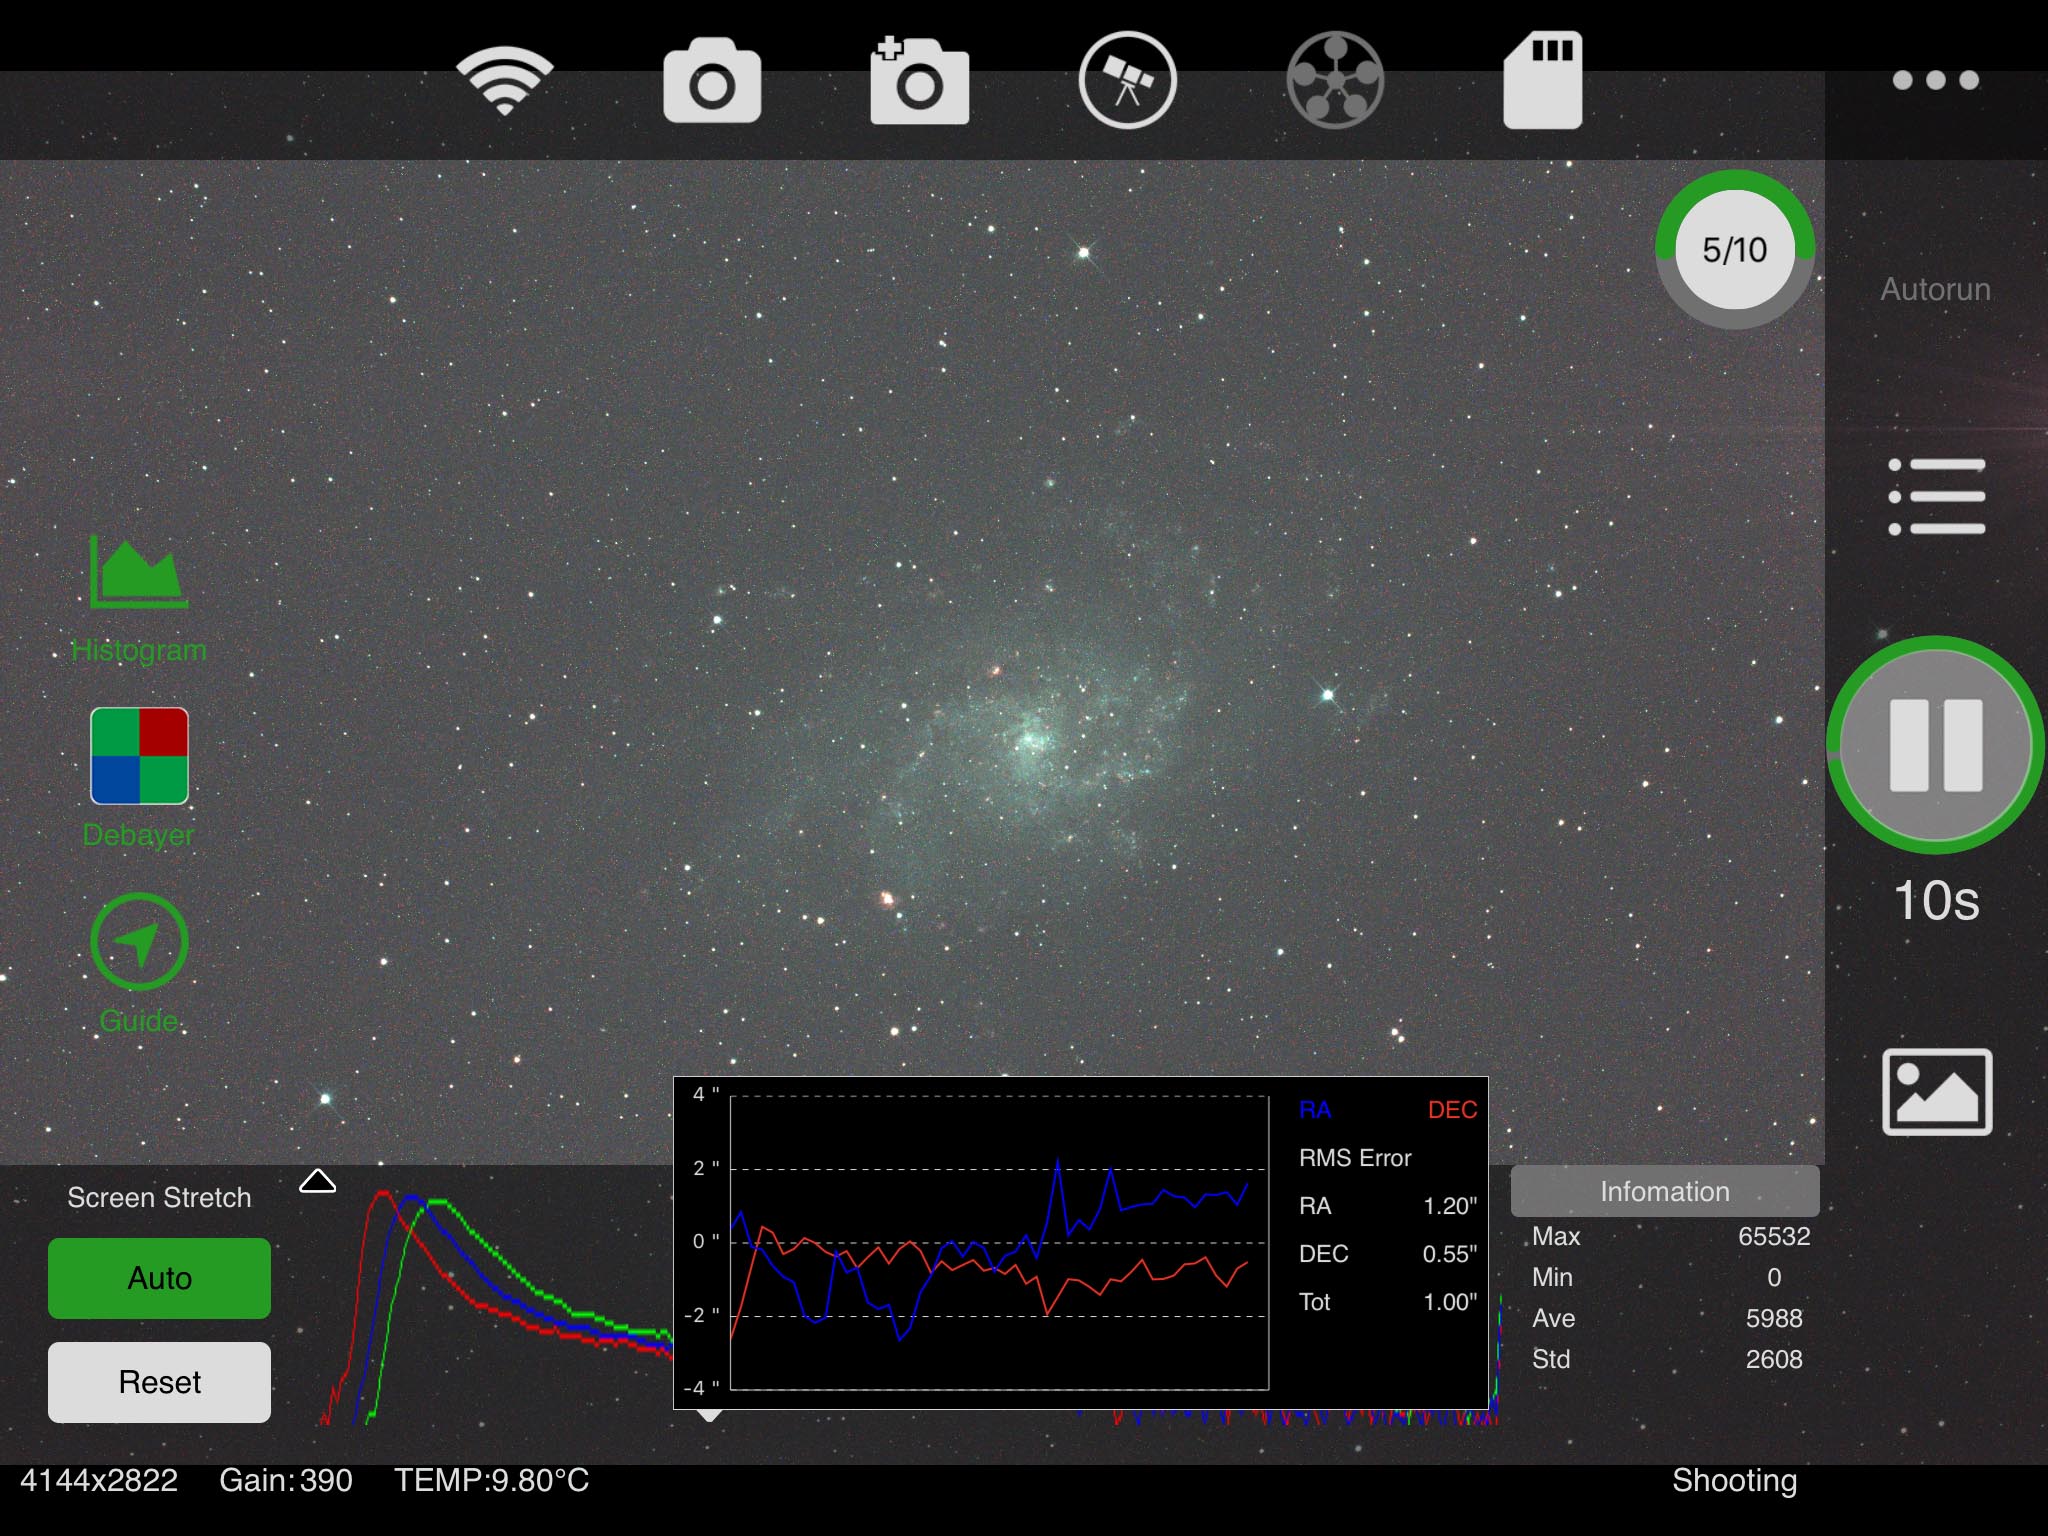
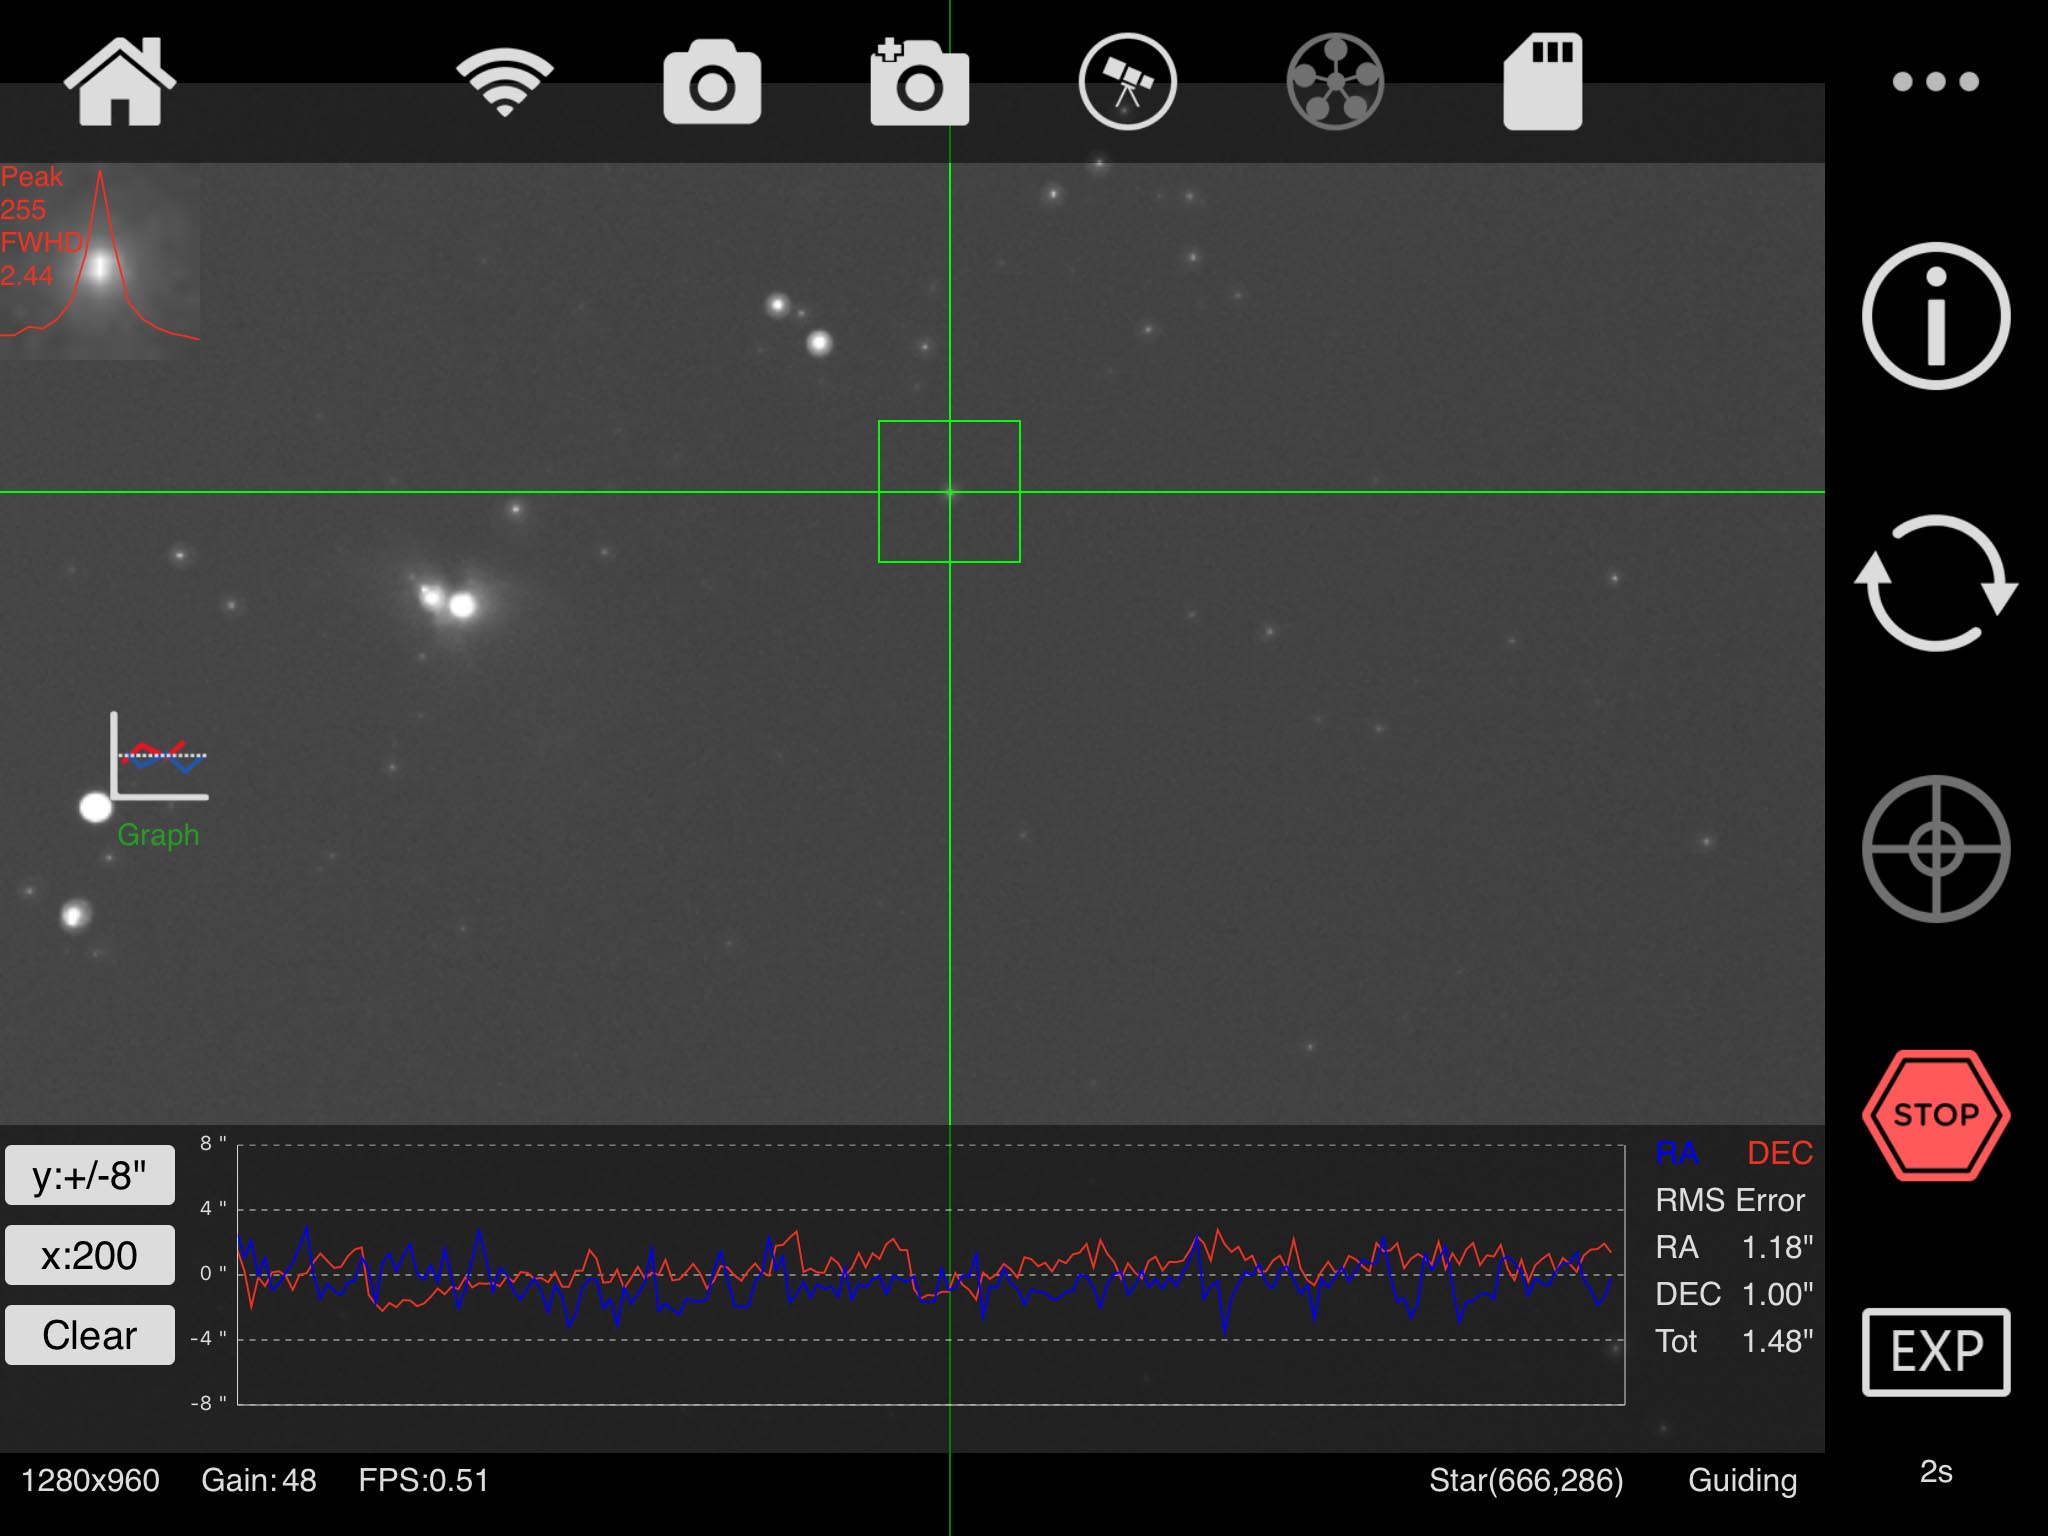
Screen and guide graph during imaging. It’s not a heavy weight stand, so it’s not strong against the wind, but it has good guide accuracy and response to guide signals. In all the years I’ve used it, both no-guide and autoguide, I’ve had consistent yields. The total RMS error was about 1 arc second (*).
(*)I didn’t exactly measure the periodic motion in the direction of the equatorial longitude, but it felt like about ±8 arc seconds at most. However, especially for smaller equatorial instruments, I feel that the ability to follow the guide signal is far more important than the gear-specific piliodic motion. This can vary greatly depending on the direction of the lens barrel, the balance and the transmission mechanism of the motor. I also use SXP equatorial mount, but I don’t really feel that either of them is clearly better in terms of accuracy, except for wind resistance and load capacity.
Great! The portable system
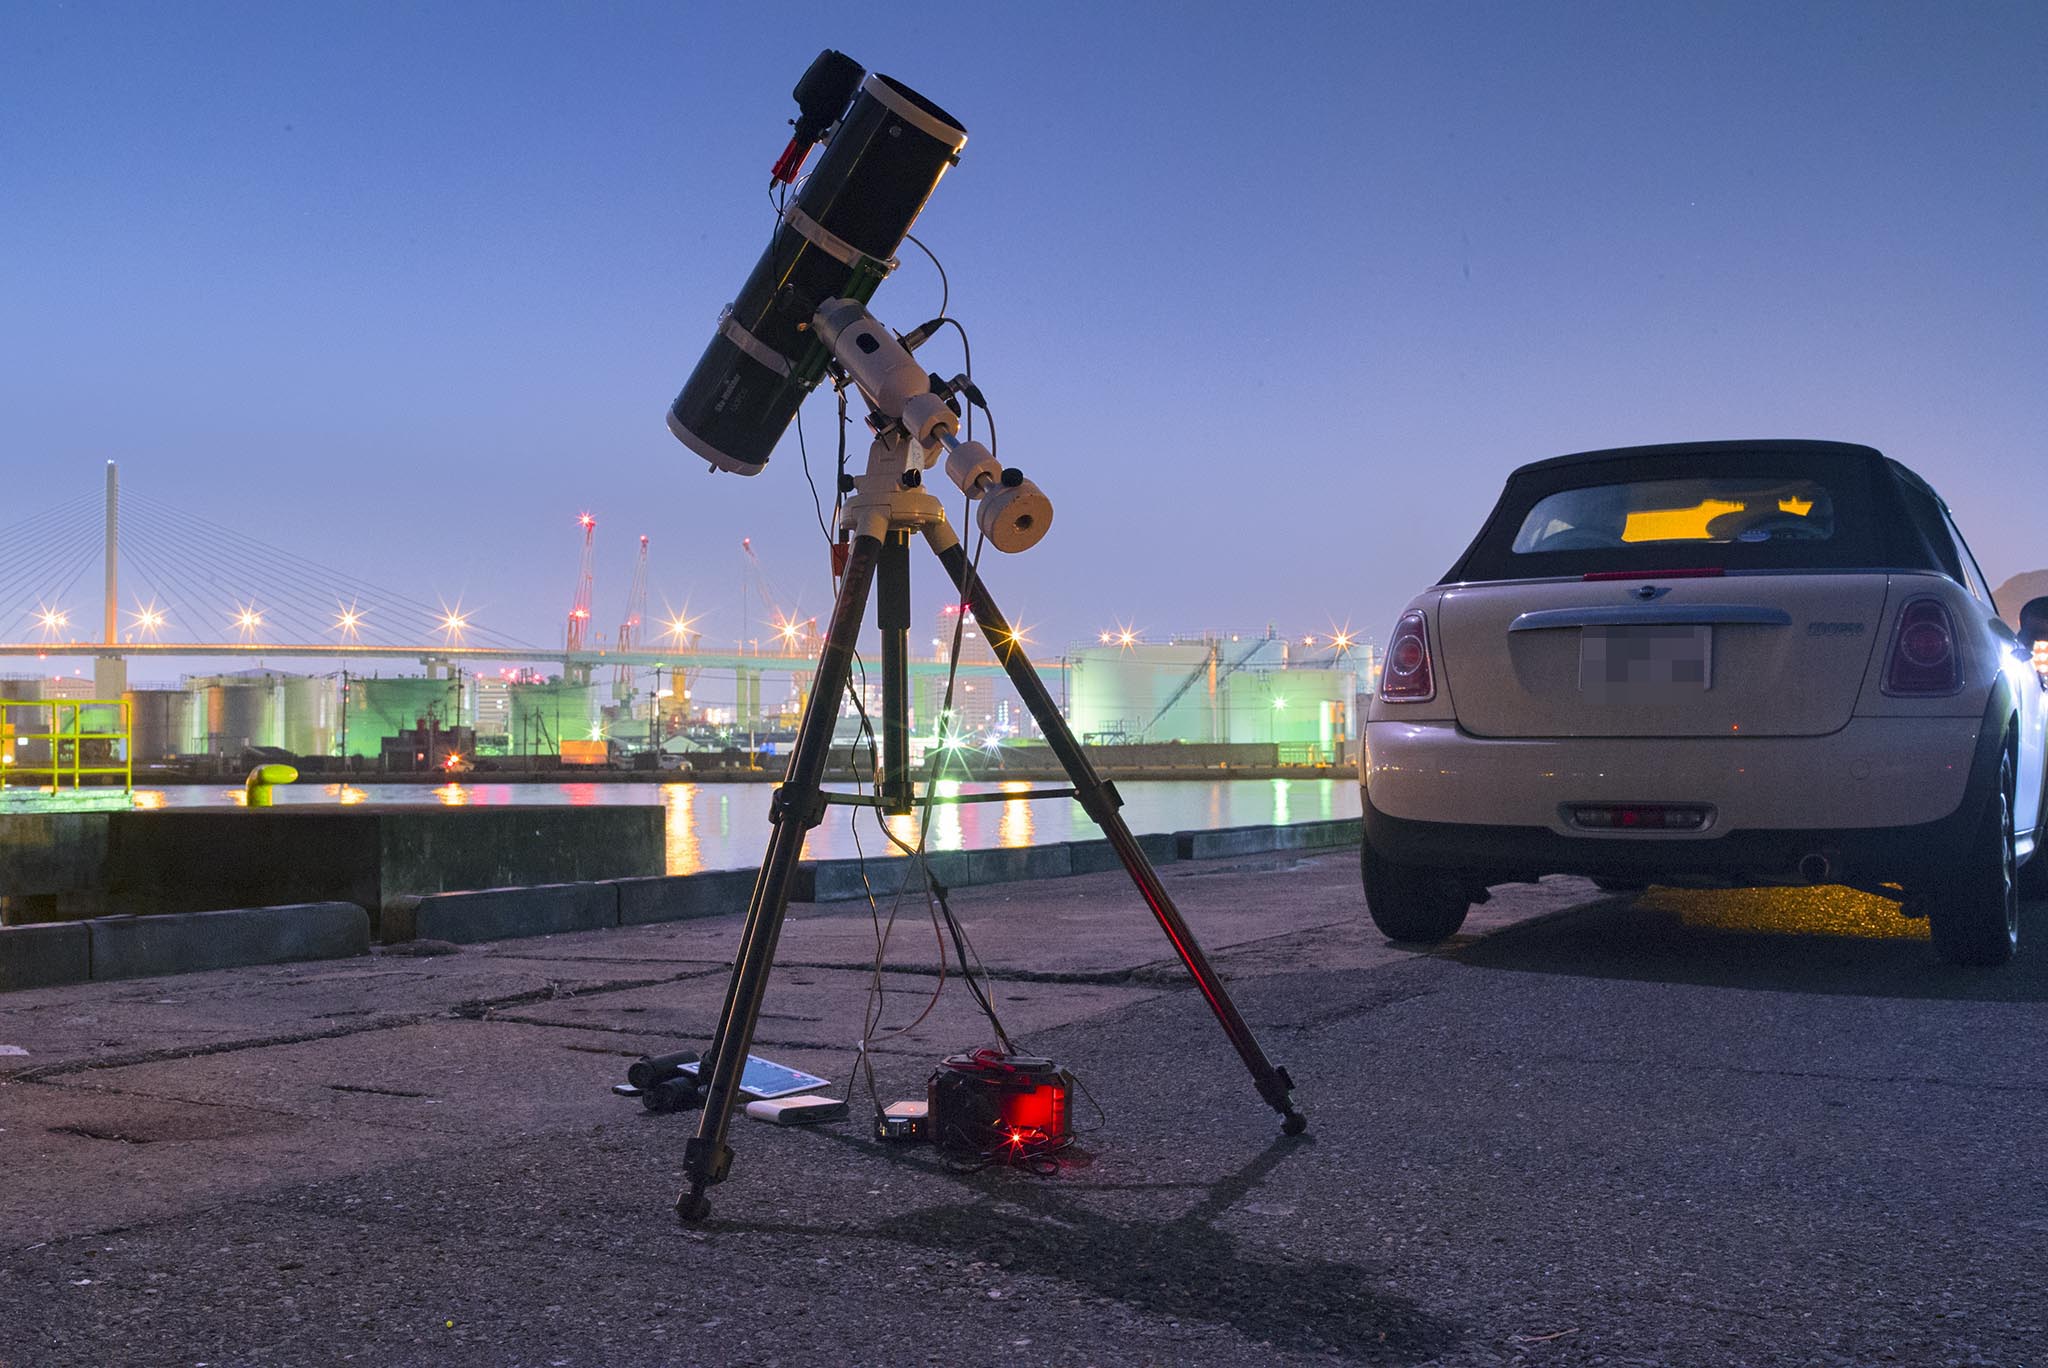
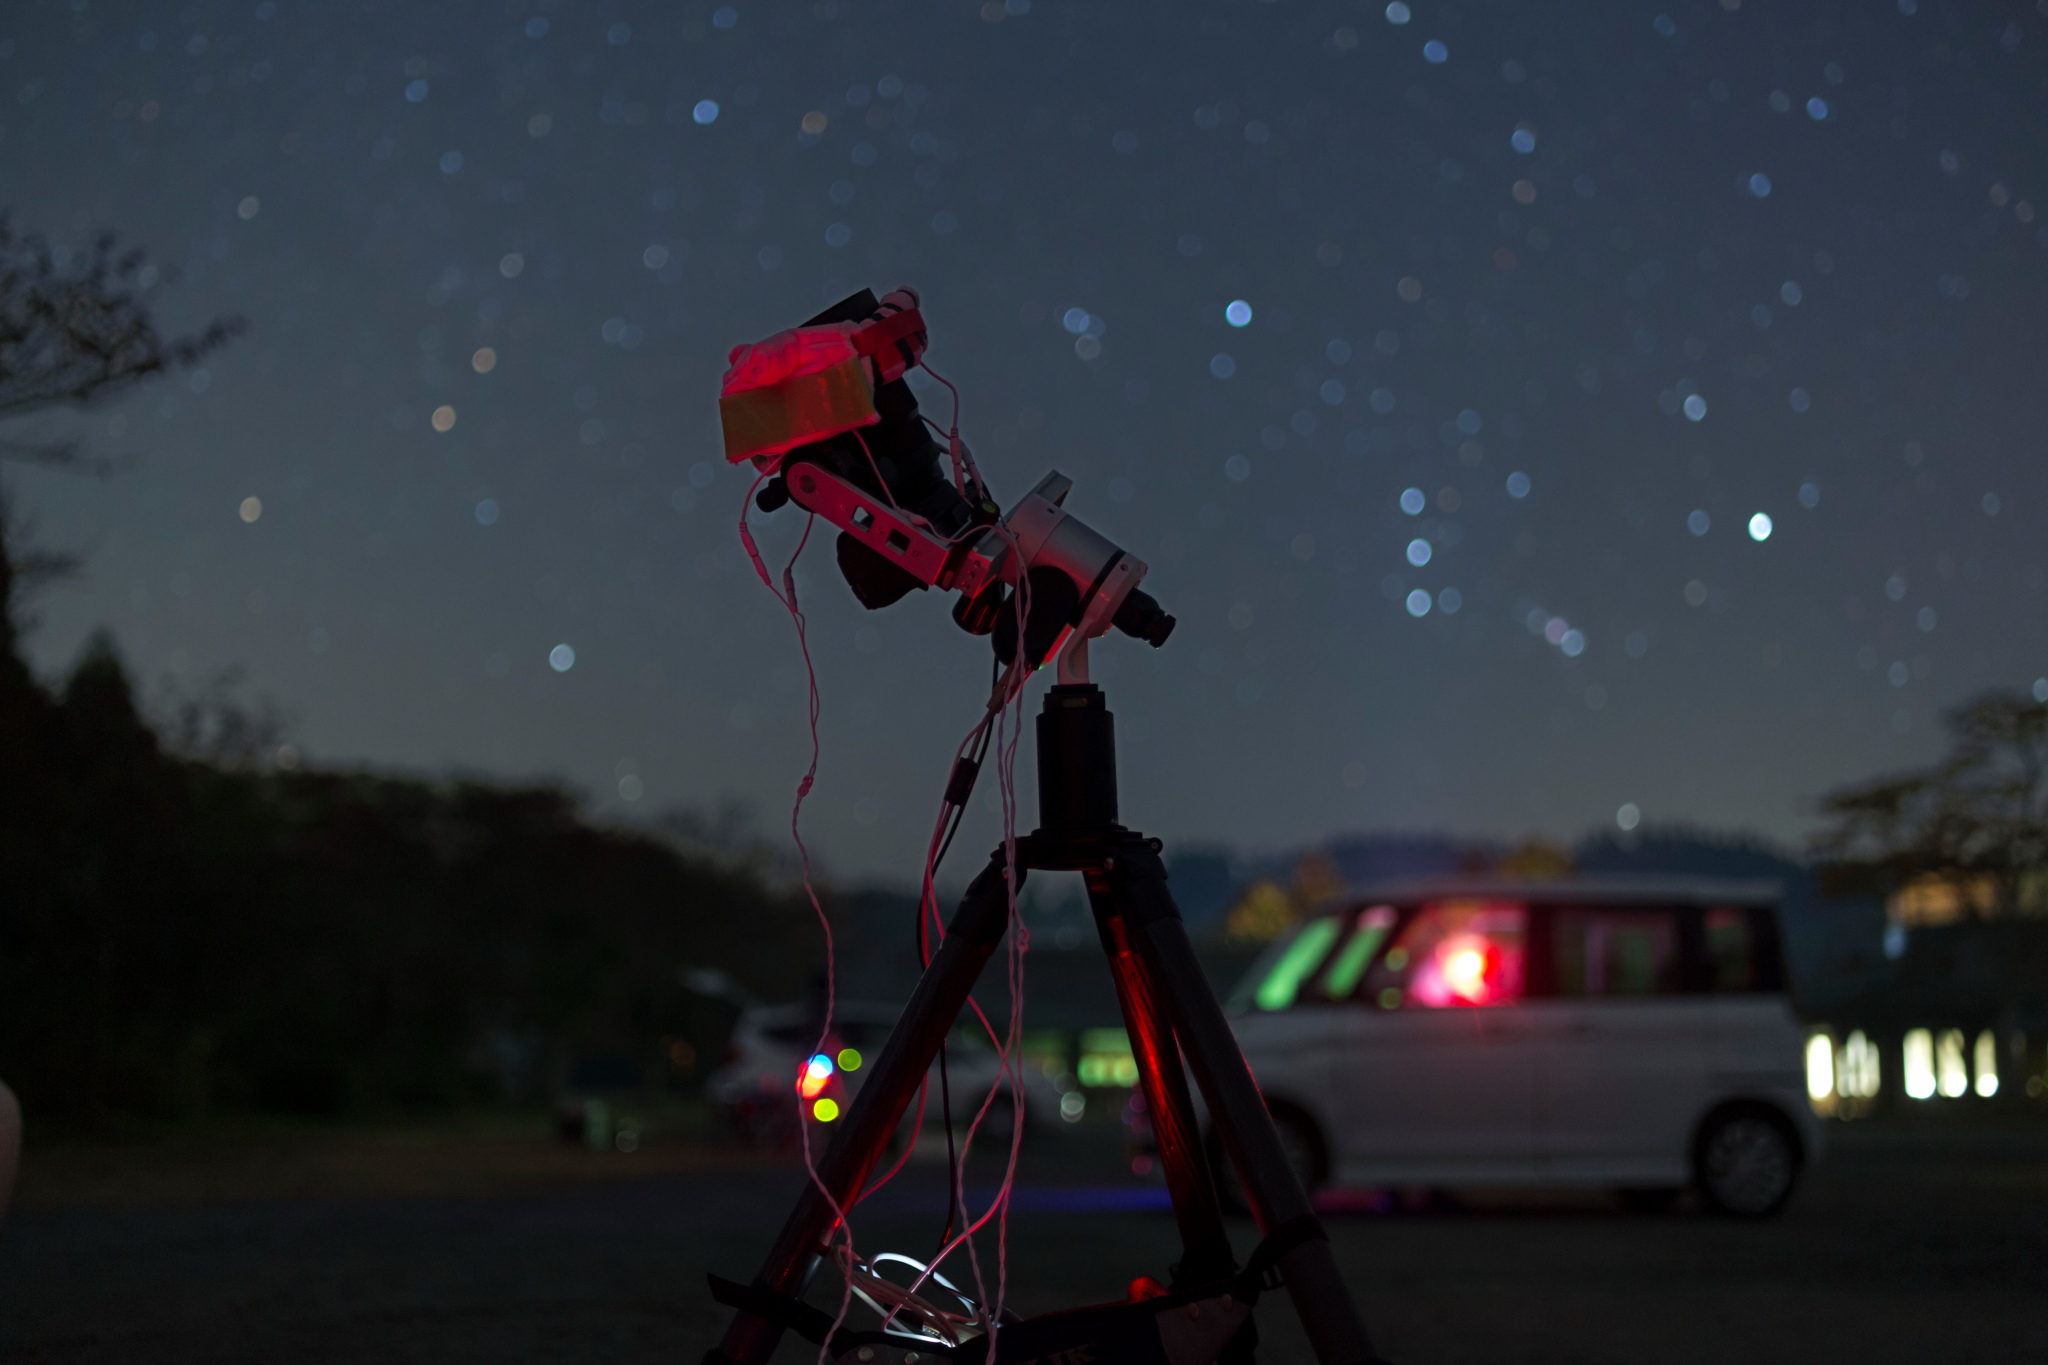
The mobility of the AP mount also comes into full play when shooting in the neighborhood. I moved a few kilometers from my house to a place where I could see the North Star and the Orion constellation in the south. The stand was removed with only the weight axle, and the tripod was folded up and stored in the back seat of the car for transport. Just spread the legs and it can be installed immediately. The benefits of a small system.
 BKP130+F5 Komakore ASI AIR ZWO120mmF4 Guide Scope ASI120MM mini LPS-V4 120sec*30 Gain120 ,Gain 0 10sec*60 dark*10 No flat ASI294MC AP Equatorial Mount (automatic introduction modification) Trimming
It’s a full moon city, so the pale parts don’t come out at all, but it’s woven in. I was satisfied with the fact that I separated four Trapeziums ^^^ It was a great harvest to know that I could go out and take pictures in the vicinity with ease, and it made me realize how much I appreciate lightweight equipment.
 ASI AIR screen. It uses a modified drive unit. The stock AP mount motor module is not compatible with the ASI AIR.
The guide graph looks like this. Maybe it was because of the wind, it was jagged and the RMS was not good (1.48sec angle), but there was no noticeable rampage and there were no frames to be discarded.
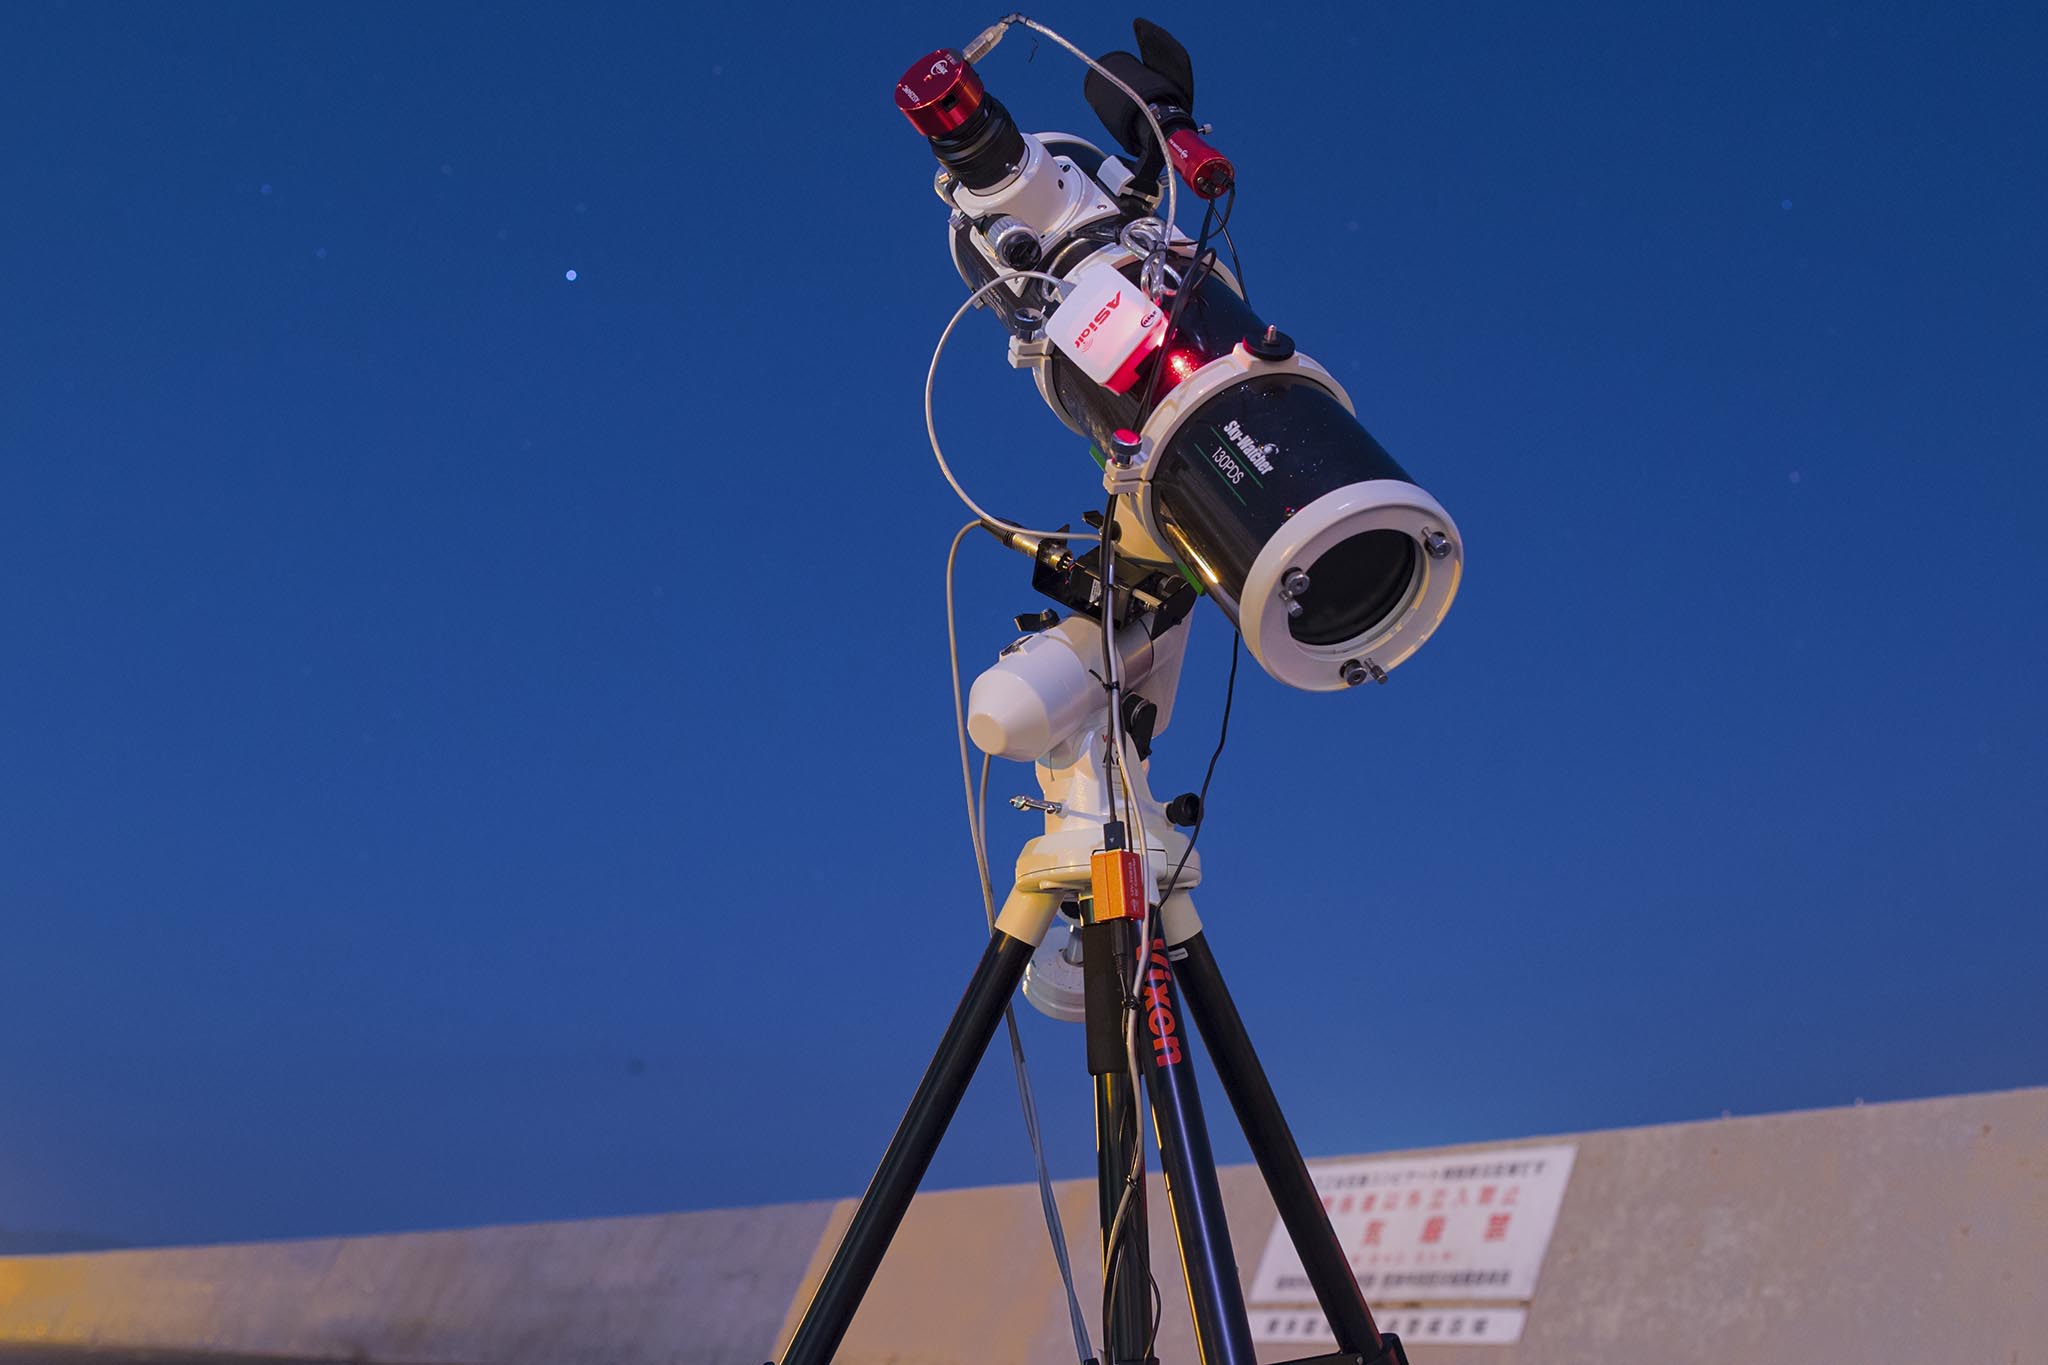 The heroic figure against the blue sky of the full moon^^v
is also a good subject for equipment portraits.
Great! lightweight star tracker
 The polar axis fine-tuning device was not used, but was adjusted with the rotation of the tripod seat and the tripod adjuster. The reason he looks a little bowed down is because he was filmed in Kyushu ^^^;
The advantage of an AP mount is that you can flexibly reconfigure the system according to the time and situation. The lightest configuration “AP Starry Sky Head(*)” with “Cantilevered Fork Configuration”. The cantilevered fork configuration is a very effective configuration for portable equatorial globes. Although the center of gravity is biased to the north, it is offset by the advantage of not needing weights and reducing the total load on the polar axis, and there is no dead angle in the whole sky and no meridian inversion.
(*) In terms of ease of recombination of the configuration and simplicity of the parts configuration, the “AP Photo Guider” configuration, which uses the polar axis unit as is, may be easier to use.
At first glance, the arm supporting the polar axis of the AP Nebula is thin and looks strong, but it was not so at all (**). This configuration will probably be fine at 200mm.
(**)For example, the Zeiss equatorial mount has a similarly slender pillar that receives the polar axis body and appears to be insufficient in strength, but in fact, it is quite the opposite and has great stability.
 The diffuse nebula from the constellation of Pisces to the constellation of Yamaneko EOS6D SIGMA 105mmF1.4 F2.0 RGB 1min*50 short second (-5EV)*15 Astro Duo 4min*36 short second (-5EV)*15 AP Equatorial Mount
Result of the above configuration, using STC’s “Astro Duo narrowband filter“. Since it is a narrow band filter, it has a long exposure of 4 minutes. The lens is the heavyweight Sigma 105mm F1.4Art, and at this weight and focal length, it’s hard to expect high yields with the normal configuration of the Polarier, such as the Potah Red, but with the AP mount, the guide yield is 100%.
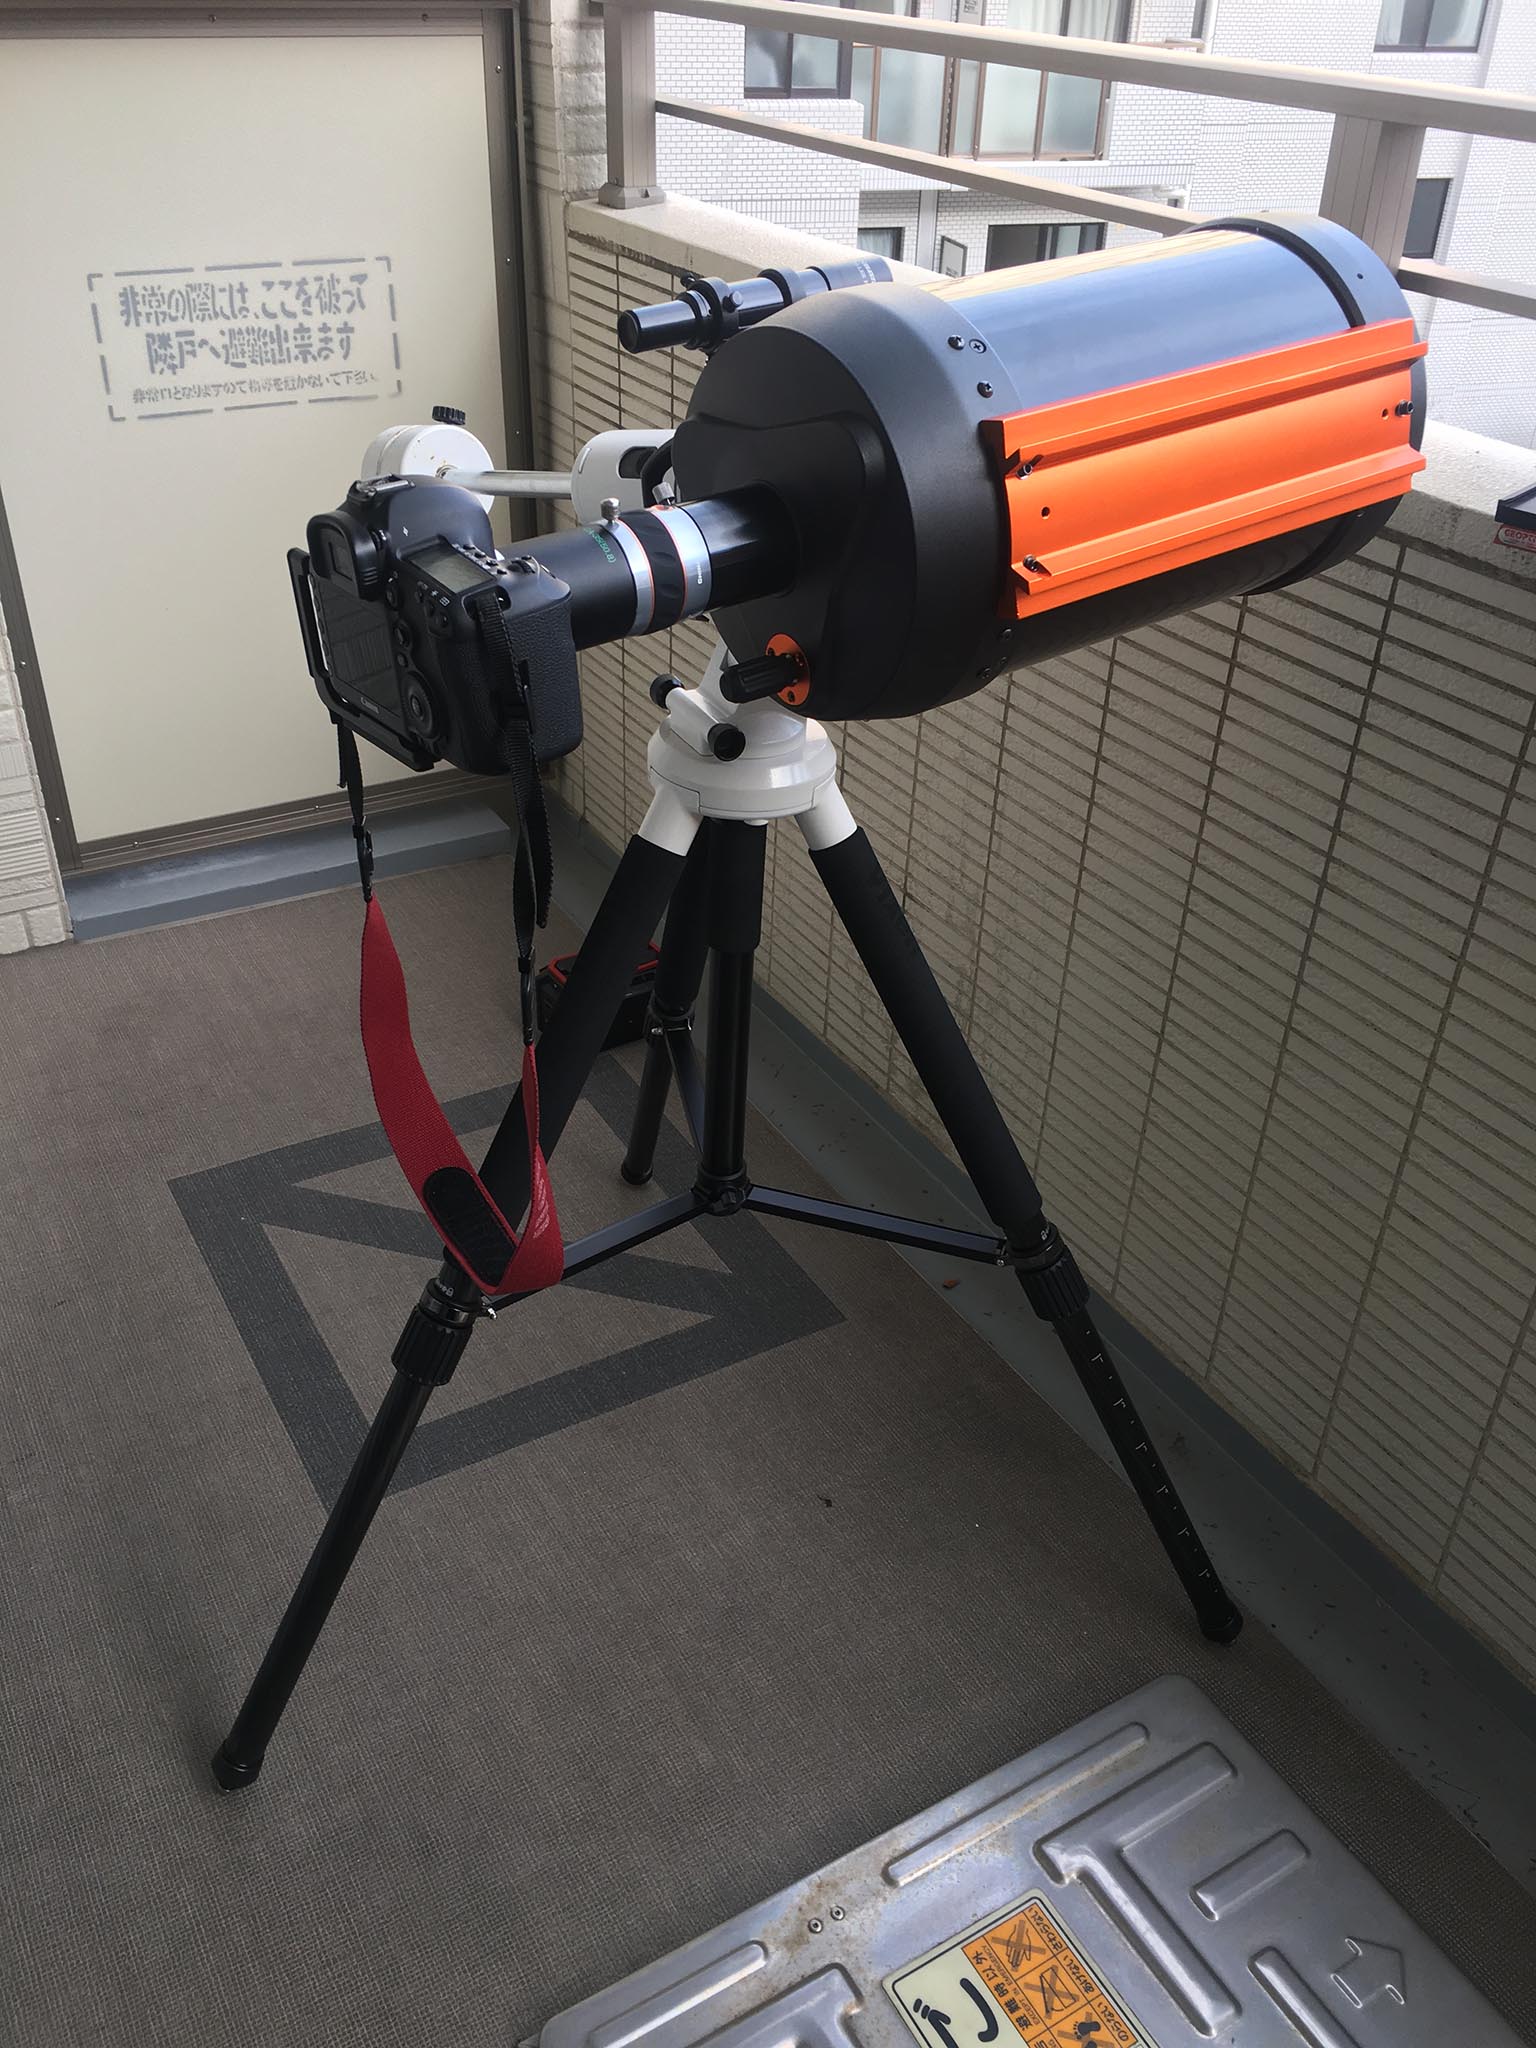
Great ! at Veranda
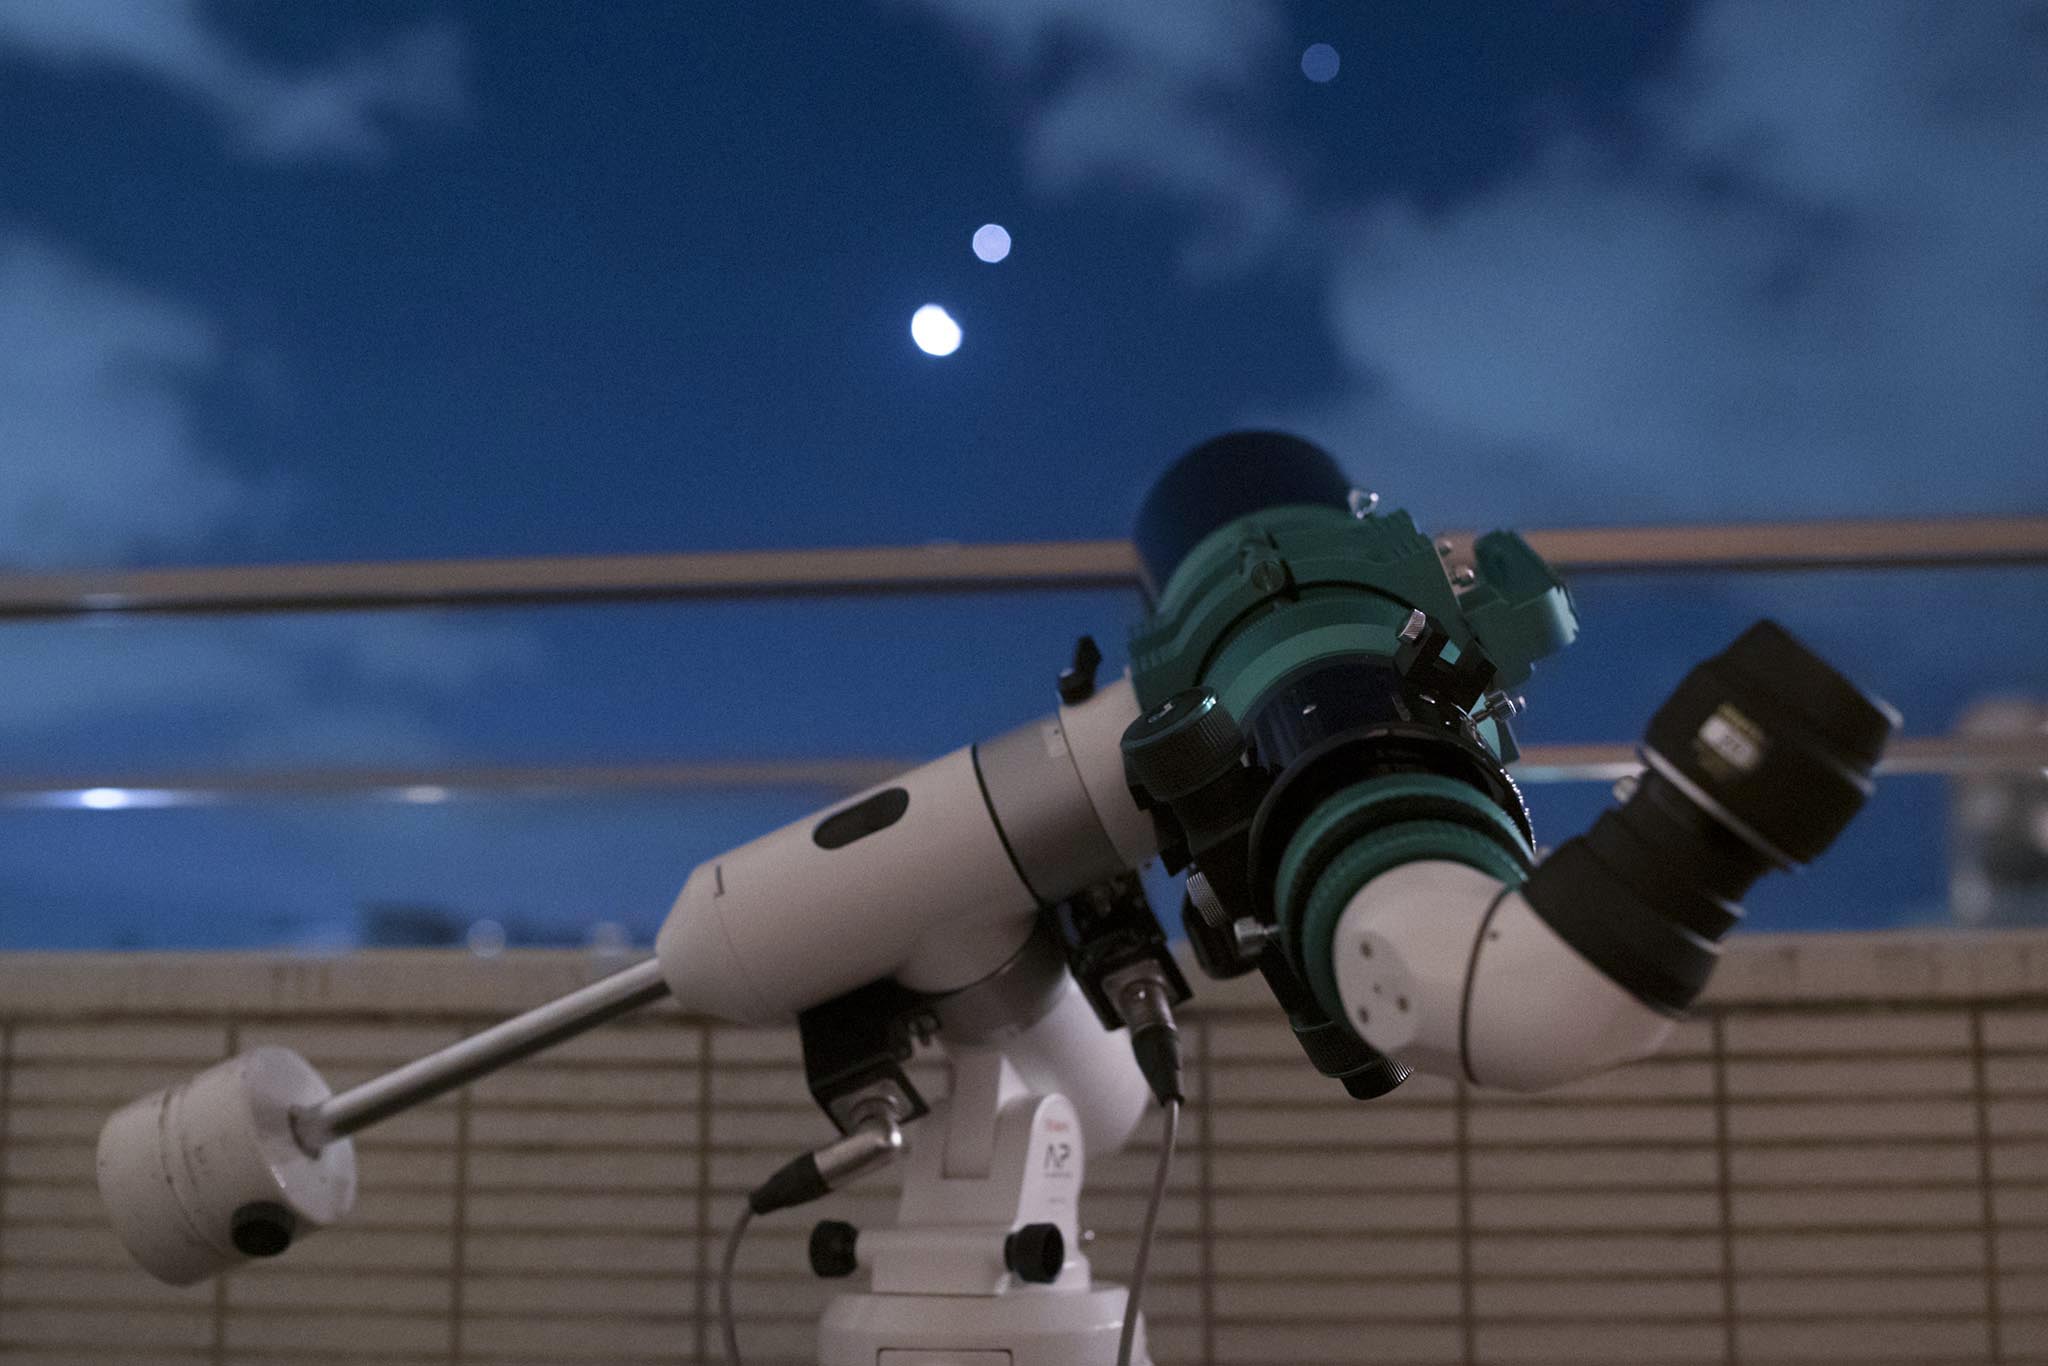 The moon, Venus, and Jupiter before dawn. I woke up early in the morning to find my first planets of the season. The optical tube is a three-element apo FOT104.
It’s a phrase we often hear: “Frequently used equipment is the best equipment. No matter how high the accuracy and stability are, if the size and weight are too heavy to be used casually, or if the configuration is too complicated and takes too much time to use, the frequency of firing will naturally decrease. It’s the same whether it’s a “home garden” or a “veranda”.
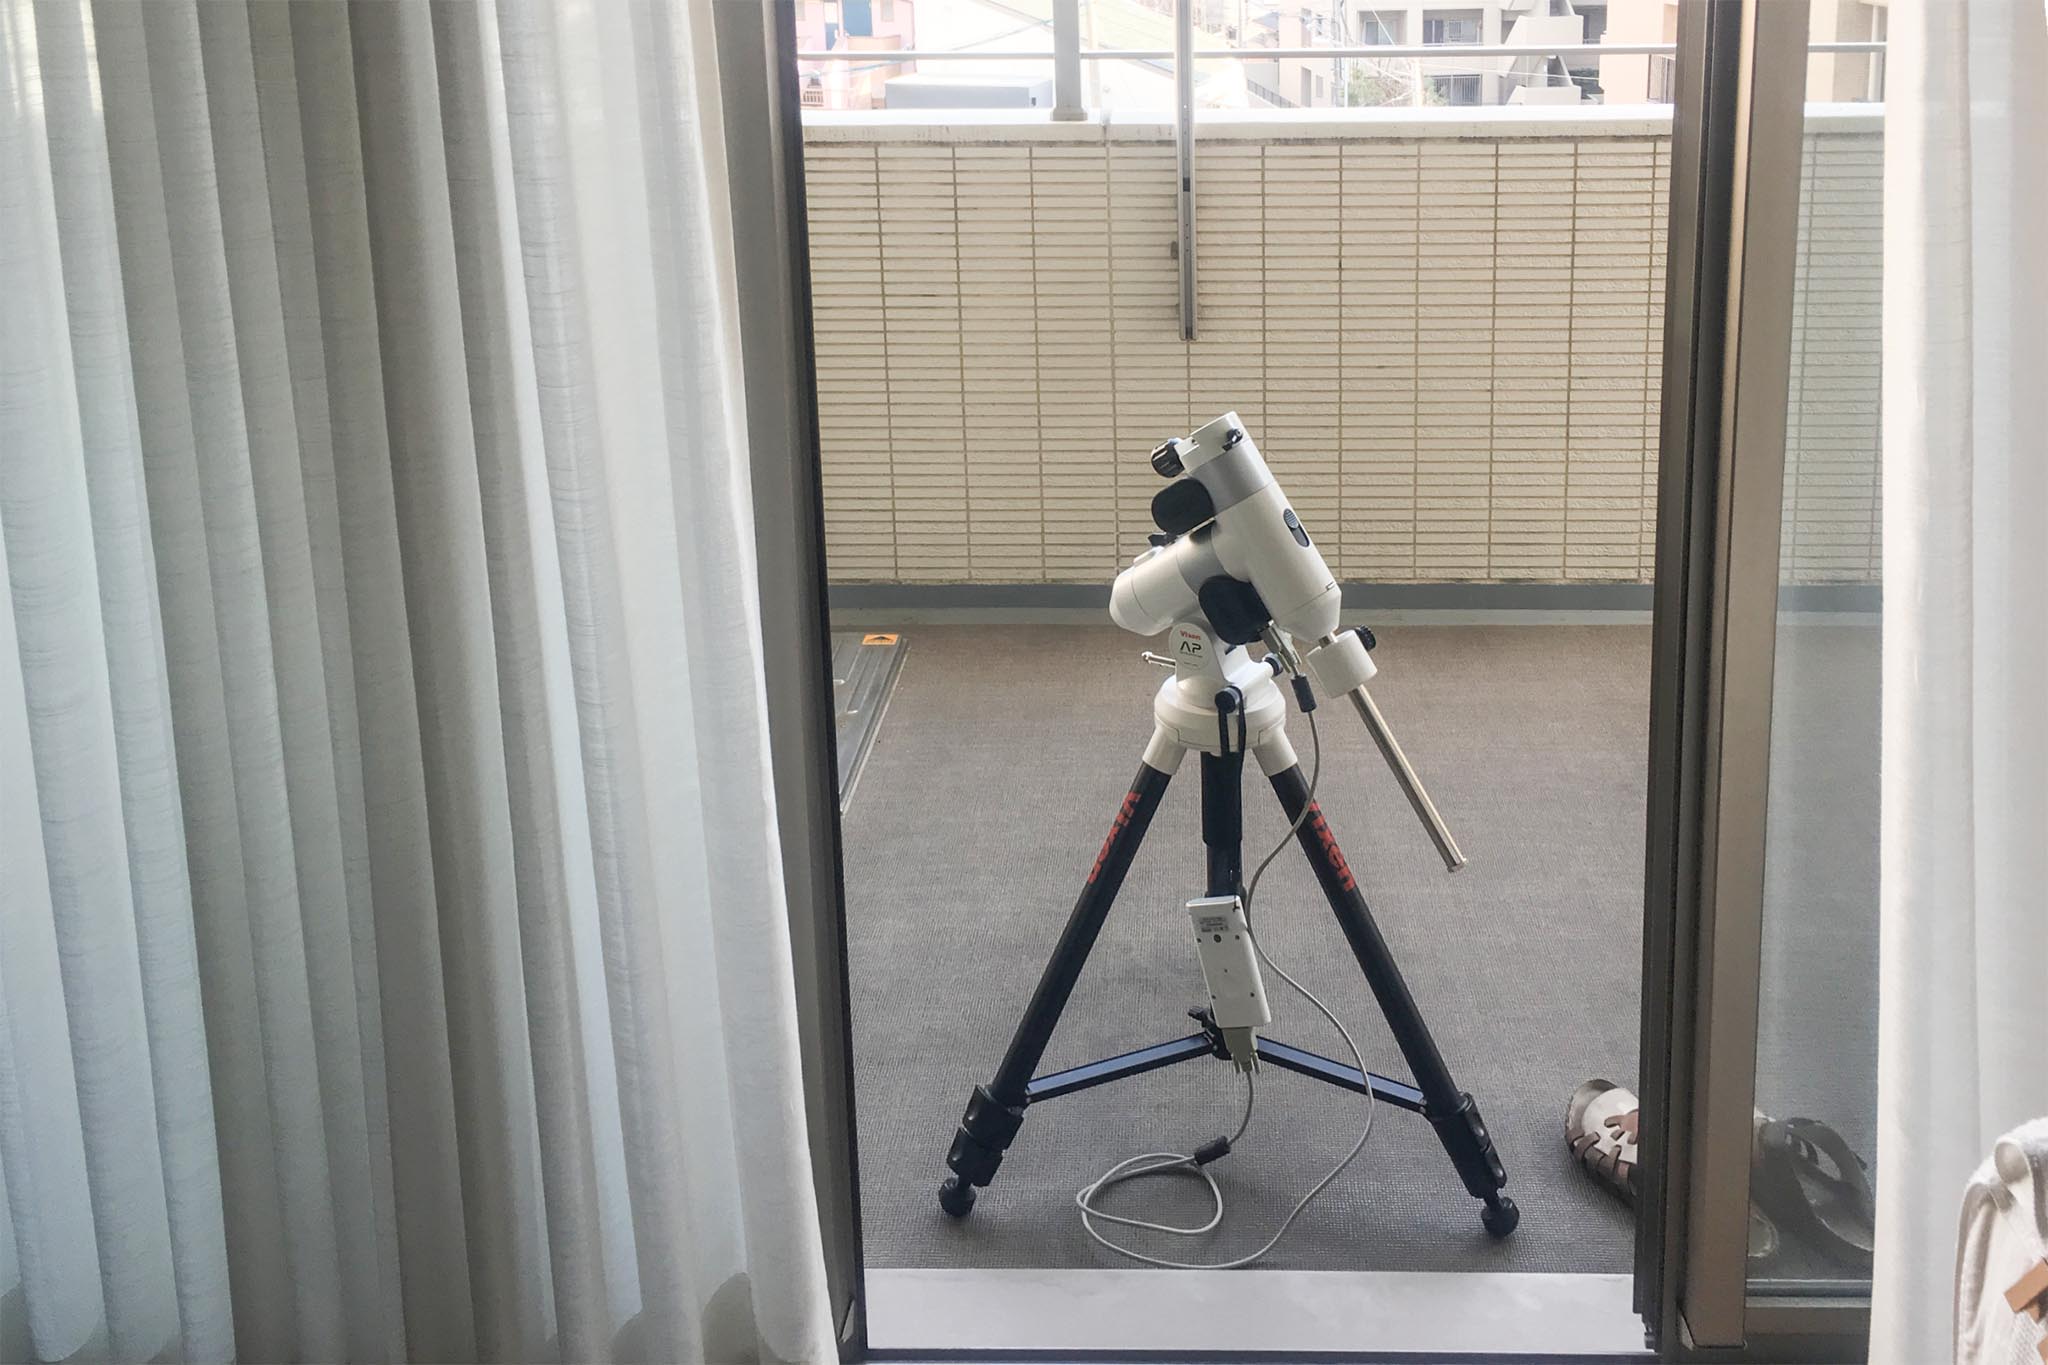 By shrinking the tripod, you can easily pass through the corridor and windows.
In this respect, the AP mount is very simple. If you shrink the tripod down when it’s assembled, it won’t get in the way when you put it in the corner of the room. Just take it out, stretch out your legs, plug in your mobile battery, and you’re ready to go. Since there is no automatic introduction, there is no need for alignment (*). It’s mostly just to the north.
(*)When I sent SXP to the veranda for a quick look at the automatic introduction, I’m pretty worried about whether to do alignment or not^^^;;

The good thing about the AP mount is that it can be used as an ordinary astronomical telescope with an ordinary lens barrel attached. “Veranda’s strongest! I give you the title of
Single axis drive equatorial mount configuration (AP photo guider)
The “systematic” nature of the AP mount comes alive in this configuration. As a set product, it comes in the form of a AP Photo Guider (direct sales price 144,720 yen including tax)(*). We can take away the declination axis and freely attach parts to the declination head to meet various needs, but let’s look at that specifically.
(*)There are some parts below that are not included in this standard set, so please check the specific part configuration when you purchase.
Basic structure
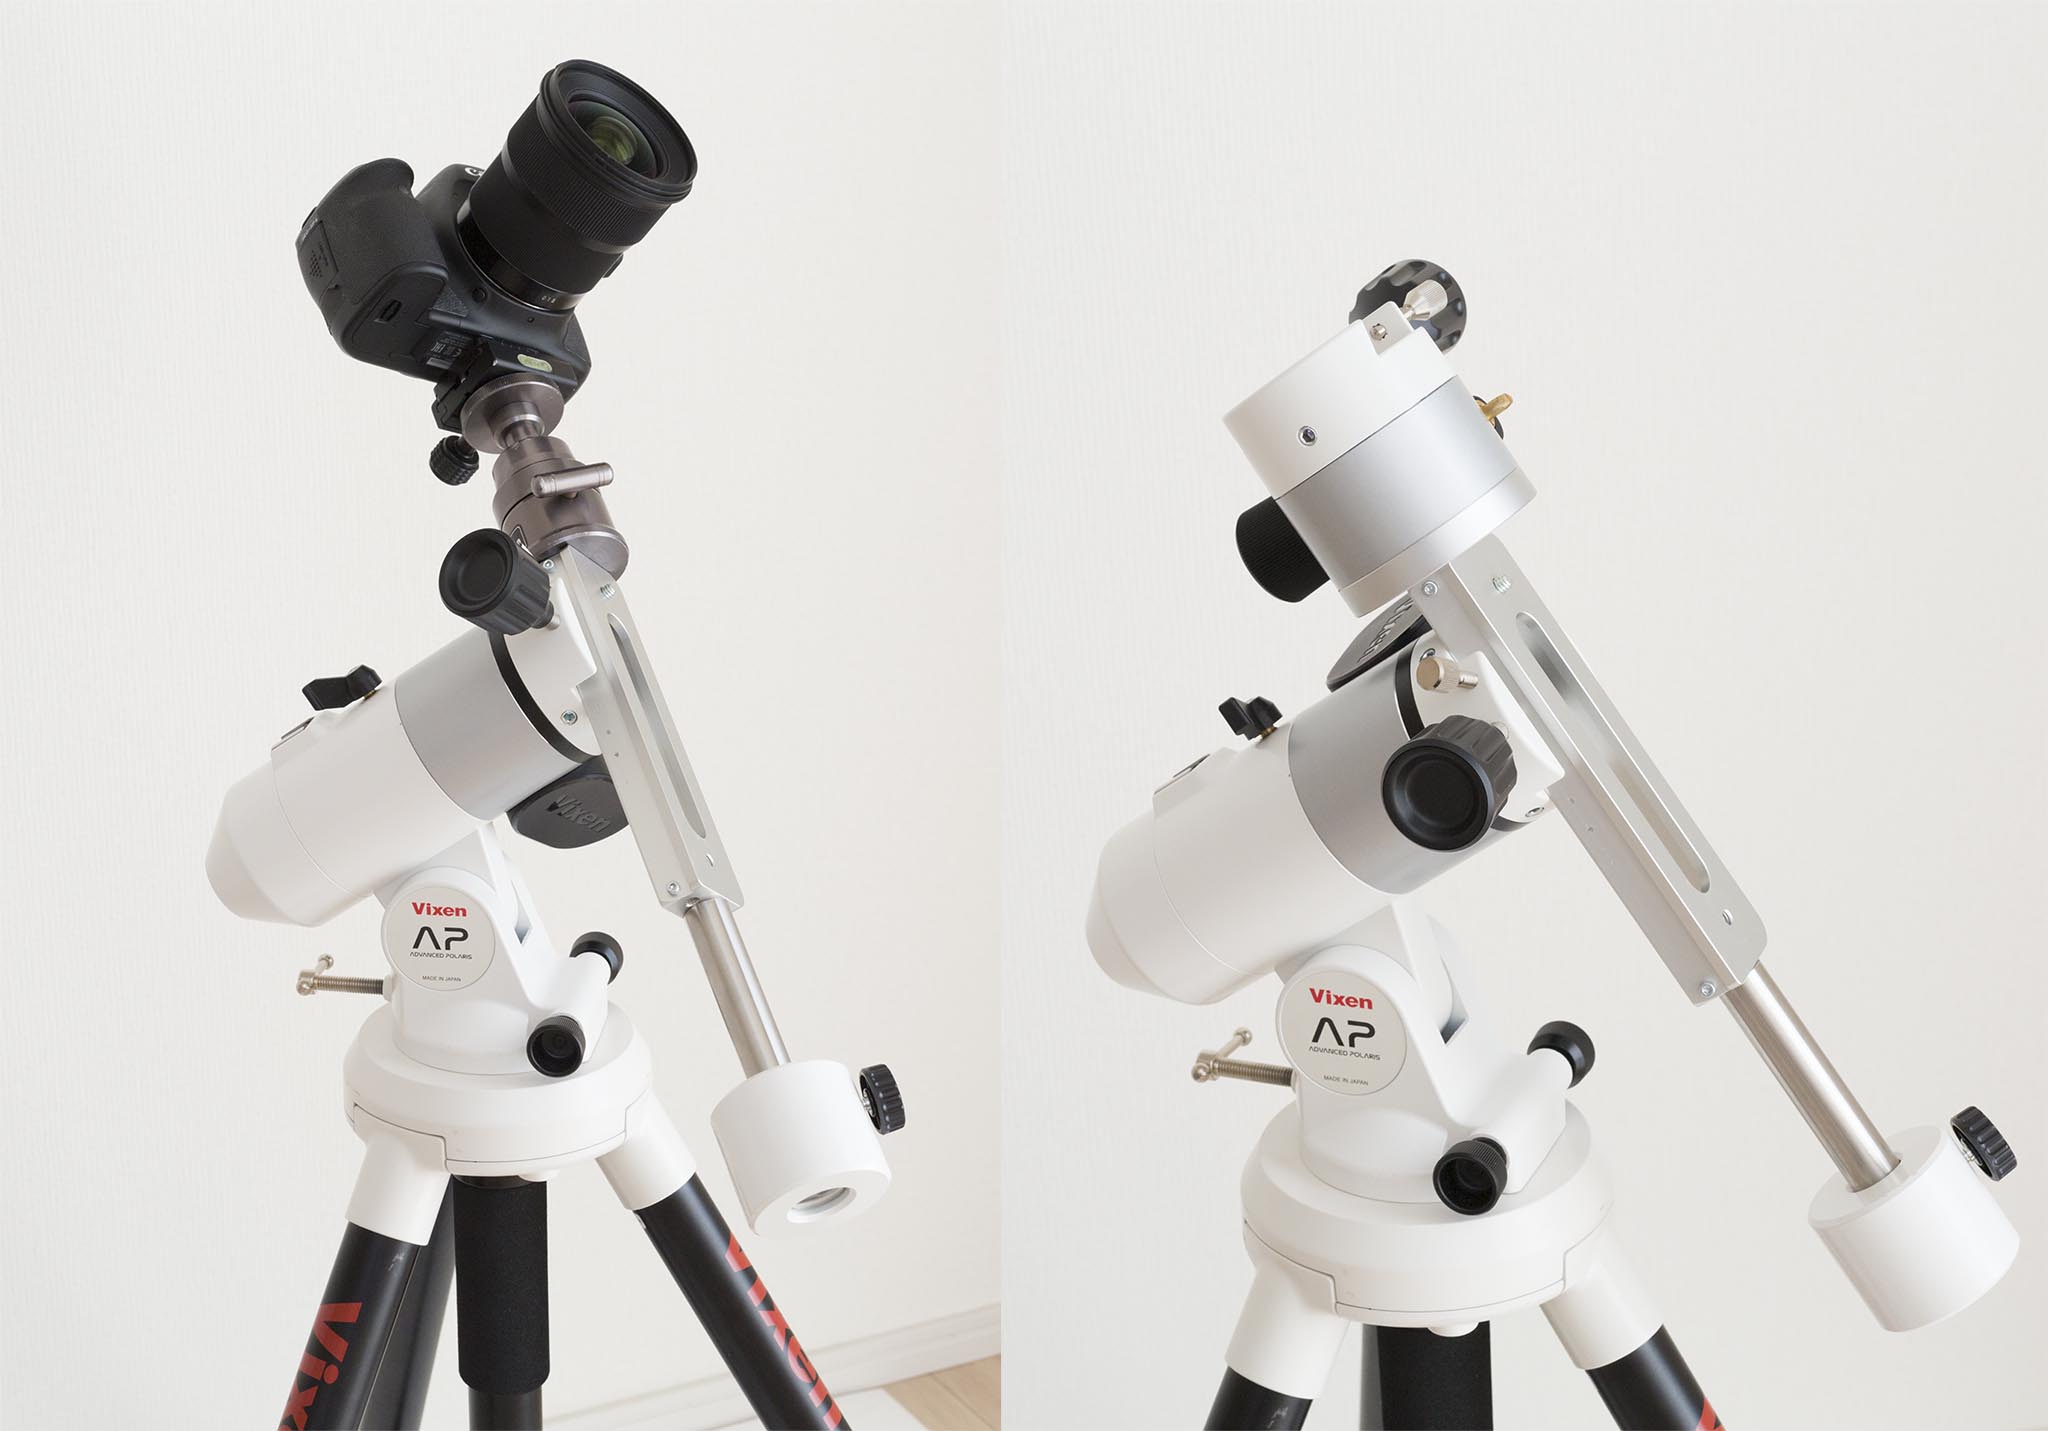 Although this is a “single axis specification”, it is also possible to attach a fine-movement unit as shown on the right and assemble it in a German style. However, in this case, the declination axis is not driven by motor, but only manually.
This is a single axis drive type equatorial mount with no declination axis, mainly intended for photography. For stellar photography with a camera lens, it will be simpler and more compact than a full configuration.
In this configuration, a Vixen-standard dovetail is attached to the ECT motor module.
“PG tube Holder” set
Three types of parts to make AP photo-guider. The product that includes these three items is the PG Tube Holder Set (direct sales price 11,890 yen including tax).
The black disk on the right is the “Plate Holder Base” (direct sales price including tax: 3,348 yen), which is attached to the equatorial motor unit with two M5 screws. The dovetail in the center is the AP tube receiving unit (direct sales price 3,349 yen including tax). It attaches to the plate holder base with three imo screws. The dovetail on the left is the “Slide Head Plate” (*).
It’s not just that it’s not the same thing as the current version.
“Sliding Head Plate DD” and “Quick Release Panorama Clamp”
This time we didn’t use it, but with the “Step Up Kit” parts to strengthen the Polarier, it is possible to build a simple German configuration with a single axis drive. The image above is a combination of “Slide Head Plate DD (9,590 yen including tax) and Quick Release Panorama Clamp (10,530 yen including tax), but the plate is Vixen alloy and can be used for AP mount as well, more compact than a combination of manual module and module base for AP.
Cantilevered Forking
I joined the Vixen Arigatas with Arca Clamp to make a fork configuration with the Panorama head and L-type arm. Although it is a combination of parts, the fork configuration is convenient when using a short lens barrel or camera lens without blind spots and without flipping the lens east-west.
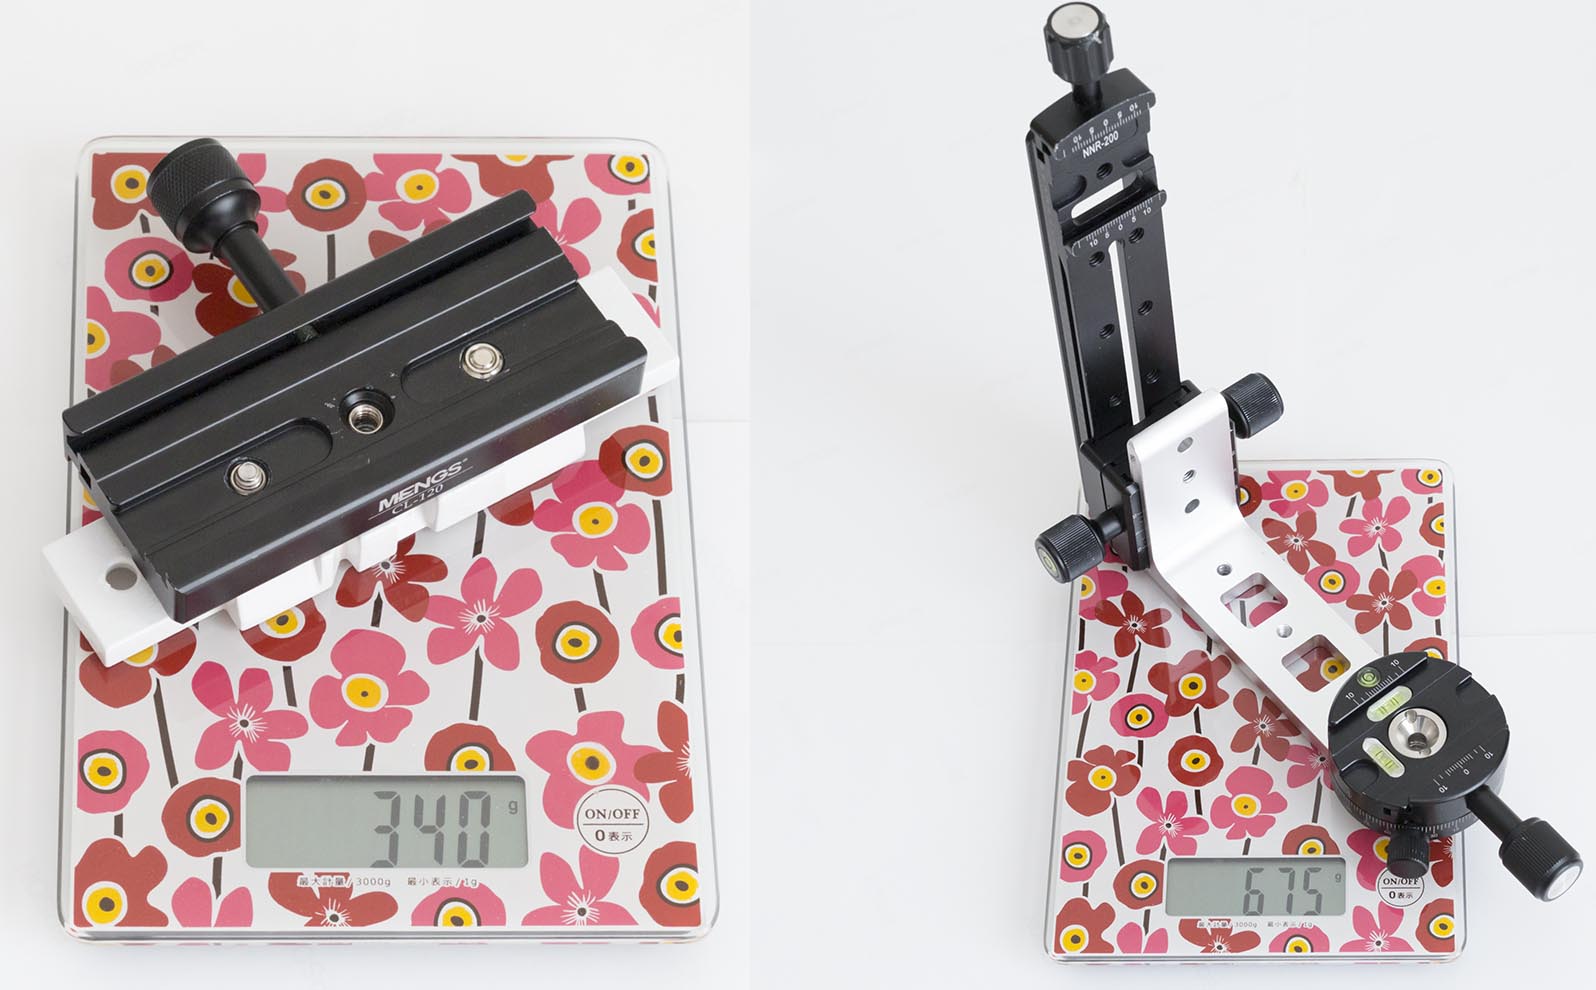
The weight of the fork-type components of the Vixen Arigatas and later is about 1.1kg, which can be made lighter by eliminating waste.
Useful item , “Module-base”
It is actually possible to use a single axis equatorial mount without using the PG tube support set. The product website doesn’t show many concrete examples of the configuration, but the Module Base (direct sales price 4,590 yen including tax) is an item that can be used in a single axis configuration. By attaching this part to the Ecliptic Motor Module, the overhead head is flattened and the universal parts can be connected.
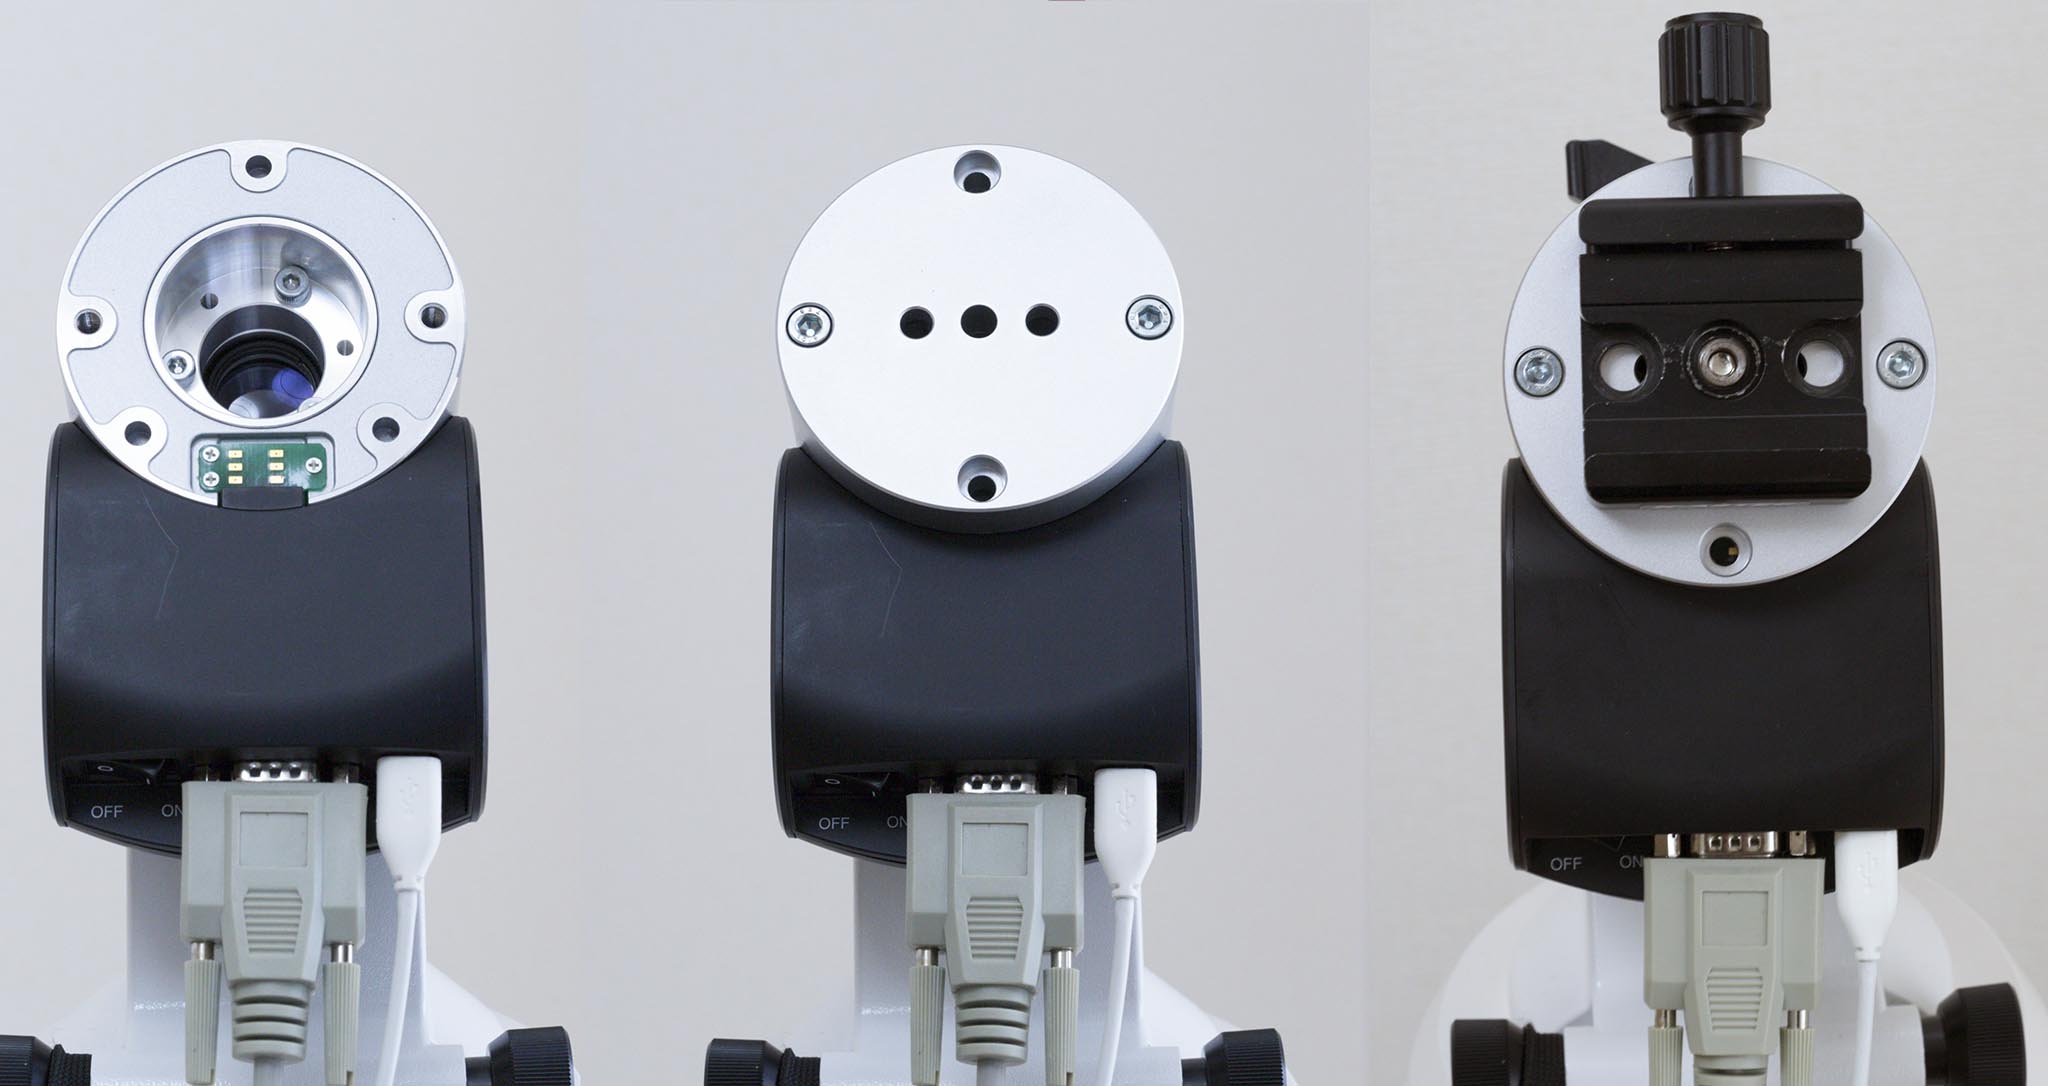
The module base is attached to the AKS motor unit with two M5 screws. If you do this, the overhead head will be clearer. Unfortunately, the screw holes are all idiot holes, and the spacing between the two holes is not 35 mm (*). If you want to install the Alka clamp as shown on the right, you will need to turn the 1/4″ screw from behind the plate to install it (**).
(*)This threaded hole spacing may be the same as the aforementioned Plate Holder Base DD and Quick Release Panorama Clamp (unconfirmed). However, there are no screw holes in the module base, so I’m not sure if a quick-release panorama clamp can be installed. I would like the specifications of the parts to be clearly described on the website.
(**)Incidentally, the module base can only be used in this form for the equinoctial motor module. This product cannot be mounted on the Declination Motor Module or the “AP Nebulae” (see below) due to the different specifications of the coupling.

Comparison of trestle heads. On the left is when the module base is used, and on the right is when the PG tube support set is used. The size of the Alka clamp looks like a difference ^^;;I find that it’s much simpler and lighter.
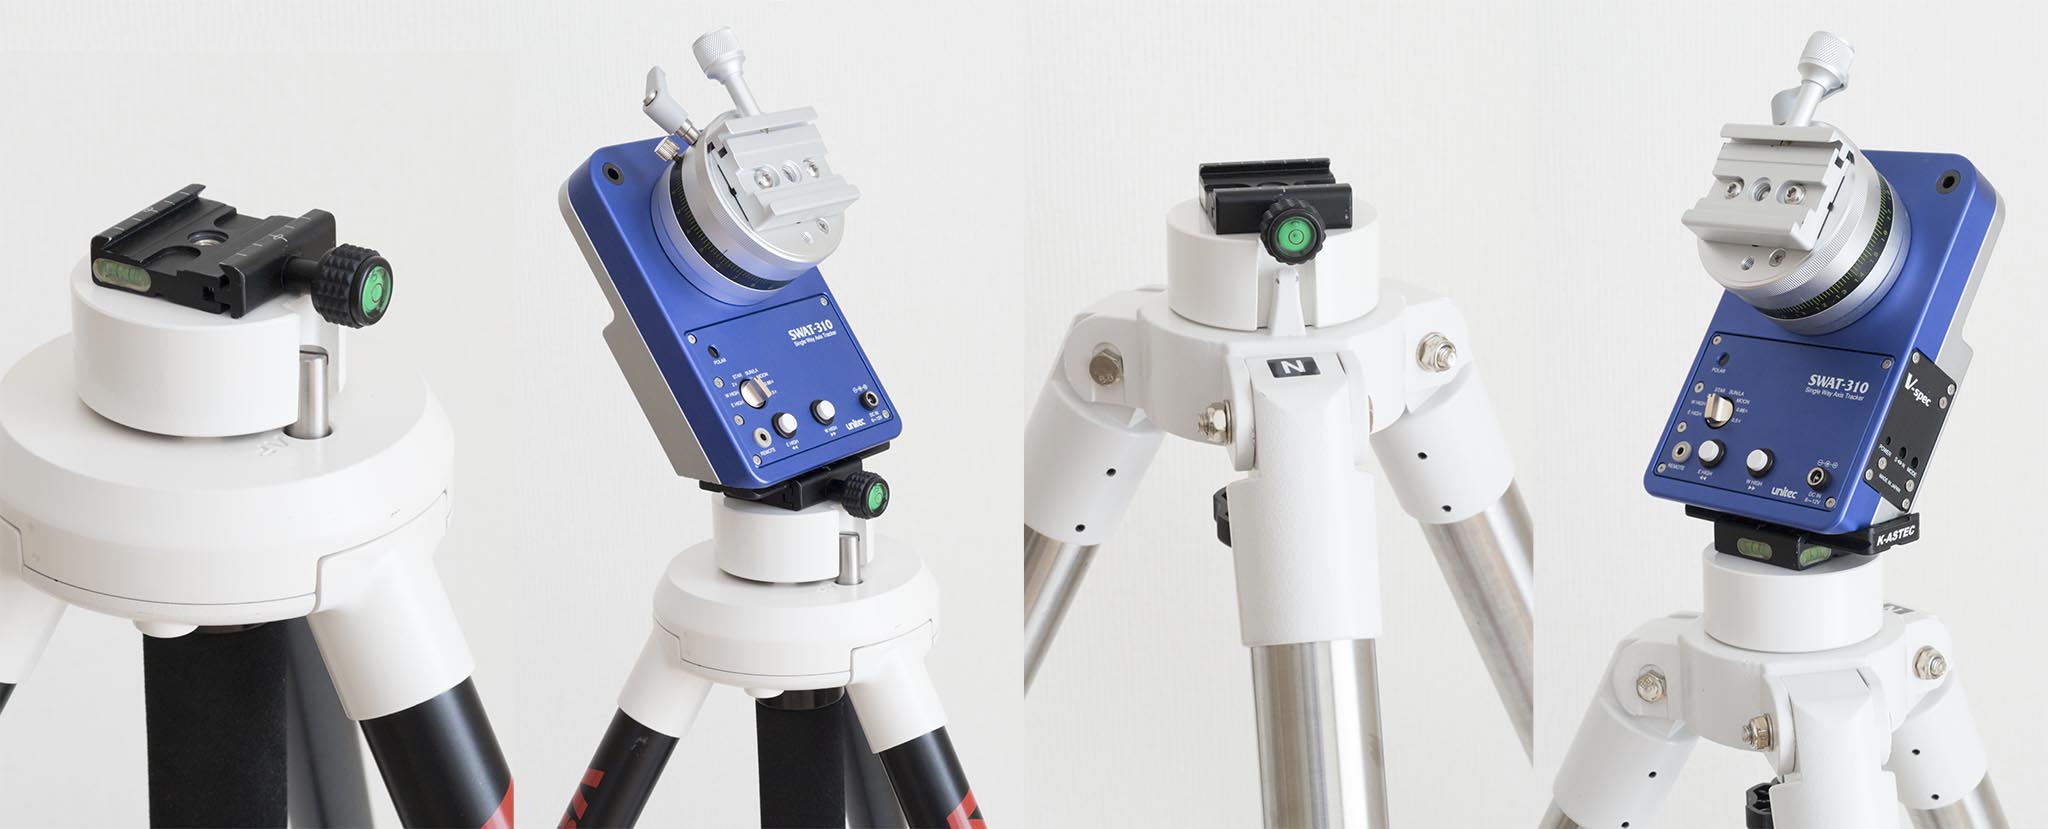
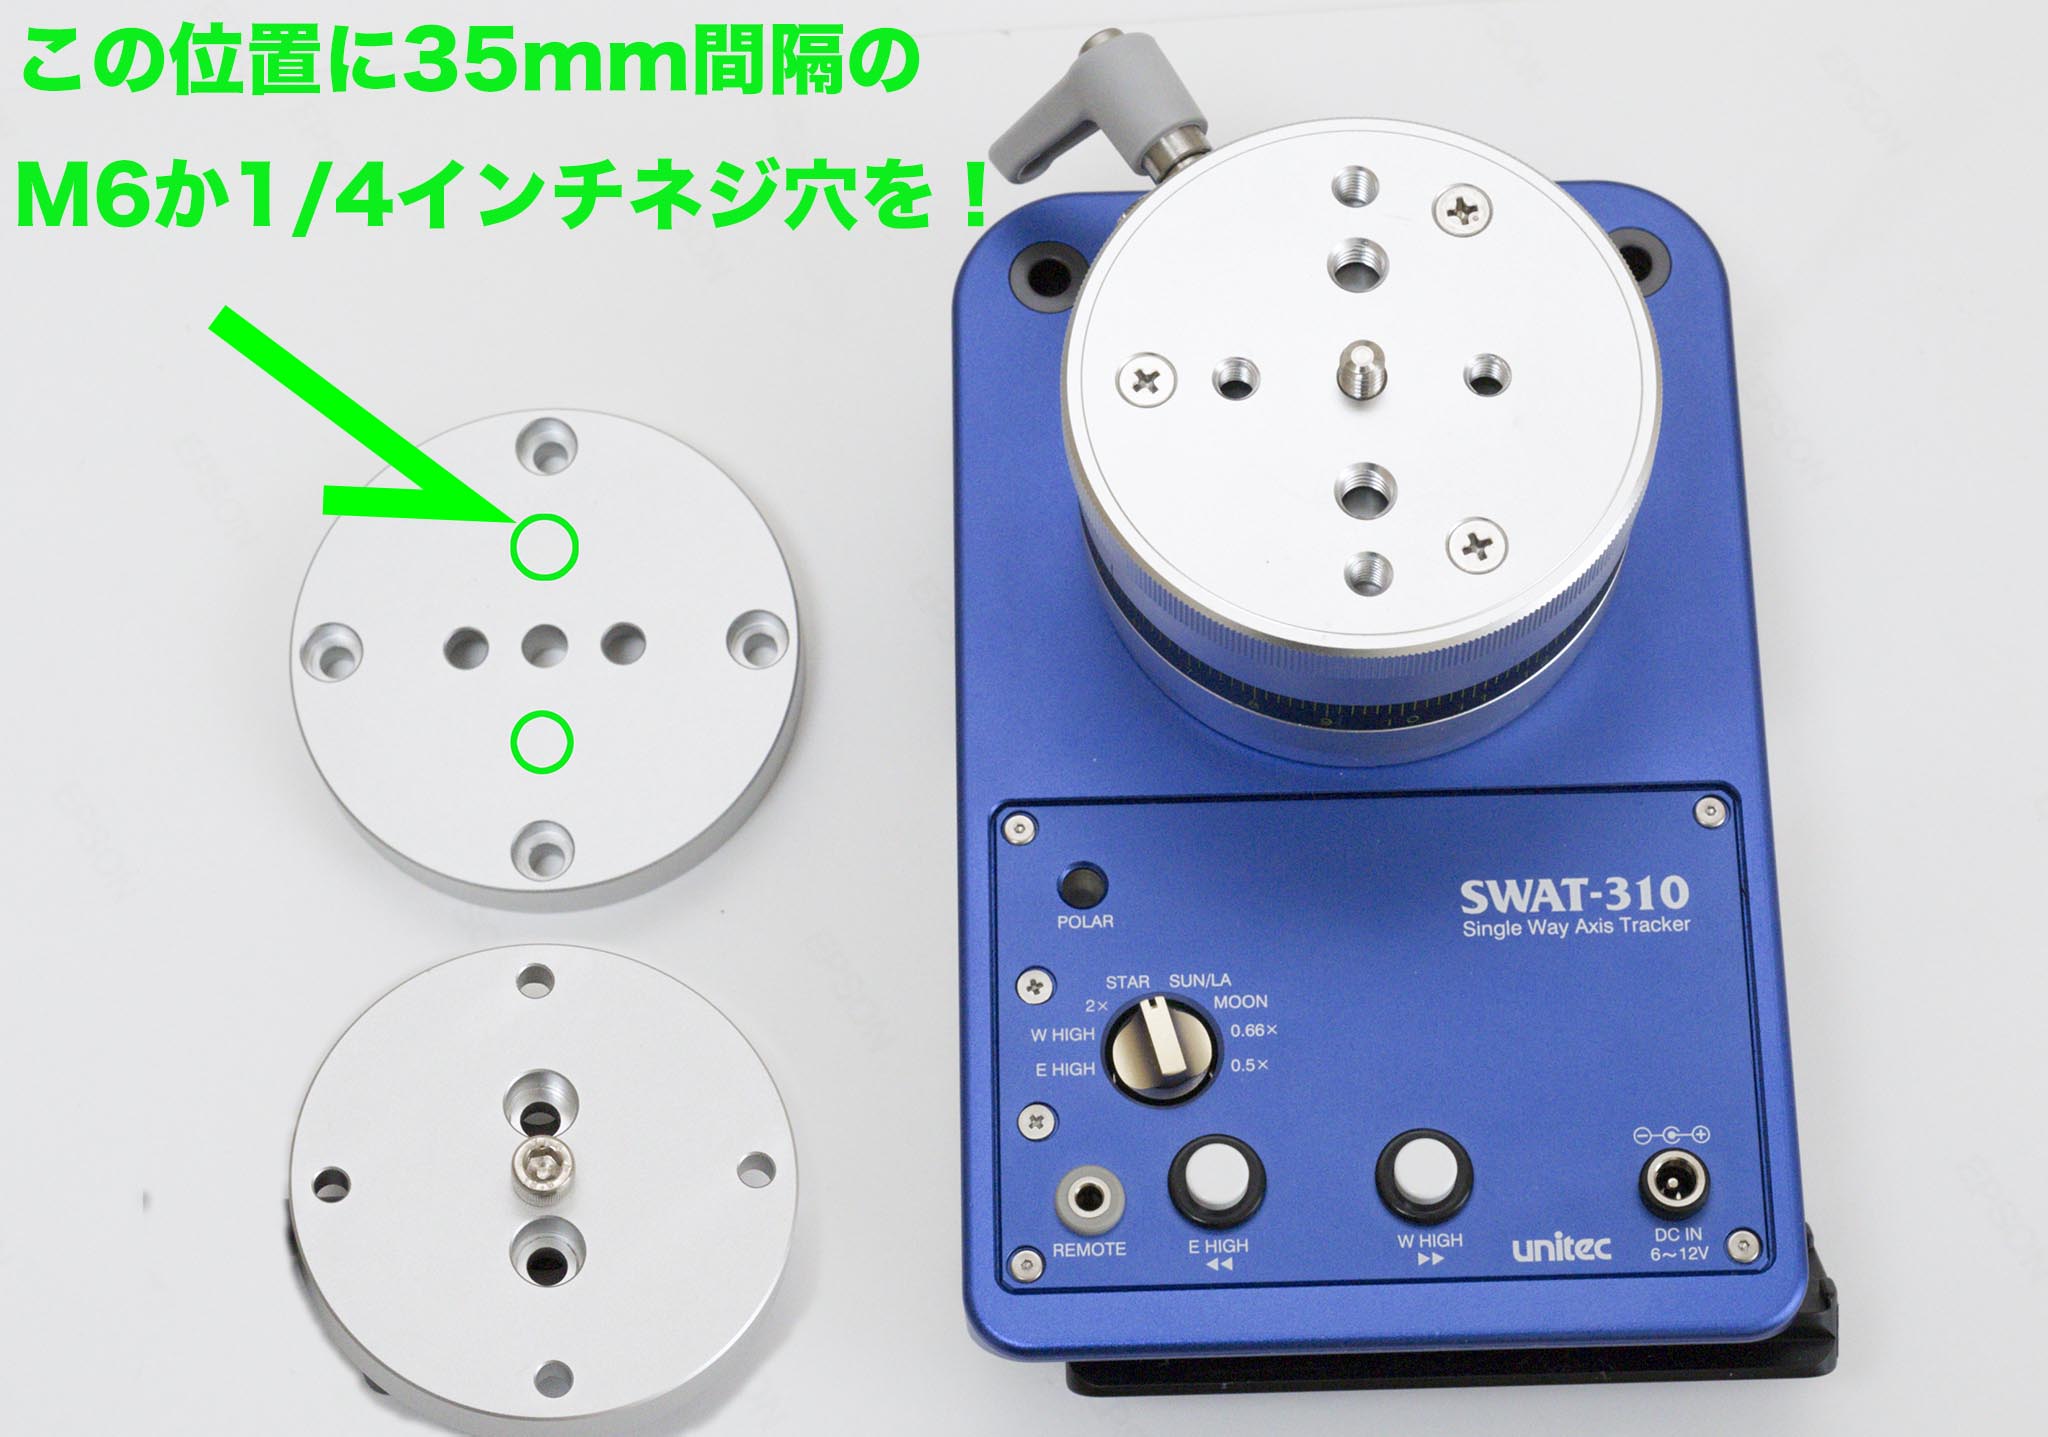 In the case of Unitech’s Portable Equatorial Mount SWAT Series, the M6 and M8 screw holes are cut at 35mm intervals in the overhead head.
However, in the configuration above, the Alka clamp is a single point with a 1/4 screw. This would be fine for lightweight equipment, but this is where I definitely wanted a 1/4″ or M6 with 35mm spacing screw holes. Then you can make sure that the areca clamp is firmly two-point stop. There’s plenty of physical space, so I’d like to see it addressed soon(*).
(*)If you’re someone who can make your own, you might as well drill holes and cut the screws yourself, or the parts could be sold by a third vendor since they’re simple parts.
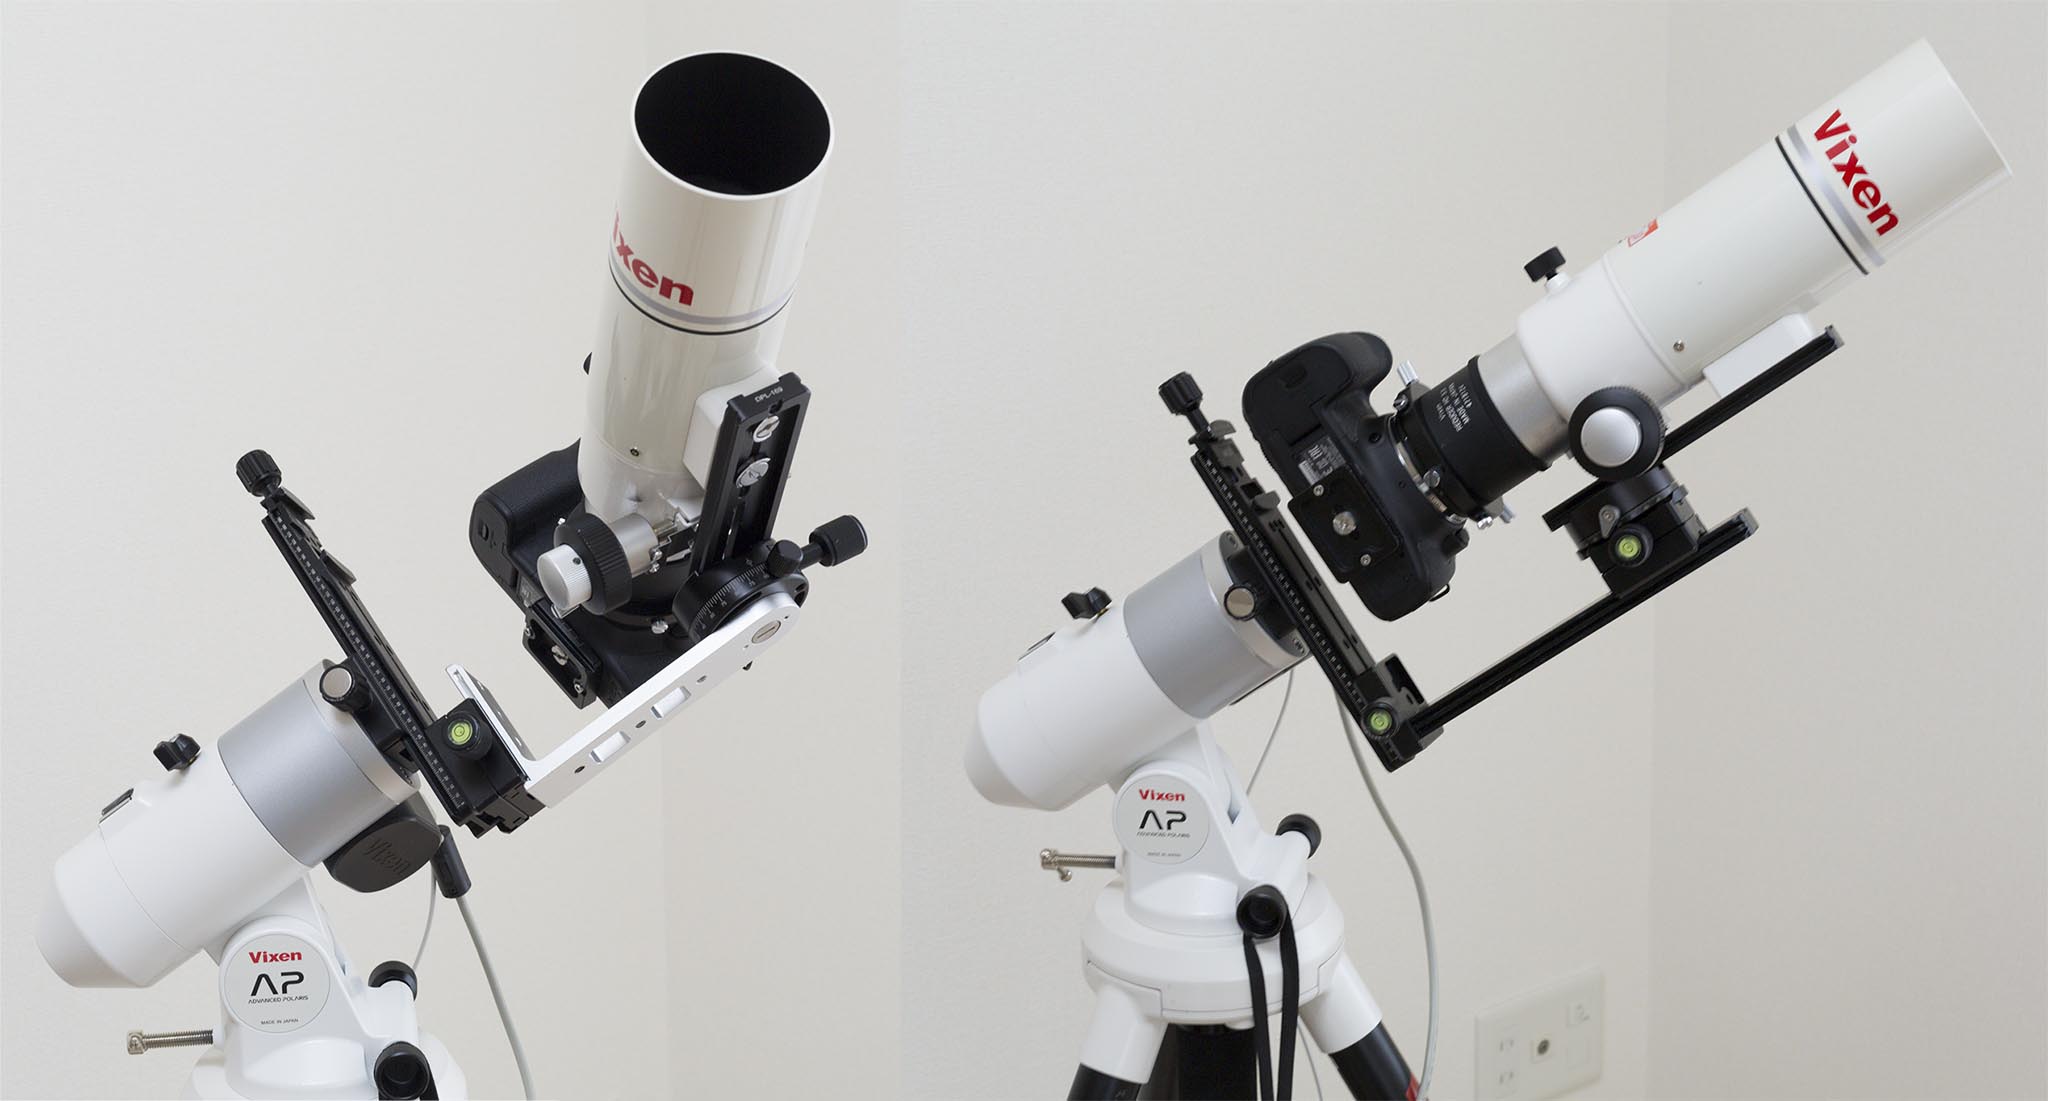
Fork configuration again ^^. The dovetail on the optical tube side has been replaced with an Arca Swiss, making it even lighter and smarter.
Although the single axis fork configuration does not allow for two axis autoguiding, it is lightweight and has no blind spots, an advantage not found in the German two axis configuration. The flexibility of the AP mount will come alive even more if you make good use of the one and two axes.
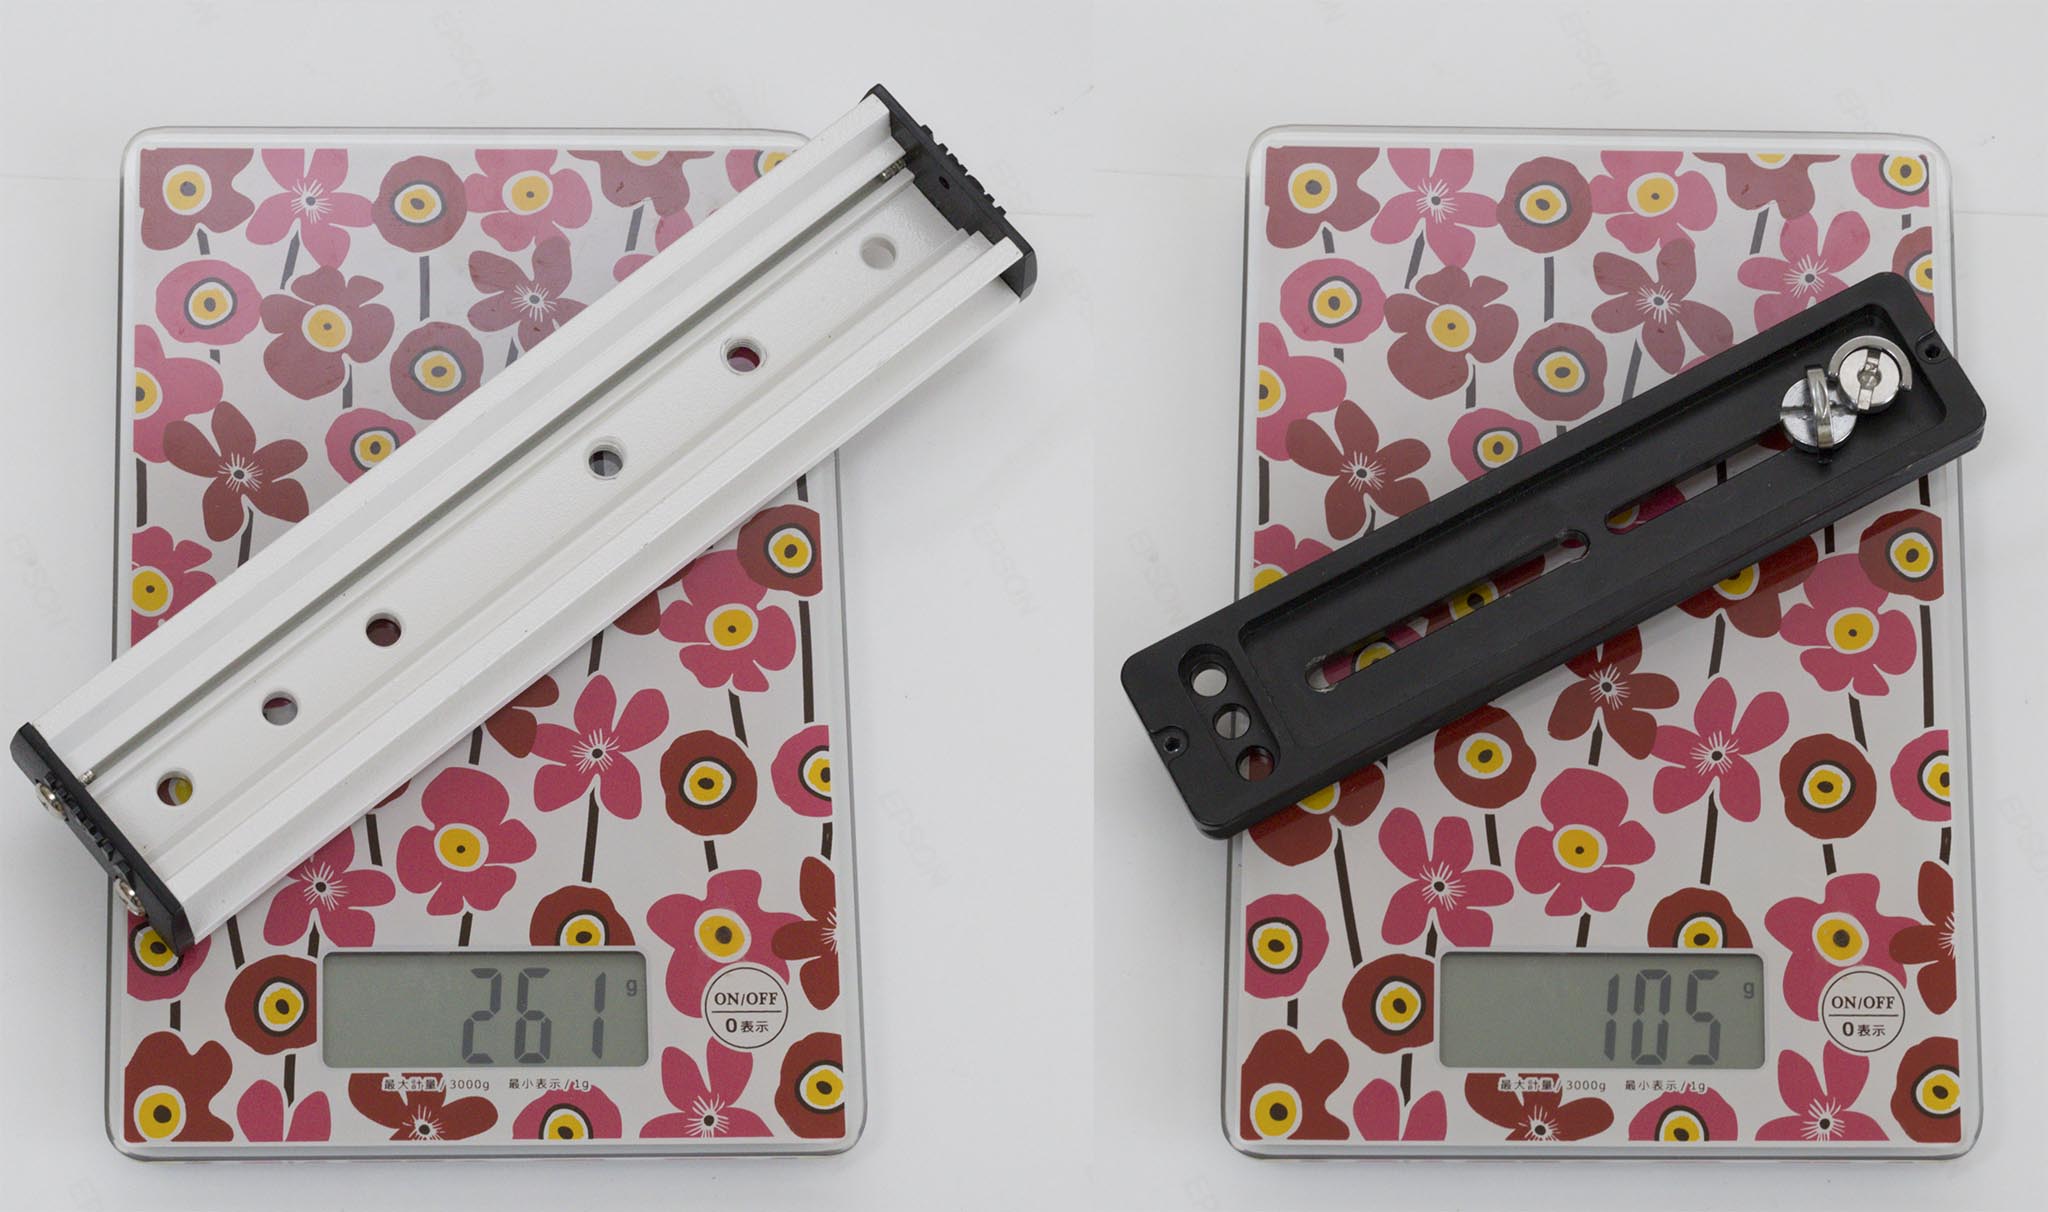
By the way, the lens barrel side can be reduced in weight if it is converted to ALCA Swiss. Above left is the Vixen FL55SS dovetail, which can be replaced by Arca-Swiss to reduce the weight by 150g. Since the single axis fork configuration is greatly out of balance from the pole to the end, we want to reduce the weight even a little.
Lightweight System (AP as Star Tracker)
 I’m diligently connecting Star Book One, but it’s fine without it as long as it’s stellar tracking-only. When the power is turned on, it becomes stellar tracking.
The AP mount can also be configured in another without using a polar axis unit. This is the AP Starry Sky Head (direct sales price: 117,450 yen including tax).
(*) Equivalent to a combination of the Red Scripture Motor Module SBO Set (direct sales price: 59,940 yen including tax) with the DD Type and the AP Portable Set (direct sales price: 27,540 yen including tax) and the Polar Telescope PF-L (direct sales price: 25,650 yen including tax). The tripod and fine movement of the polar axis are sold separately.
.
 From the left, the AP clamp tube bearing unit H, the equatorial motor module, the plate holder base, and the AP pole axis holder.
In this configuration, an “AP Clamp Unit H (direct sales price 10,152 yen including tax) is connected to the red light motor module in the “reverse direction (*)” and it is received by the “AP Polar Axis Holder (direct sales price 8,424 yen including tax) via a plate holder base. The AP Polar Axis Holder has a 1/4″ thread and is supposed to be mounted on a camera tripod.
(*)Wouldn’t the direction of rotation be reversed if you turned it backwards? There is no problem because the part fixed to the tripod is also reversed. I didn’t understand it at first, but after touching it, I finally understood^^^;
 The part on the right is the “AP Polar Axis Holder”
The total weight of the system is about 1.5 kg in the above configuration, which is lighter than the absence of the polar axis unit. At first glance, the bottom surface of the AP polar axis holder looks small and unstable, but I felt that this part was strong enough to use in practice.
Incidentally, when upgrading the AP stargazer configuration to the AP photo-guider configuration, it is necessary to note that the AP Clamp Holder Unit (H) cannot be attached to the AKS motor module (*).
(*)A “PG Bearing Set” or “Module Base” without a clamping mechanism is required. “AP Clamp Bearing Unit H” can be used for the Declinator Bearing Unit.
AZ mount (APZ)
The AP mount can also be used as a longitude and latitude table. While there are only a few full-fledged, load-bearing table mounts available in Japan, the AP mount is a valuable product. How good is he?
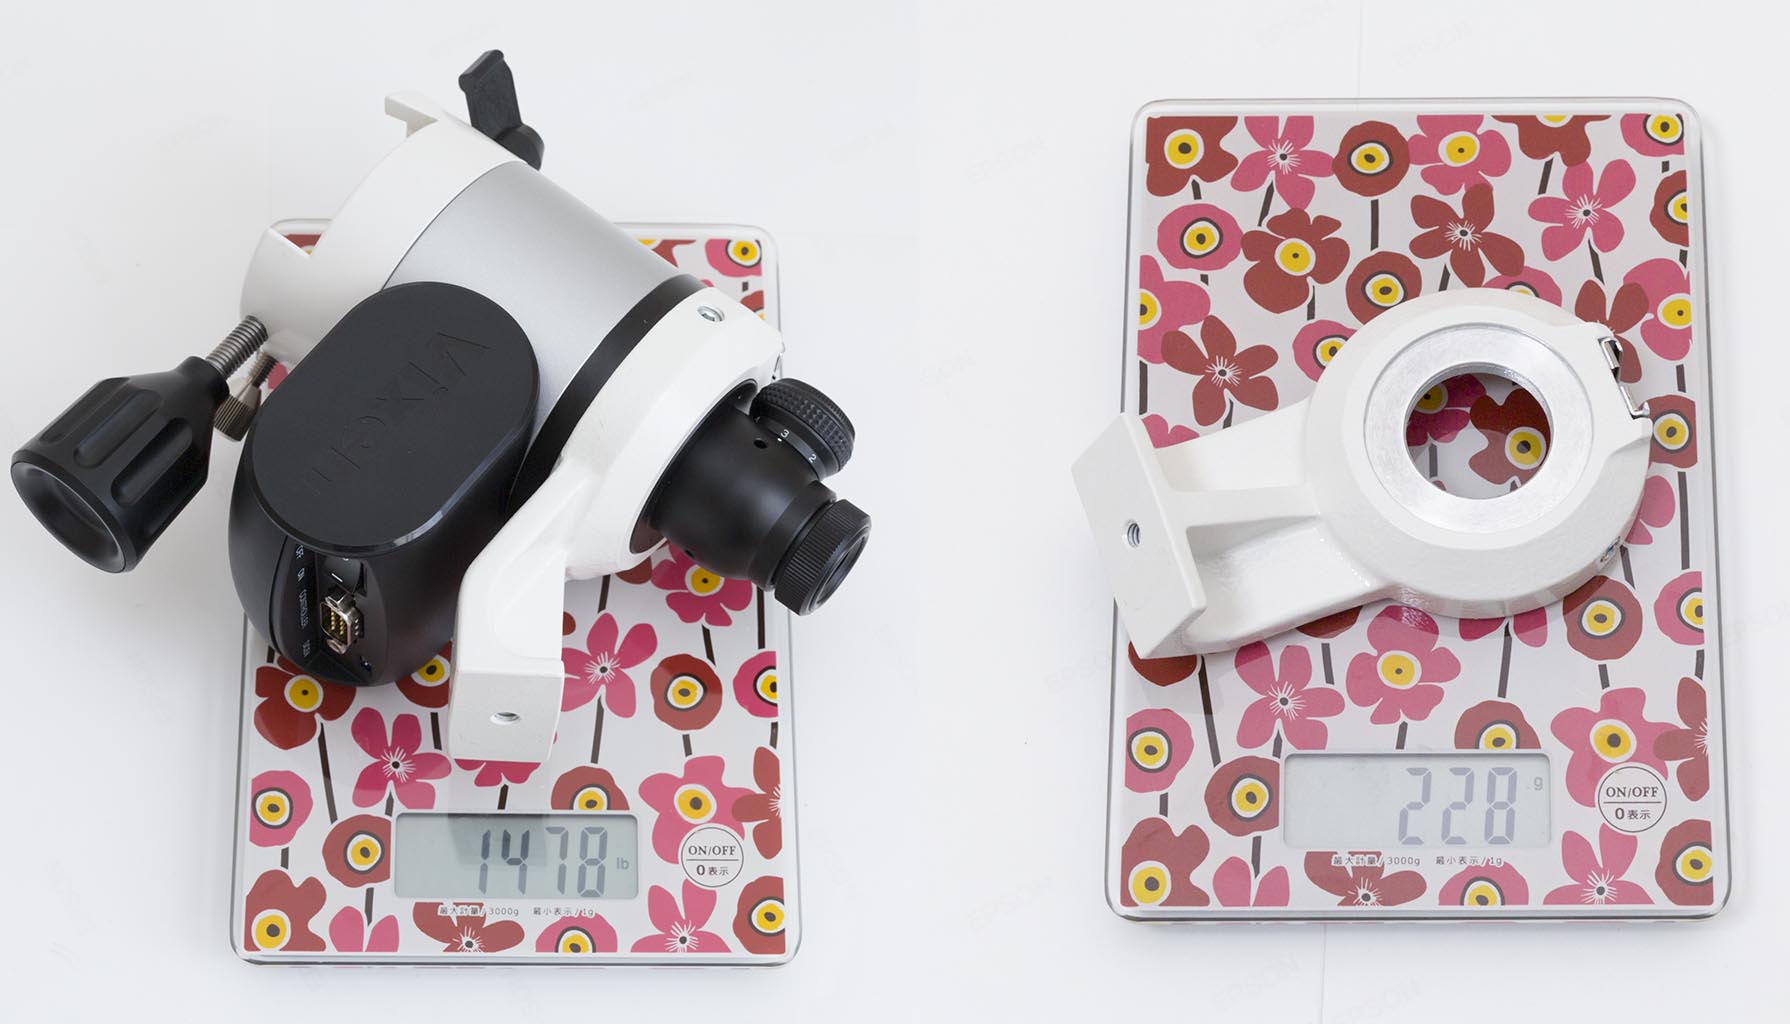
Max. payload 8kg
 Left is the APZ tripod base, actual weight 565g, with shielded ball bearings, coarse motion and clamping mechanism. Clamps are sold separately.
The basic structure of the latitude and latitude table is simple. Add “AP Tripod Base (9120 yen including tax)(*)” in the photo above, and recombine it into a tripod configuration.
<It’s a great way to get the most out of your iPad.
AP mount equatorial mount configuration has a nominal weight of 6kg, but this equatorial mount configuration has a nominal weight of 8kg, and it works smoothly without any problem.
APZ Counterweight
For a latitudinal configuration, it’s not very cool to stretch out a long weight shaft. If you want to use it exclusively for a longitude and latitude table, it would be cooler to use the above “APZ Counter Weight (direct sales price 3888 yen including tax). The APZ Mount (direct sales price including tax: 59,670 yen)(**) is a standard accessory of the APZ Mount (left image).
(*)Because when set horizontally, it does not move when clamp-free, even if it is out of balance.
(**)Personally, I think this price is also quite reasonable.
Smooth clamp-free motion
The “comfort” of the clamp-free operation of the AP mount’s longitude and latitude table configuration is noteworthy. It has all the good features of an AP mount, such as the coarse moving parts with bearings and the high-precision fine-motion device (*). This is a must-try experience.
(*)It may seem a little outdated when compared to the recent excellent automatic introduction table, but it is also a pleasure to watch the Milky Way flowing without any particular doubt, which is unique to the manual introduction table.
note the height of the tripod
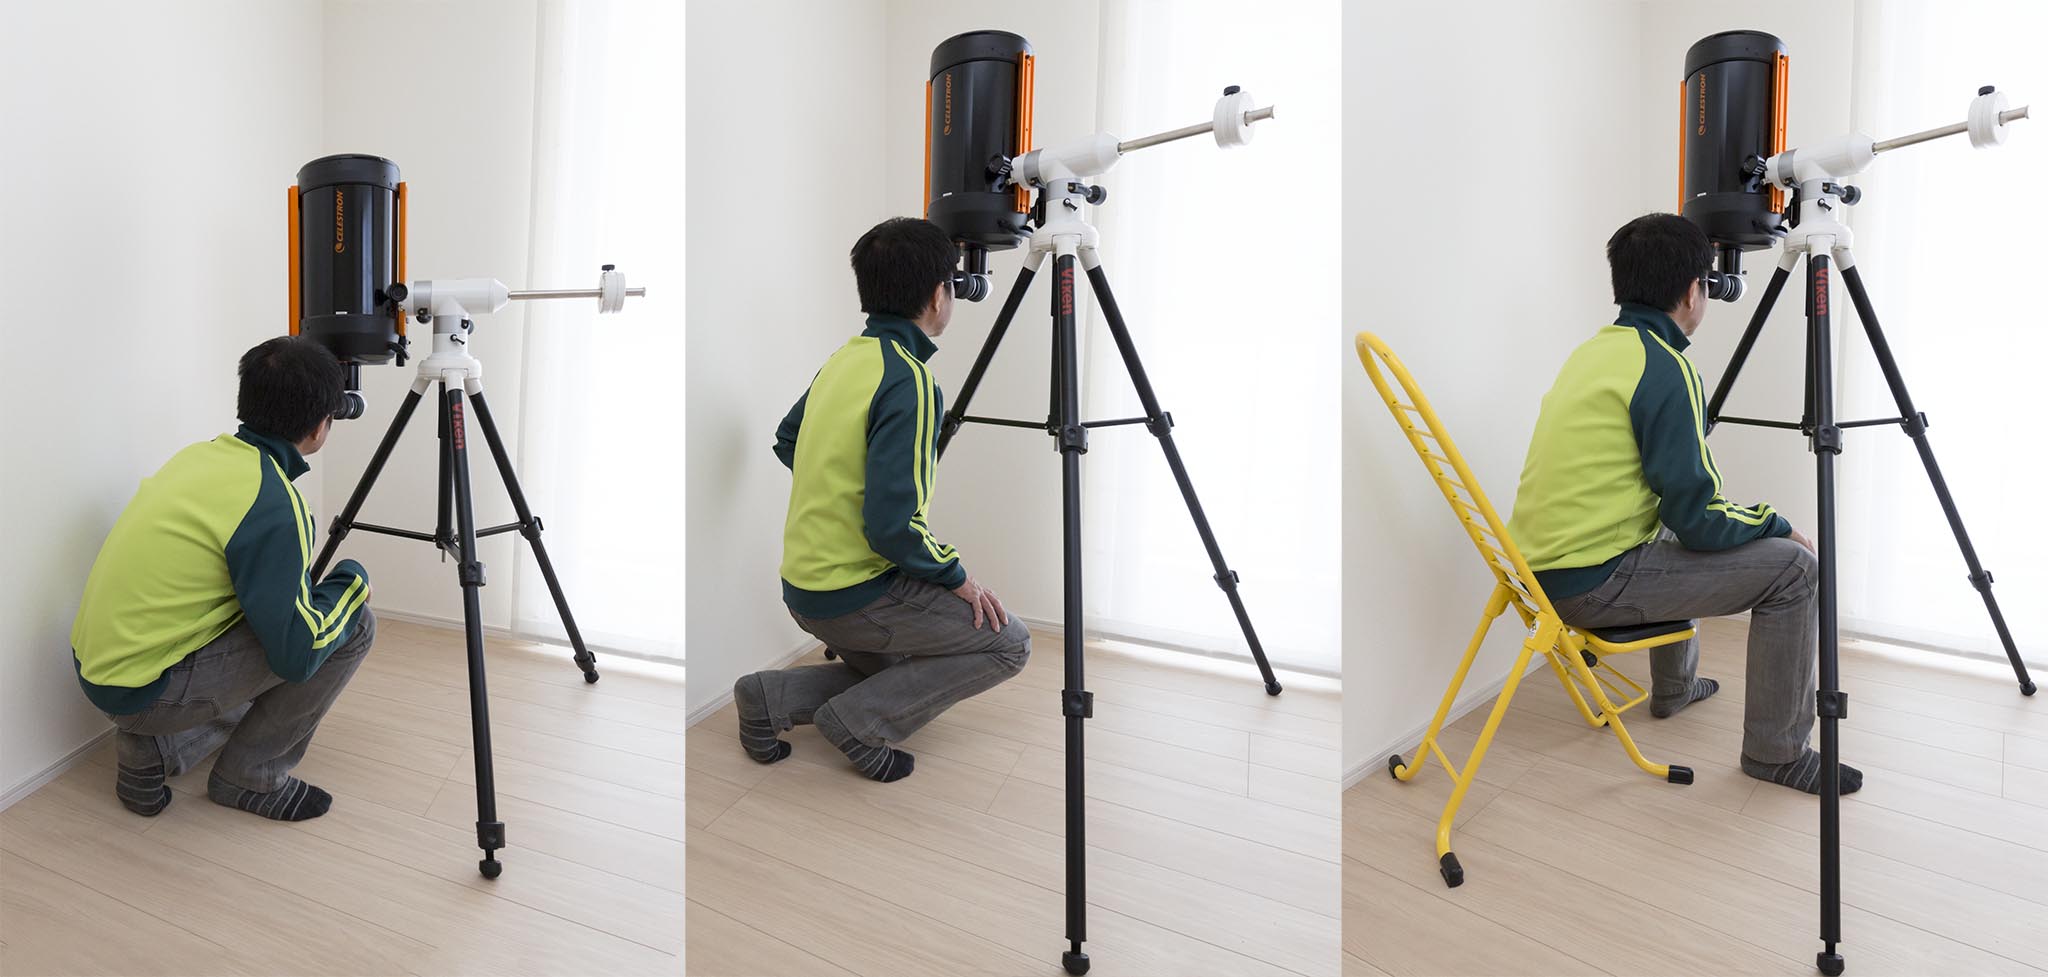
When used in a weft configuration, the height of the tripod should be taken into account. It depends on the lens barrel, but with an AP tripod (APP-TL130) with two positions extended, the lens is a little shorter and the posture is tighter(*). It would be better to stretch it to three tiers. The upper model carbon tripod, the ASG-CB90, is too short even when fully extended. If you use it with heavy equipment, you might consider the SXG-HAL130 for SX.
(*)The person in the above image is 168cm tall.
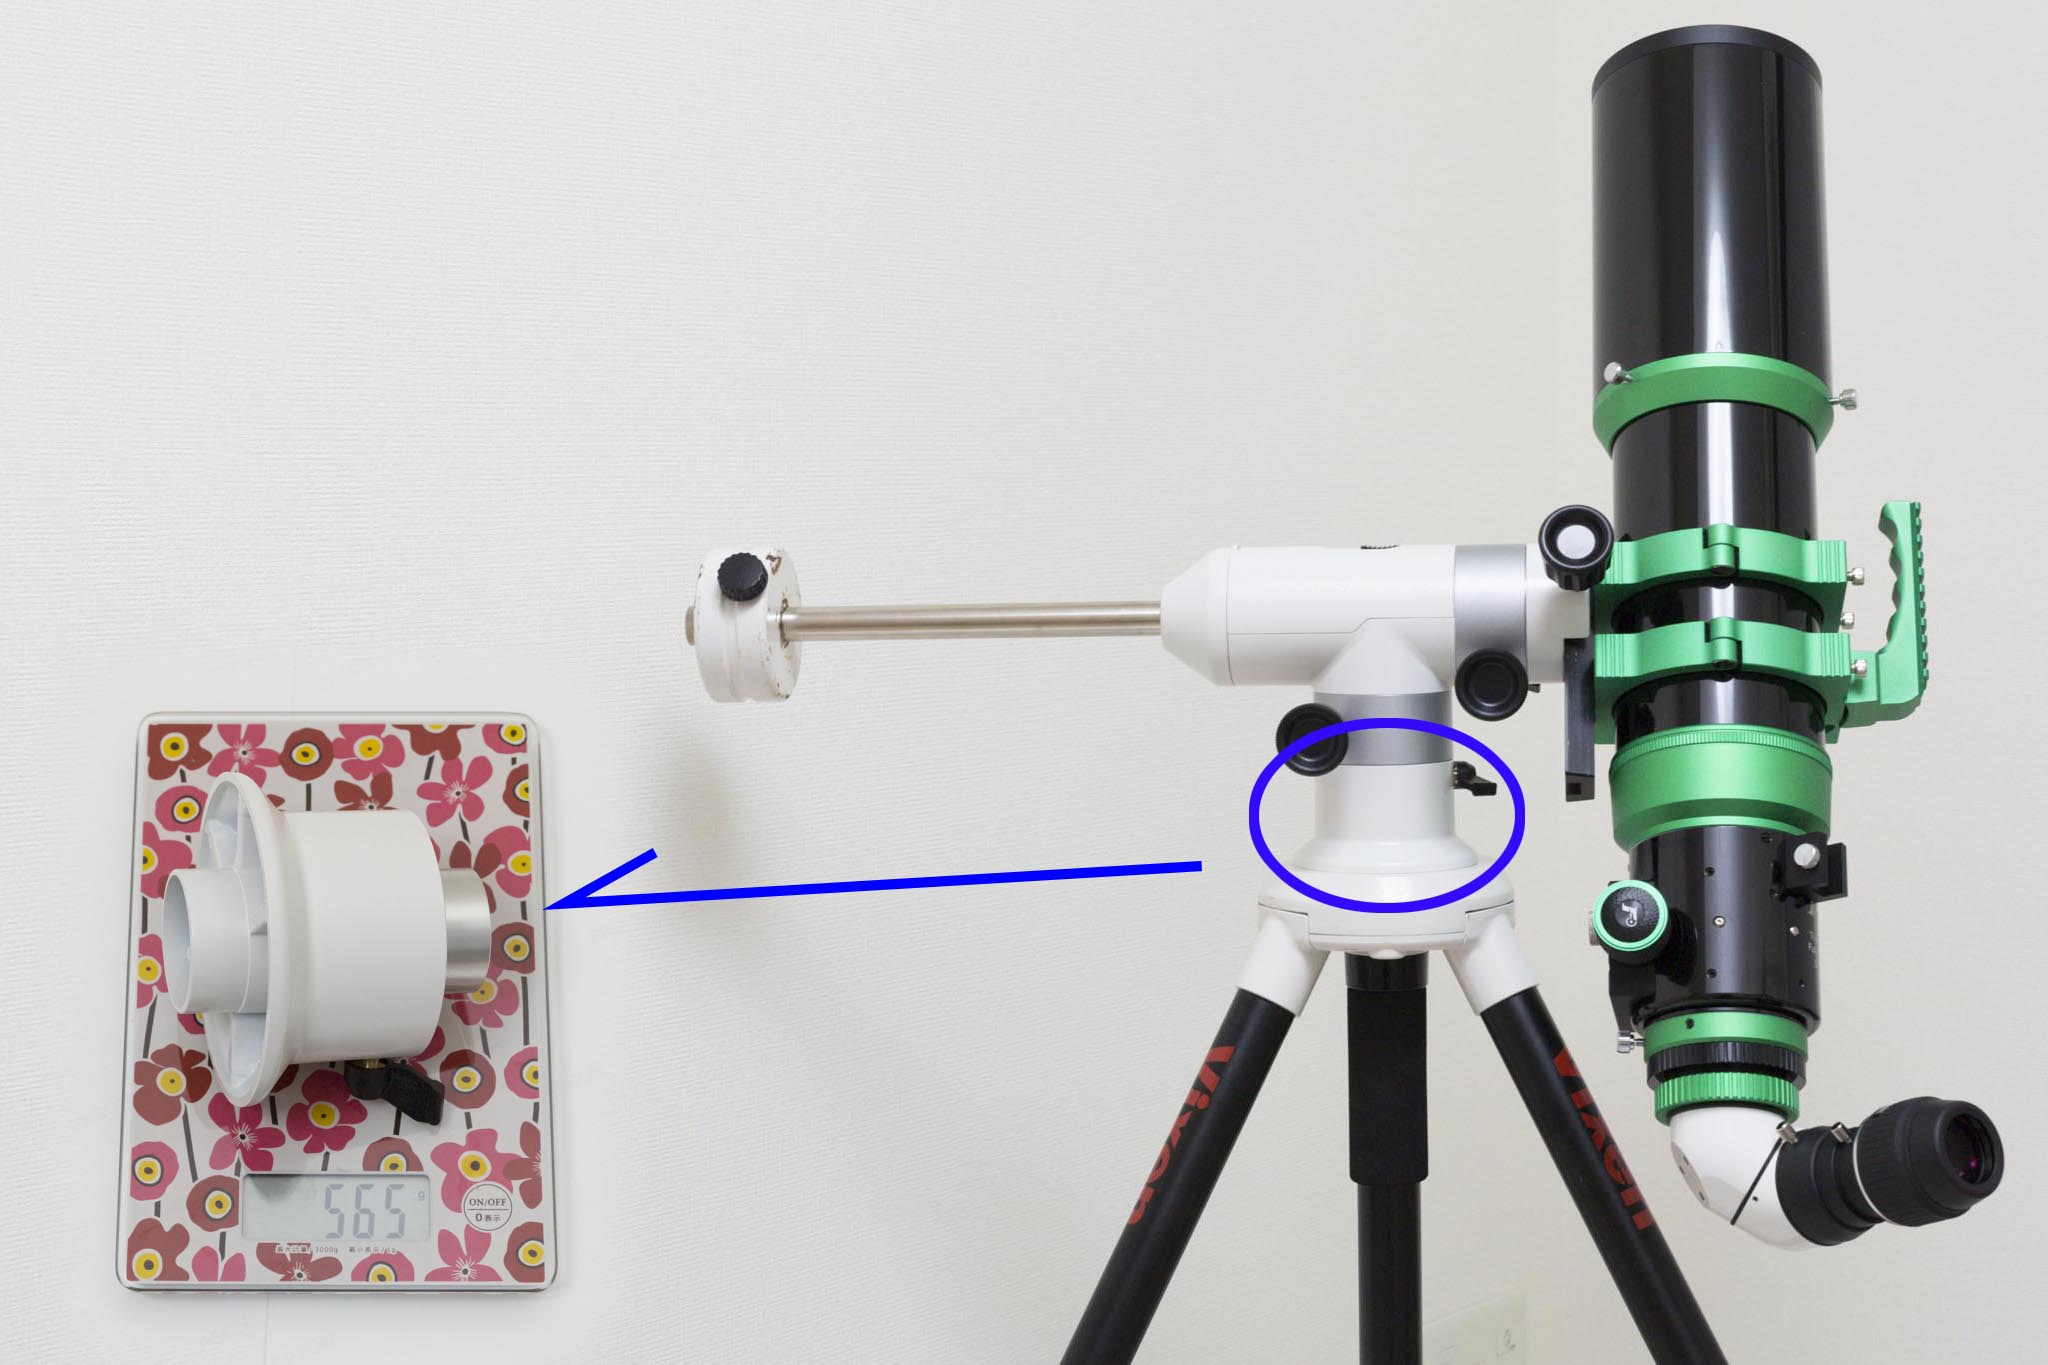
System change from a rather cumbersome equatorial mount configuration
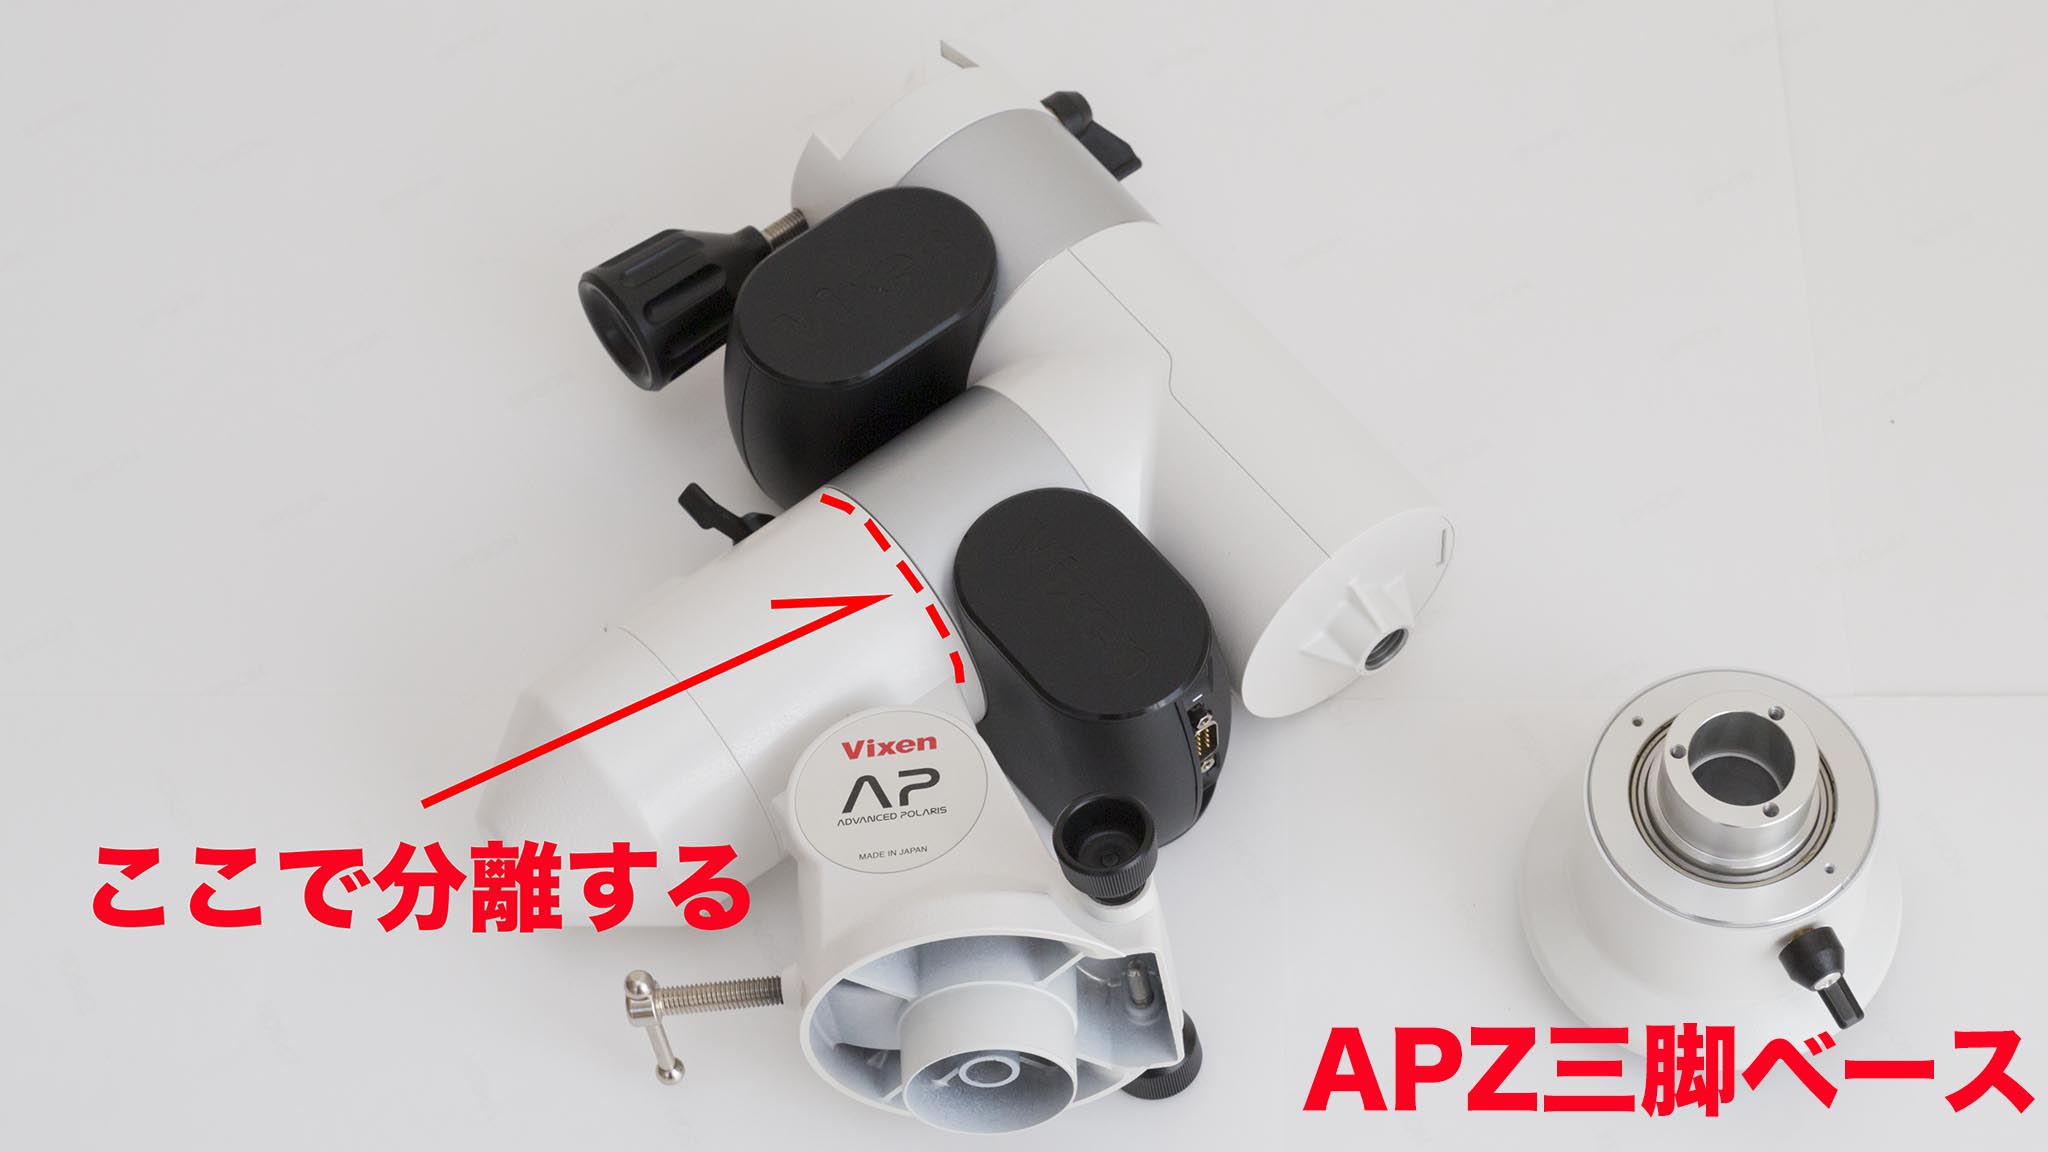
It is an AP mount that can be used as both an equatorial mount and a longitude and latitude mount, but it is necessary to take some time to change the configuration. Intuitively, the part of the dotted line of the upper figure is separated, if it converts to the APZ tripod base, it should do, but …
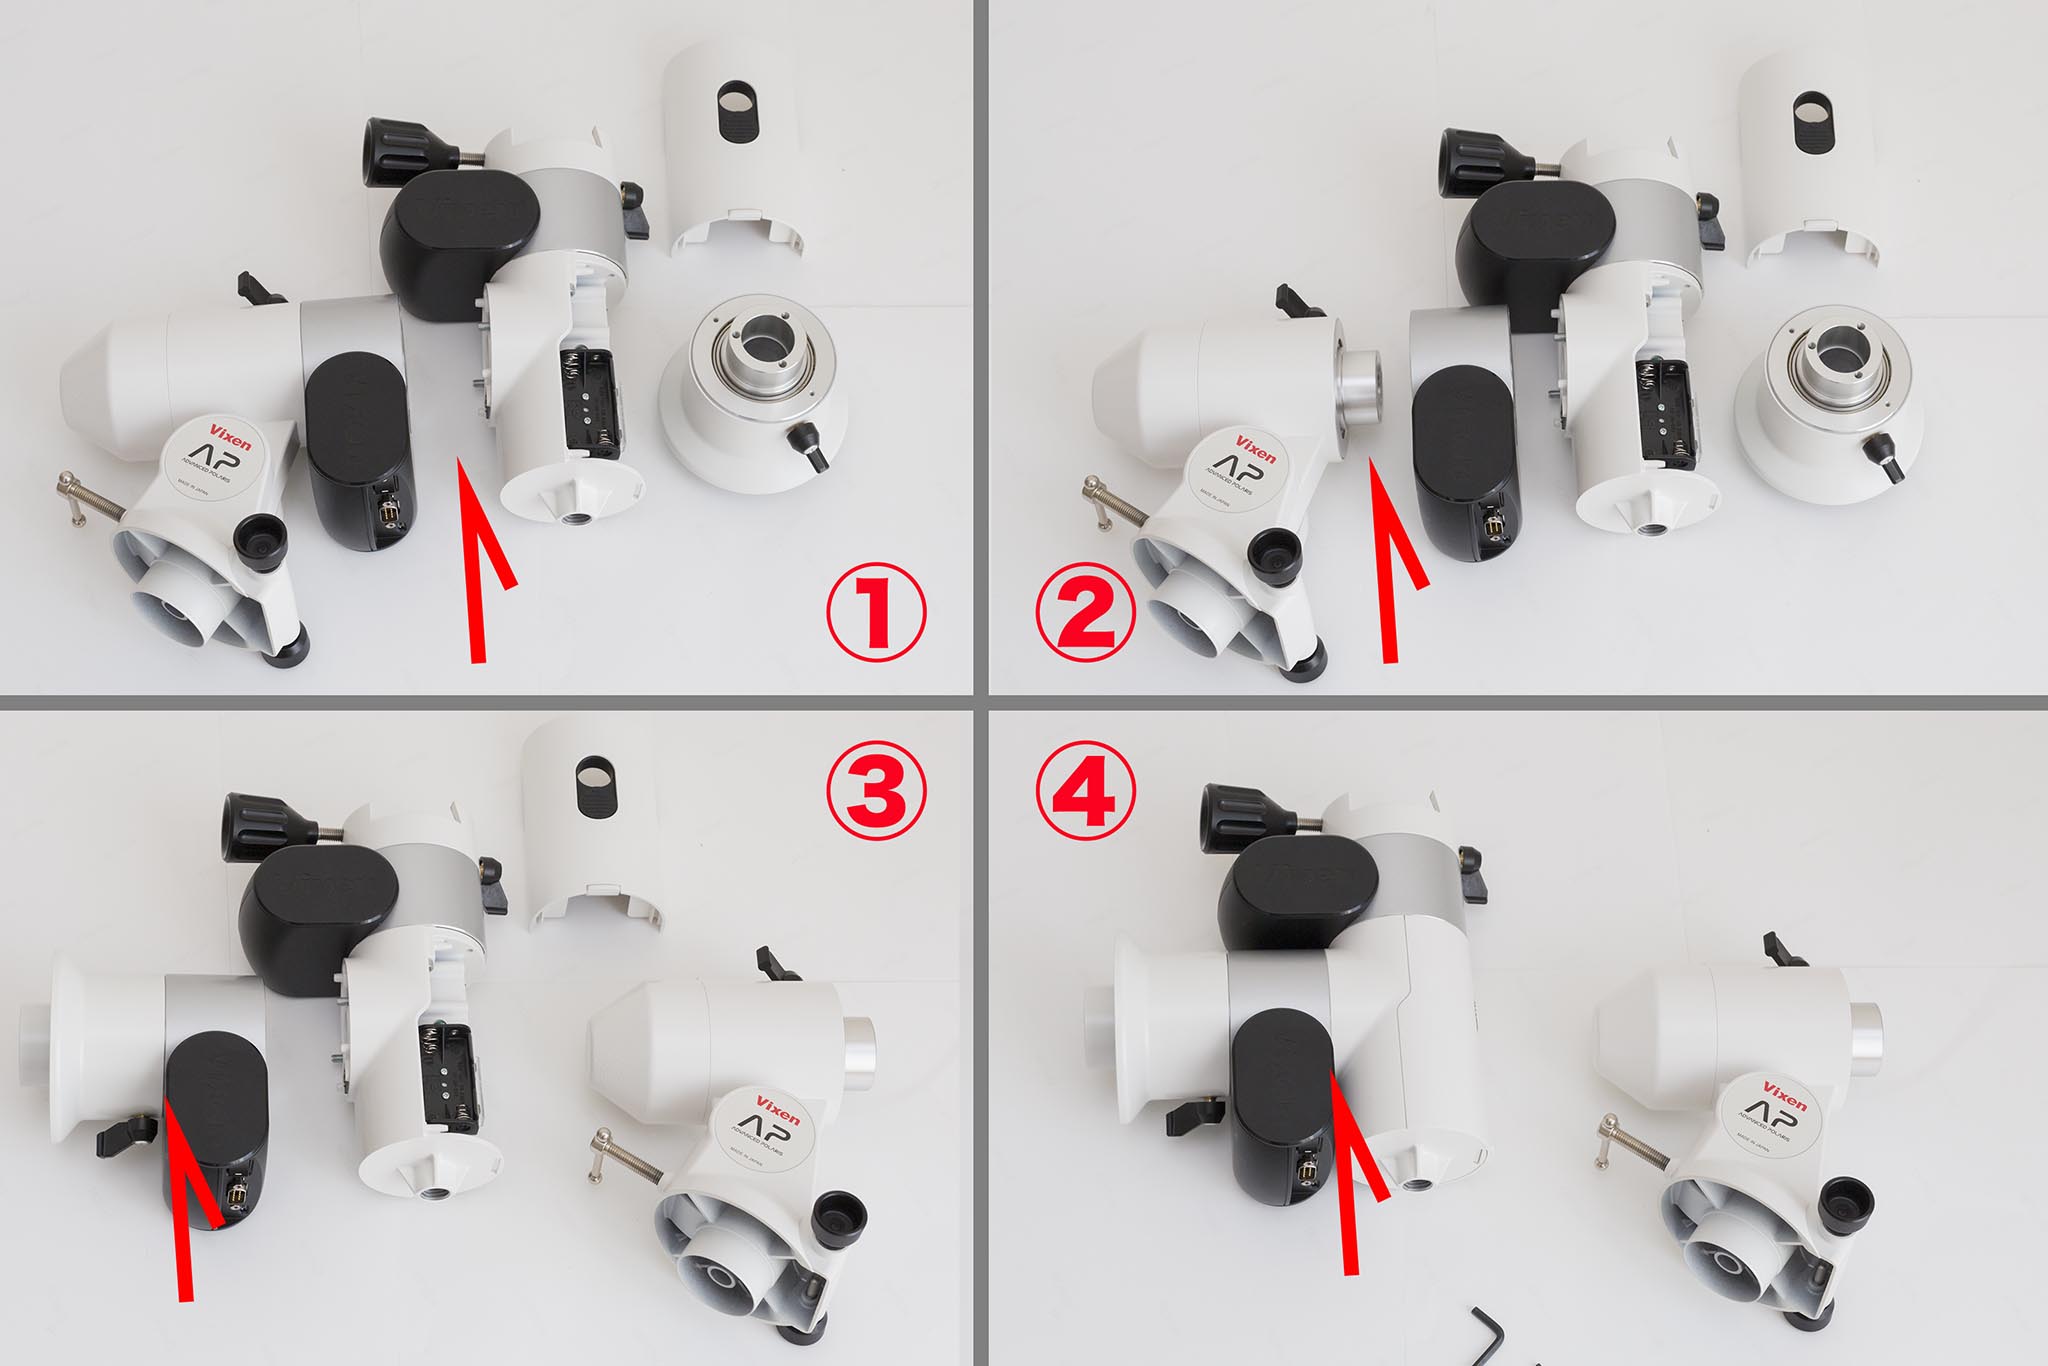
In practice, you have to (1) separate the declination and the ECT first, (2) separate the pole unit and the ECT, (3) mount the ECT on the APZ tripod base, and (4) mount the declination on the ECT.
It’s understandable that it’s designed the way it is today in order to make it possible to assemble solidly and accurately between parts, but speaking of cumbersome, it’s cumbersome. On the other hand, if you enjoy this procedure, you can say that it’s a “ritual” that you don’t have to worry about^^;
In the case of a motor unit
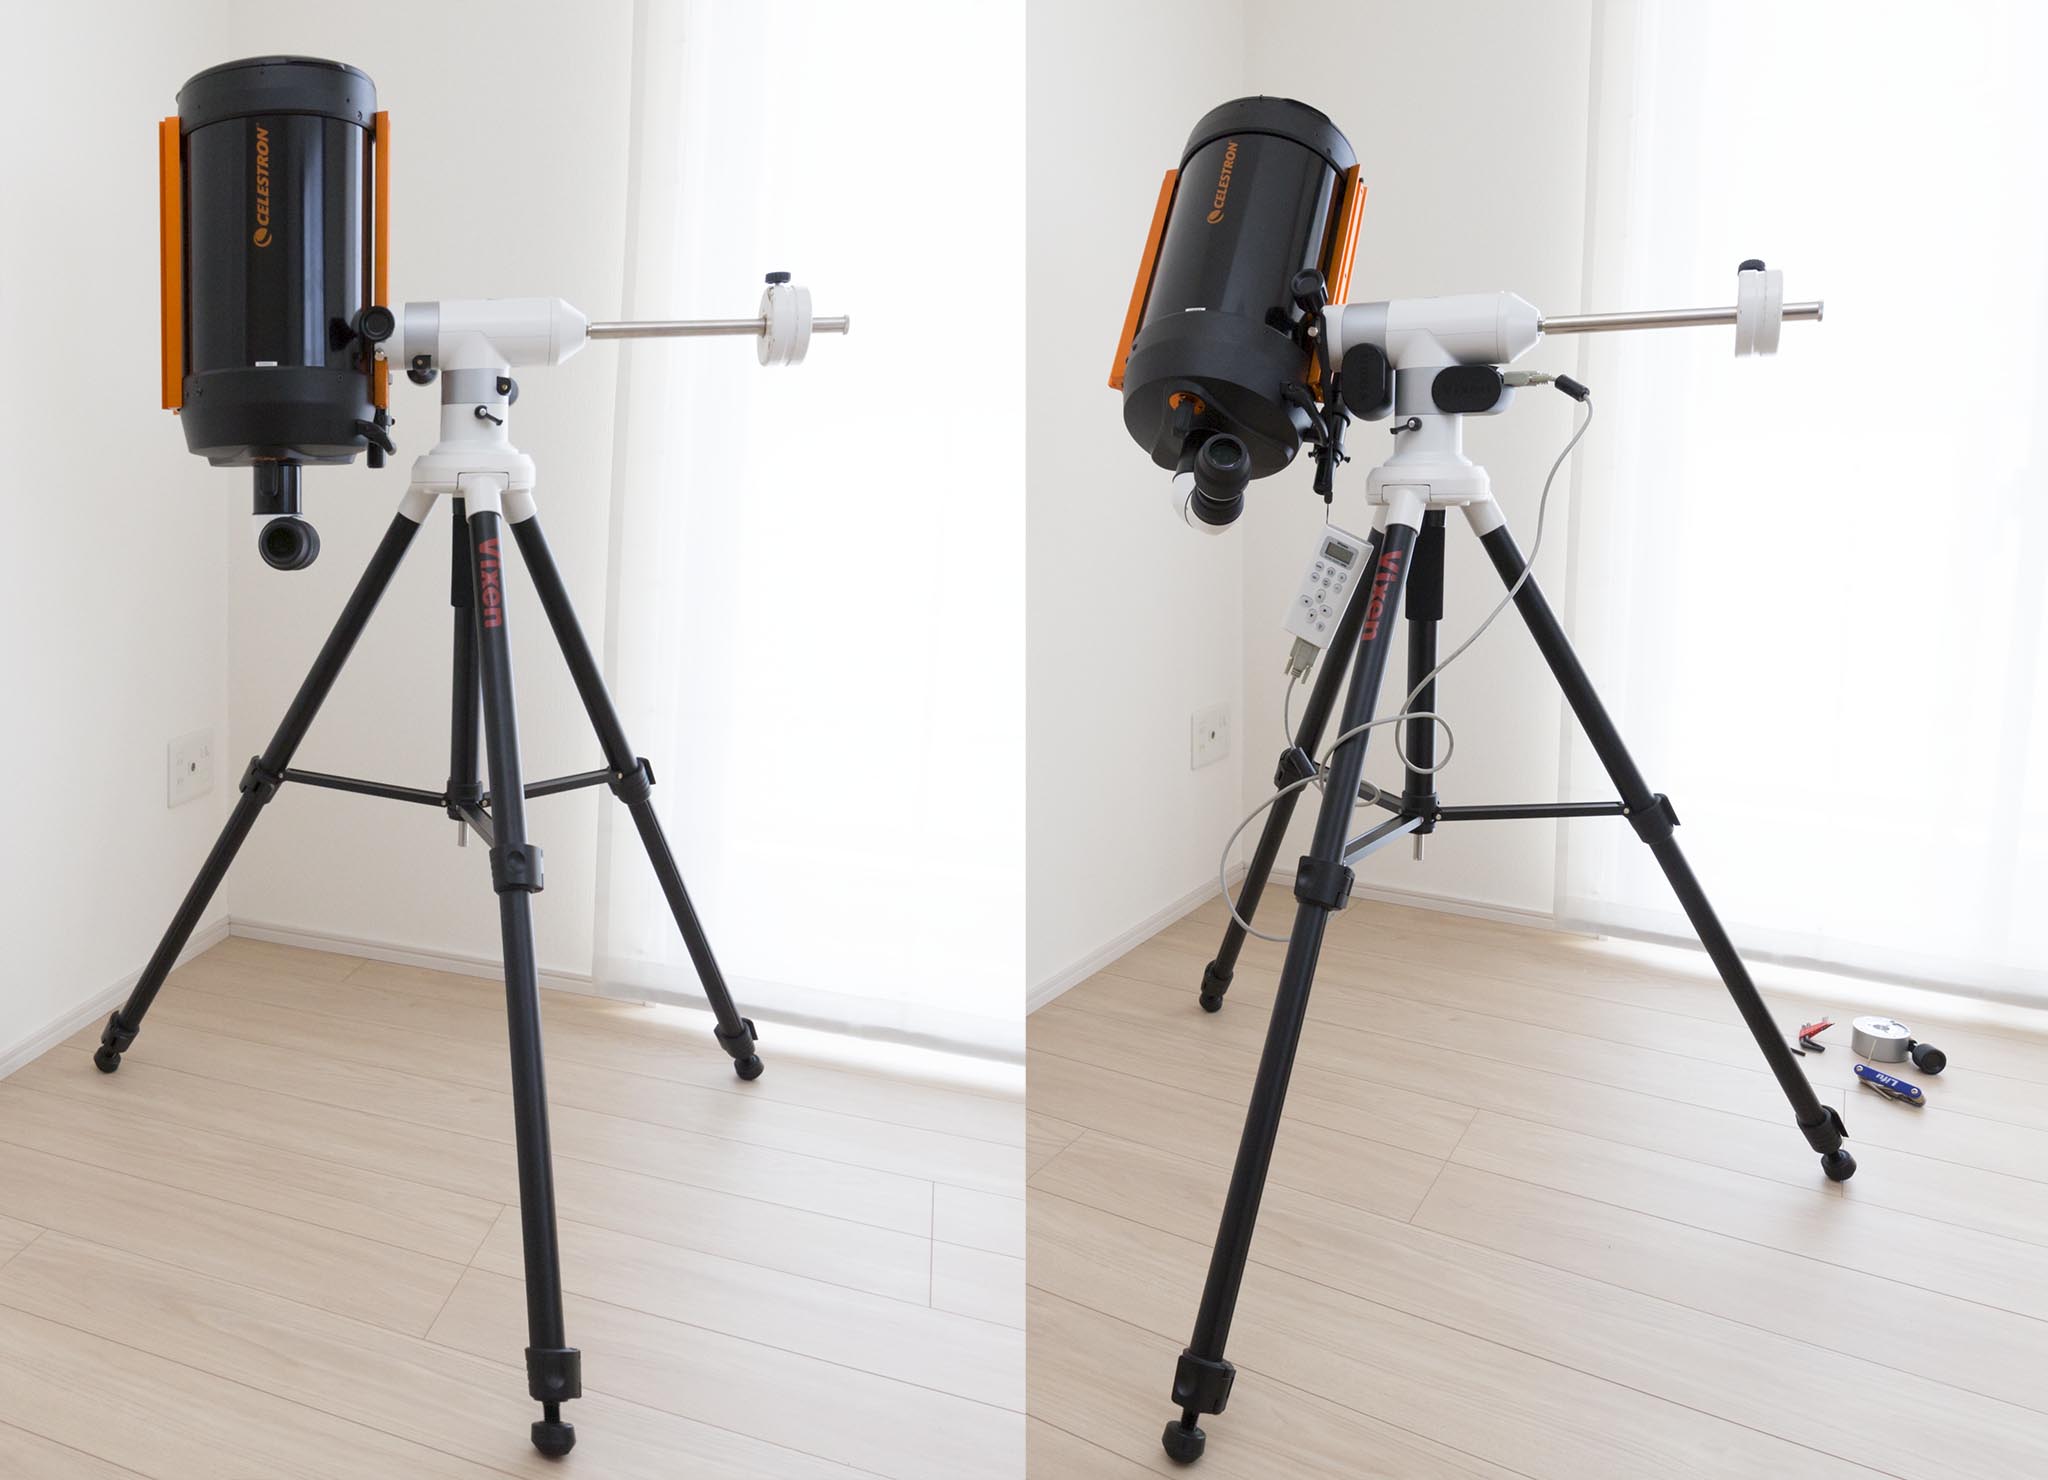 In the left image, the fine movement handle is facing the opposite direction, but it can be easily removed and replaced. In the case of the motor module configuration on the right, if you hang the controller on the declination unit, it will turn together when it rotates horizontally, so there will be no tangling of cords.
The AP mount can be configured with either a motor unit or a manual fine movement unit. I felt that the manual fine movement is easy to operate and simple if it is used as the exclusive use for the latitude and latitude table, but when I use an equatorial mount usually and recombine it with the latitude and latitude table according to the time and the case, the motor unit can be used without a problem.
Tips
To get more out of your AP mount. Here’s a summary of what I’ve noticed so far from using it, including details, weaknesses and their completions.
Applying the clamp

One of the product concepts for the AP Equator is “Free Stop“, similar to Vixen’s popular Porta series. The Free Stop eliminates the need for “clamping operations,” which are somewhat troublesome, and has the advantage of being able to swing freely in the desired direction.
However, when the telescope is used for photography, the telescope cannot be fixed firmly and may be moved carelessly, or conversely, it may be inconvenient. Therefore, I ended up taking a hexagonal wrench to the shooting site and tightening it each time as shown in the photo above.
In order to use AP mount more conveniently, we recommend you to purchase “AP Clamp (920 yen including tax)” which is sold separately (*).
(*) This is standard equipment for the AP Photo Guider and the AP Polar Axis Unit. I feel that all of them, including the latitude and longitude specifications, should be standard accessories.
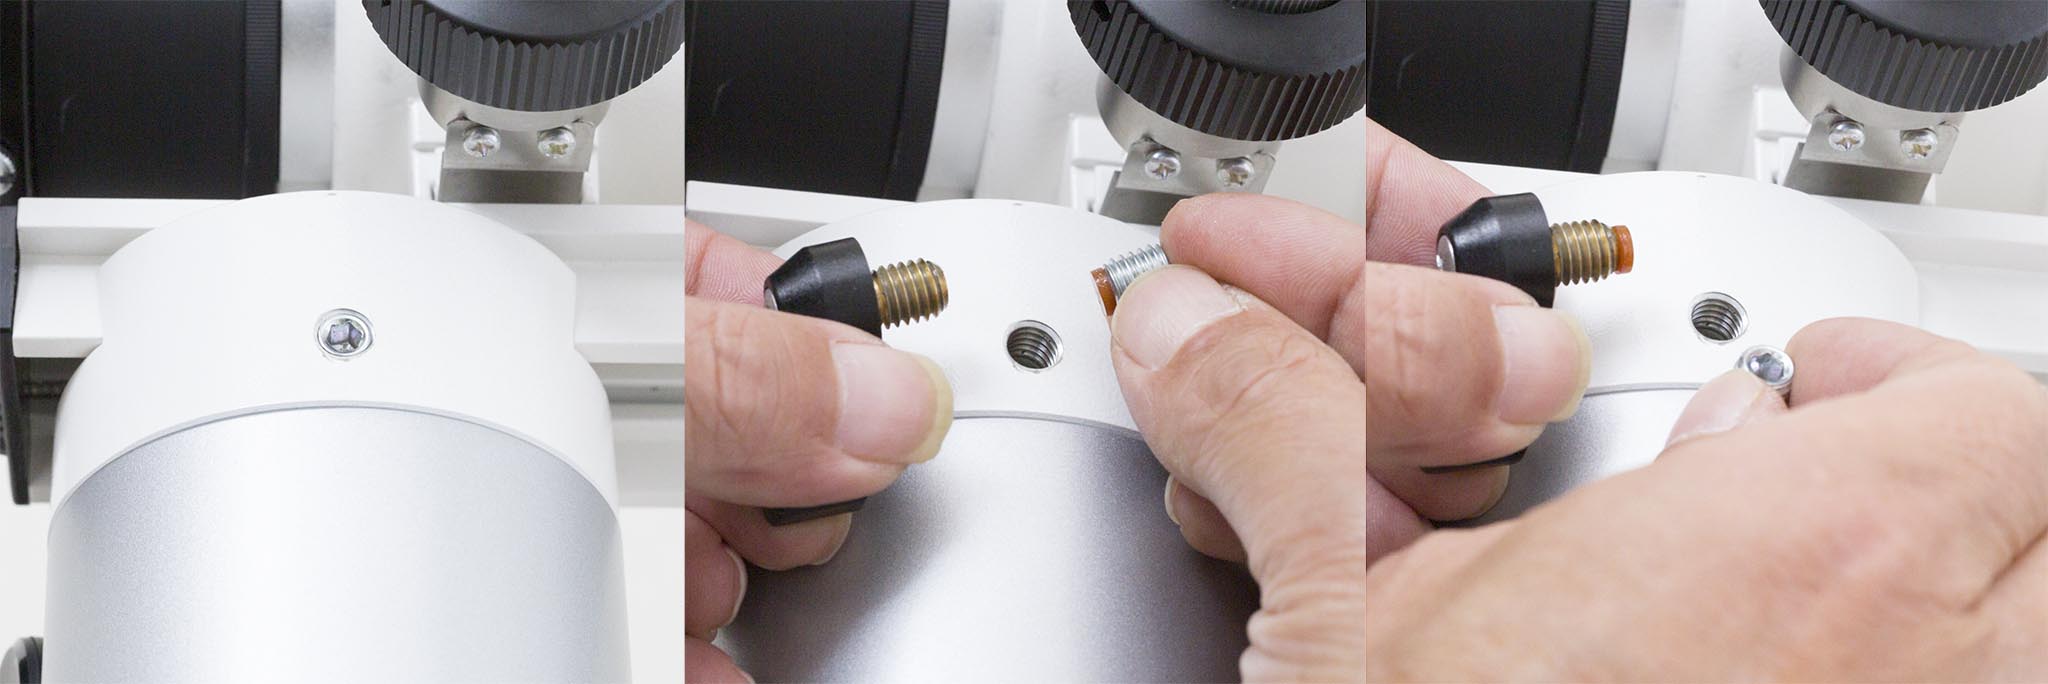
When installing a separately sold clamp, remove and replace the clamp screws with an Allen wrench, but be careful of the orange “spacers” when doing so. In some cases, when the screw is removed, it may remain on the side of the stand, or it may come off with the screw, in which case it must be replaced with the end of the clamping screw.
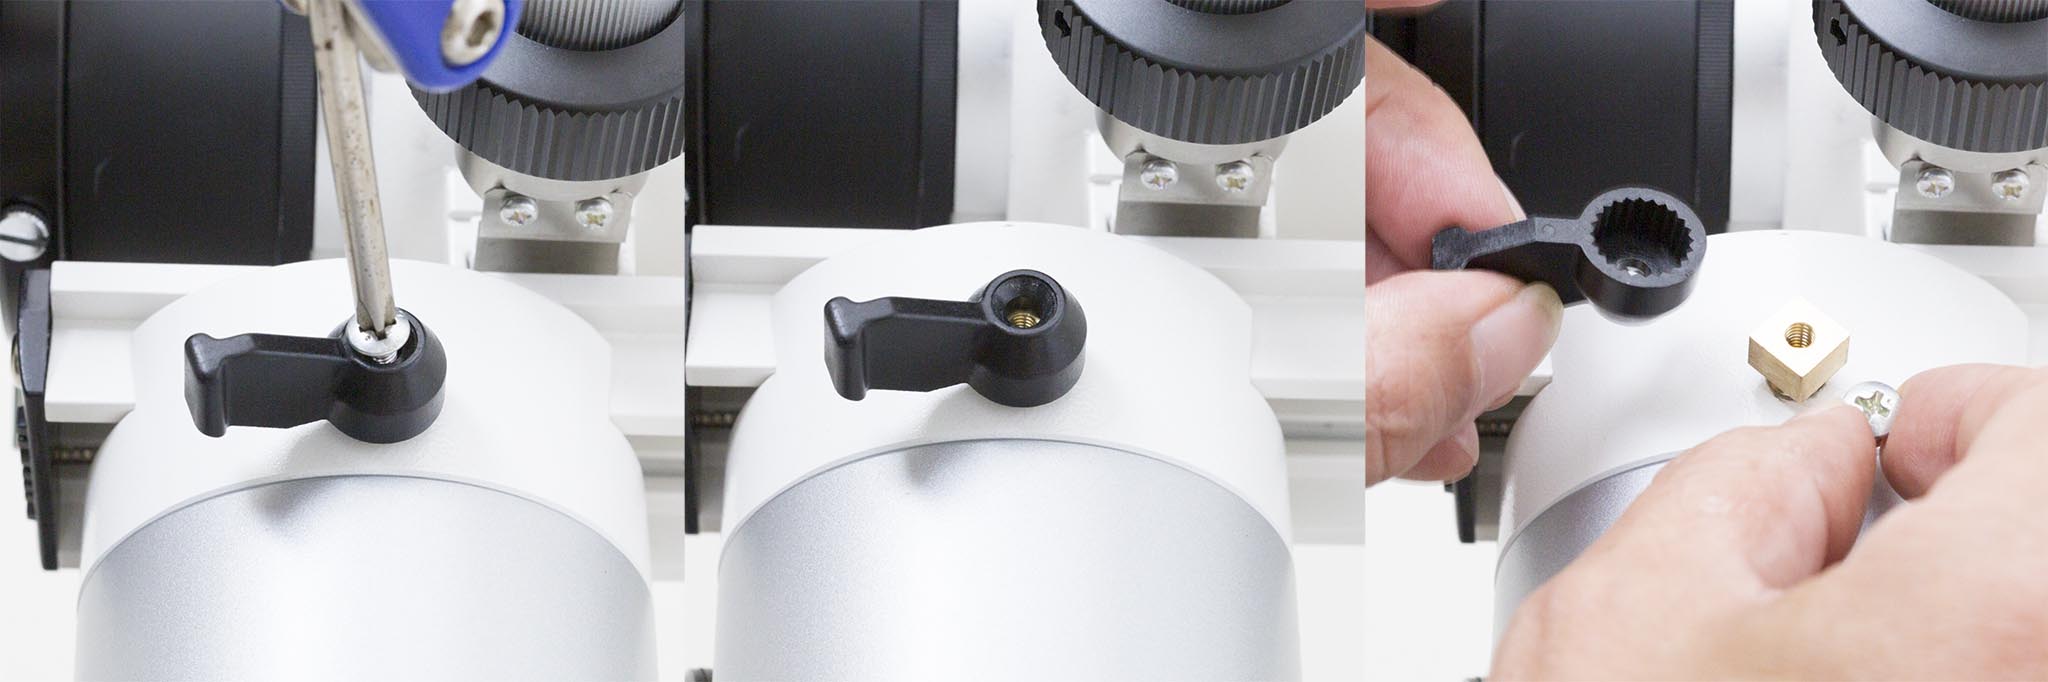
The angle of the clamp can be changed by loosening the screw with a Phillips screwdriver. It is recommended to adjust it properly before the production specification because it can be adjusted finely.
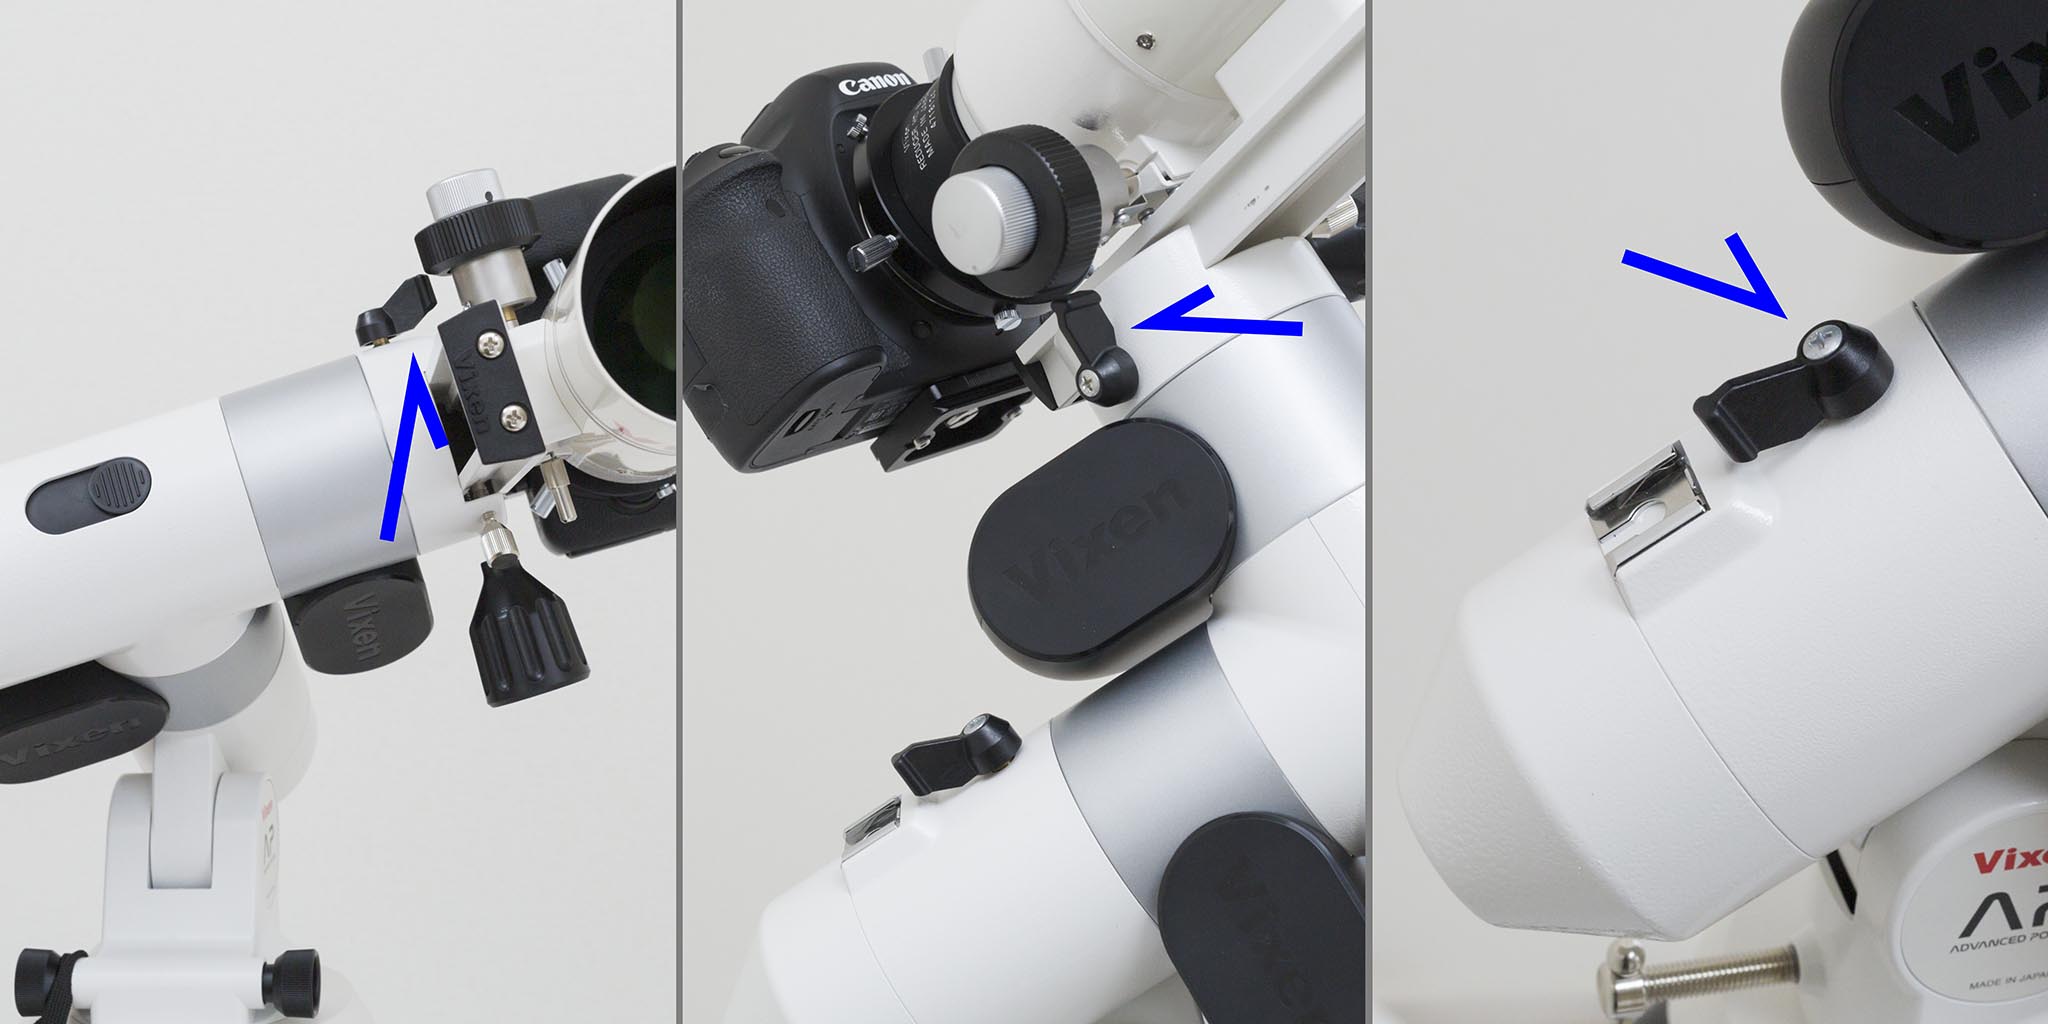
The positioning of the clamp on the E longitude side (right in the photo) is relatively easy. In this position, it is almost impossible to interfere with the base. On the other hand, the clamps on the declination side (left, center) tend to interfere with the motor housing, plate and barrel, so you should carefully fine-tune them (*).
(*)It may be that the clamp is not included as a standard accessory because of the design concept that beginners should not be made to pay attention to such details, but if that is the case, there may have been room for ingenuity, such as making it possible to adjust the angle of the clamp by one touch.
GOTO by Star Book Ten
Is the configuration of the AP mount equatorial mount official? is not supported by automatic introduction. To begin with, “free stop” and automatic introduction (without encoder) are incompatible. But a backroom trick? The AP equatorial mount can be installed automatically if you have “Star Book Ten(SB10)(*) (direct sales price 97,200 yen including tax)”.
(*)It is currently out of stock at Vixen Direct Sales, but there is some information that it will arrive in April.
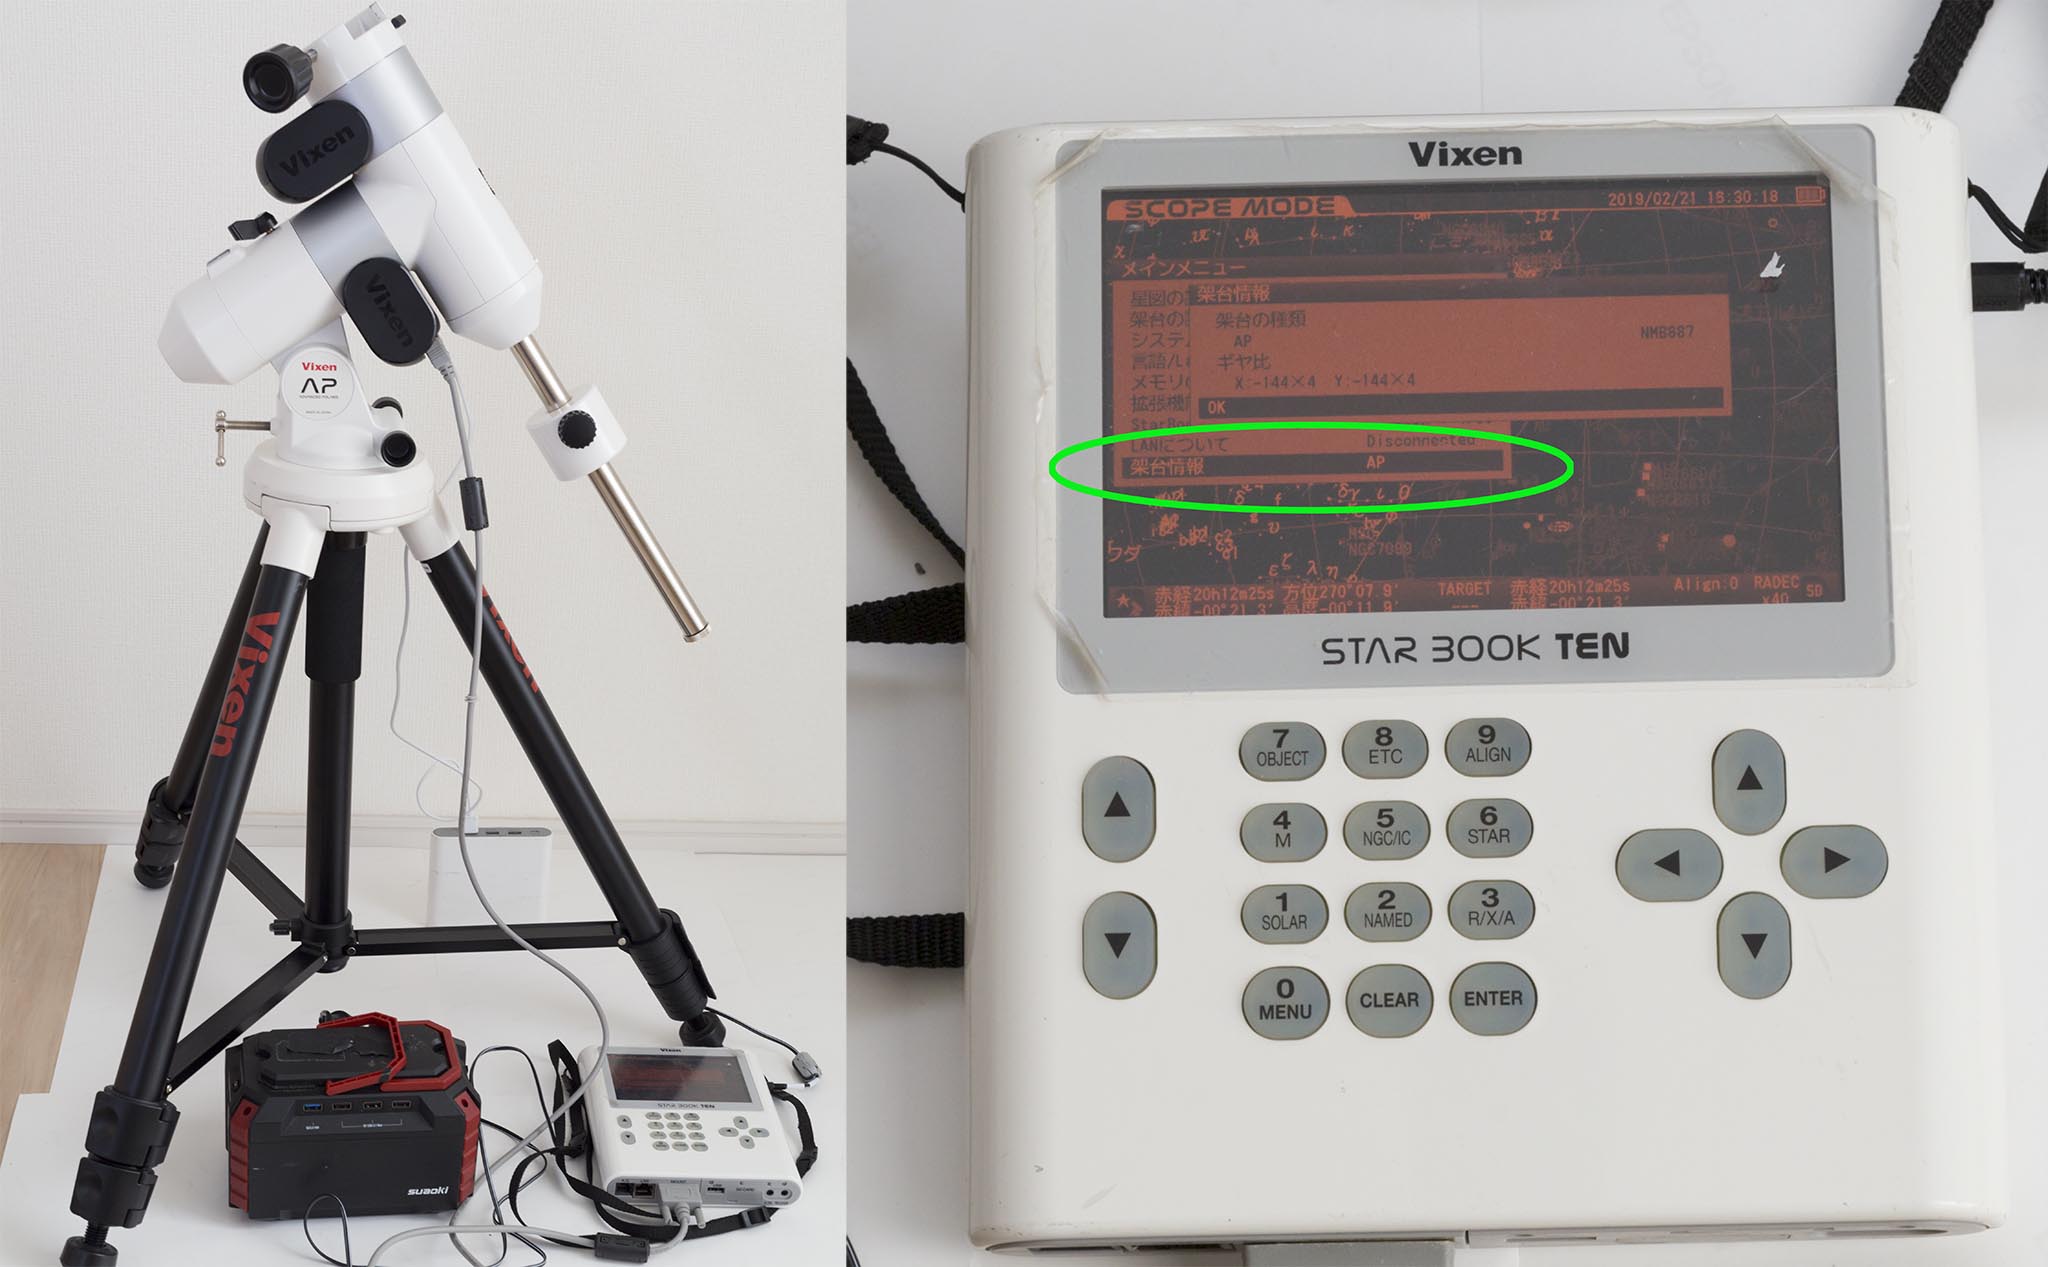
Connecting the SB10 to the AP mount, the AP needs to be powered by 5V and the SB10 needs to be powered by 12V, and the SB10’s “stand information” shows “AP”, indicating that it is recognized (*).
(*)It was recognized by turning on the AP and then starting SB10. If reversed, it will not be recognized and the trestle will remain in the “disconnet” state. When turning off the power, turn off the power to the AP first. If you reverse it, the SB10’s screen goes blank and “Runaway? It will be a wind screen.
It seems to be automatically introduced at “100x speed” when SB10 is connected. It’s not a very fast camera, and it’s honestly stressful to switch subjects frequently, but it’s practical enough for slow and steady shooting like “a few subjects in one night”.
In any case, it seems that SB10 is not officially supported by AP mount (*) so please use at your own risk.
(*)I’m sure there are various circumstances, but I’d like to see them officially support it…
Storage case
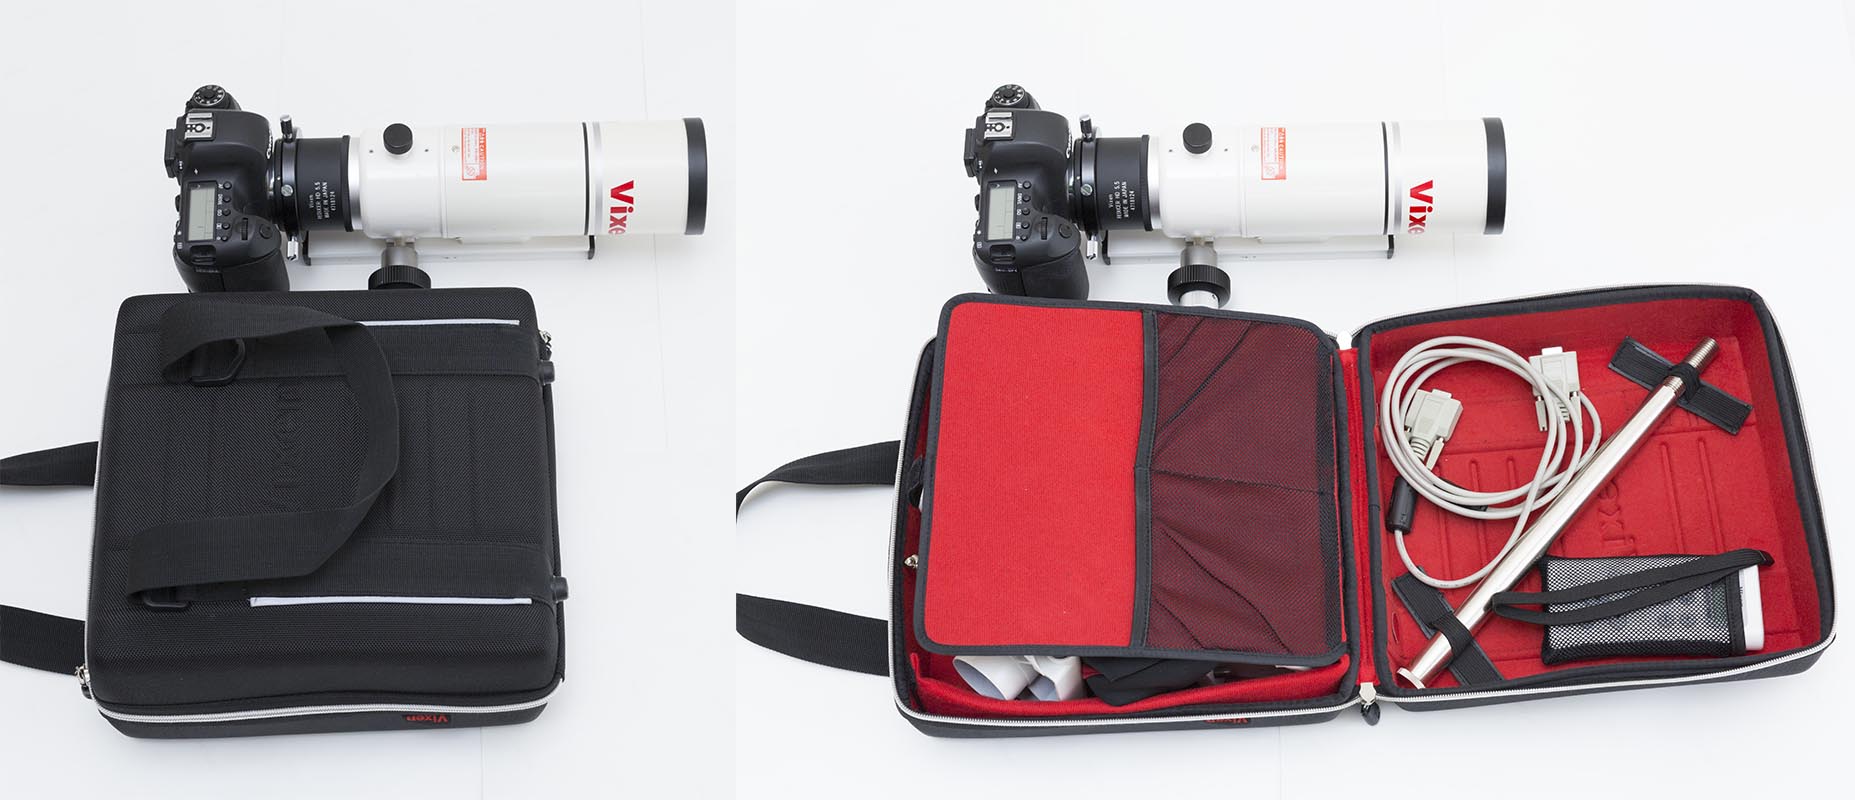 Weighing 800g, with special retaining material for weight axis and SB1 controller. The weight axis is a little difficult to pass through.
Dedicated case “AP Mount Case (direct sales price 13,770 yen including tax)” is sold separately. It is possible to store a set of equatorial mount itself. The main body of the case weighs only 800g. It’s not as rough as the aluminum trunk case, but it’s very compact and easy to use, matching the AP mount concept well in many ways.
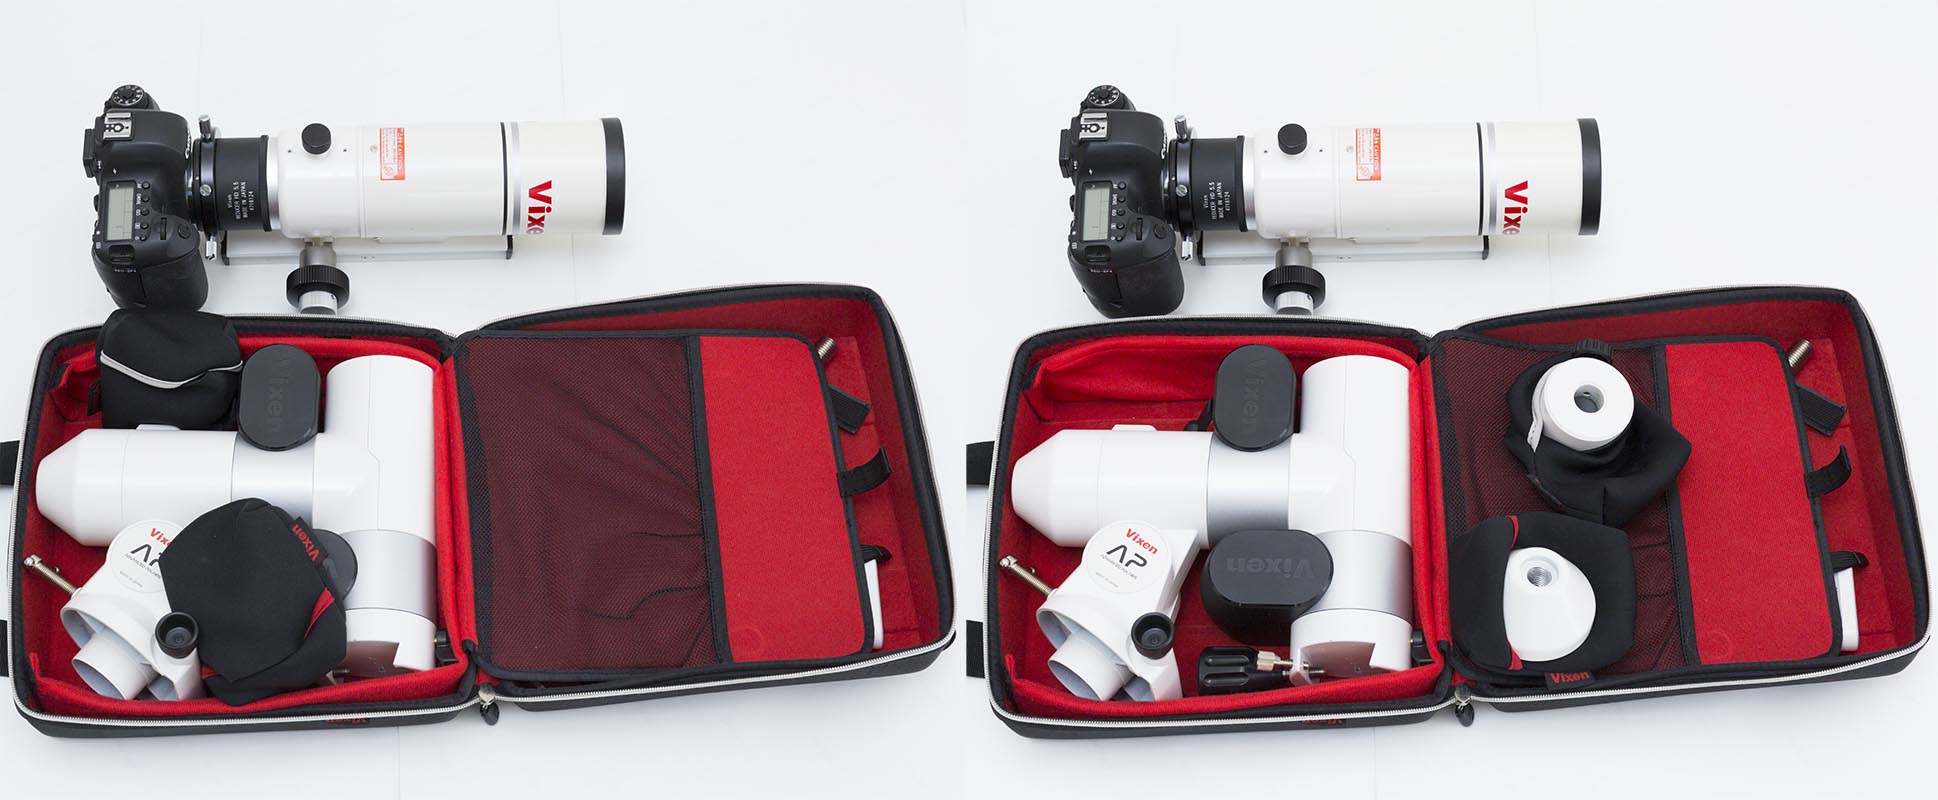 It also comes with a soft pouch to hold the balance weight/weight axis cover.
When storing it, you need to be careful not to interfere with the inverted deciduous body and the fine movement of the clamp and pole axis of the dovetail, but if you get used to it a little, you can take it out and store it easily.
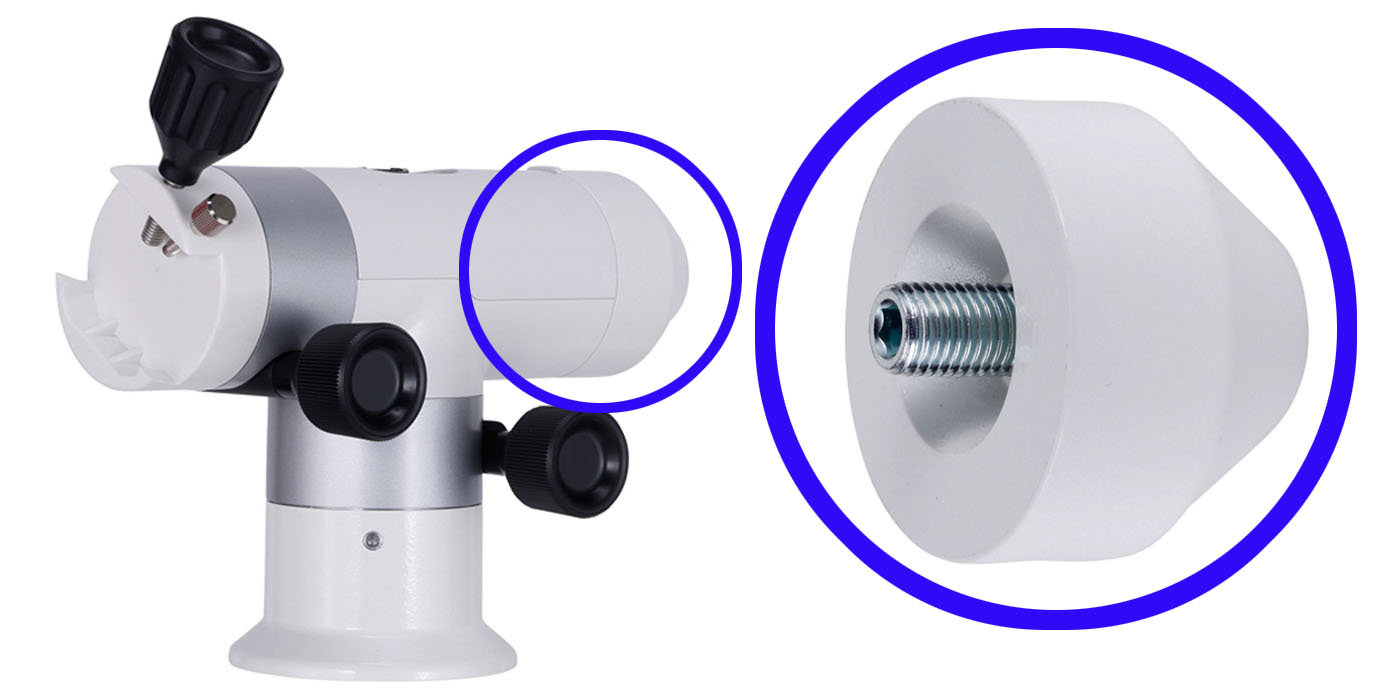
Attaching and detaching the weight shaft
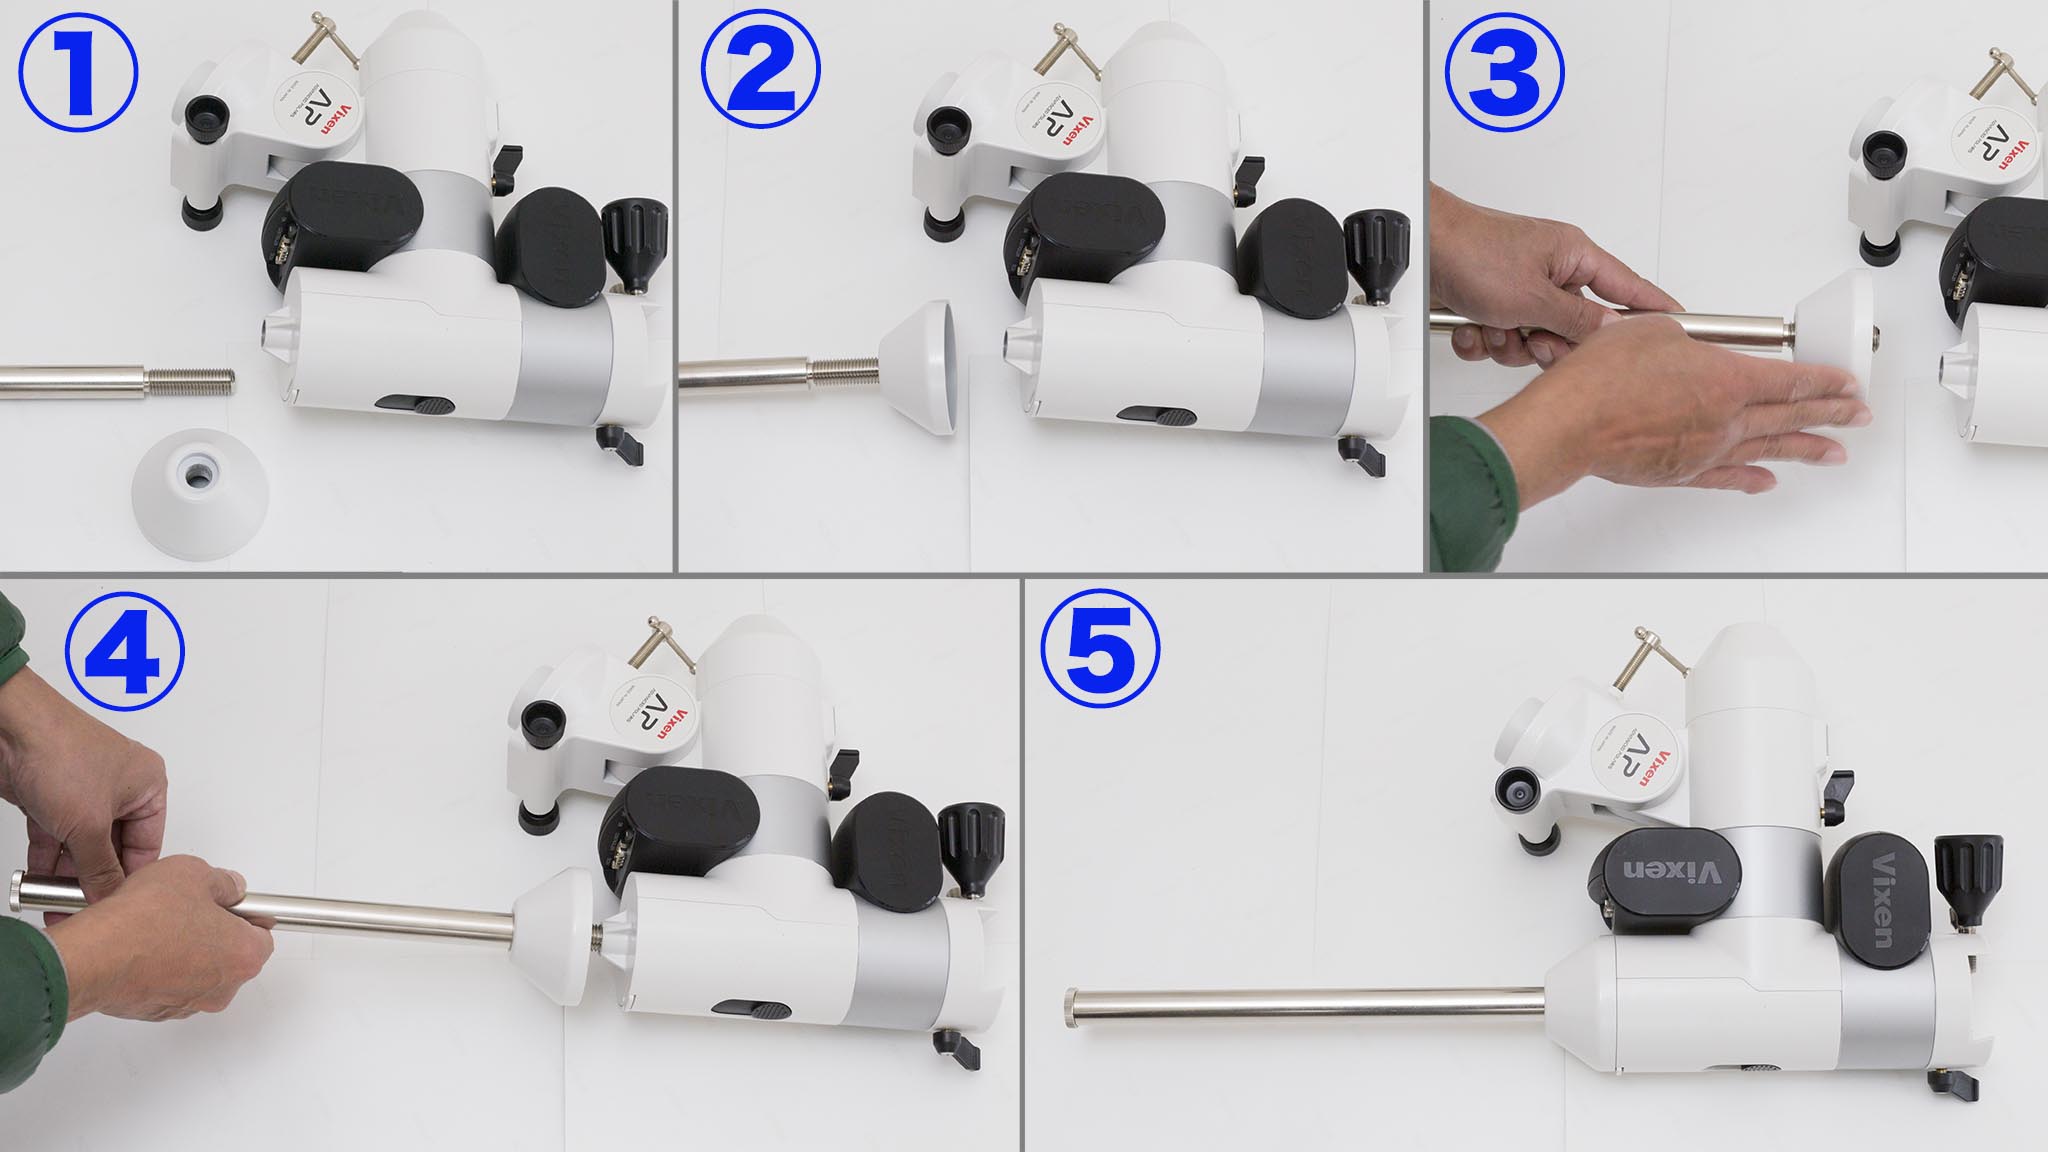 Assembly Instructions. It’s just a matter of turning the game over and over, but it’s hard to do ④…
It’s a sad part of the AP mount that the weight shaft is a bit troublesome to remove. The threaded part of the shaft is quite long, so I had to turn it around and around a lot to screw it in as much as I could. .
Is there any way that this part can be put on and taken off by one touch with an alkasys clamp? I think that would make it possible to configure the equipment to be mounted on both ends of the declination axis, which would make it more flexible.

The above configuration is the equatorial axis which I have used in another equatorial mount. The weight axis is fixed to the Alka clamp and the L-angle for camera is attached to the large plate which is the equatorial axis. It’s convenient to put on and take off with one touch^^
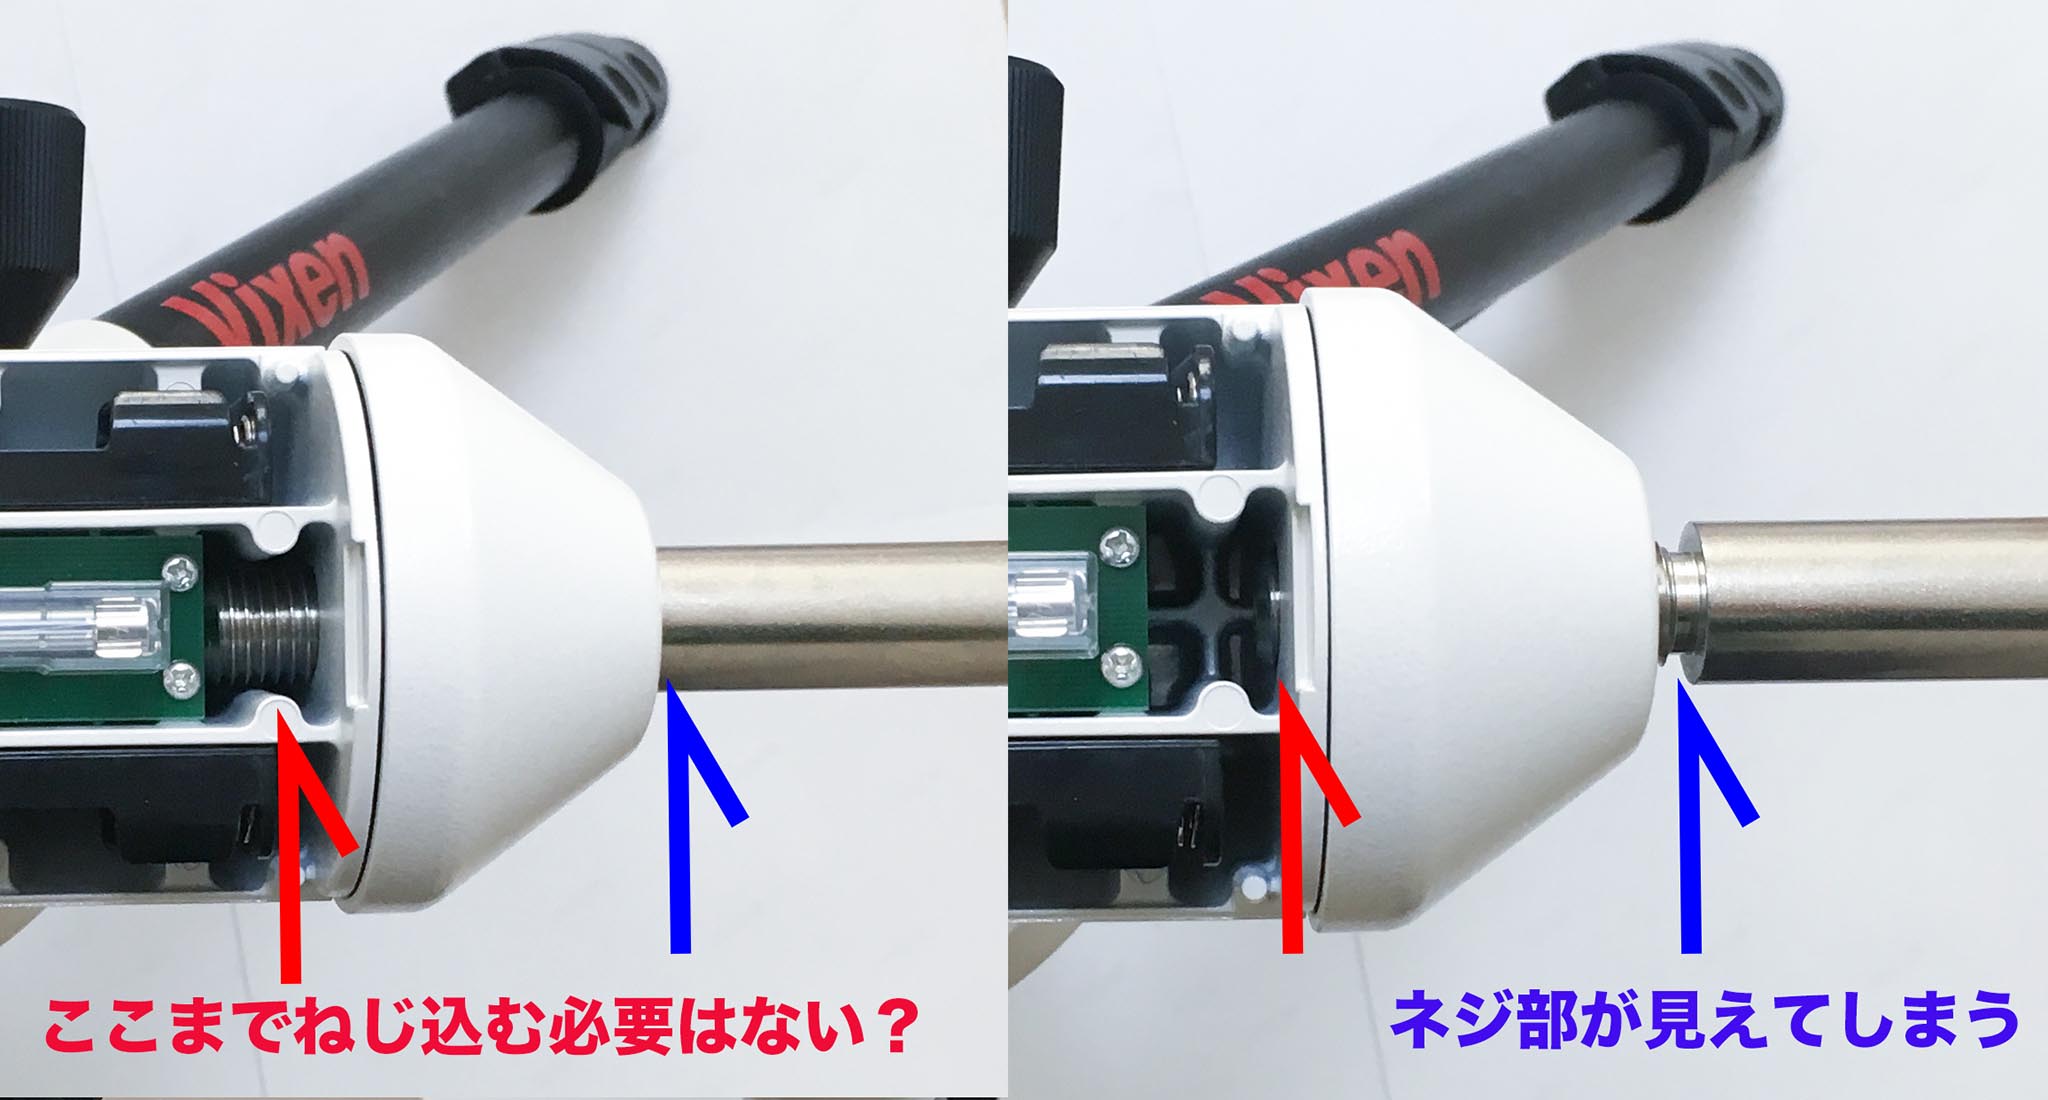
The threaded part of the weight shaft is slightly longer than the length required to mate with the deciduous body. When fully screwed in, there is a little extra threaded part (left side of the image above), but it will be securely mated without being screwed in this far. It looks a little uncomfortable, but there is no problem even if there is a little bit of extra threaded part visible (right side of the image above).
AP mount as a base for self-building and modification
The manual module of the AP mount is very high quality and high precision. By taking advantage of this, it is possible to “install a motor in a manual module and convert it to 2-axis automatic introduction”. However, it will be on a “home-grown” basis…
In fact, we purchased a manual version of the “AP Mount (direct sales price 72,900 yen including tax) separately and asked an acquaintance to convert it to a 2-axis automatic installation. Using open source drive software and high performance drive chips, it can be automatically installed at 800x(*) speed.
(*)Maximum speed varies depending on drive software settings, drive circuit, and motor specifications. Incidentally, even at 800x speed, the drive noise is so quiet that you don’t even notice it.
Physically, it is driven by a belt from a small stepping motor with a metal fitting formed from a steel plate between the parts that connect the fine movement module. The controller has WiFi and is recognized by the outside world as an LX200 compatible equatorial mount. For this reason, automatic introduction and autoguiding is possible using SkySafari or ASI AIR. It’s the best small equatorial instrument ever made. The “background goodness” of the AP mount has come to life in a big way.
This mod was more of an experiment in “distribution” between individuals, rather than a commercial base(*), but as this form of customization by third vendors expands, the options will be greatly expanded!
(*)The details of this mod will be introduced in the Tenrif sooner or later.
What we want for AP
The Importance of the ALCA Swiss Compatibility
In the world of camera tripods, it is often said, “There is no greater or lesser use of a tripod. Large tripods, medium-sized tripods, and small tripods all have the right fit, and it doesn’t mean that you only need one large tripod.
This is also true for astronomical mounts, which come in a variety of sizes, from heavy equipment (over 20 kg) to small cameras.
The exact same could be said about the “Arimizo-Arigata system. In the world of camera tripods, ALCA Swiss compatibility is becoming the de facto standard for everything from camera bodies to 4kg telephoto lenses. There is a wide variety of products in the market, from cheap to high-end products, such as plates, clamps and panoramic heads.
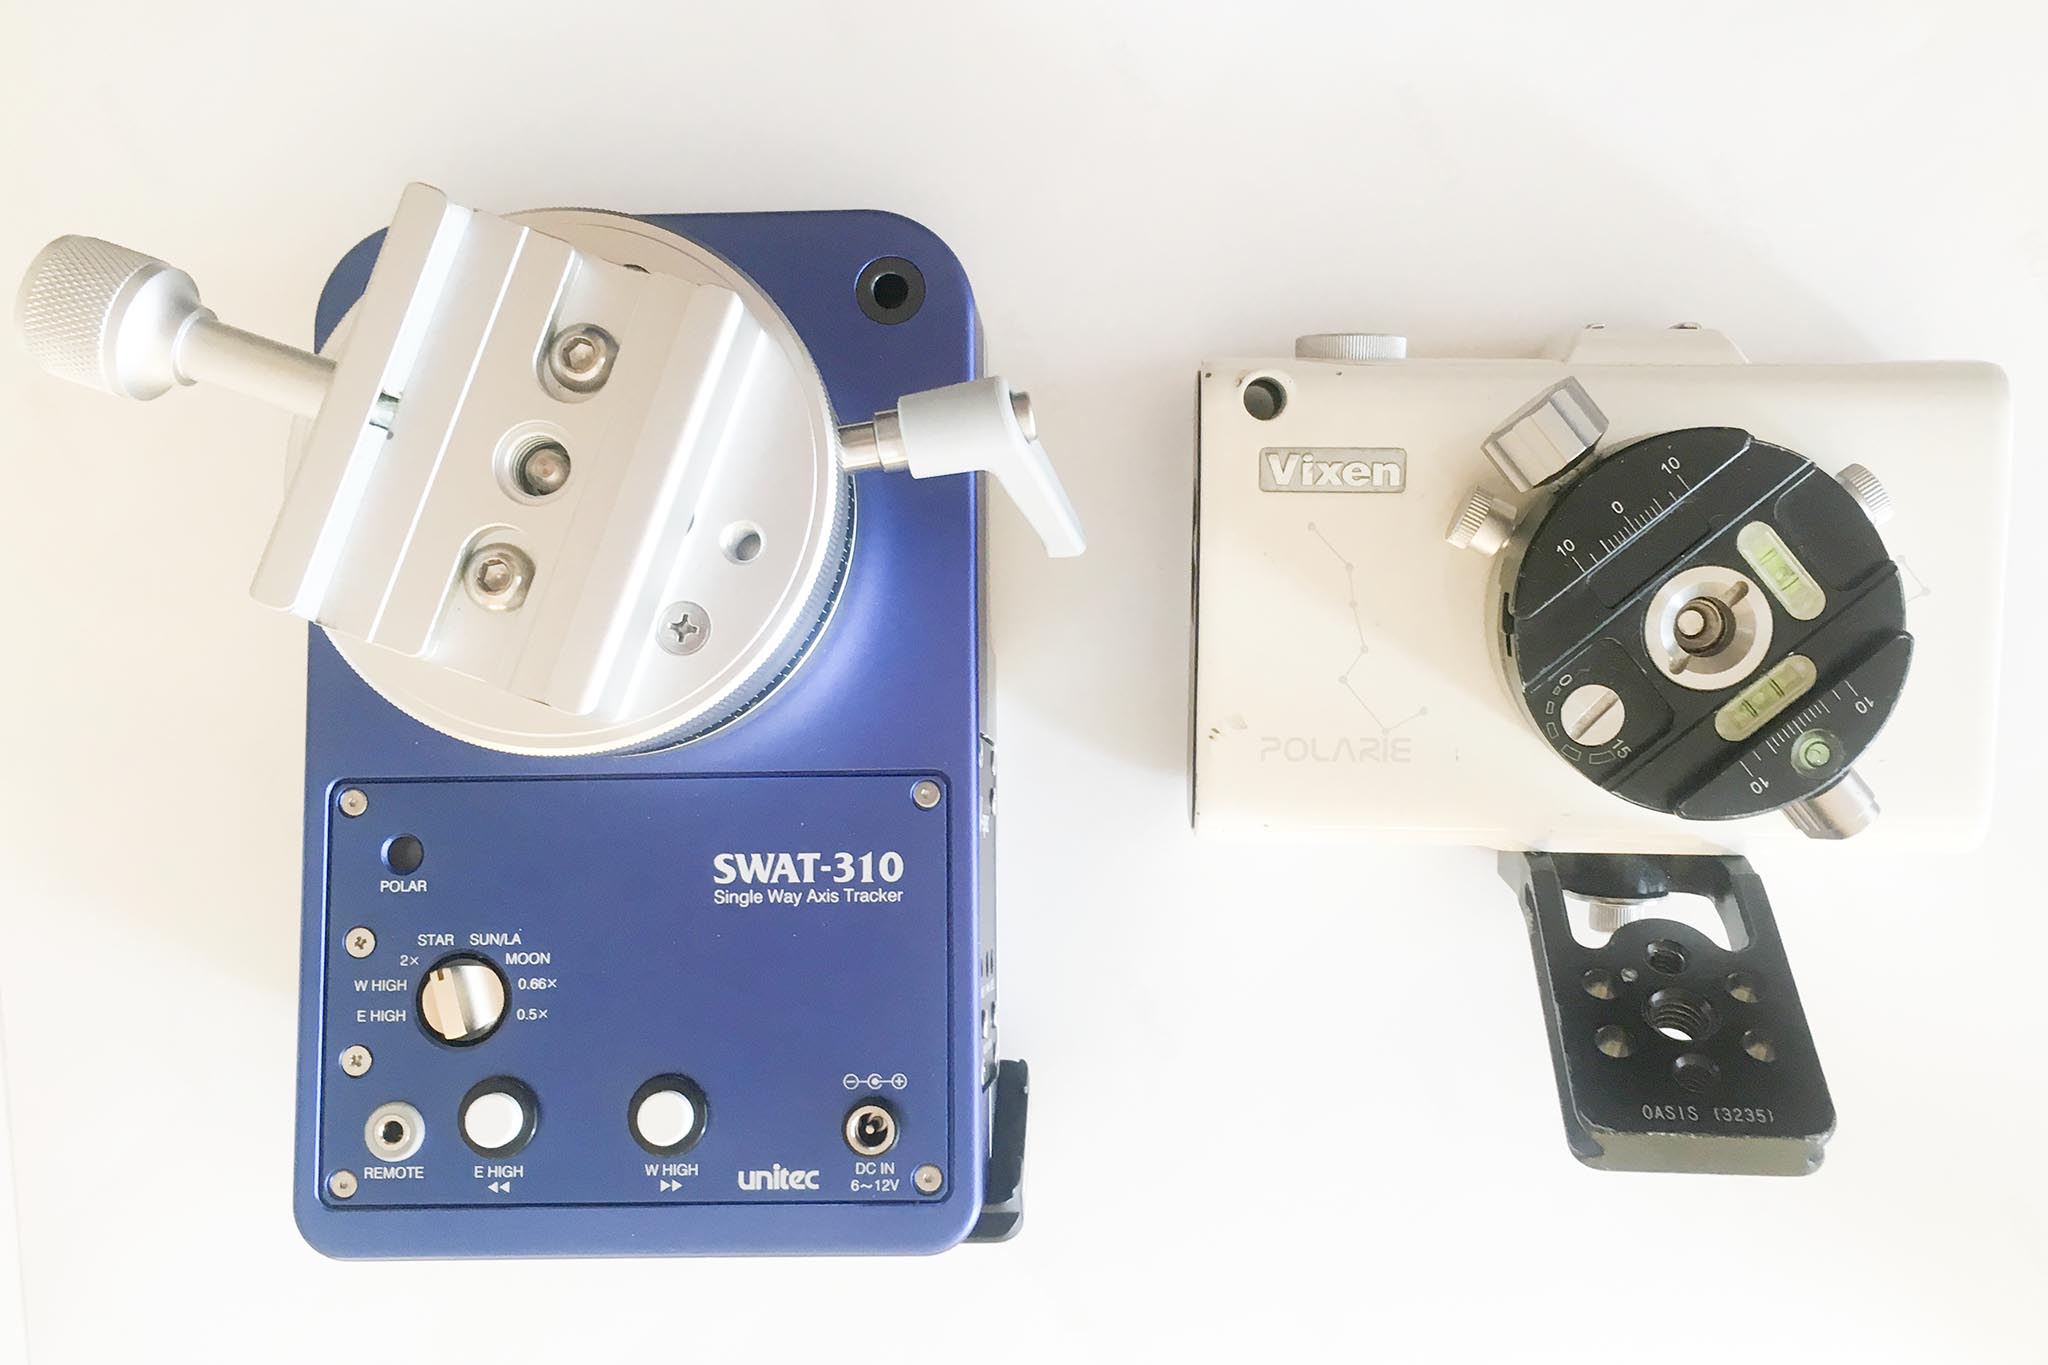 Alcus Swiss Catcher, an optional part of the left-hand SWAT equatorial mount. The crumple bars are longer than those used for cameras to prevent interference. The right is the author’s Polarie. A commercial panoramic head is just the right size, and I leave it on as it is. Of course, a cantilevered fork configuration is also possible.
You can’t afford not to take advantage of this in your astronomical equipment, and in recent years, the use of the ALCA Swiss has become more widespread in astronomical equipment, including BORG and SWAT, and improvements have been incorporated to reflect the needs of astronomical equipment.
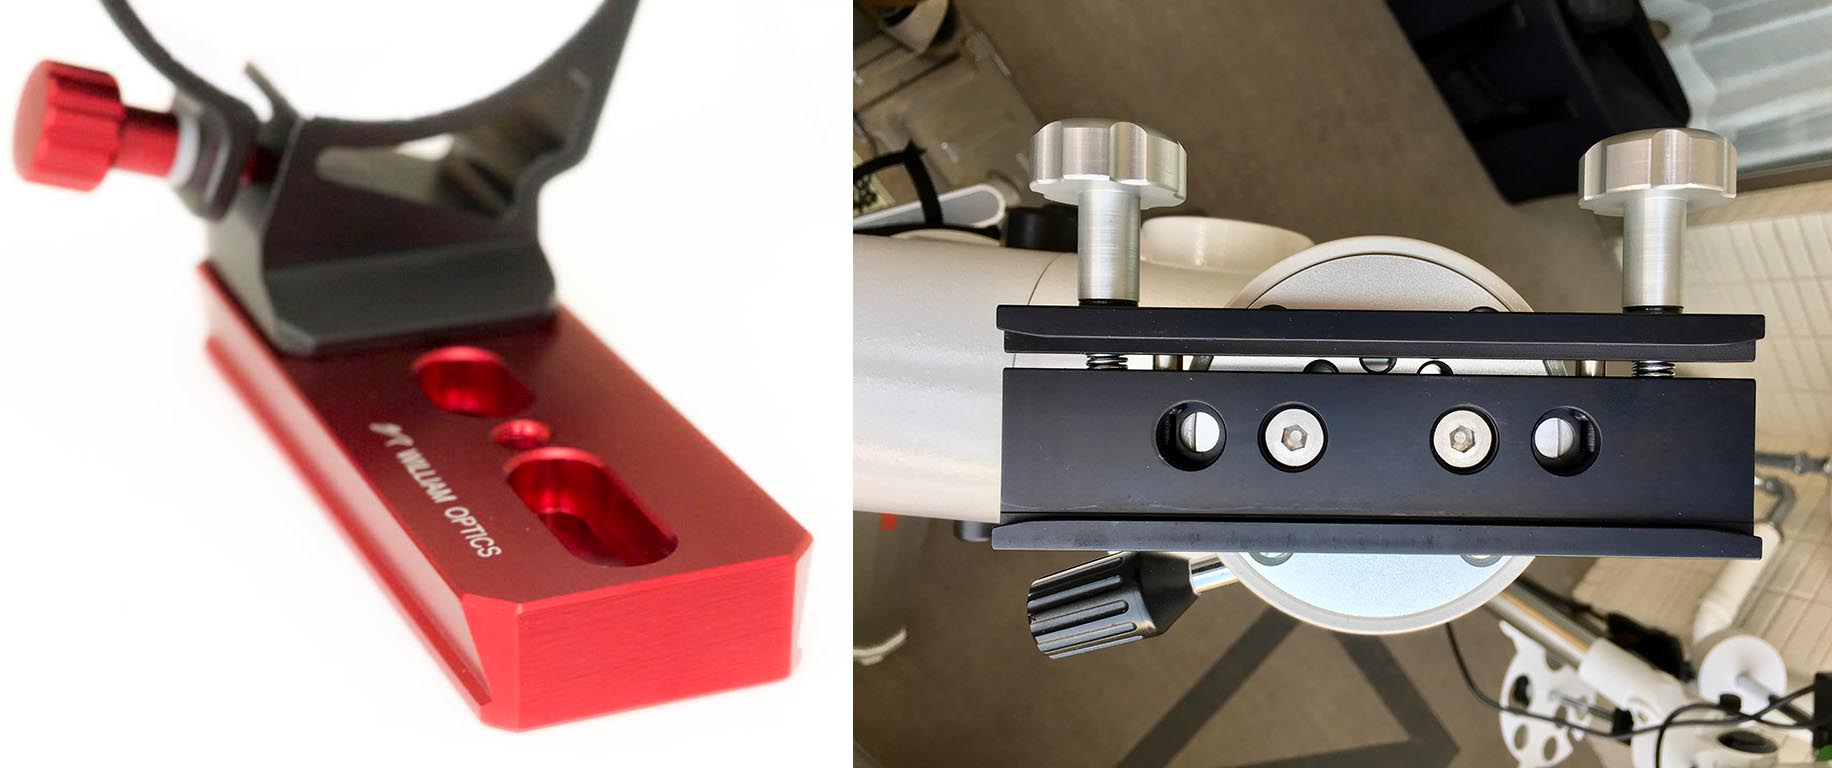 Left: The aligator plate for both Alcasuisse and Vixen used in William Optics’ RedCat51 optical tube. Right: ADM’s Arca Swiss Long Clamp. It can be installed on Takahashi standard trestles. The image shows the installation on SXP.
For example, in terms of strength and size, if it’s a Polarier, Arca Swiss is enough. As for the AP mount, except for the lens tubes for beginners(*) and those of other companies, I think we can use the Arca-Swiss as the base.
(*)Considering the risk of falling out, the Vixen standard, which is larger and thicker than the Arca Swiss, may be safer.
(**)For the same length, it is an absolute fact that, in terms of strength, it is “Vixen Standard >Alca Switzerland”. Especially with small (less than 50 mm long) Alka clamps and thin, long plates, deflection or insufficient clamping may be a problem when shooting for long periods of time.
GOTO function
Is it free stop or automatic introduction that is more beginner-friendly? Is it a free stop or an automatic introduction that maniacs want? There is probably no “right answer” to this question.
The only thing that can be said is that many users know the convenience of automatic introduction and are seeking it, and there is still product development going on somewhere to make automatic introduction more convenient. As long as Vixen is a “comprehensive astronomical telescope manufacturer,” we shouldn’t be able to look away from this fact.
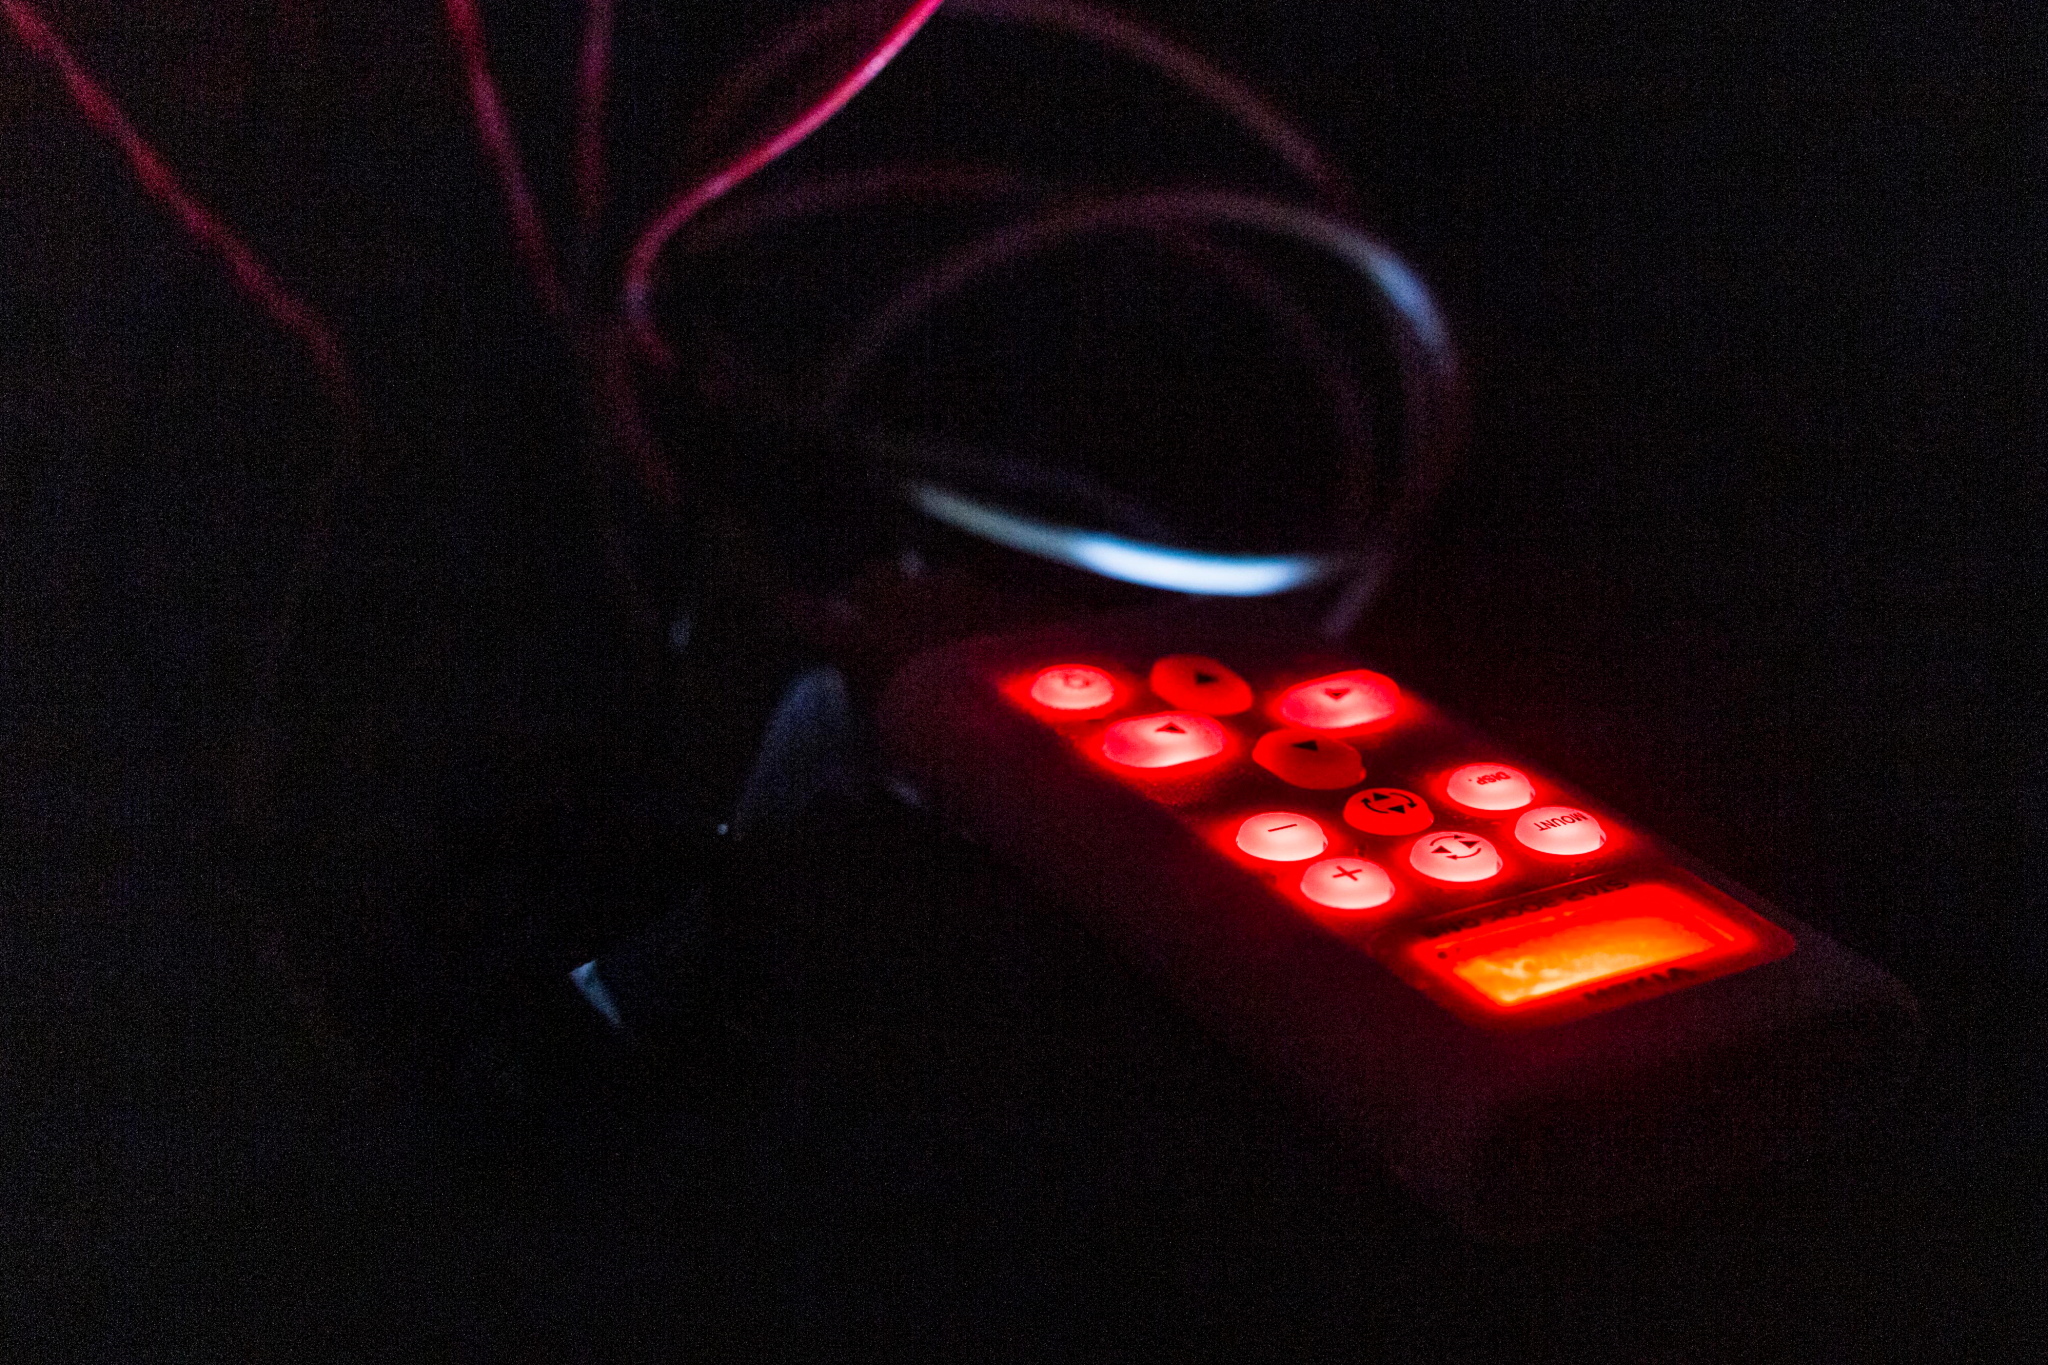 Star Book One. Easy-to-see key illumination and easy-to-operate buttons are the same as in Star Book Ten, but it’s a shame that there’s no more expandability.
I’ve written many times, but unfortunately the AP mount is not compatible with automatic introduction. Automatic introduction is “unofficially” possible if you connect “Star Book Ten”, but 100x speed is the upper limit. There is structurally no room for automatic introduction of “Star Book One”(*).
(*) The external interface is ST4 terminal only.
I would like to see this situation broken down.
conclusion
Thanks for reading this far!!
I’ve been using the AP mount for about six months now, and I found it to be a very good and easy to use system. On the flip side, the finer points? So, there are some weaknesses that I wrote about in this article, but from the user’s point of view? Some specifications are also available. Even so, I would like to express my great admiration to Vixen for bringing this product to the world and hope that they will continue to improve and innovate their products in the future.
I also felt that there was some misunderstanding and lack of awareness in the evaluation of the AP mount. For example, we hear a lot of people say that AP is expensive, but if you take out the general price difference between foreign and domestic products (which is a serious issue), the quality level is also high and it is not exorbitantly expensive(*). Also, if you carefully consider your objectives and make a list of what you need and build it up, you may find that the total amount of solutions that the AP mount provides is actually not much different from other companies’ products, but rather cheaper.
(*)I won’t point out the details, but there is a part of me that says, “Surely this is expensive.
I’ve rambled on about something a bit abstract, but in summary, “AP is good. I can’t stop hoping that many of you will experience the “powerfulness” of the AP mount^^
“Great equatorial mounts” gets astronomy fans fired up! So I’ll see you next time!
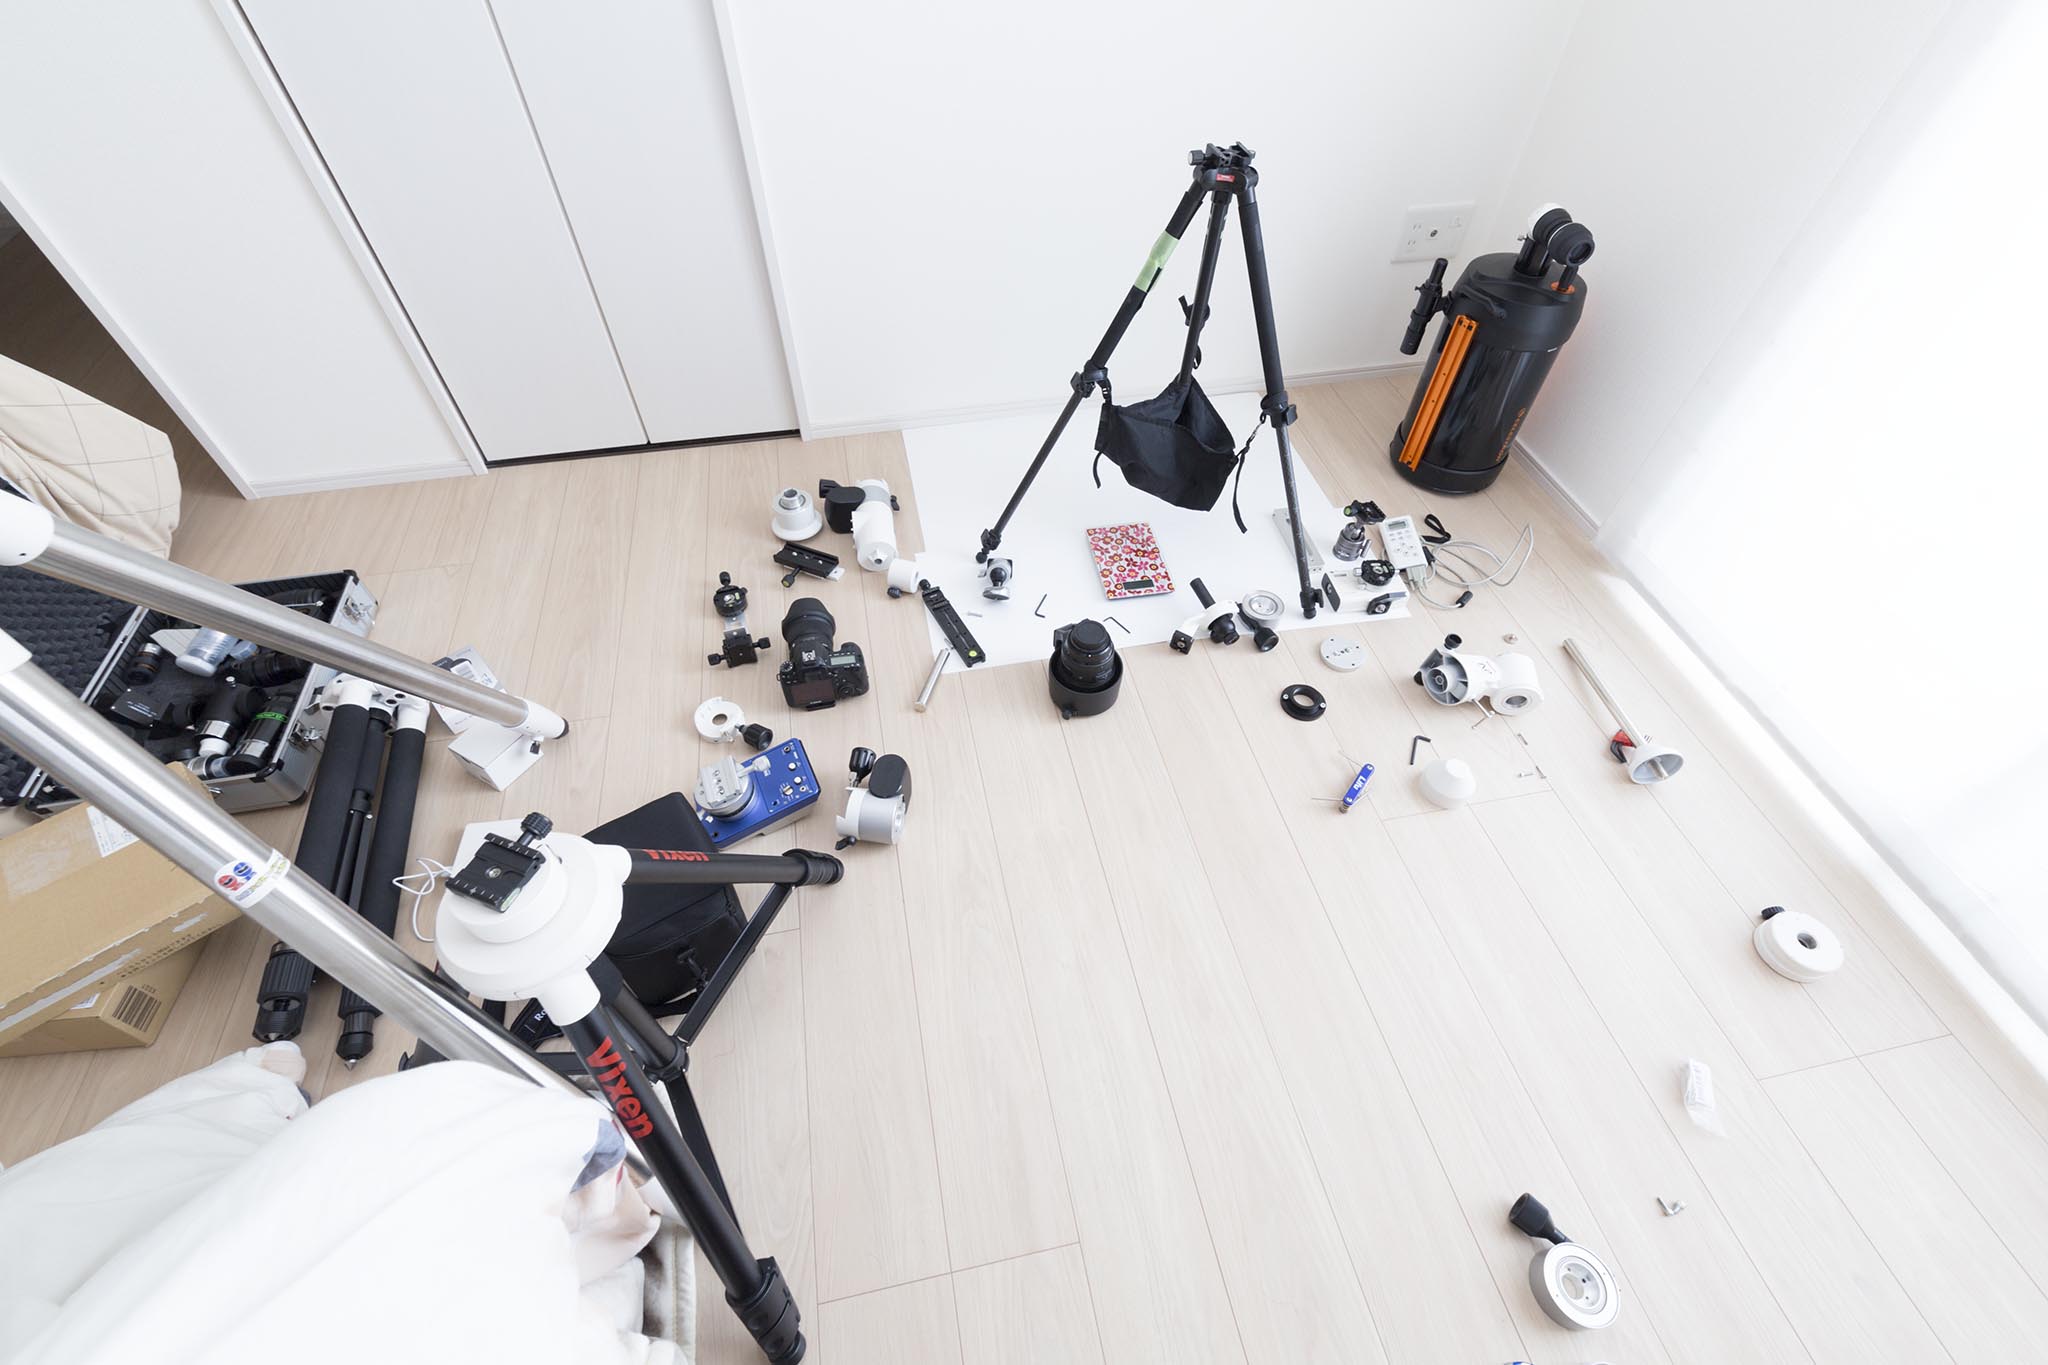 Offshot of the AP system being evaluated. The spirit and hardships of the developers, and the circumstances of the situation, sometimes make me contemplative^^
- This article was prepared by Astronomical Reflexions at its own expense and discretion, with equipment loaned by Vixen Corporation. All editorial responsibility rests with the Astronomical Reflexions editorial department.
- Please contact the manufacturer or distributor for product purchases or inquiries.
- Astoronomial Reflexions assumes no responsibility whatsoever for any events that occur as a result of this article.
- Images not otherwise noted are original, with all rights reserved by Astoronomial Reflexions.
- The product specifications and prices in this article are correct at the time of writing (Feb 2019).
- We used DeepL for translation. Click here to read the original article in Japanese.