
East and West, ancient and modern, We’ll review the “Legendary Equatorial Mount” ! This article is about Vixen’s star tracker (*) “Polarie U” and “Polarie (1st generation)”.
(*)in Japan , it is called “portable equatorial mounts”
In fact, when I came back to astrography in 2013, the first equatorial mount I bought was “Polarie (1st generation)”. After that, it went through various “parts swamps” and is still active as an active mainstay aircraft. The new “Polarie U” was released after much anticipation. Thanks to the kindness of Vixen Corporation, we were able to borrow the actual machine.
Let’s take a closer look at the evolution of “Polarie” and the common features of “Polarie” over the two generations, and let’s take a closer look at the two models, which are also among the “portable equatorial mount”.
Vixen Optics – VIXEN POLARIE STAR TRACKER(US)
https://www.vixenoptics.com/Vixen-Polarie-Star-Tracker-p/35505.htm
[notice]At the moment,”Polarie U” is only available in Japan, but it is expected to be released in the near future.Please refer to the following pages for Vixen’s International Distributors.
Vixen Online Store – Polarie U(written in Japanese)
https://www.vixen-m.co.jp/item/35491_7.html
Vixen Online Store – Polarie(written in Japanese)
https://www.vixen-m.co.jp/item/35505_1.html
Upwardly compatible “Polarie U” with all specifications
“Polarie U” and “Polarie (1st generation)”. What is the difference between the two? First of all, let’s state one conclusion. The “Polarie U” is upwardly compatible with the “Polarie (the 1st. generation)” in everything but price. Let’s take a closer look at the difference.
The “Polarie U” is smaller, lighter and more powerful than before
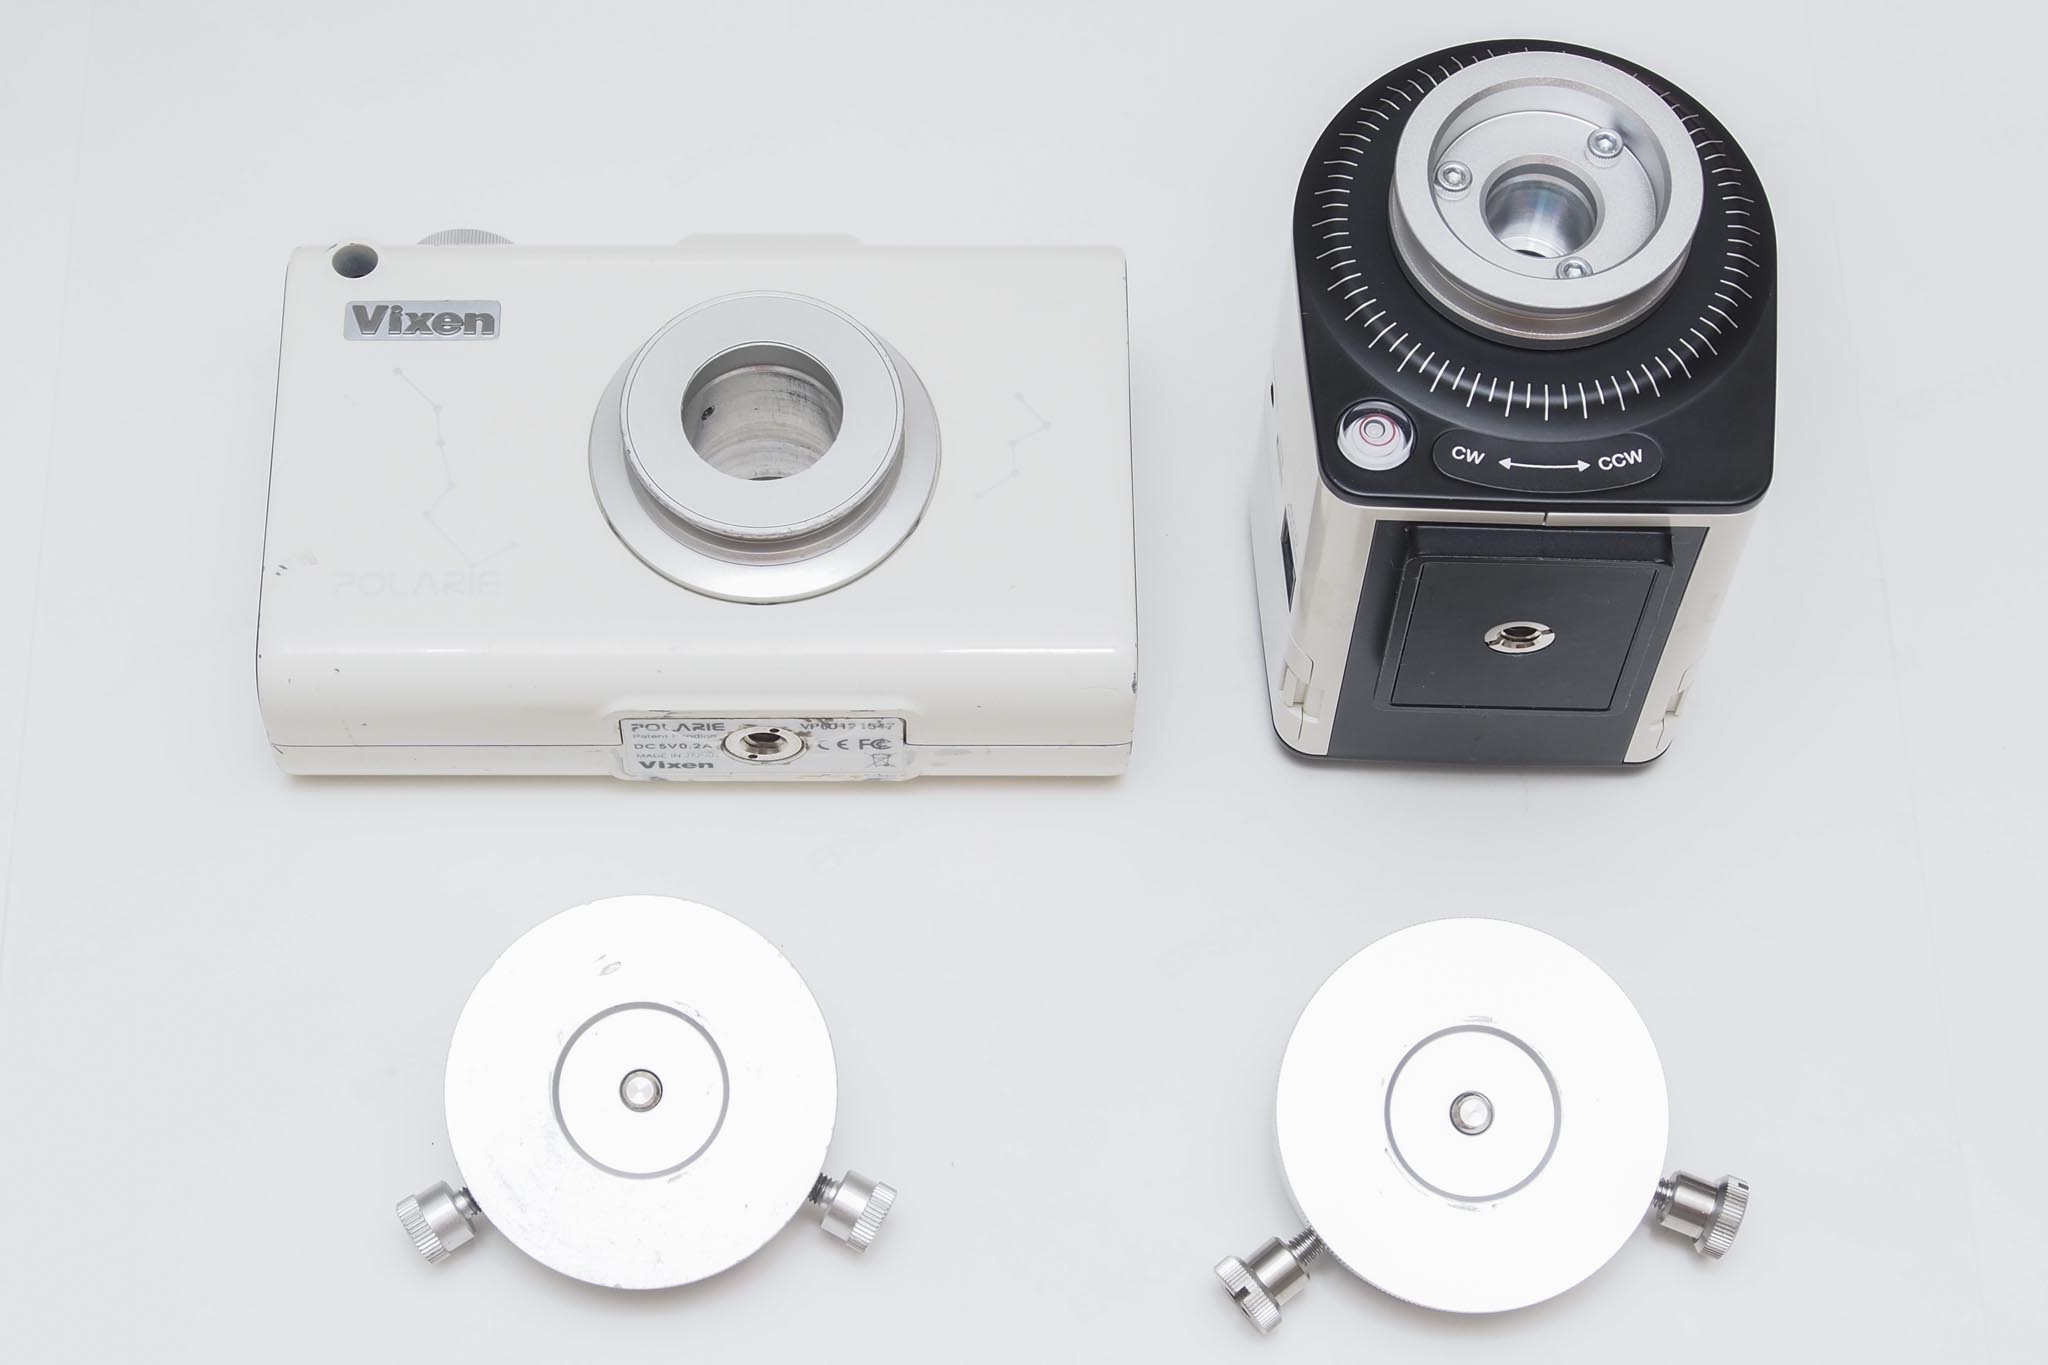
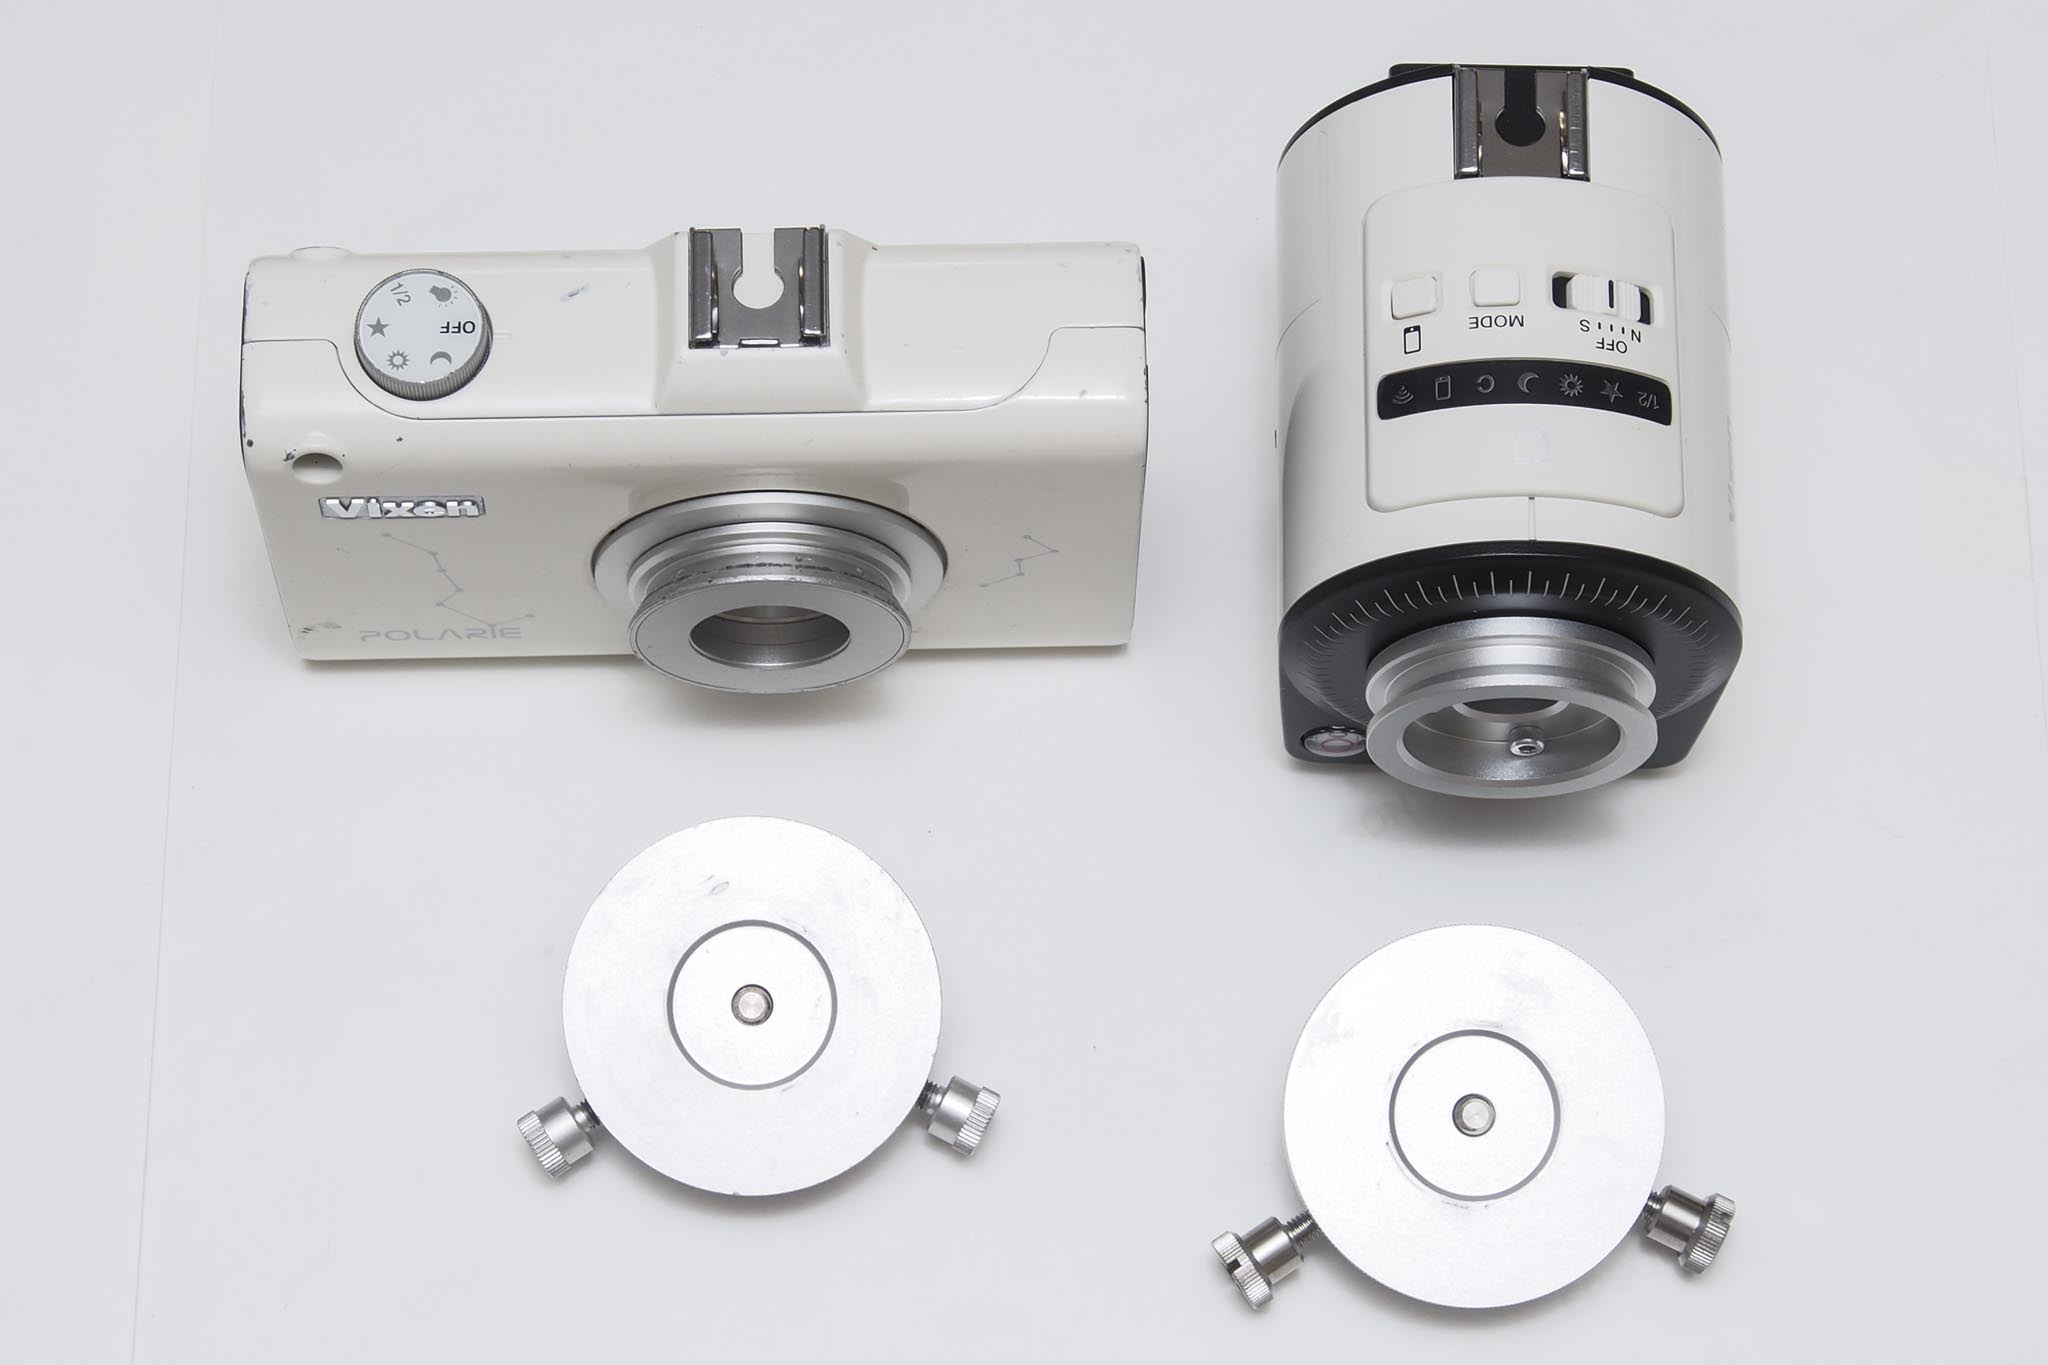
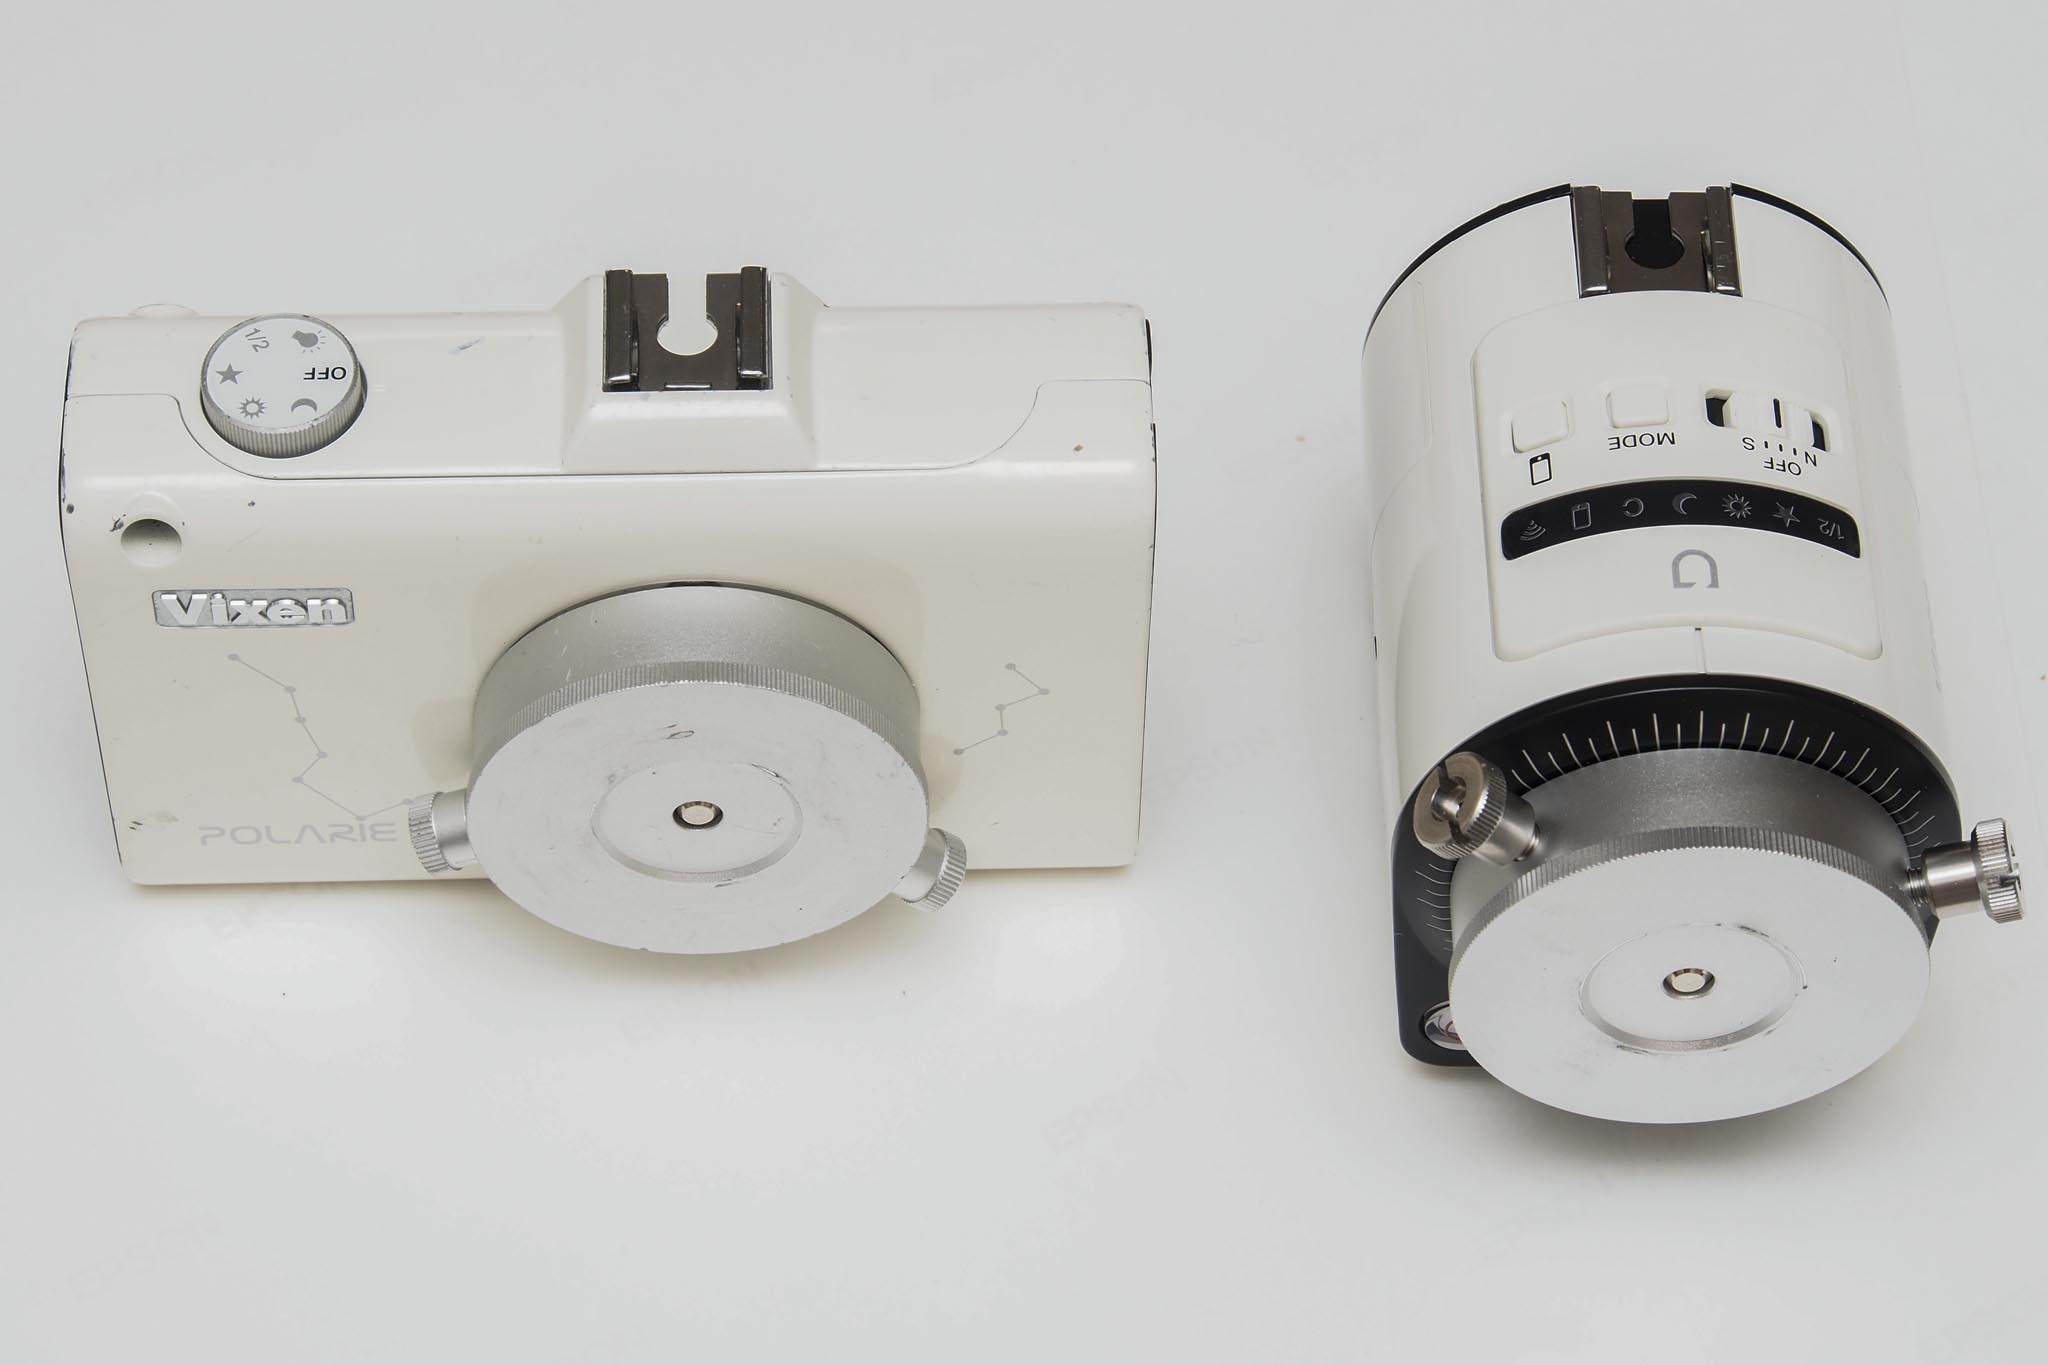 The left is Polarie (1st generation) and the right is Polarie U. The 1st generation product had a horizontal shape like a camera, but the U has a U-shape like an equatorial mount.
Comparison of the appearance of Polarie U and Polarie (1st generation). The Polarie (1st generation) is thin and compact, but it is heavy and weighs 740g (excluding batteries). The Polarie U is stocky, but also has a design with no protrusions and is easy to store and weighs 575g (batteries not included). Even though the load is larger(*), it is lighter.
(*) payload on spec sheet is 2.0kg for Polarie (1st. generation) and 2.5kg for Polarie U (same) when using the “Standard Head Base”. If you use the “Multi Head Base” to keep the balance between east and west, you can carry heavier equipment.
The number of gears (144 teeth) and gear outer diameter are the same at 58.4mm, but the Polarie U has a longer pole shaft and about four times the distance between bearings. https://www.vixen-m.co.jp/item/35491_7.html
When you pick up the Polarie U, it is surprisingly light, but this difference is mainly due to the difference between the exterior (plastic for the Polarie U and metal for the first-generation Polarie) and the slimmer worm wheel shaft (top image). In spite of these weight savings, the stiffness feels rather improved.
We believe that the current equatorial mount can still be lightened. This will be especially important in the Japanese market.
Furthermore, since the 1st generation Polarie, there are no screws on the exterior of the car, giving it a sleek design, but with the Polarie U, the design is even more thorough and there are no exposed screw heads at all(*).
(*)In the Polarie (1st. generation), there was a screw at the opening of the battery box lid.
Price
However, there is a big difference in price. At Vixen’s online store, the Polarie U is priced at 68,200 yen (10% tax included) and the Polarie (1st generation) is priced at 37,634 yen (10% tax included). The difference is almost double.
However, the Polarie U beats the Polarie (the 1st. generation) in all respects, including being “lighter”. Not only has the basic specs been improved, but in terms of expandability and usability, Polarie U surpasses Polarie (the 1st. generation), and there’s nothing inferior about it.
Almost everything that can be done in Polarie (1st generation) can be done in Polarie U(*). If you are on a budget, it is definitely the choice of Polarie U.
(*)There is a difference such as the inclinometer and the compass built in the 1st. generation Polarie are omitted in Polarie U though it is described later.
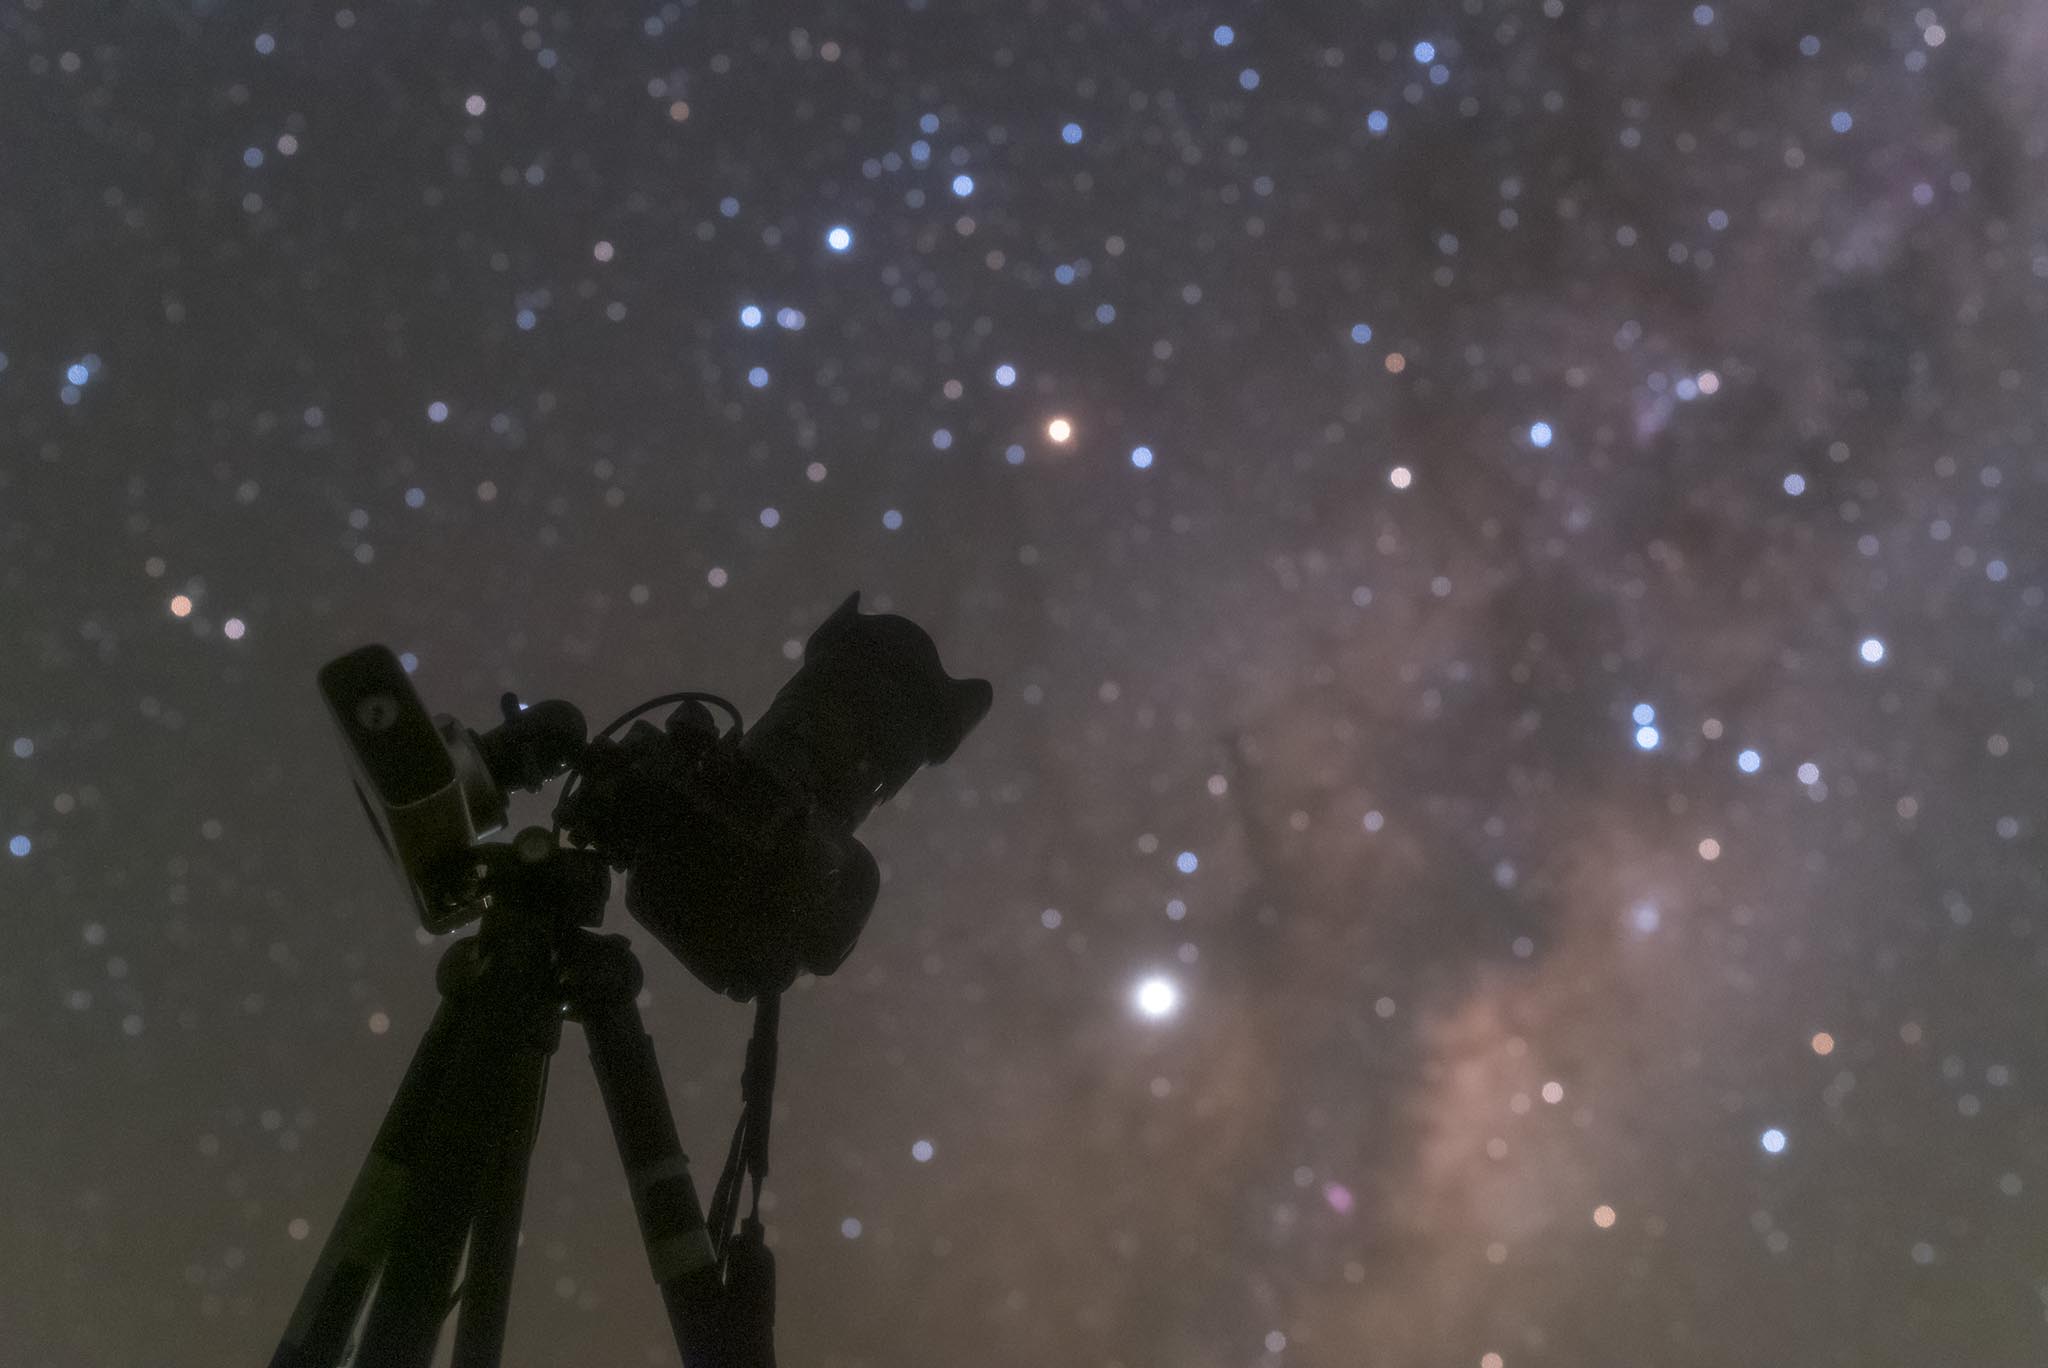
Great ! The Legend of Polarie (1)
Great ! for Authentic deep sky photography
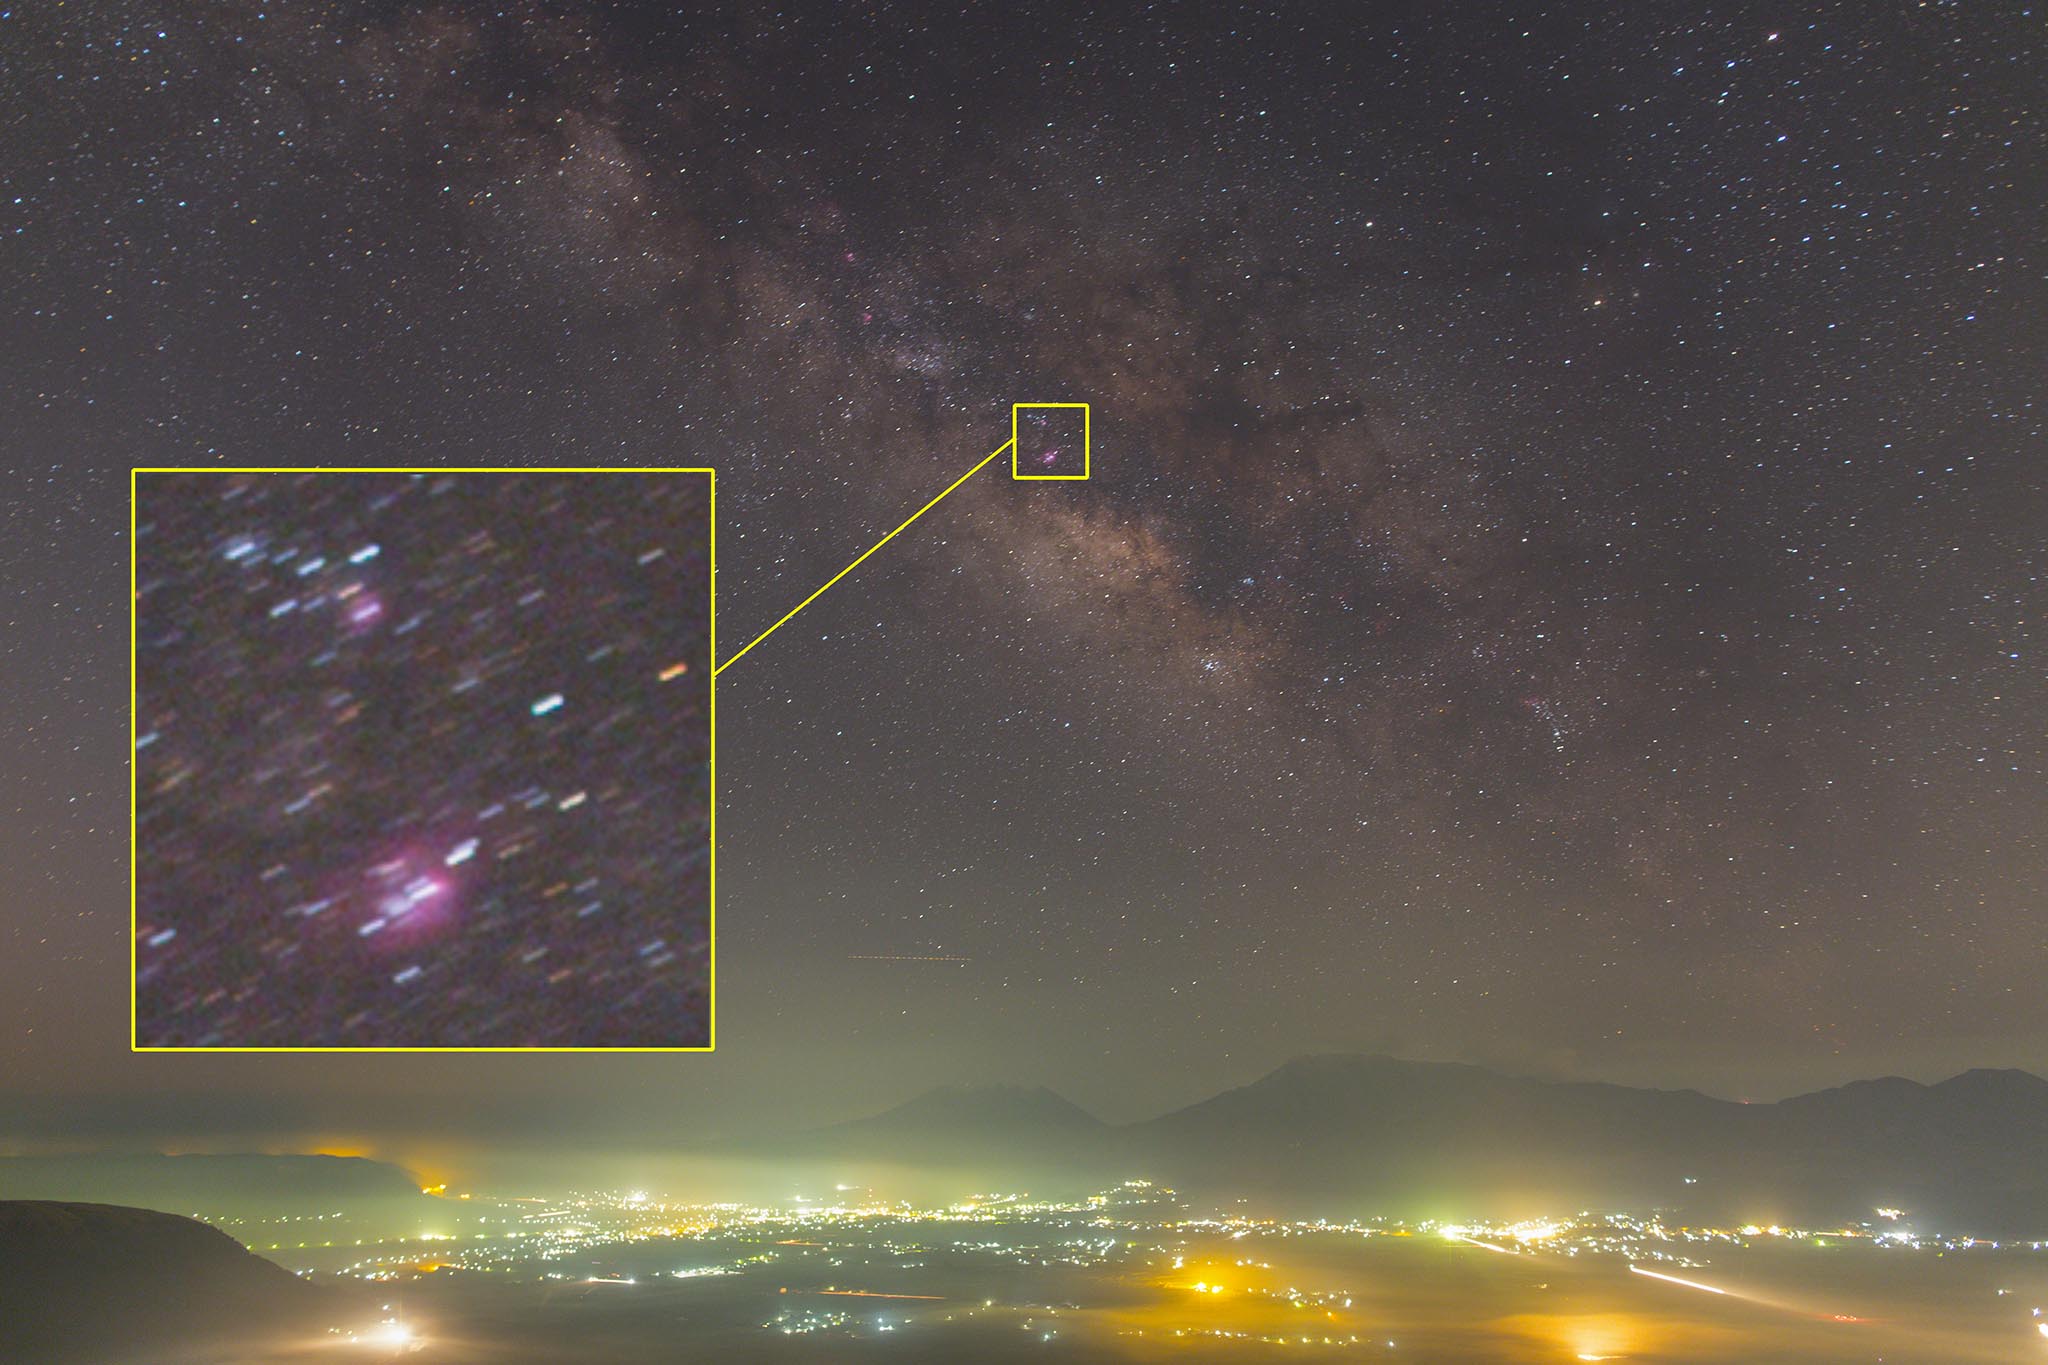
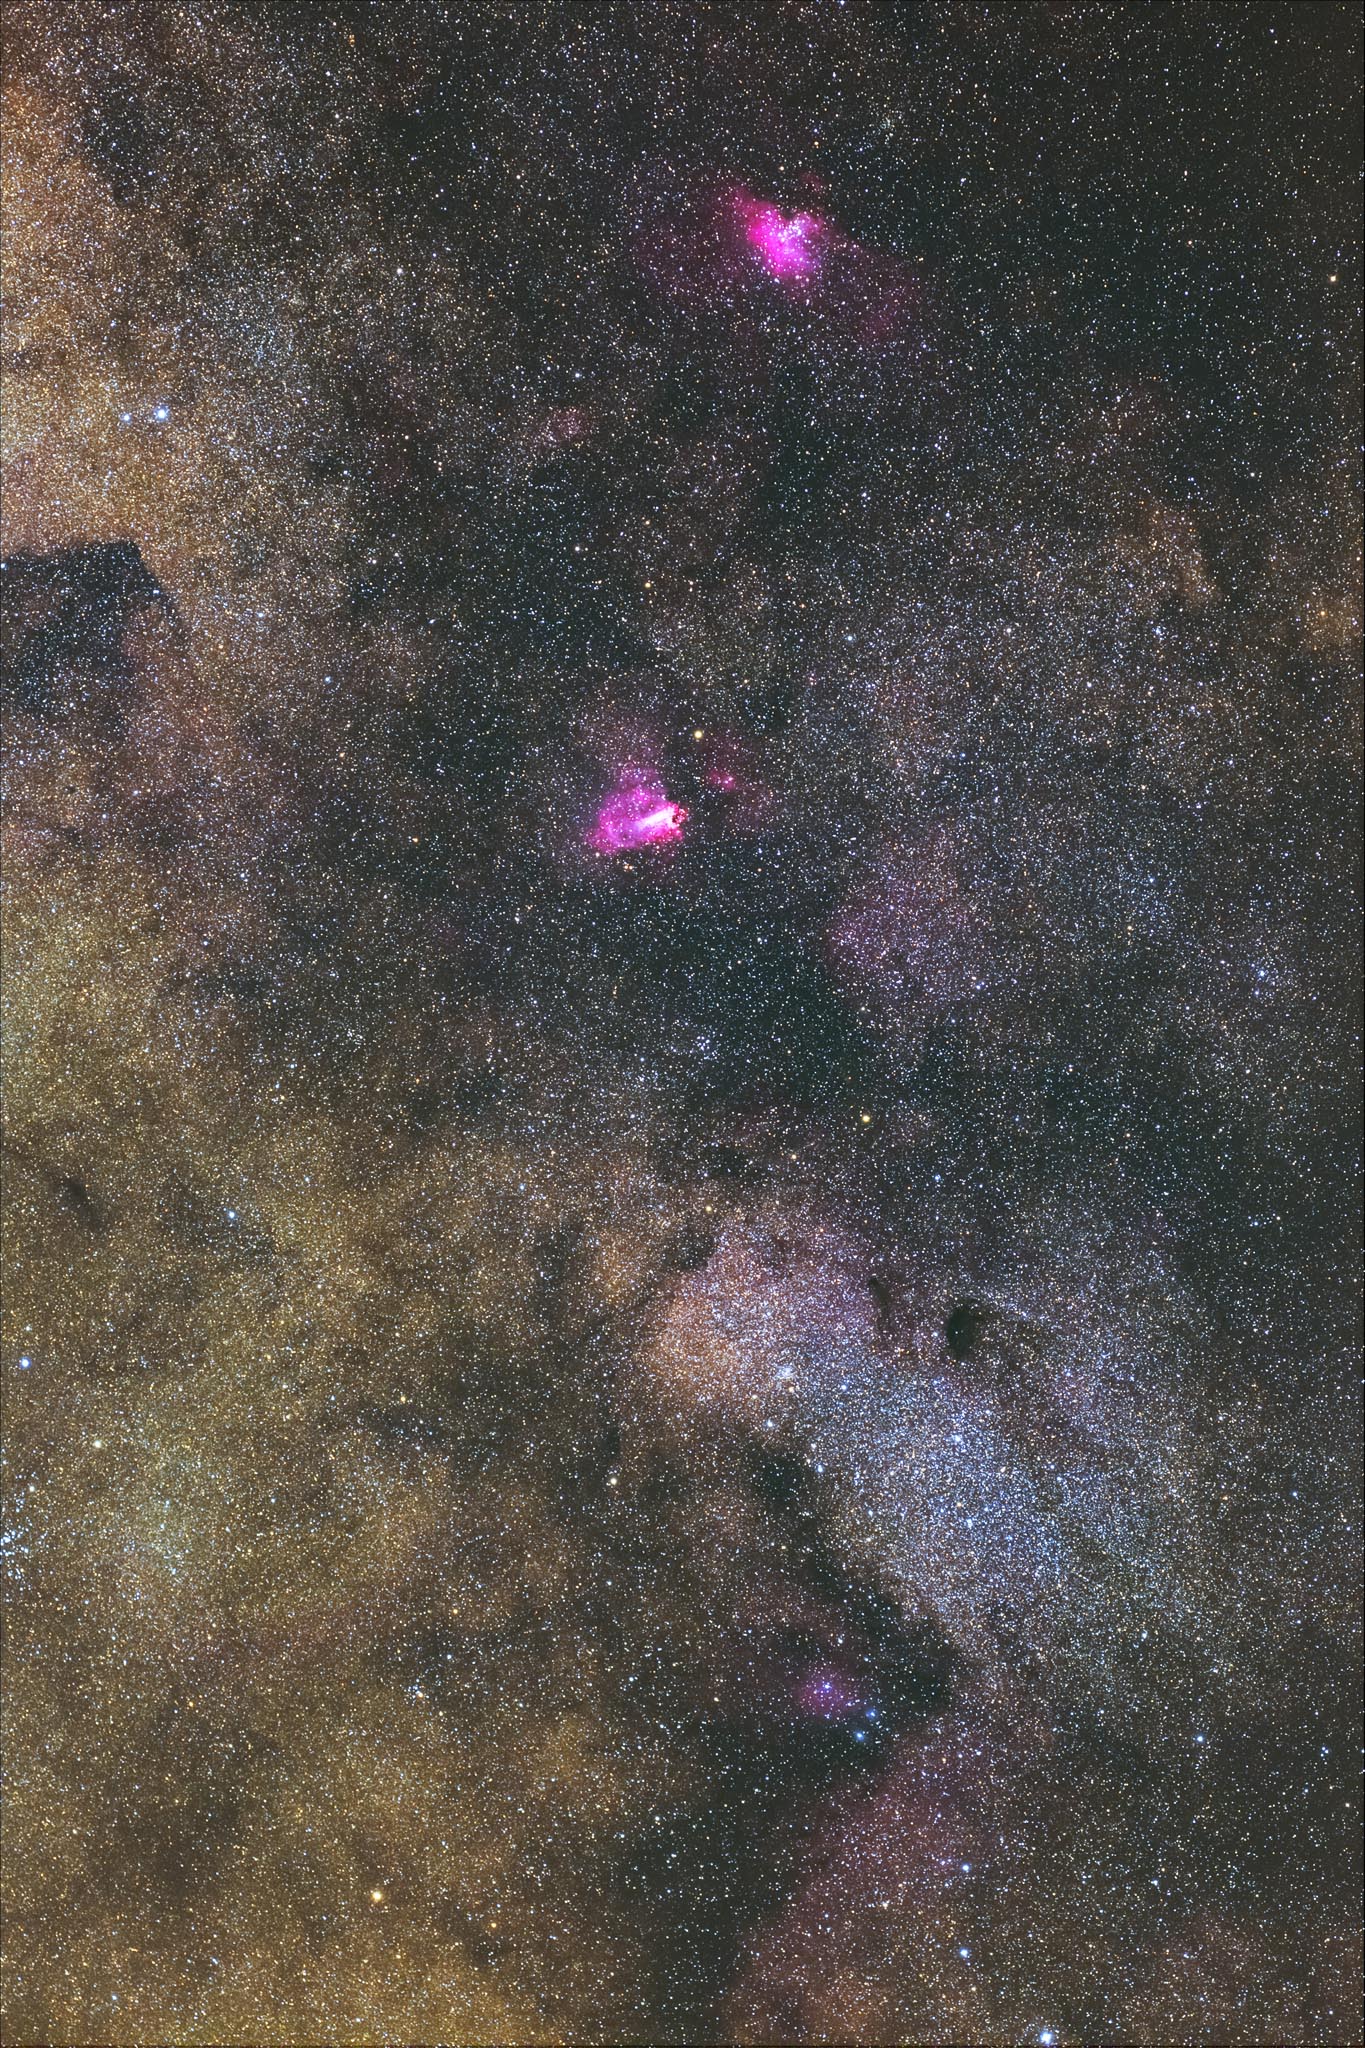
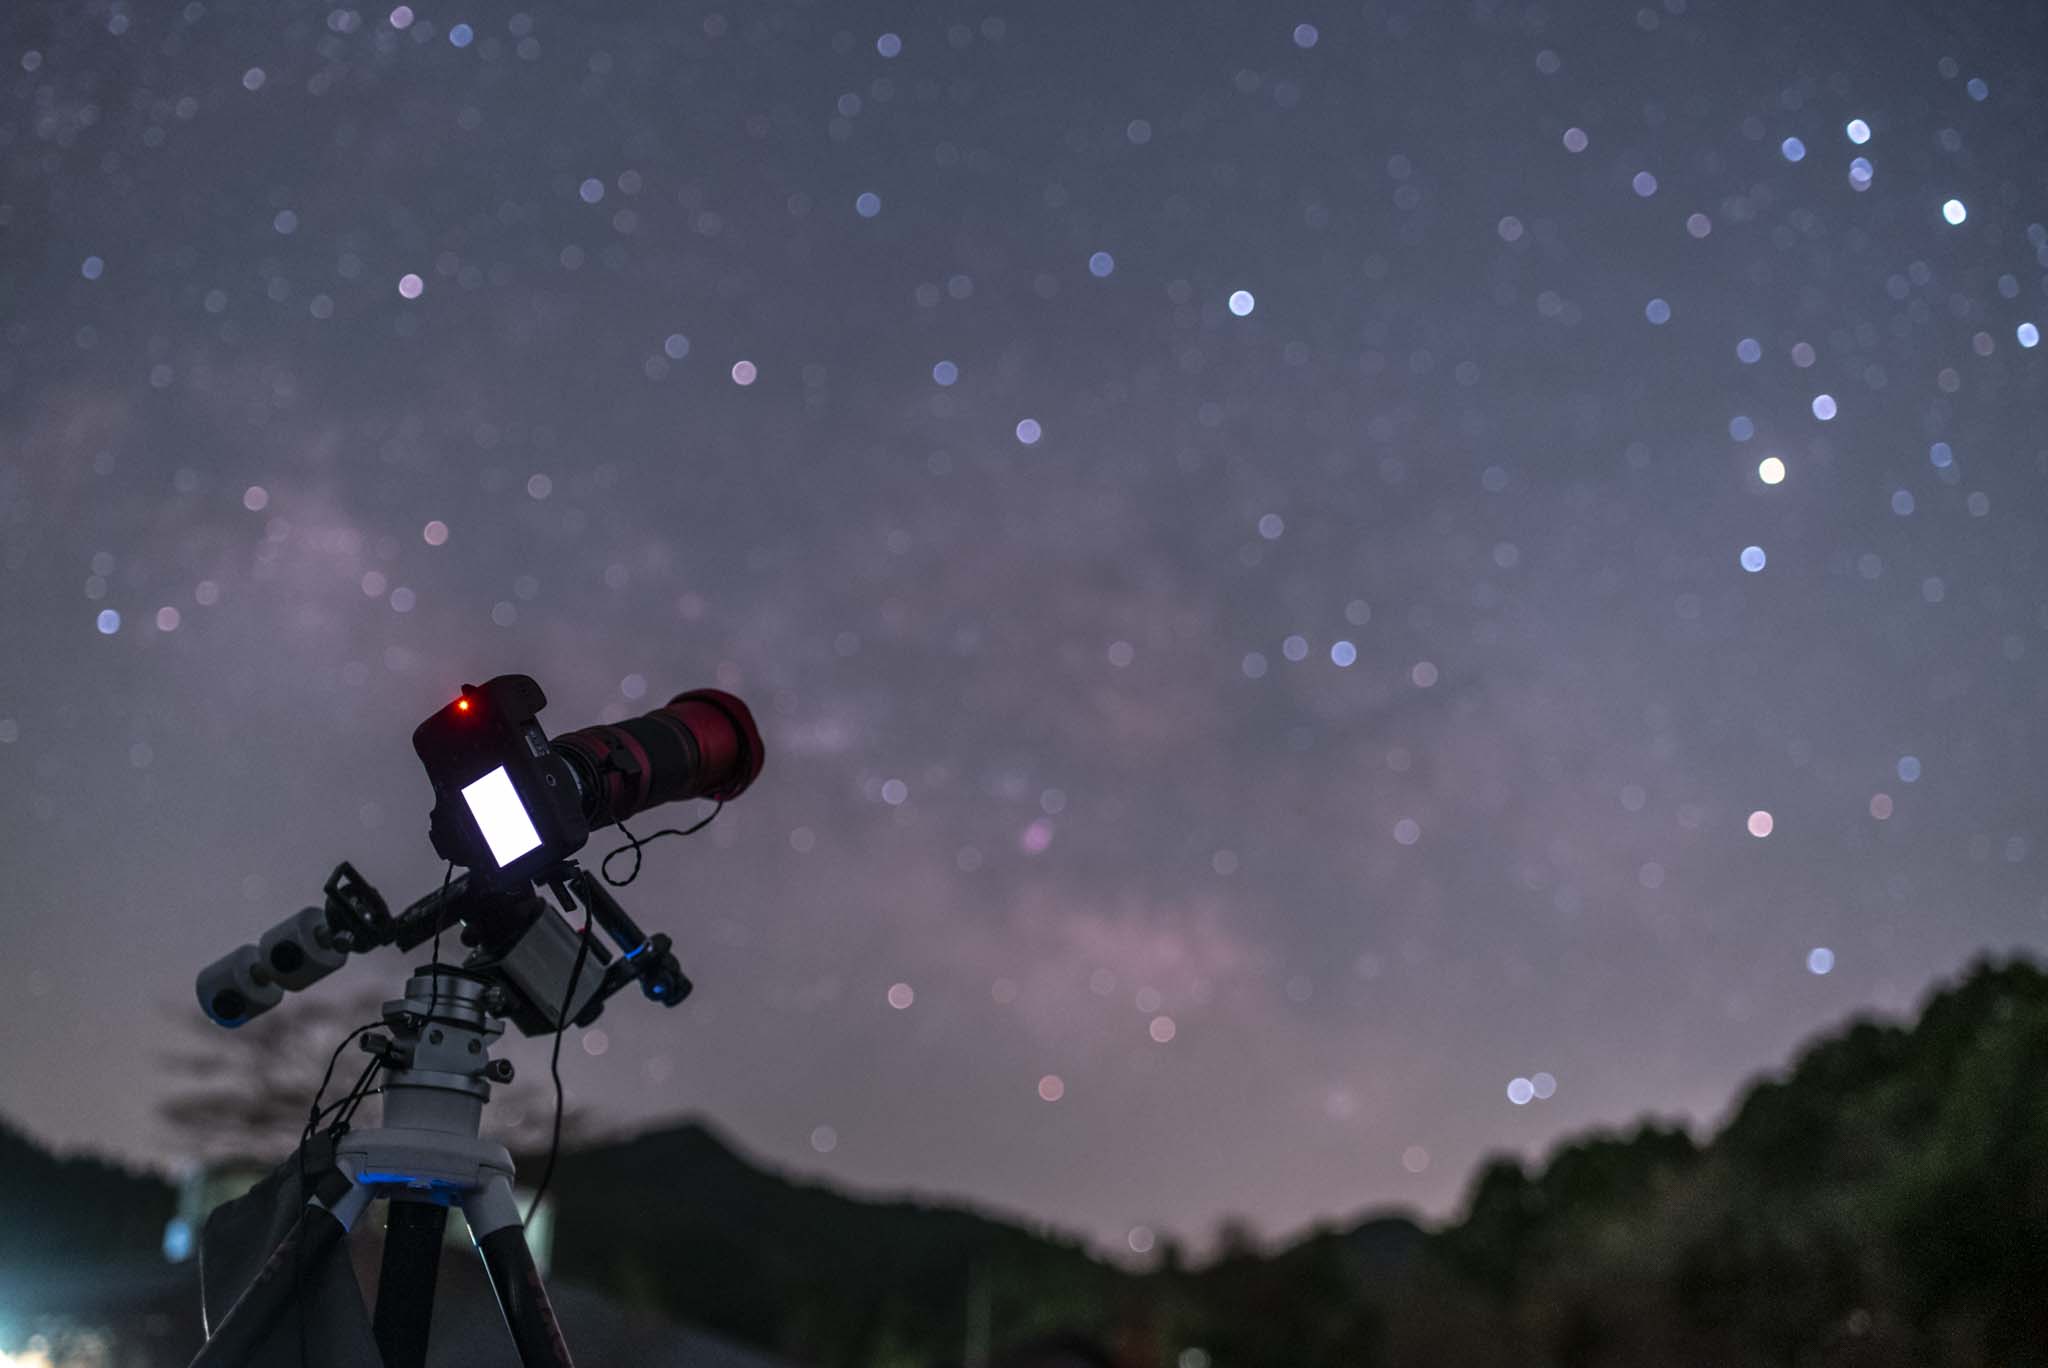 Near Antares the Scorpion with Polarie U. a7S Samyang 35mm F1.4 F2.8 13sec ISO6400 Koishiwara, Fukuoka , Japan
Since the 1st. generation, Polarie has had a reputation for high tracking accuracy. However, the Polarie by itself could not fully demonstrate its performance, and various strengthening parts were needed.
The situation is the same for Polarie U, but the basic structure of the Polarie U has been redesigned to increase the stability of the equatorial axis, and the connection of the tripod and base head has been made smarter, making the reinforcement configuration easier to assemble.
 EOS6D(mod) RedCat51(fl=250mmF4.9) 1 min. x 55 ISO3200 Polarie U Astrophotography mode, Koishiwara, Fukuoka , Japan
In this example, the exposure per frame was shortened to one minute, but instead 50 images were composite. The focal length is 250mm, but with a one minute exposure, the star will remain in point image.This method is a good way to use long-focus optics with a lightweight star tracker.
In the case of a lightweight star tracker, there are a variety of other factors that can cause tracking errors besides the periodic motion of tracking, such as equipment deflection, misalignment of the polar axis, sinking of the tripod, and declination of the target.
From my experience with the Polarie U, I felt that a 3-minute exposure at a focal length of 250mm would be possible, depending on the conditions, but a 1-minute exposure would be more safe(*).
(*)As a practical matter, if you zoom in on an image in a test shot and half the exposure time when it starts to feel clearly linear, you’ll get a near 100% yield.
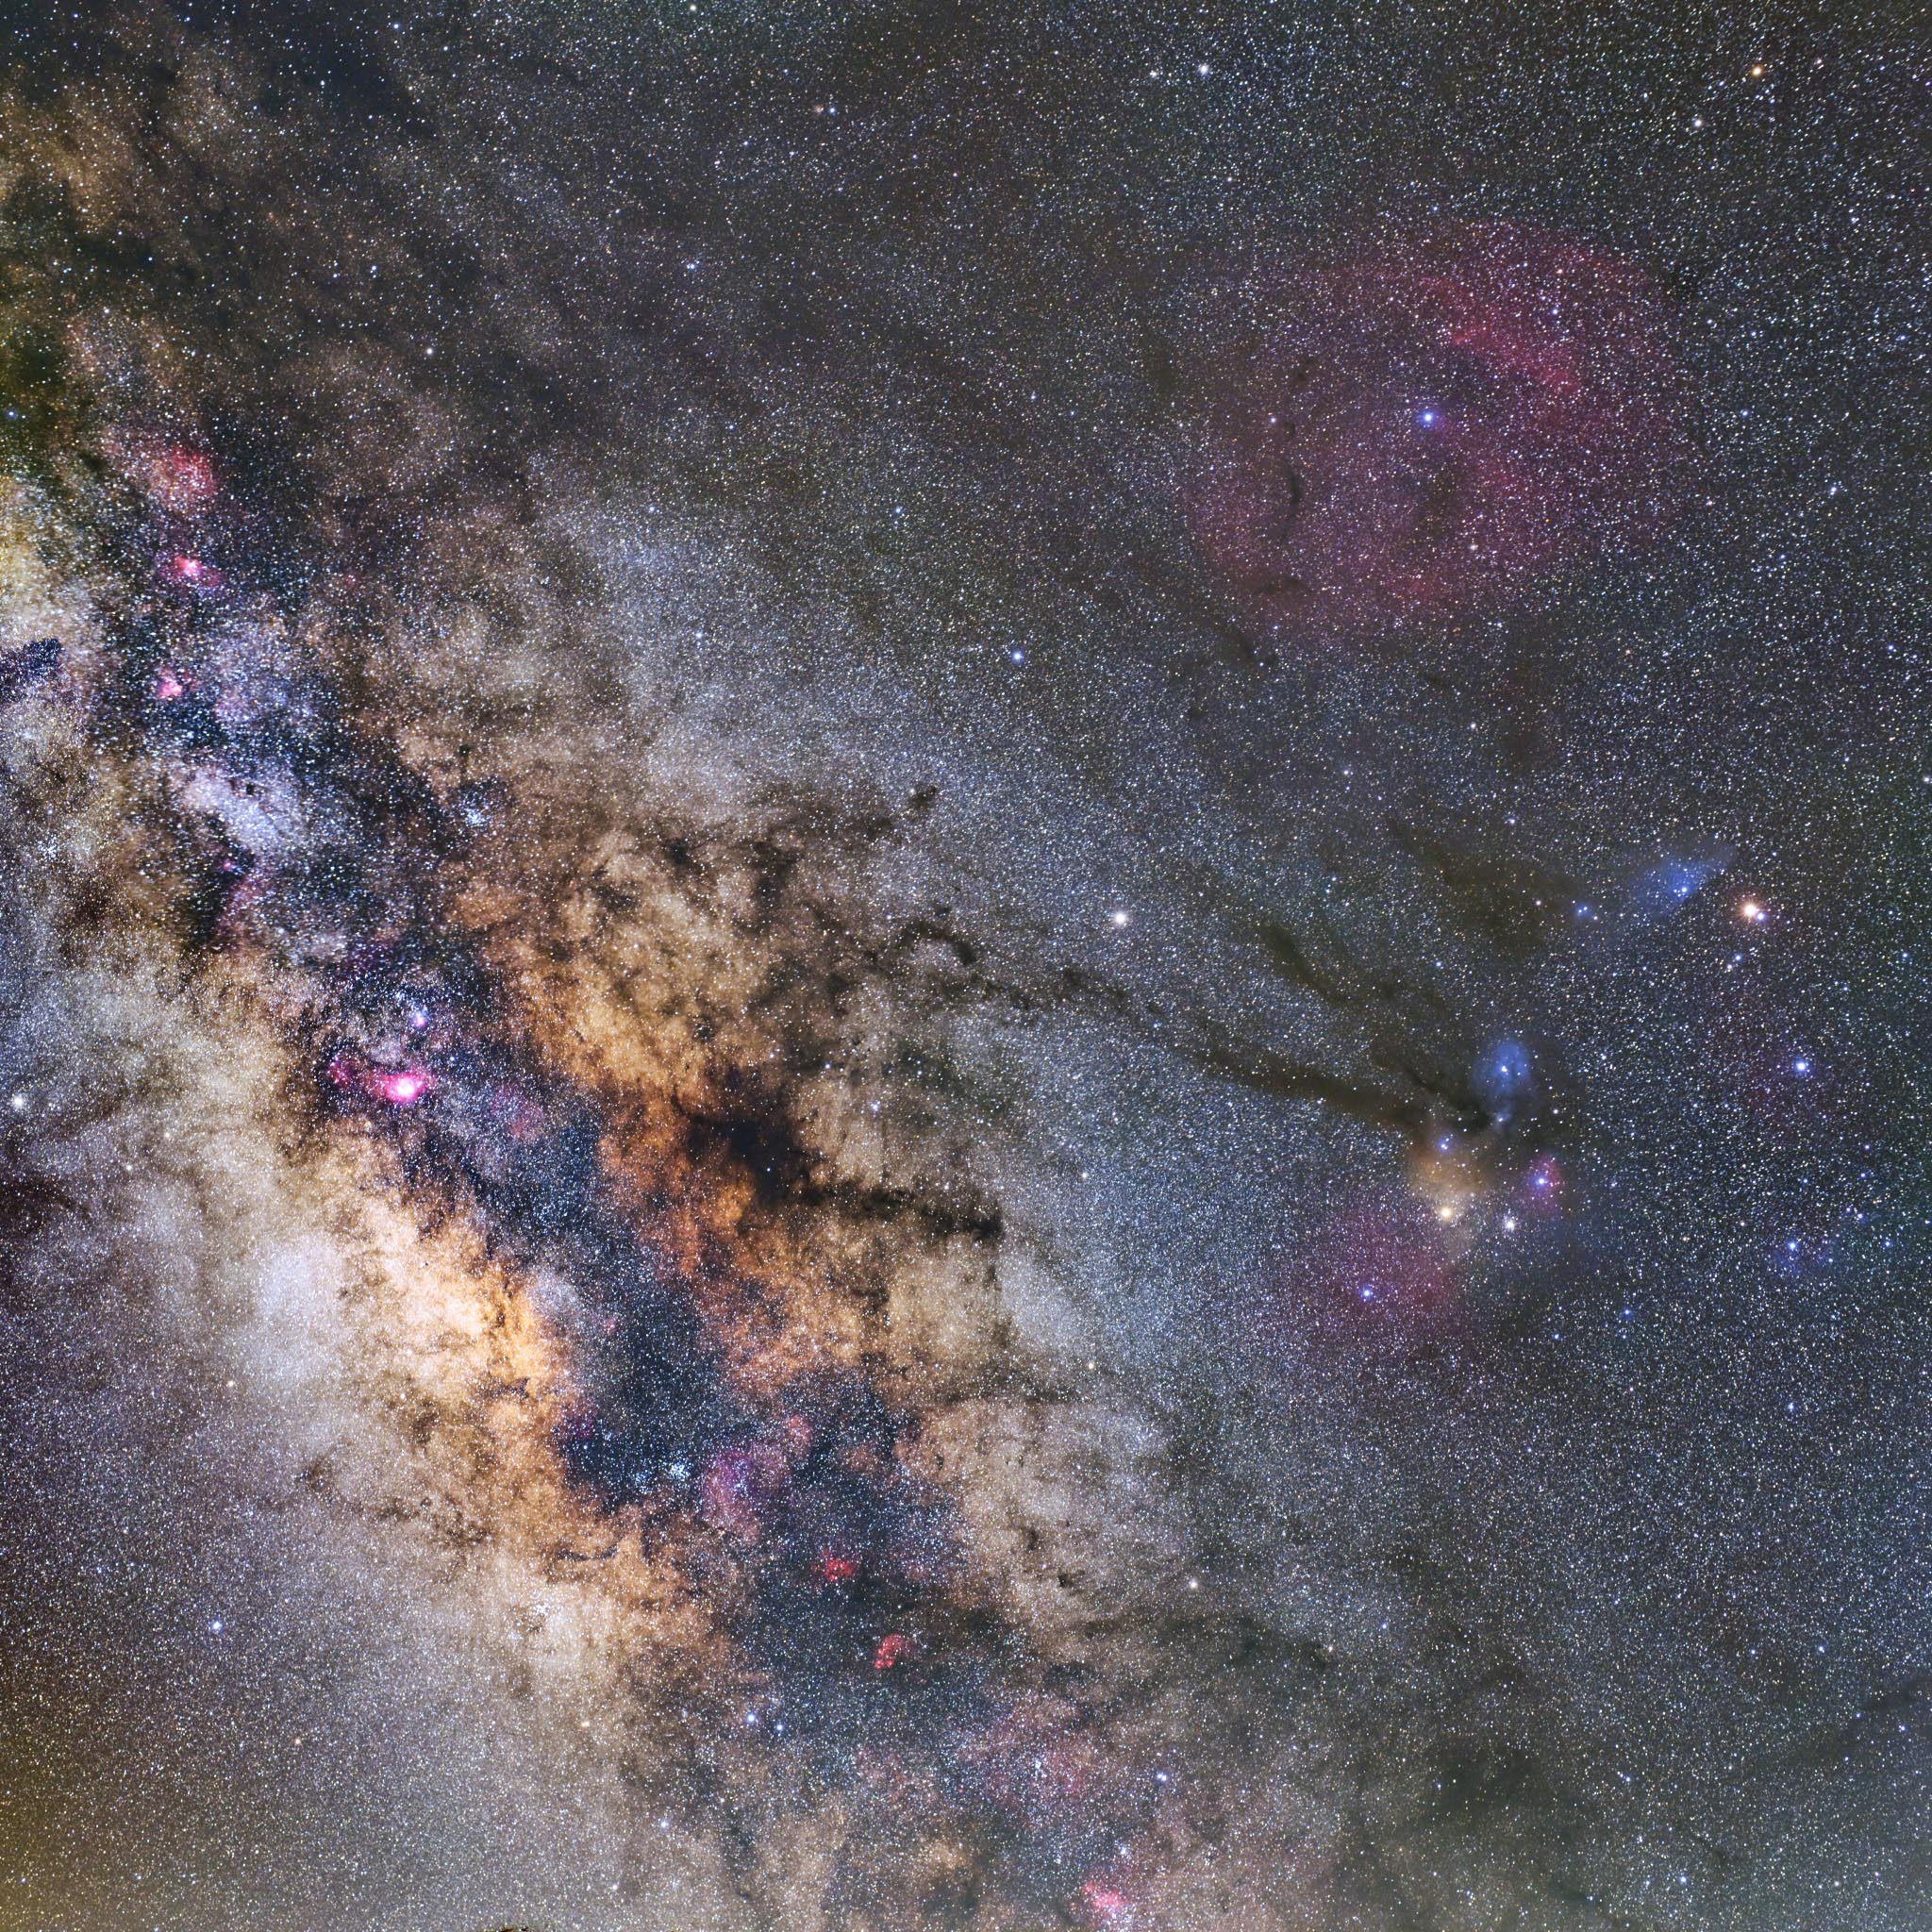
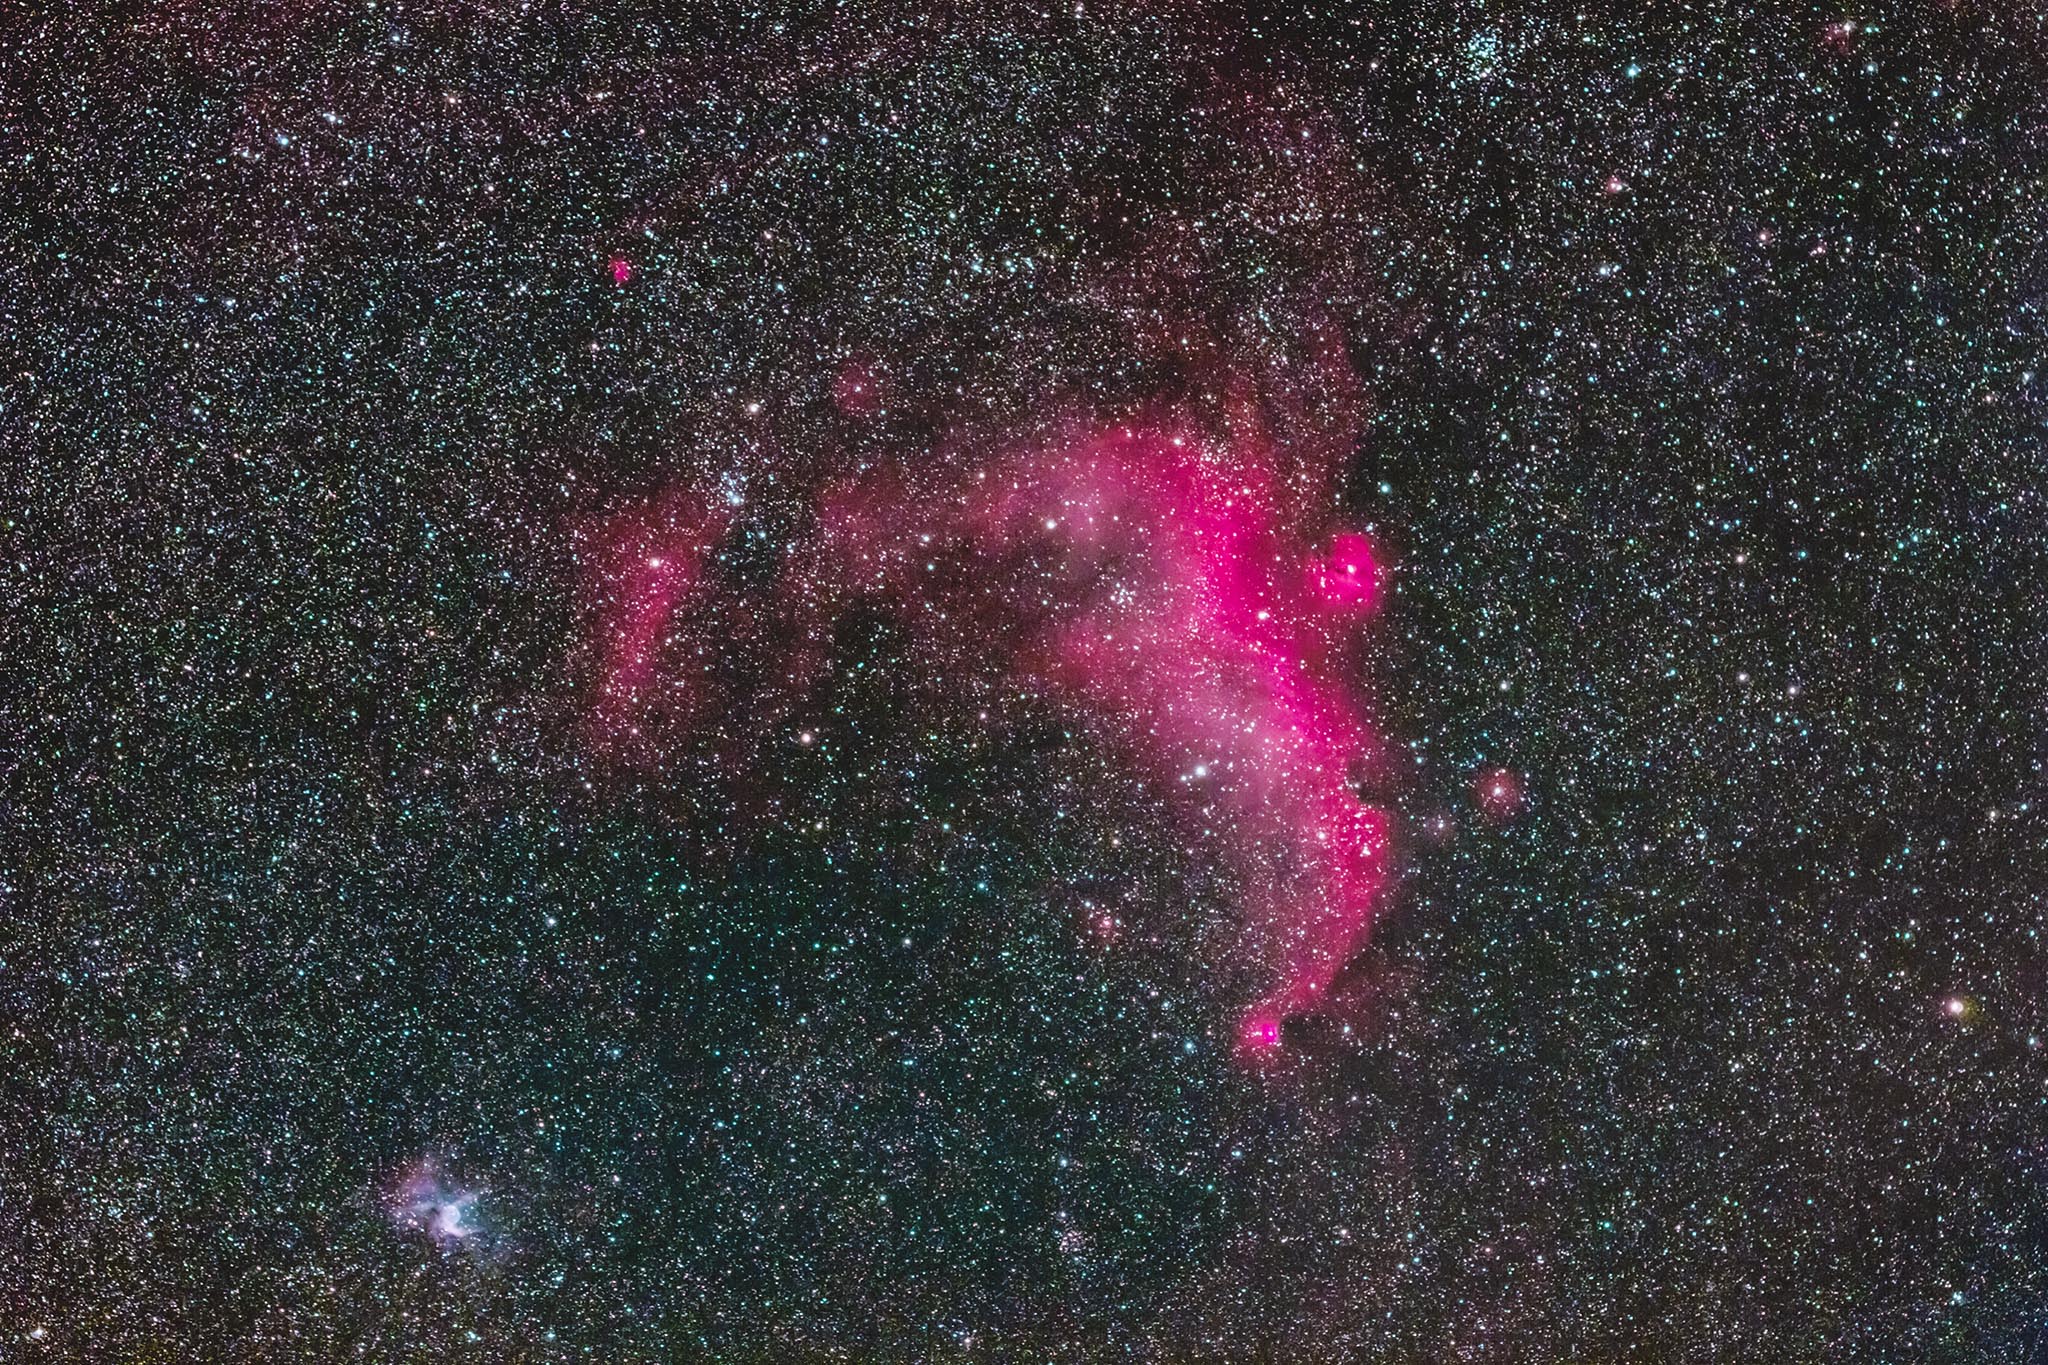 EOS6D RedCat51(fl=250mmF4.9) 3min. x 20 ISO6400 STC Astro Duo filter, Polarie U, Astrophotography mode, Koishiwara, Fukuoka, Japan
An example of a “one-shot narrow band” that allows only Hα (red) and OIII (blue-green) light to pass through.
When shooting with broadband, the exposure time per frame is only one minute, but when shooting in narrowband, where light is extremely scarce, the exposure time needed to be longer, so I used three minutes of exposure per frame.
If you zoom in on each frame at equal magnification, you can see that the composite image is almost a point image, although some of the images are not completely point image.
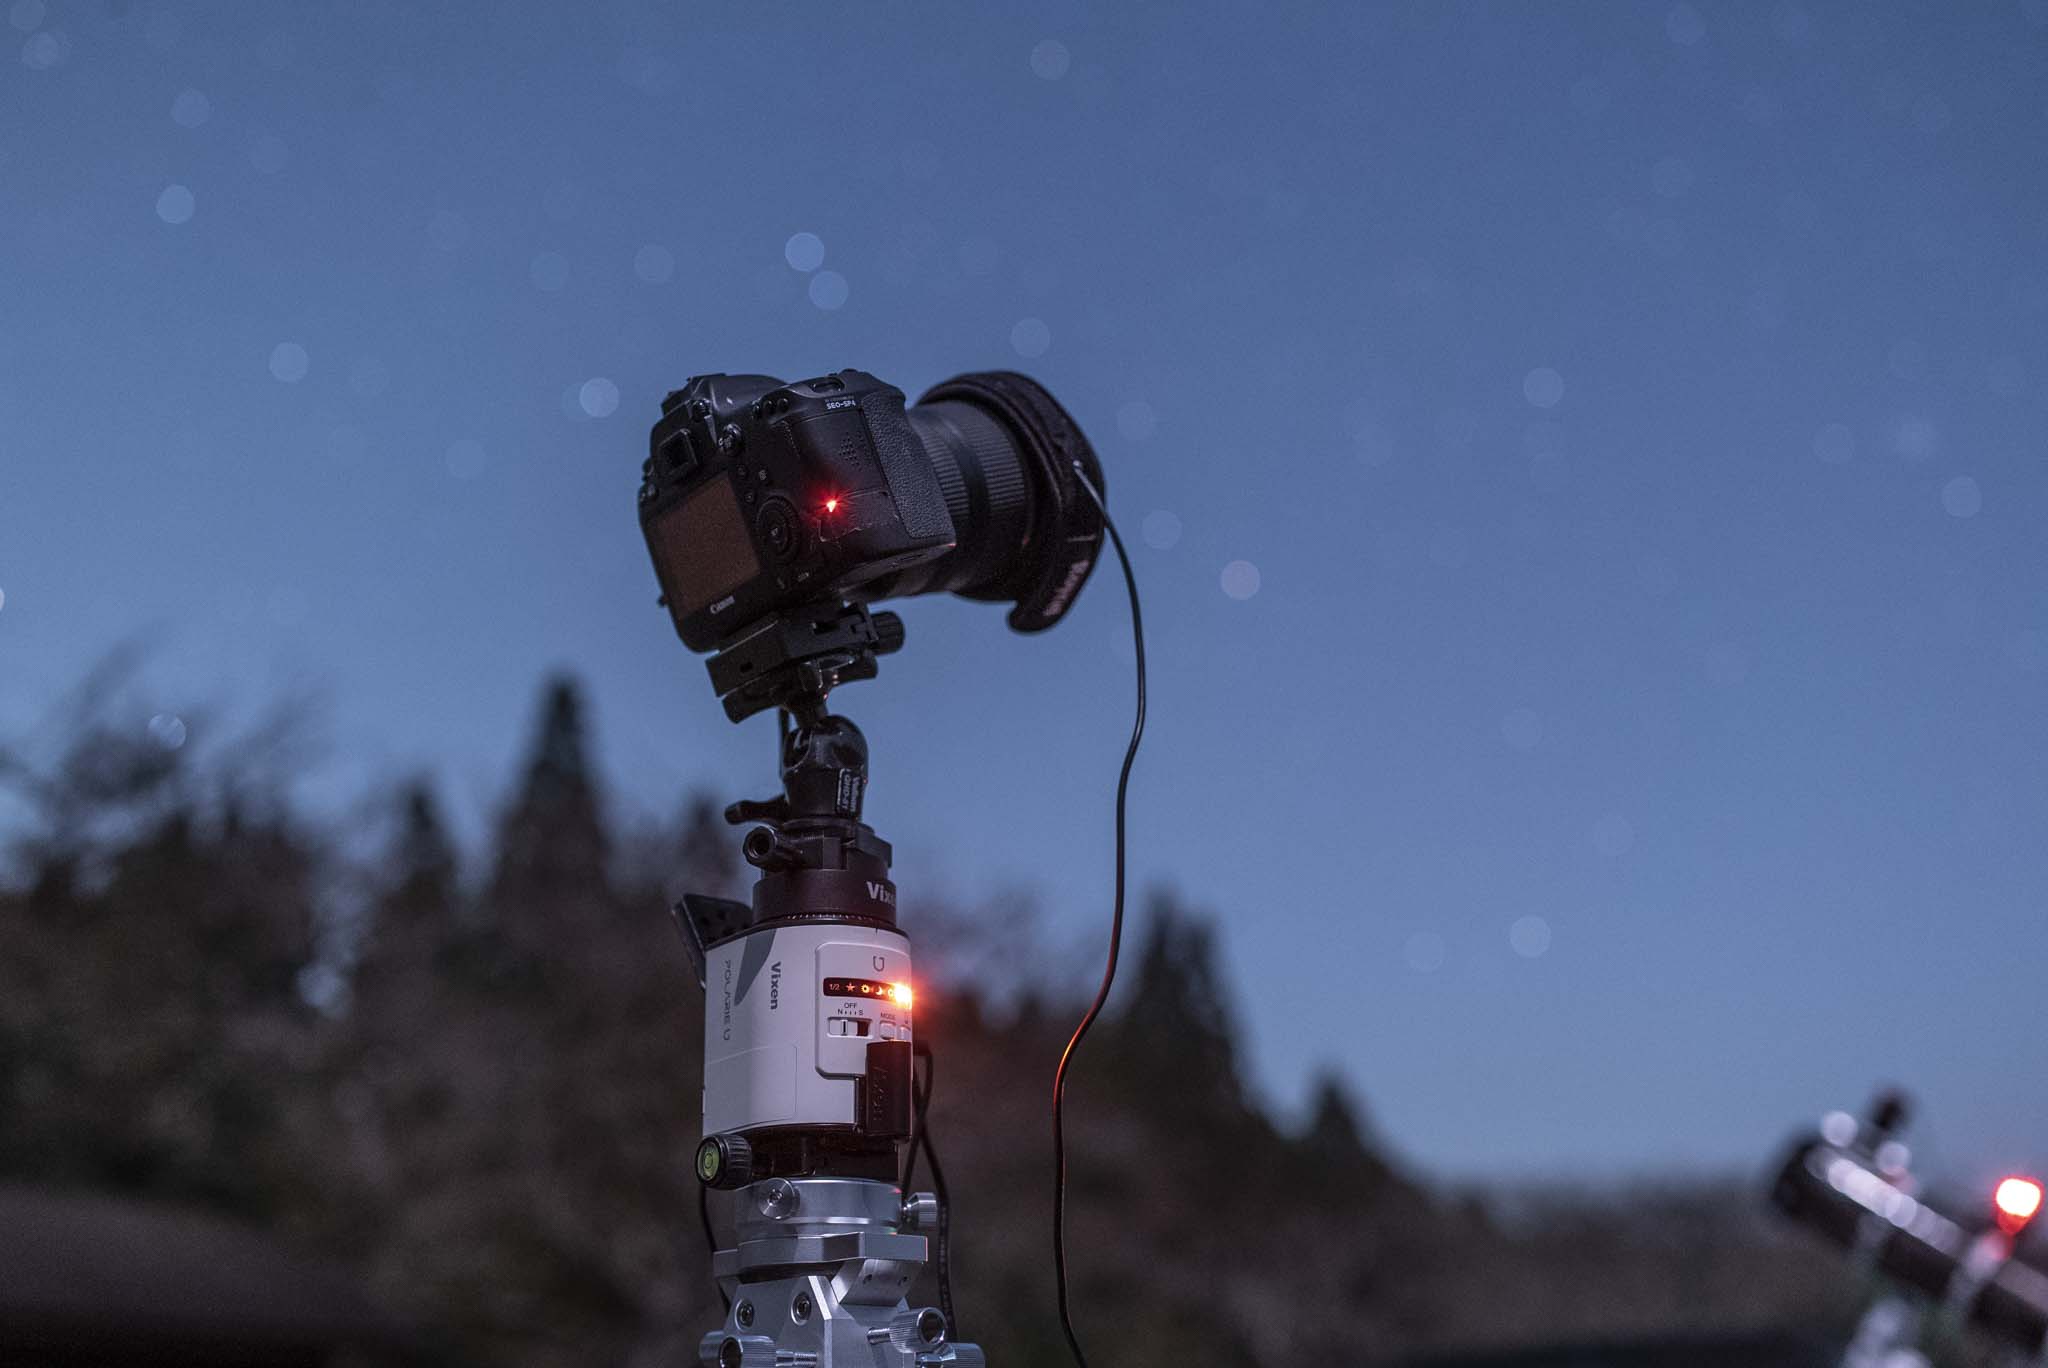
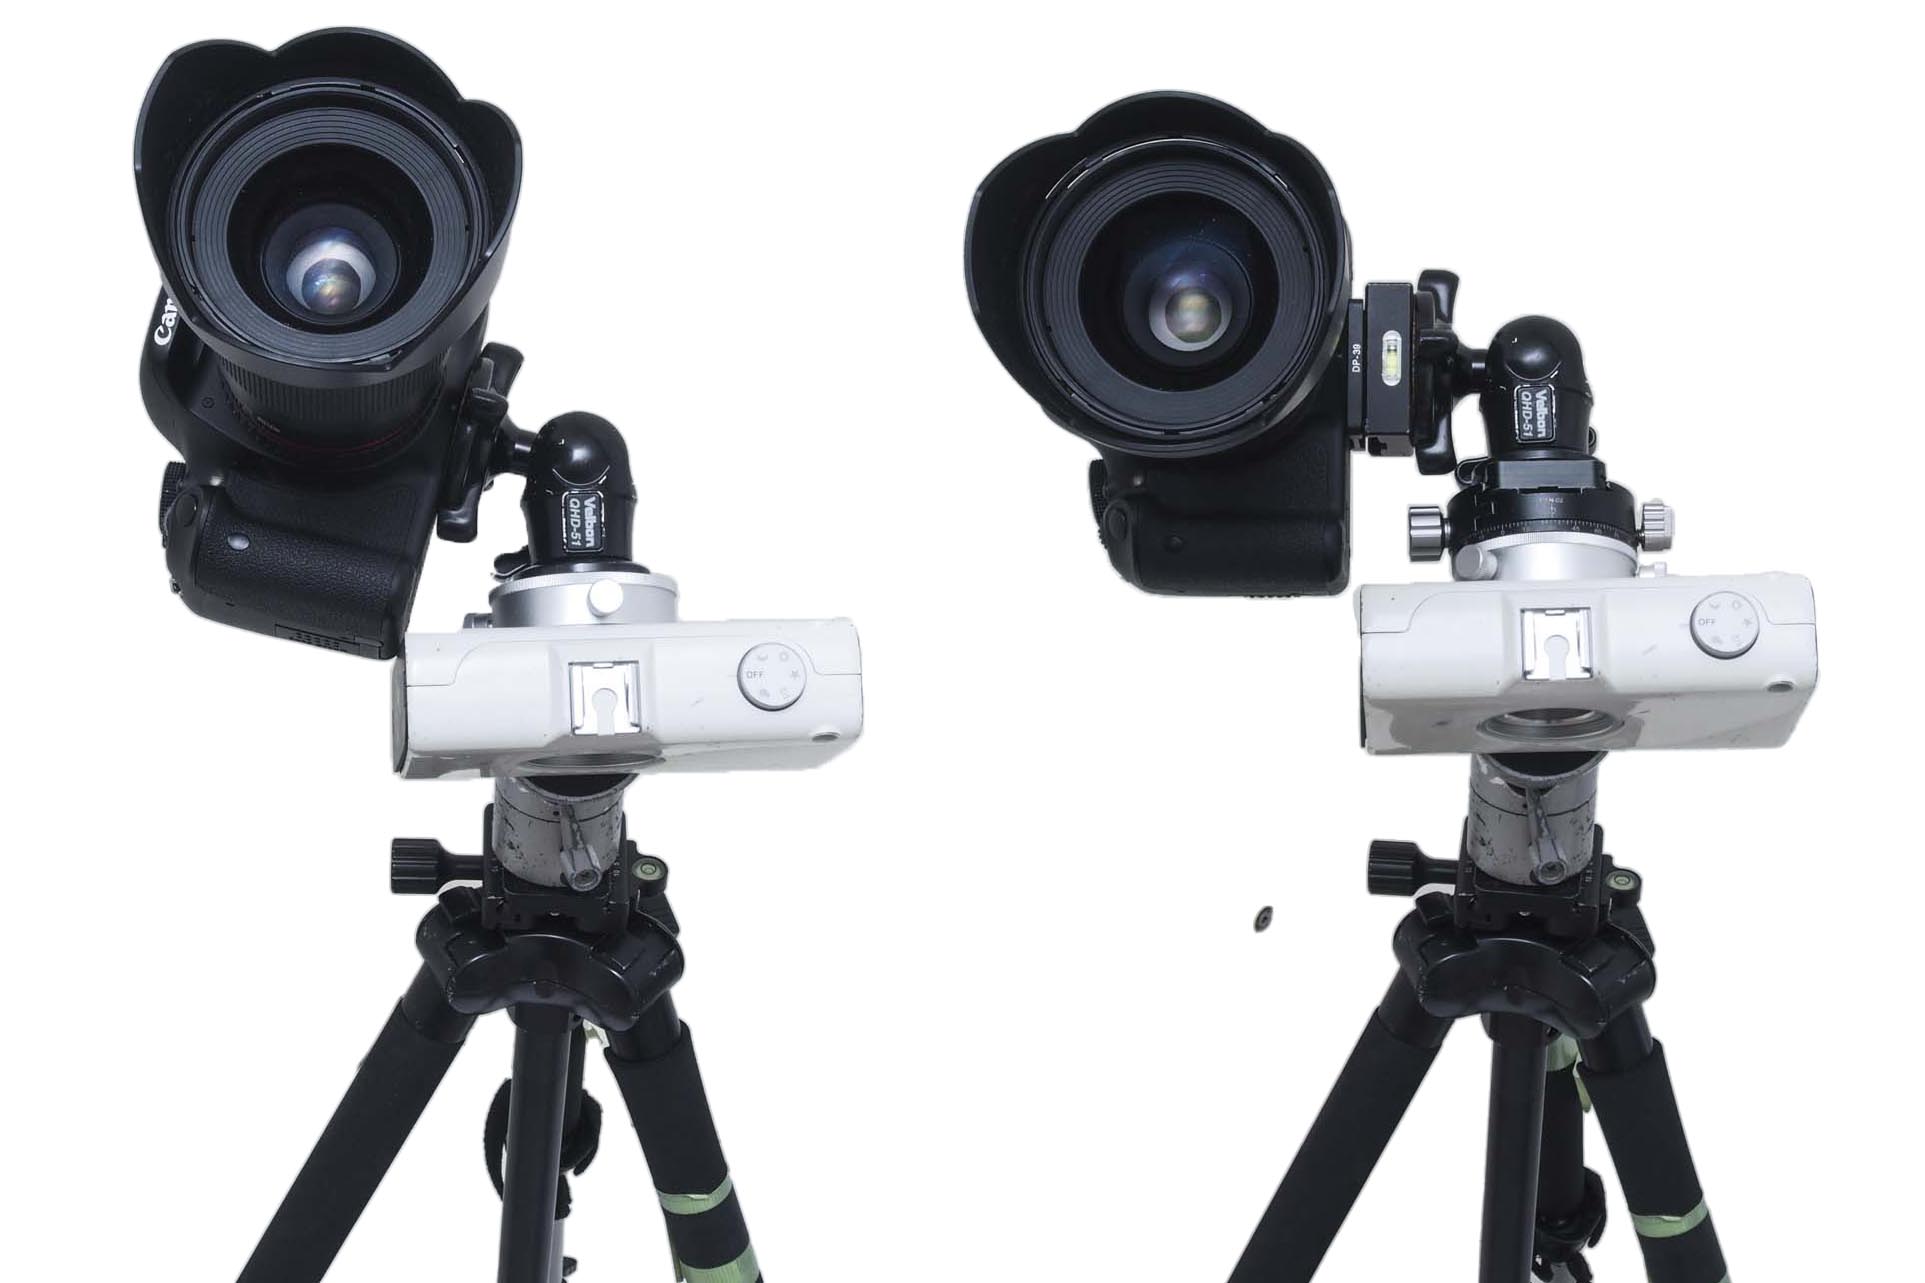
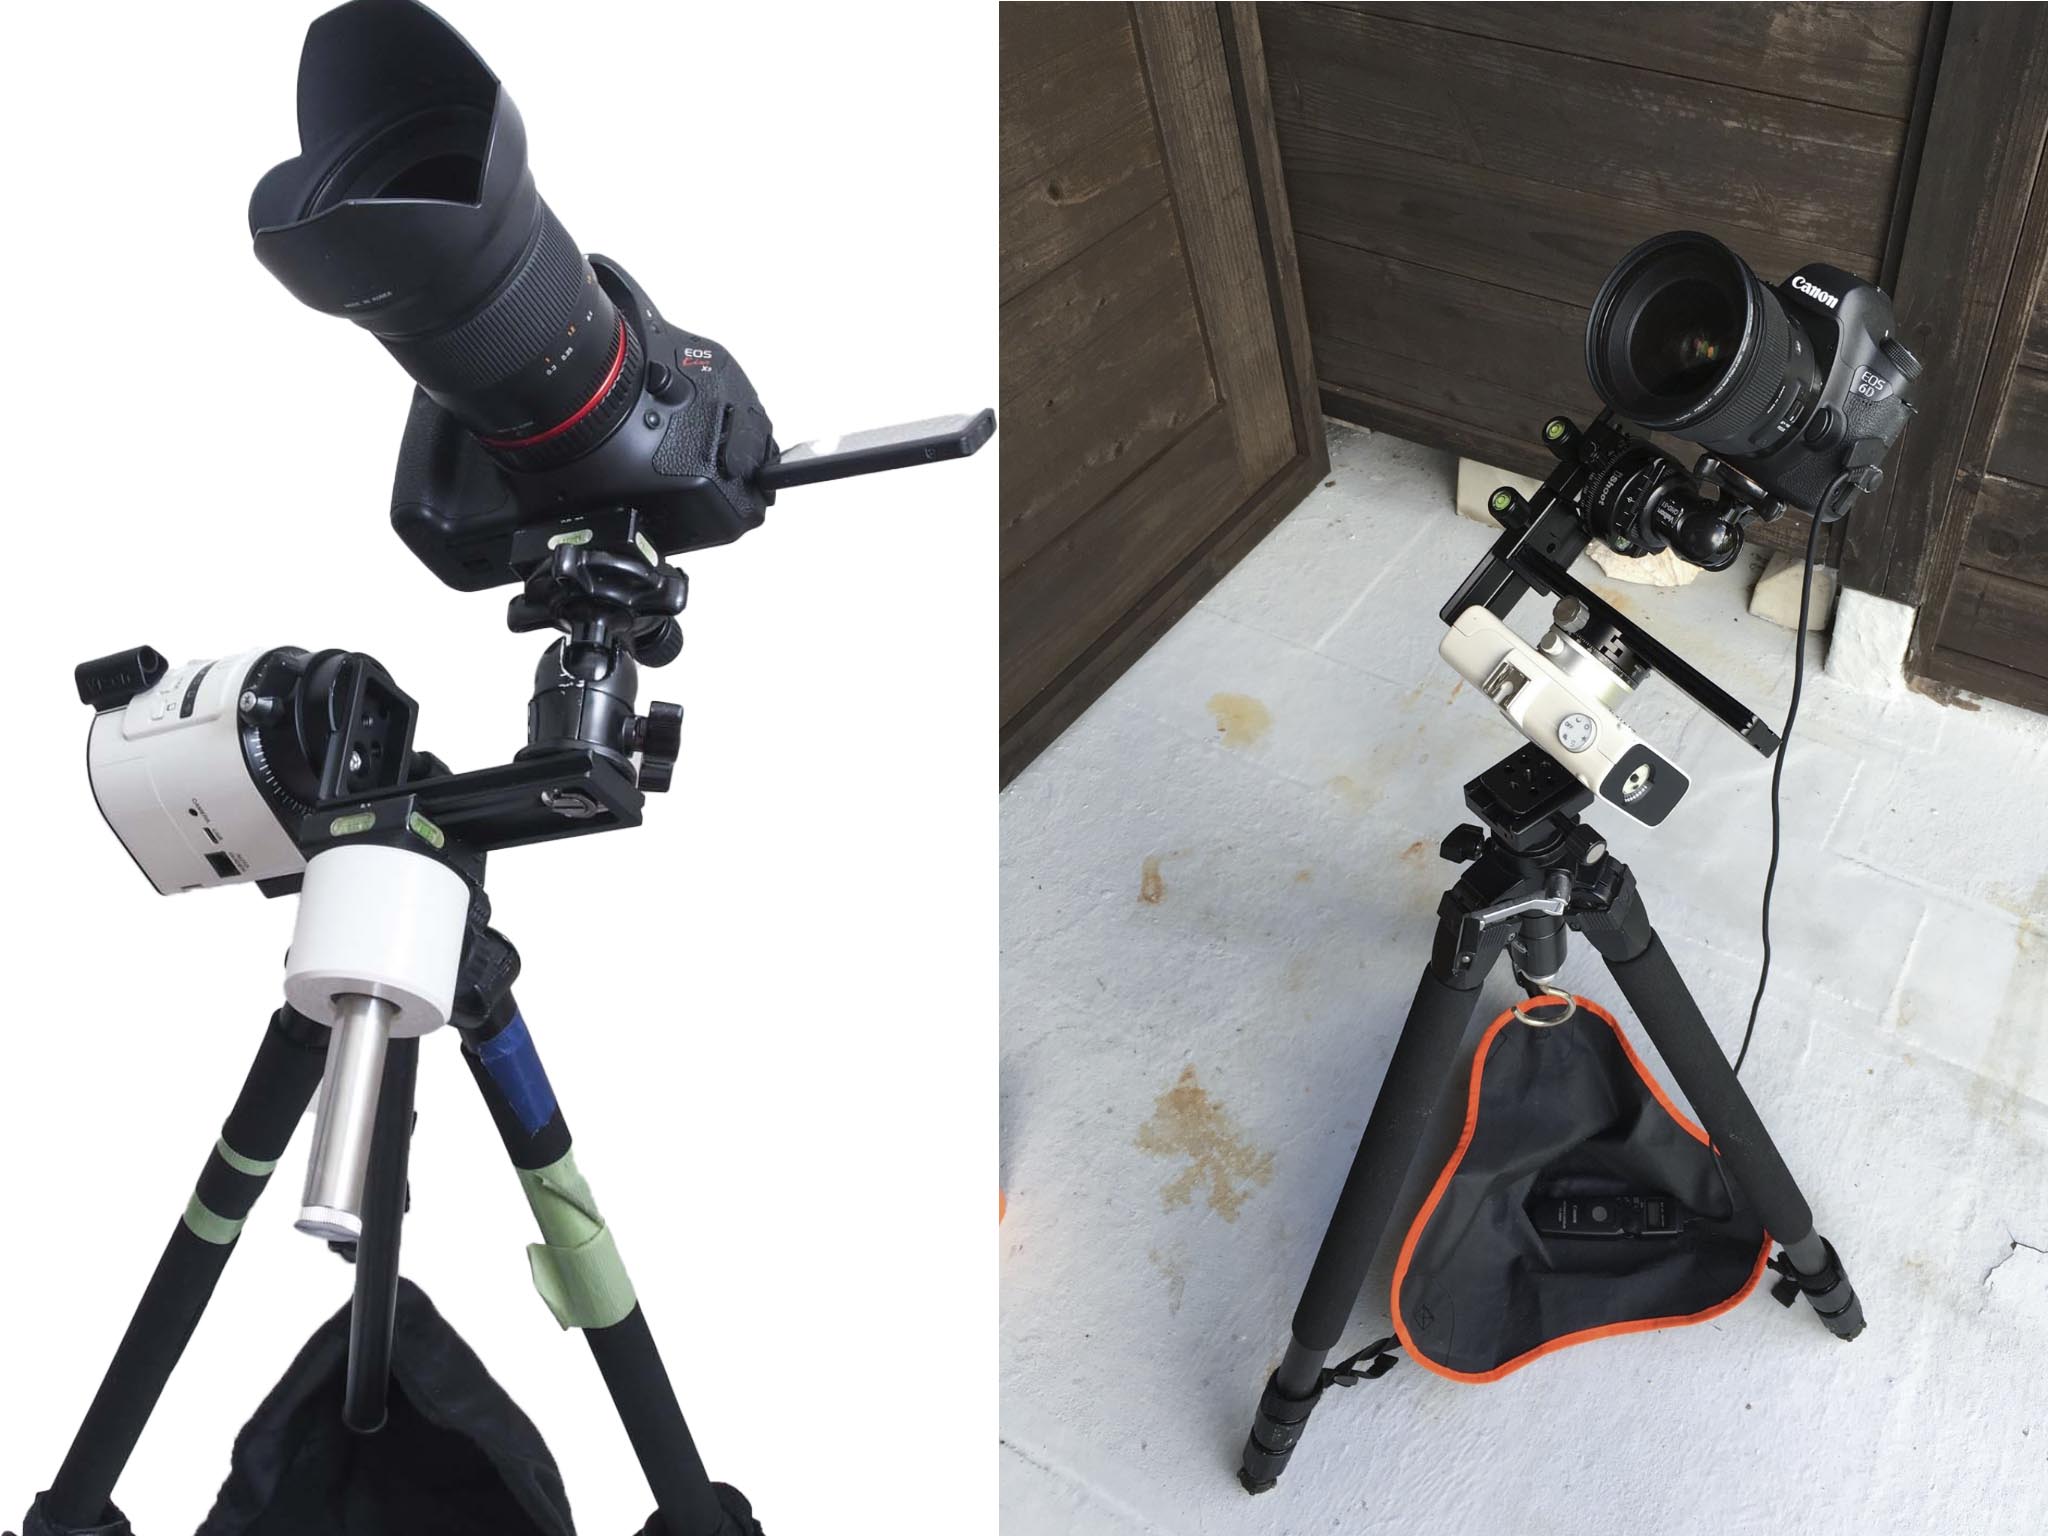
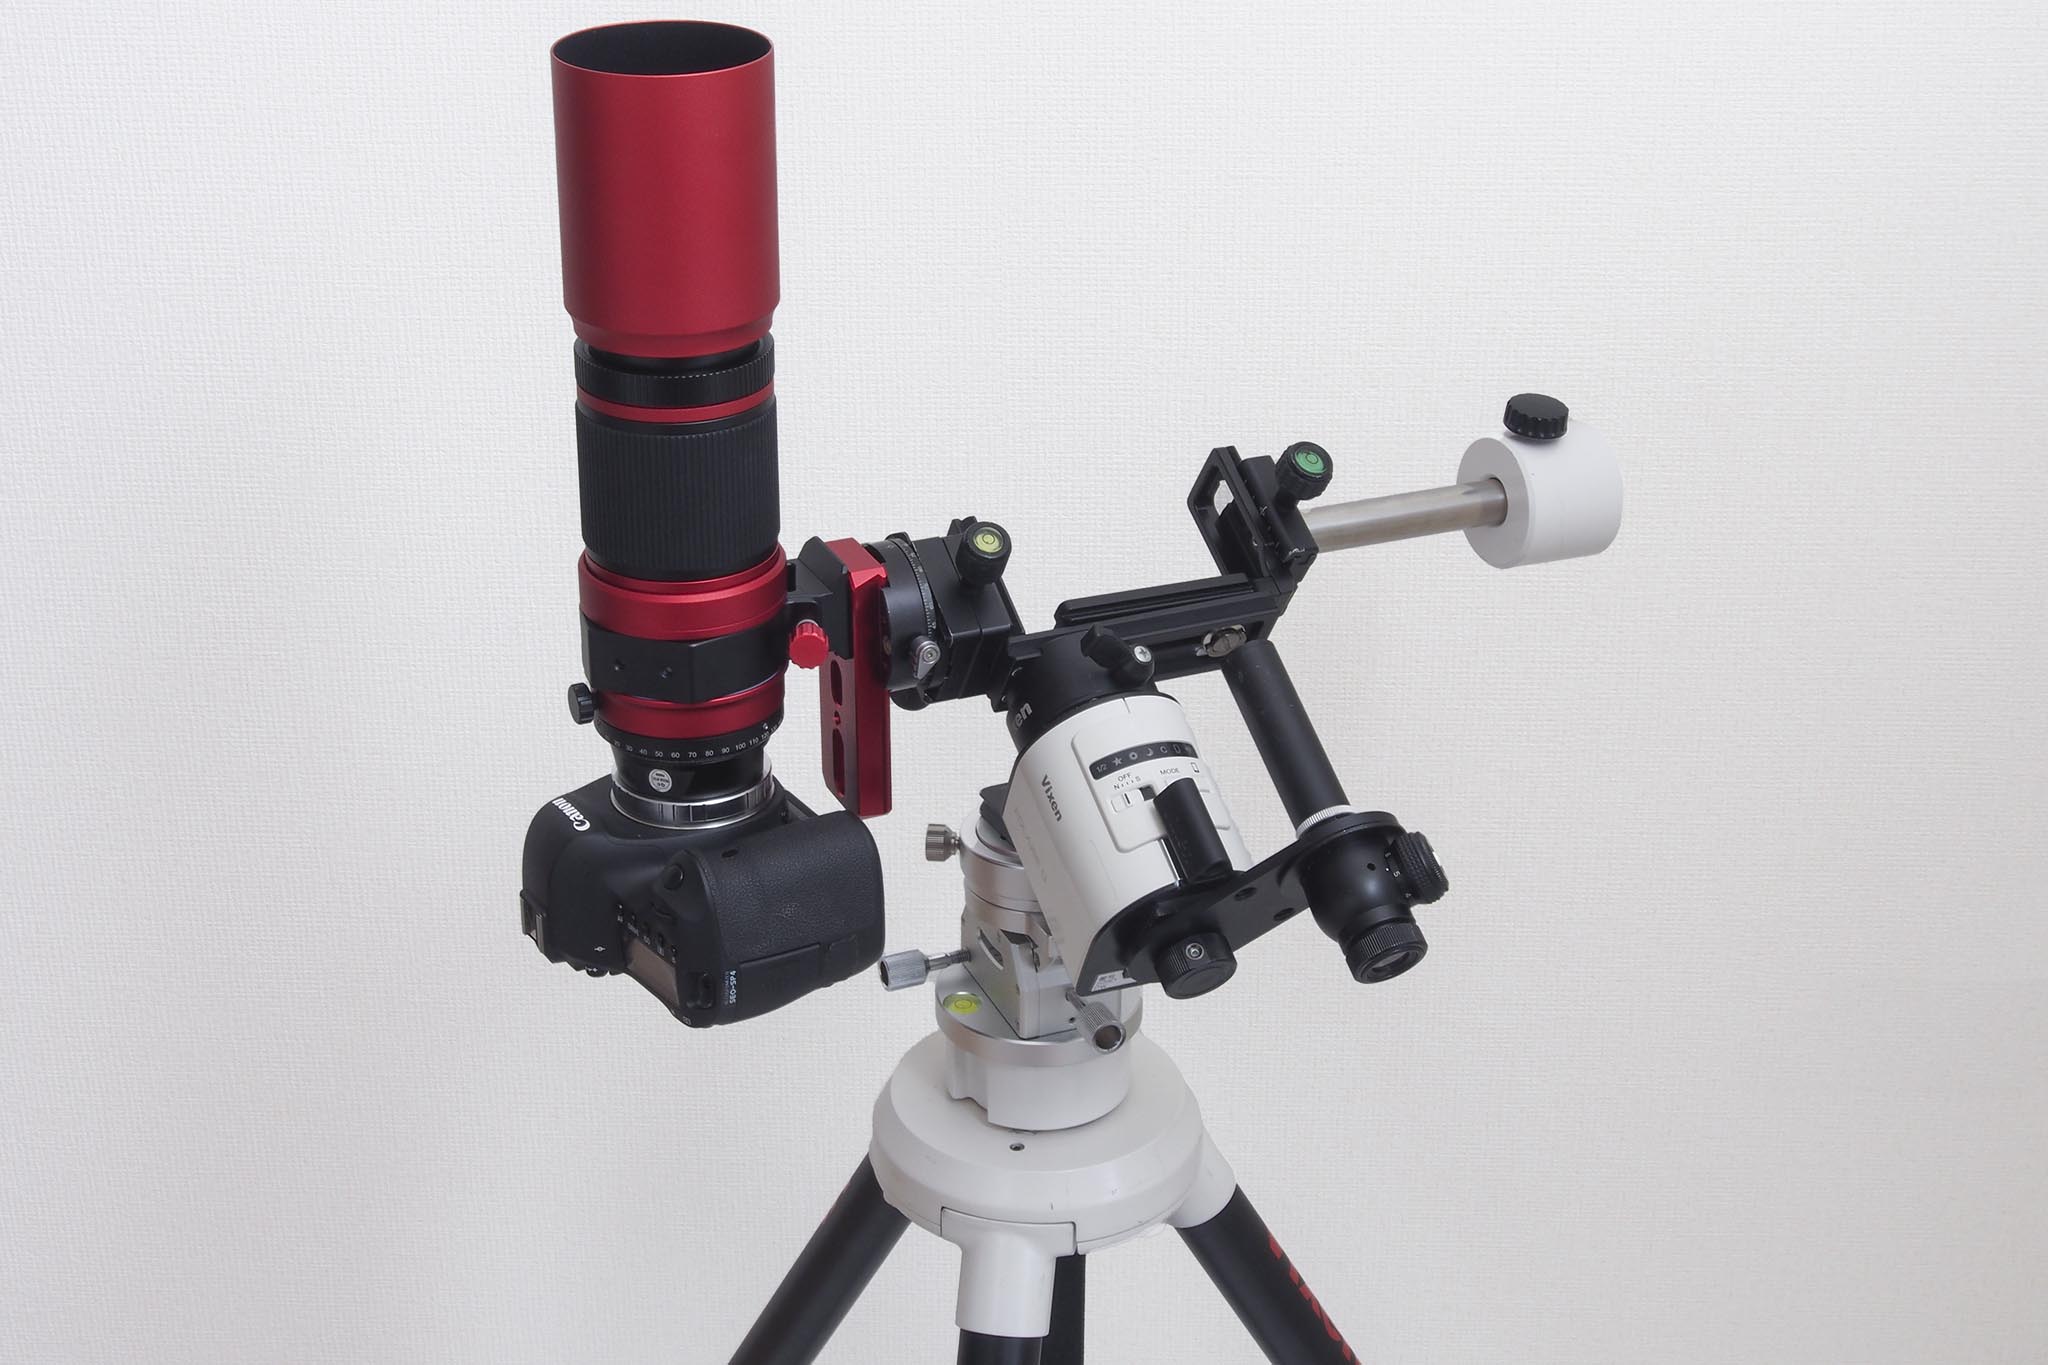 Setup used for the shooting. The equatorial mount is Polarie U, EQ base is made by Unitek, and the tripod is an AP tripod by Vixen.
Polarie’s worm is the same for new and old products. Even the 1st generation was able to achieve a high level of accuracy, but it did not provide enough support to carry heavy equipment.
Polarie U has been strengthened in every part except the gear, and the stability is one rank better. It’s now possible to take full-fledged deep sky shots with a focal length of 300mm.
Great ! star tracker for Starry sky.
 EOS6D (mod.) Sigma 24mm F1.4Art F2.2, ISO 1600, 30 sec×10, fixed shot, tracking shots in 30 sec×18. Aso , Kumamoto , Japan
” I want to take more beautiful pictures of the Milky Way!” The Starry night photographer’s wish is fulfilled with a Polarie.
The above image is a composite of the image tracked by Polarie and the image taken by the fixed camera when tracking was stopped, but I was able to capture the Milky Way more clearly and precisely.
 EOS6D (mod.) Sigma 24mm F1.4Art F2.2 30sec. ISO1600 Polarie (1st generation) Sidereal rate tracking, Daikan-bo, Kumamoto , Japan
The image above is a fixed 30-second single shot. At the viewing distance, you don’t feel the trail so much, which is enough to be a work, but when magnified by equal magnification, it is clearly a trail. The limit exposure time for a 24mm lens as taught by the “500 rule (*)” is 20 seconds, but that’s a pretty loose standard for modern, high-performance digital cameras and lenses, and even a 10-second exposure that’s twice as stringent would be a trail. It is necessary to track the Milky Way with an equatorial mount in order to express the “fineness” of the Milky Way.
(*)The rule of thumb is that you can shoot up to “500 / (focal length)” seconds without trails, even with fixed shooting. If the standard is “viewing distance” and no flow, the 500 rule is sufficient, but if it is a point image even in equal magnification, the 200 rule would be appropriate.
 EOS6D (mod) Sigma 24mm F1.4Art F2.2 ISO 1600, 30sec×12 fixed, 30sec×21tracking. Polarie(1st gen.) , Soft filter , Choja-baru,Kumamoto,Japan
One more example. This is also a composite of fixed and tracking shots taken by Polarie (1st. generation).Neither tracking accuracy nor payload is much of an issue when shooting with a camera lens with a short focal length. I think Polarie (1st. generation) can be used without much difference from Polarie U.
 The smallest configuration of Polarie U. The ball head is attached to the head base and connected to the camera tripod with a 35° tilt plate. The polar axis alignment is a peephole.
If you want to use Polarie in starry sky , you don’t need any expansion parts in particular. Both the EQ mount and the polar scope are useful, but not essential. With the standard configuration as shown in the image above, you’ll be able to simply enjoy as star tracker.
 The installation procedure of Polarie’s standard head base. It’s a well thought out and rational mechanism.
When using Polarie U/Polarie (1st. generation) in the minimum configuration, it should be noted that there is a very good mechanism which is unique to Polarie.
The camera head is attached to the “Standard Head Base” of Polarie with UNC1/4 screw, but actually this screw is usually retracted (above image 1). When attaching the camera head, remove the “standard head base” and lightly press the protrusion on the other side to release the screw (see image ② above). Rotate the camera head and screw it in (Image 3). At this time, you can tighten it tightly with fairly strong force. Finally, attach the “Standard Head Base” to the Polarie with two set screws and you’re done.
The beauty of this system is that it allows the head to be screwed in more securely without exerting any undue force on the gears when attaching the camera head(*).
(*)With products that screw the head directly into the screws on the head, a weak force may cause the head to come loose when the camera is on the east side. On the other hand, if you apply too much force, you risk damaging the gear. The Polarie gears are made of metal, but there have been cases where the plastic gears have been damaged.
And because the screws don’t protrude when stored, they won’t damage other equipment or damage the threads. This mechanism, while sober, is an excellent design that takes into account the characteristics of the product and the convenience of the user.
Great ! for Motion time-laps
“Polarie U” has added a function for “Motion Time-Lapse”. Motion time-lapse is a method of taking a time-lapse shot with more “movement” by rotating the camera horizontally or vertically, as in the example above (*).
(*)Please check out Kitayama Teruyasu’s example on Vixen’s official channel !
 Time-lapse photography in progress. The Polarie (1st. generation) also allows motion time-lapse photography, but requires an adapter to hold the camera horizontally and stably, and does not have an SMS function.
Polarie U can shoot SMS (Shoot-Move-Shoot). This function is used during motion time-lapse photography to minimize the flow of stars during shooting by rotating the frame only from frame to frame. When “shoot” is selected, the camera stops, and the frame rotates in the interval until the next “shoot” is selected.
With the addition of the motion time-lapse function, it can be said that the use of Polarie U has expanded even further.
Features and comparison of Polarie U/Polarie (1st generation)
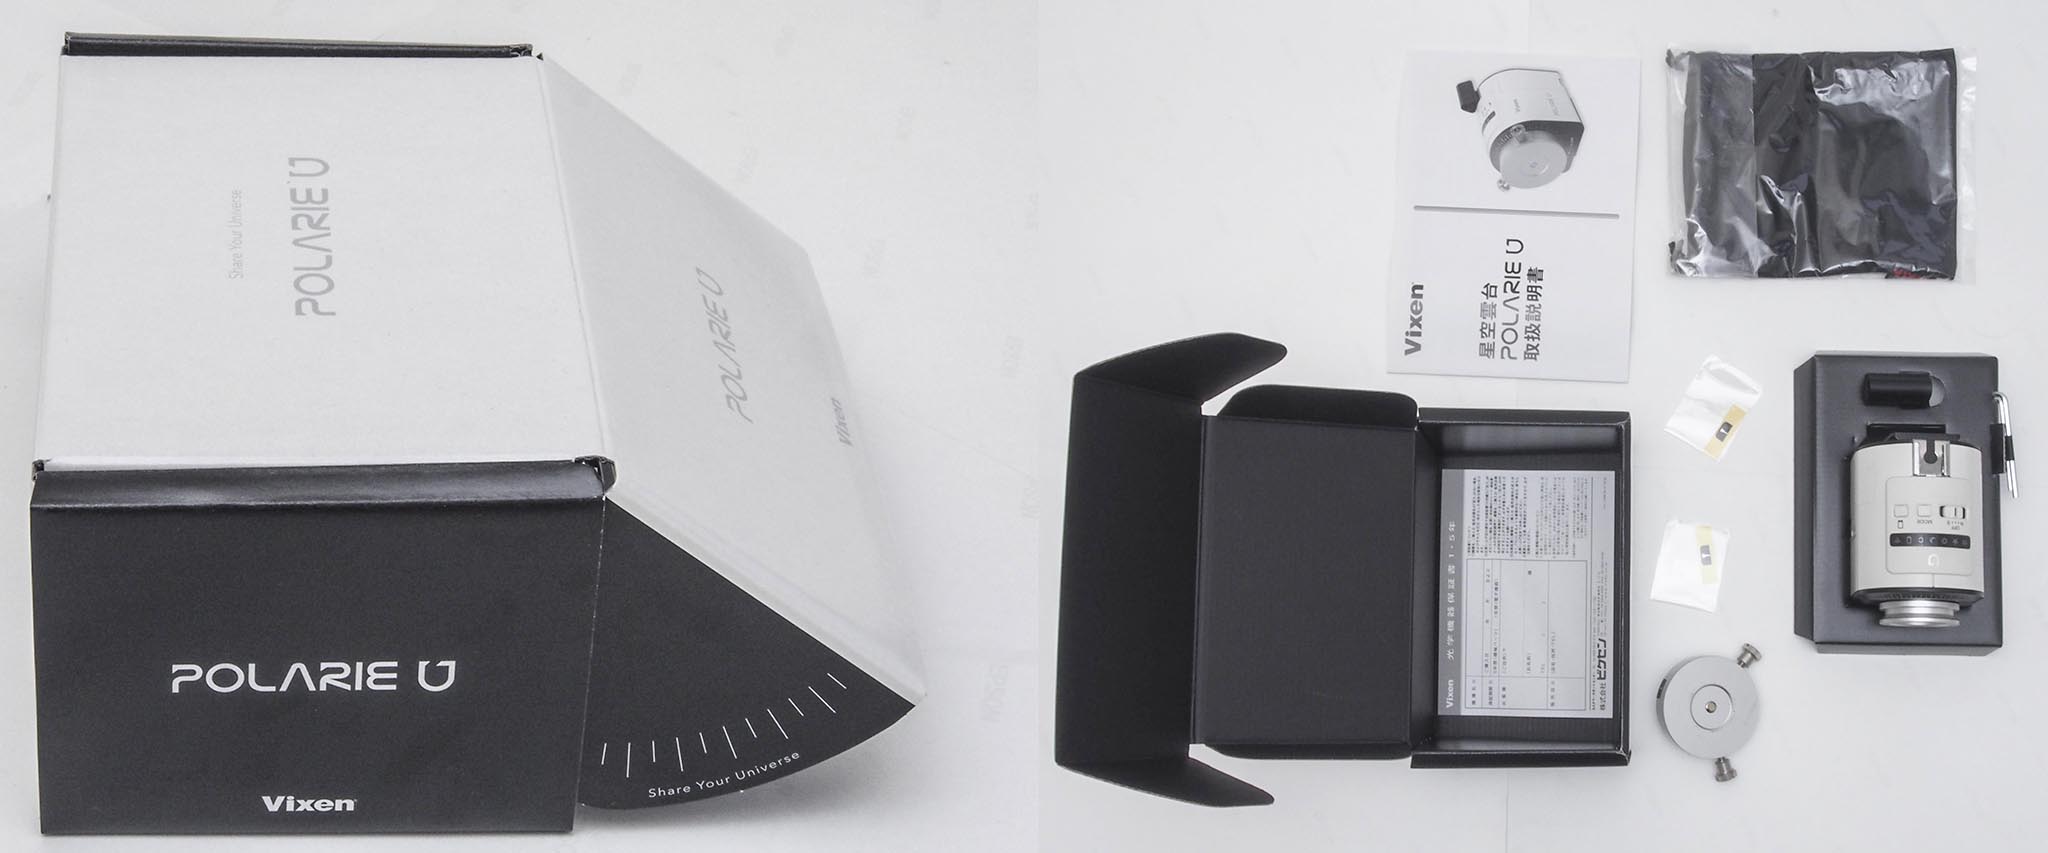 The outer box and contents of Polarie U. Stylish design with a ring of scales on the main body. Two indicator seals for the scale ring are included.
Let’s take a closer look at each part of the Polarie U and Polarie (the 1st. generation).
A compact and simple Star Tracker
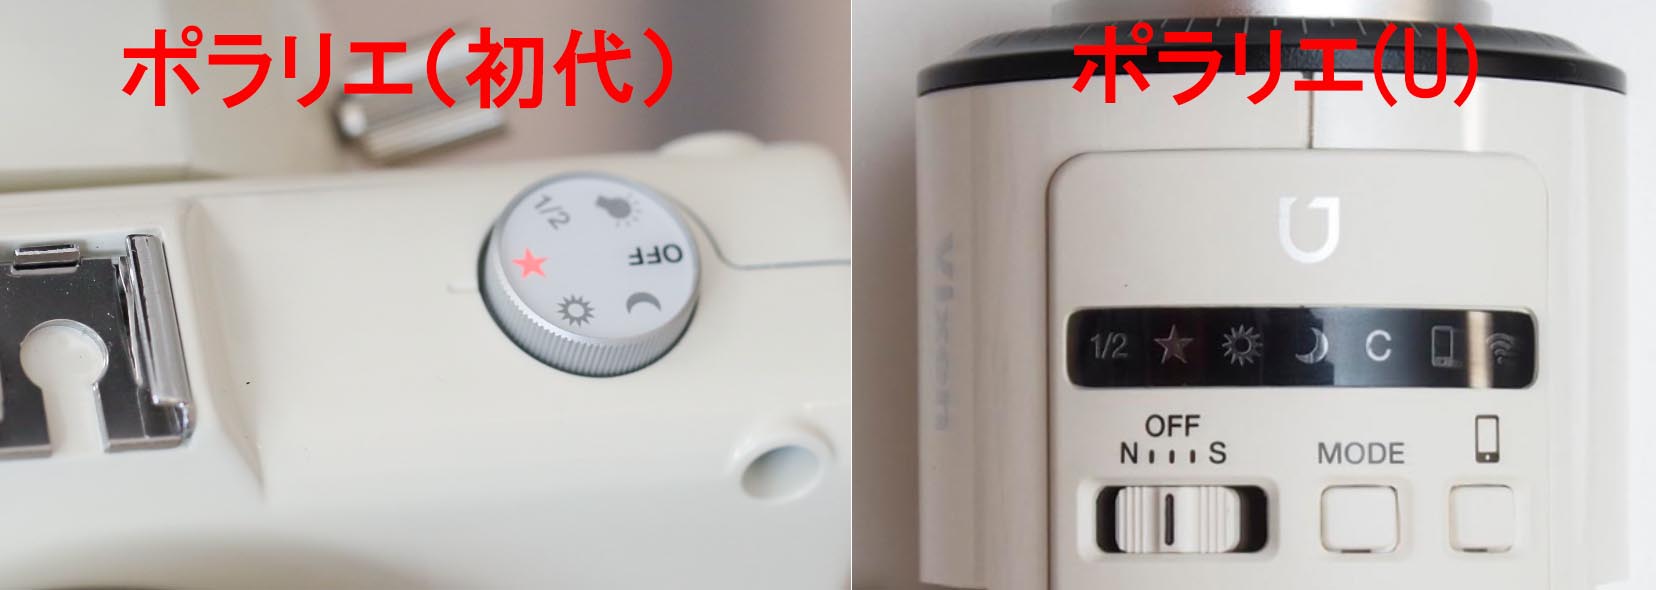 left: Polarie (1st generation),Turn the dial on the top. right: Polarie U , slide switch and mode button, to set the operating mode.
Basically, there is nothing complicated to do with Polarie. Just turn it on and set the operating mode. Once you try it out, everyone will be able to use it without hesitation.
In Polarie U, the northern and southern hemisphere modes are switched using the same slide switch as the power switch (*). The northern hemisphere is “N” and the southern hemisphere is “S”. If you make a mistake, it will be trailed at “double speed”, so be careful.
(*)In the Polarie (1st generation), this is done with a small switch in the battery box. It wasn’t easy because of the need for pointed drivers and such, but on the contrary, it made beginners less aware of its existence and less likely to make mistakes.
The four operation modes “Sidereal Tracking (★)”, “1/2 Sidereal Tracking”, “Sun Tracking”, and “Moon Tracking” are the same for both Polarie and Polarie U. However, Polarie U adds “C” (custom setting from 0.0 to 10.0 times in the app.)(*)
(*)For example, you can set the speed to 0.7 times faster to reduce the flow of stars than the 1/2 sidereal time tracking.
By the way, when the power supply of Polarie U is turned on, the mode display section lights up as if it were flowing and it starts. This is the same as the direction of rotation of the diurnal motion. It’s a consideration to reduce misoperation even a little.
 Polarie 1st generation(left) and Polarie U (right).
The “Standard Head Base” to which a camera head is attached has the same standard of attachment and is compatible with the old and new models. As for the screw hole on the tripod side of the bottom, the 1st. generation is only for UNC1/4 inch, but it becomes both correspondence of UNC3/8 inch and UNC1/4 inch in Polarie U, and it also becomes the aligator of the ALCA Swiss compatibility.
 Standard head base. Polarie 1st generation(left) and Polarie U (right)
The standard head base of the Polarie U has a knurled section that is a little larger and much easier to tighten. In addition, it can be re-tightened with a hexagonal wrench (hex key). With the 1st. generation, it was difficult to tighten at some angles and sometimes loosened up during use, but this is a huge improvement.
 Scale rings and indicator seals for Polarie U. When retracted, the 1/4 screw for the camera head is recessed like this.
The body of Polarie U is engraved with an angle scale and an additional level, perhaps for motion time-lapse. The scale indicator is attached with the attached sticker. This seal can also be used with the “Quick Release Panorama Clamp” described below.
 The lower side of the polar axis of Polarie U. This side is also an Arca Swiss compatible dovetail. The image is a prototype.
The screw holes for the tripod are also on this side and can be used for horizontal rotation in motion time-lapse. The retainer of the polar axis telescope (described later) is also installed in this screw hole.
Fewer “blind spots”
 The weakness of Polarie (the first), the south-central vertical composition. Depending on the height of the head, there was some interference as shown on the left. On the right is the connection through the panorama head. There are some things that can be eliminated if you stand a little taller.
Due to its horizontal structure, the camera and the main body of Polarie sometimes interfere with each other in the vertical composition in south-central mode as shown in the image above. In Polarie U, the possibility of this kind of interference is greatly reduced because of the length of the housing.
On the other hand, as shown in the right side of the above image, it is very confined when taking pictures of the Southern Central North sky (*). The vertical Polarie U has a little more room, but it’s still a pain in the butt. This is the fate of a star tracker with a ball head to the tip of the polar axis, and the only way to solve it is to take a German EQ or fork EQ configuration.
(*)for example , Cassiopeia or Crux
crossing the meridian, in this position. When you’re in this position, the camera is a vari-angle monitor, which makes it much easier to use.
Expandability that can be used for full-fledged Deep sky
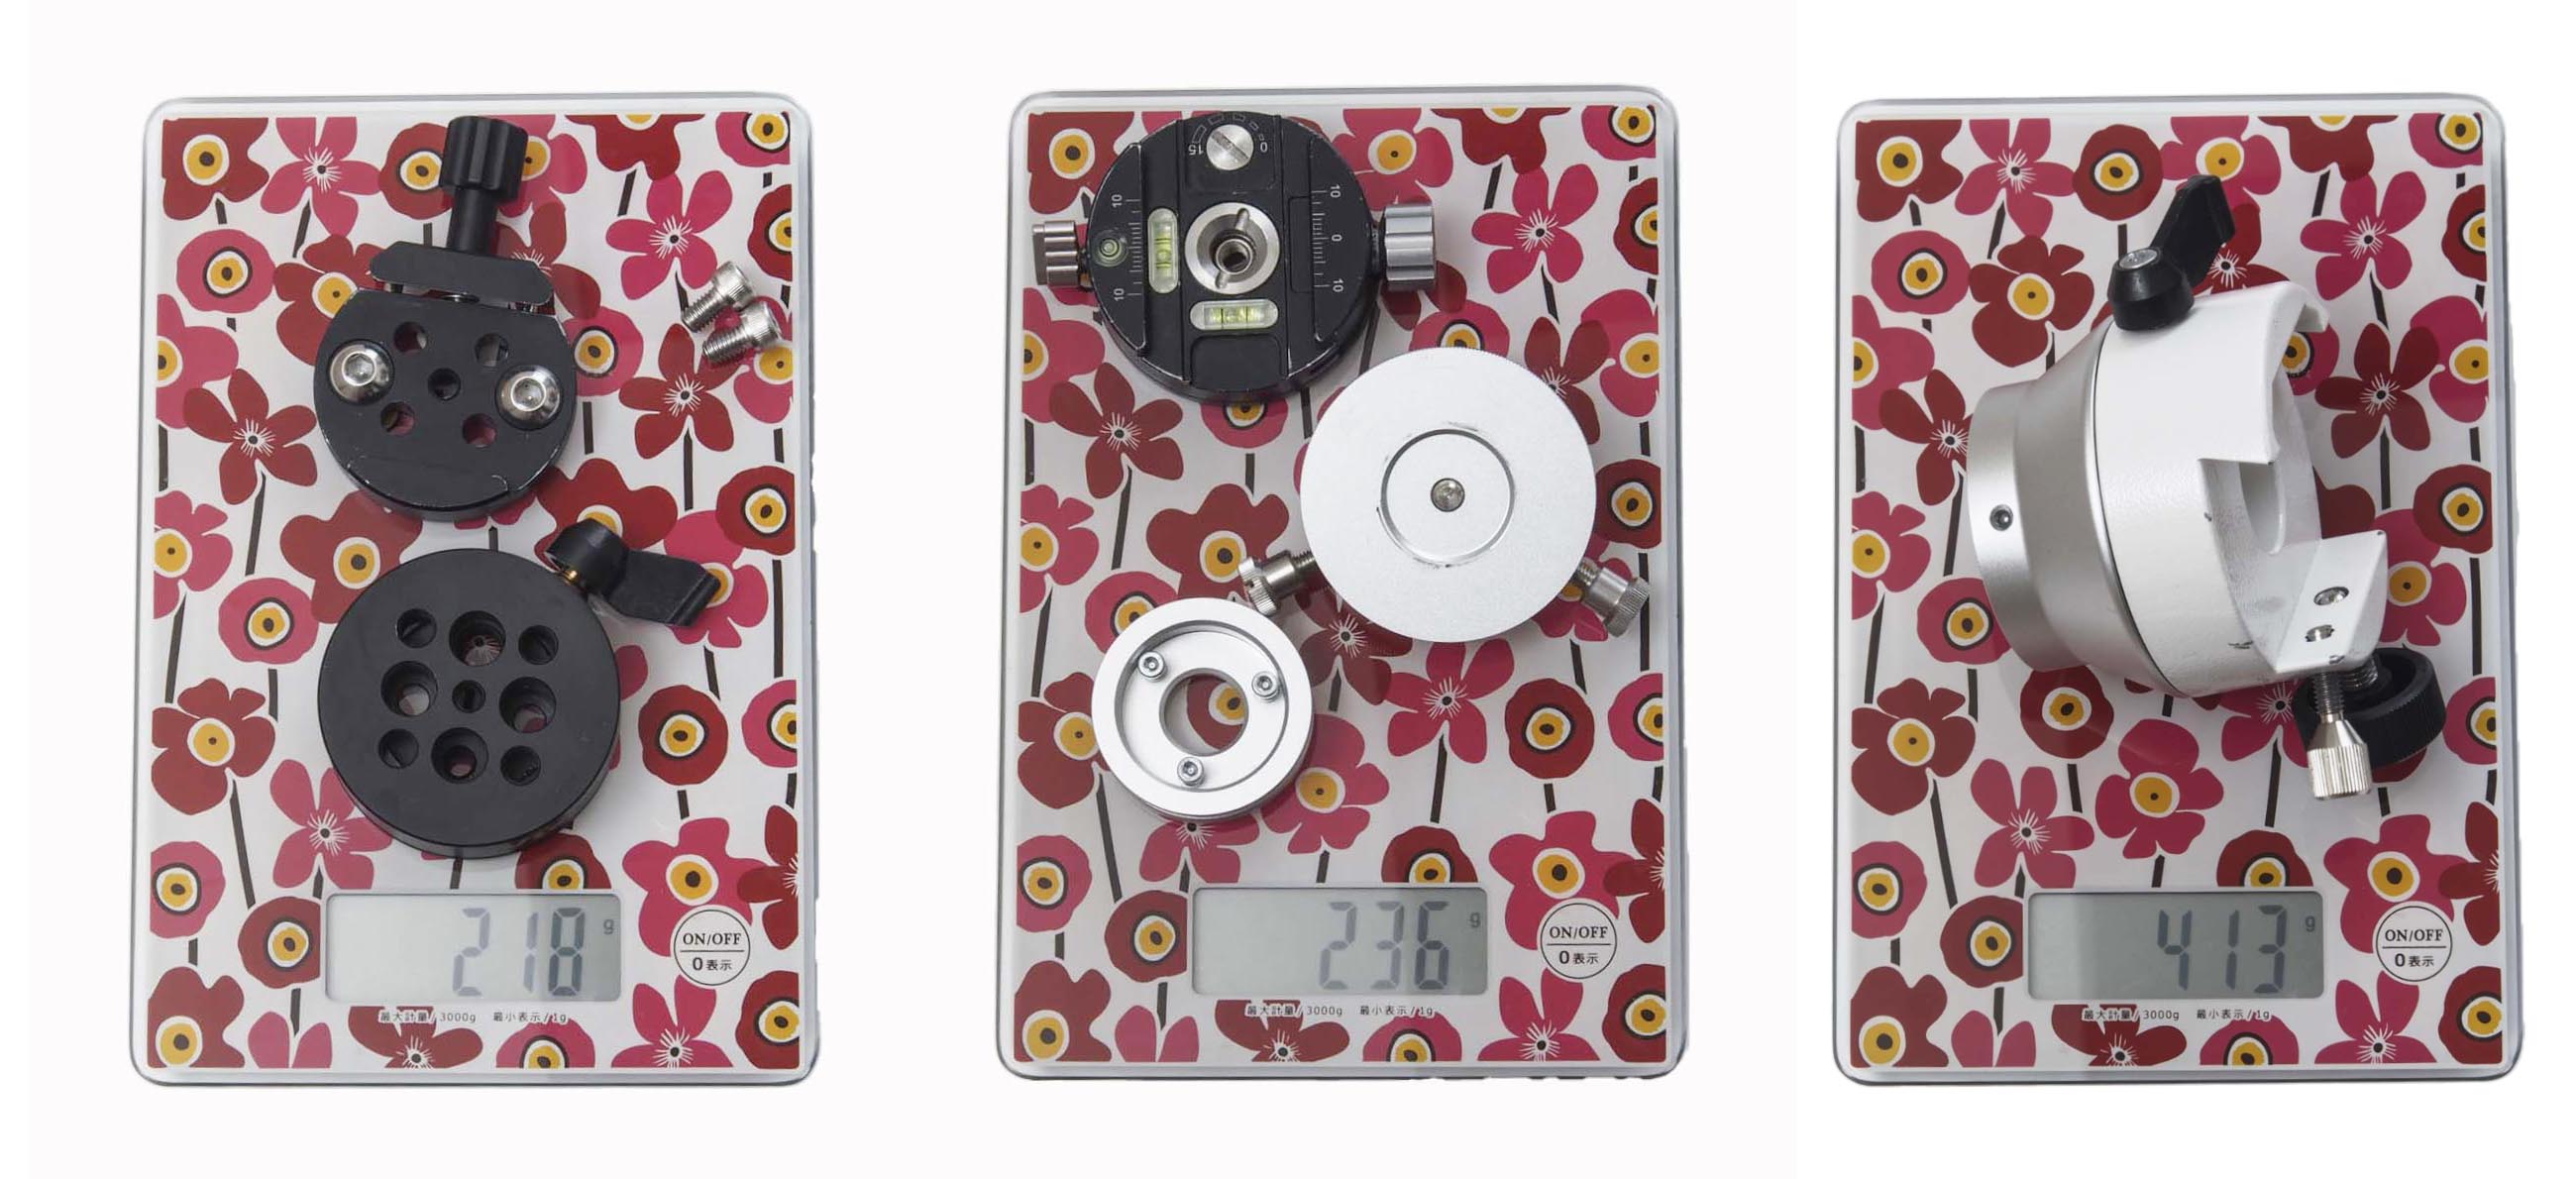
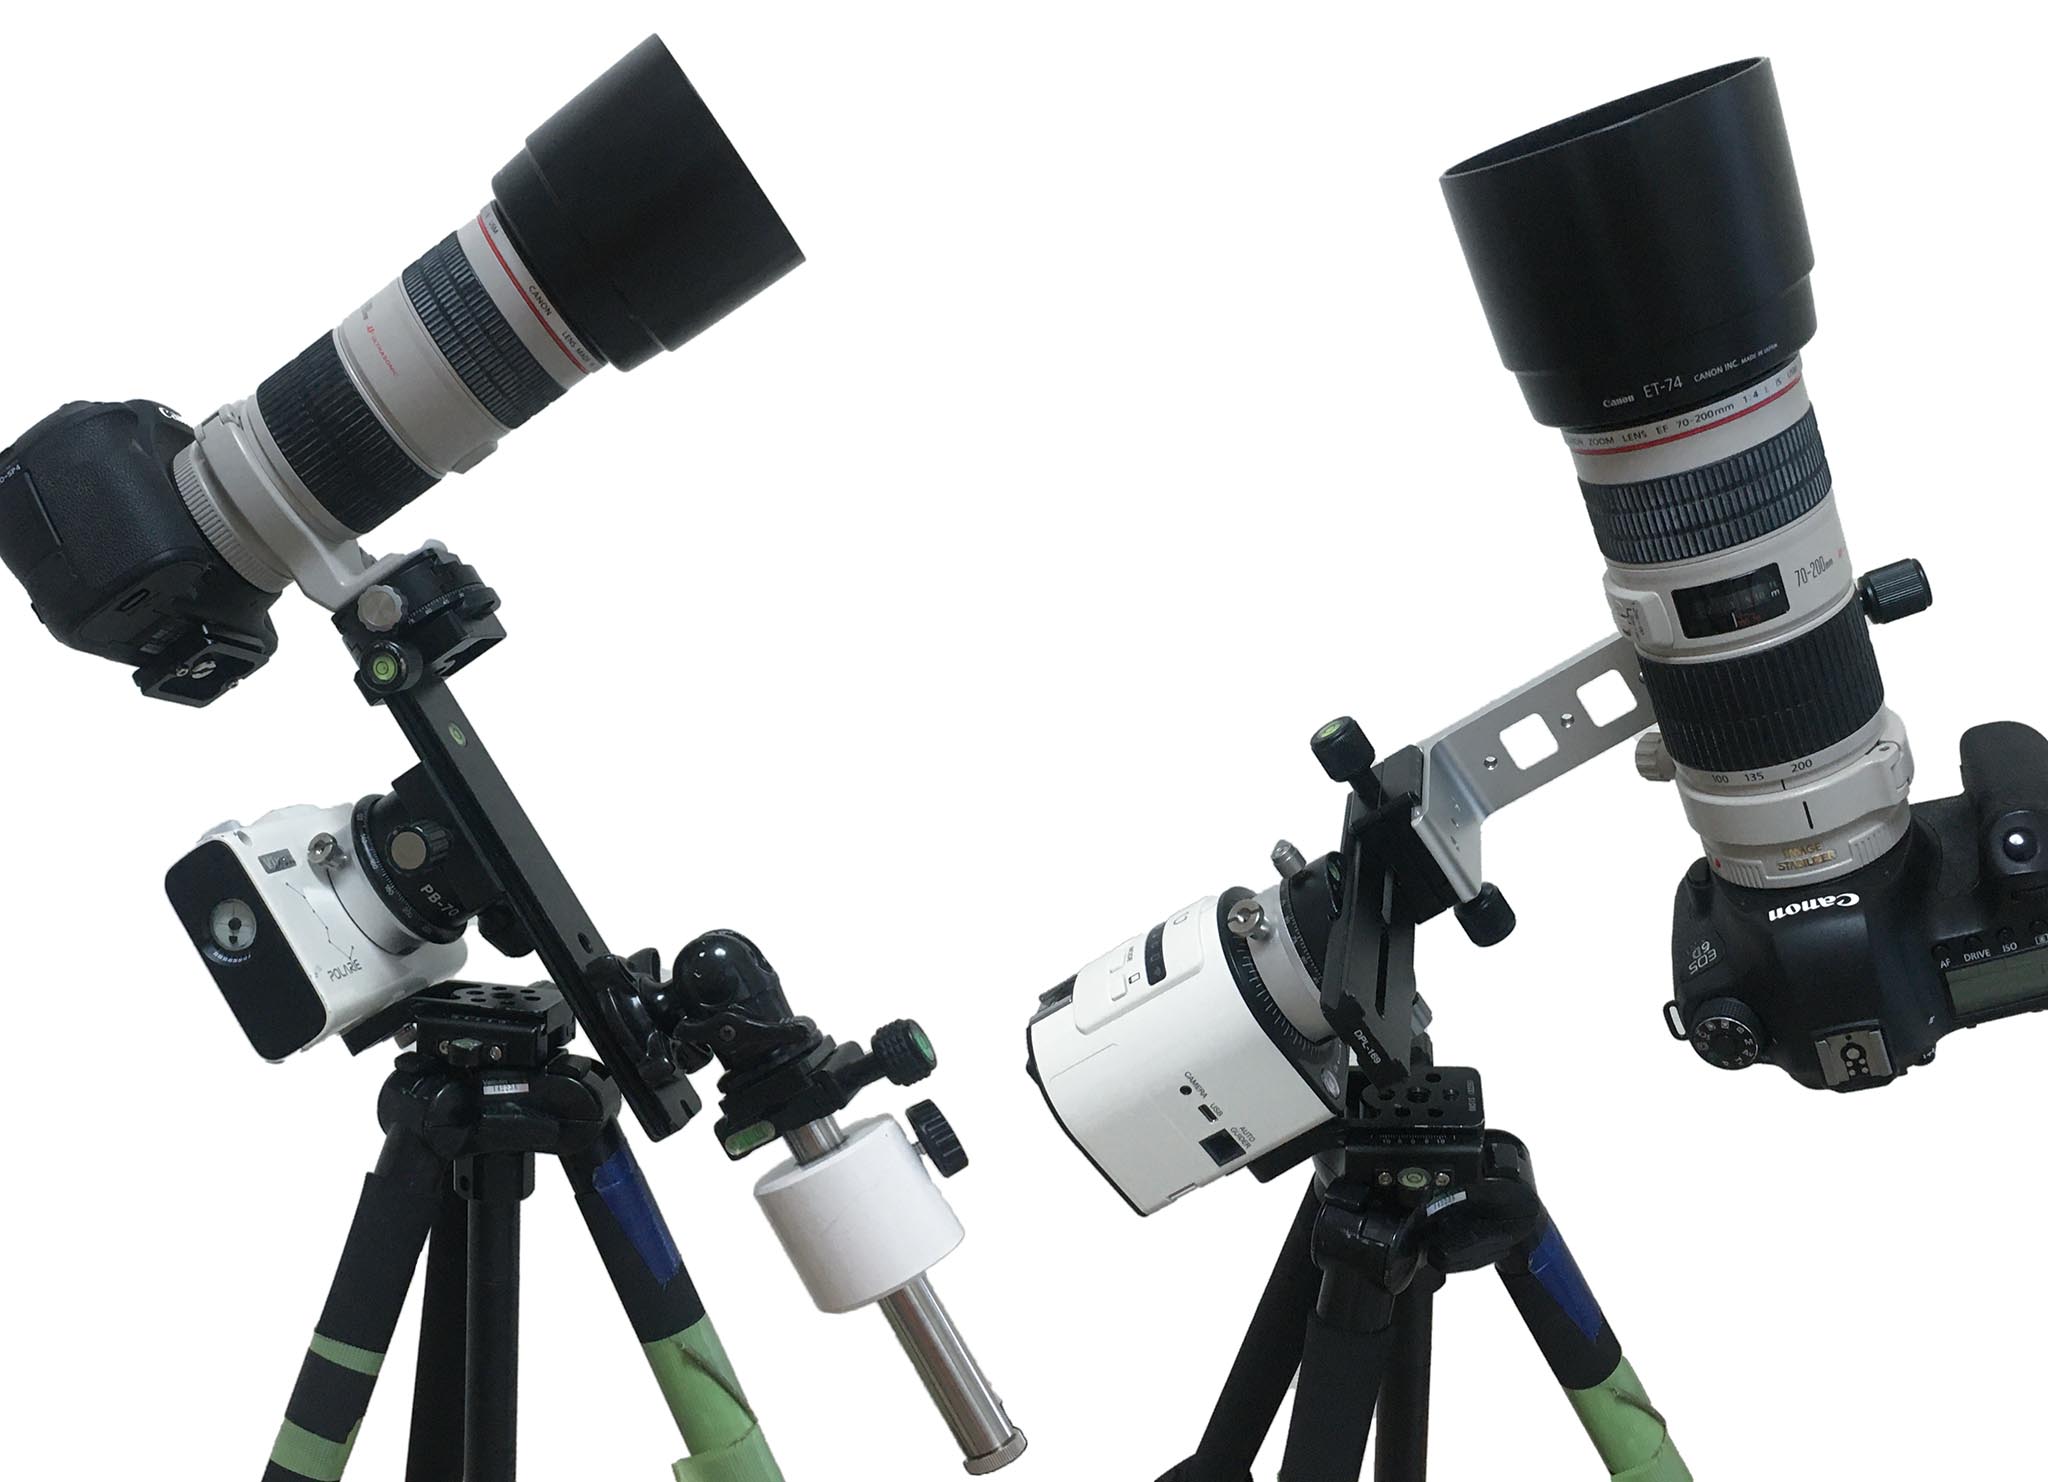
 “Telescope Factory”‘s head base and EQ base for Polarie, which were the first to strengthen Polarie parts. Both are now newer, lighter versions
1st generation Polarie was initially intended for not so “serious” photography. However, because it actually had a fairly high level of tracking accuracy, a variety of “enhanced parts” came out later.
These reinforcement parts have been replaced with the standard head base that comes with the camera, but the Polarie U has a structure that allows the reinforcement parts to be installed more stably while maintaining the conventional specifications.
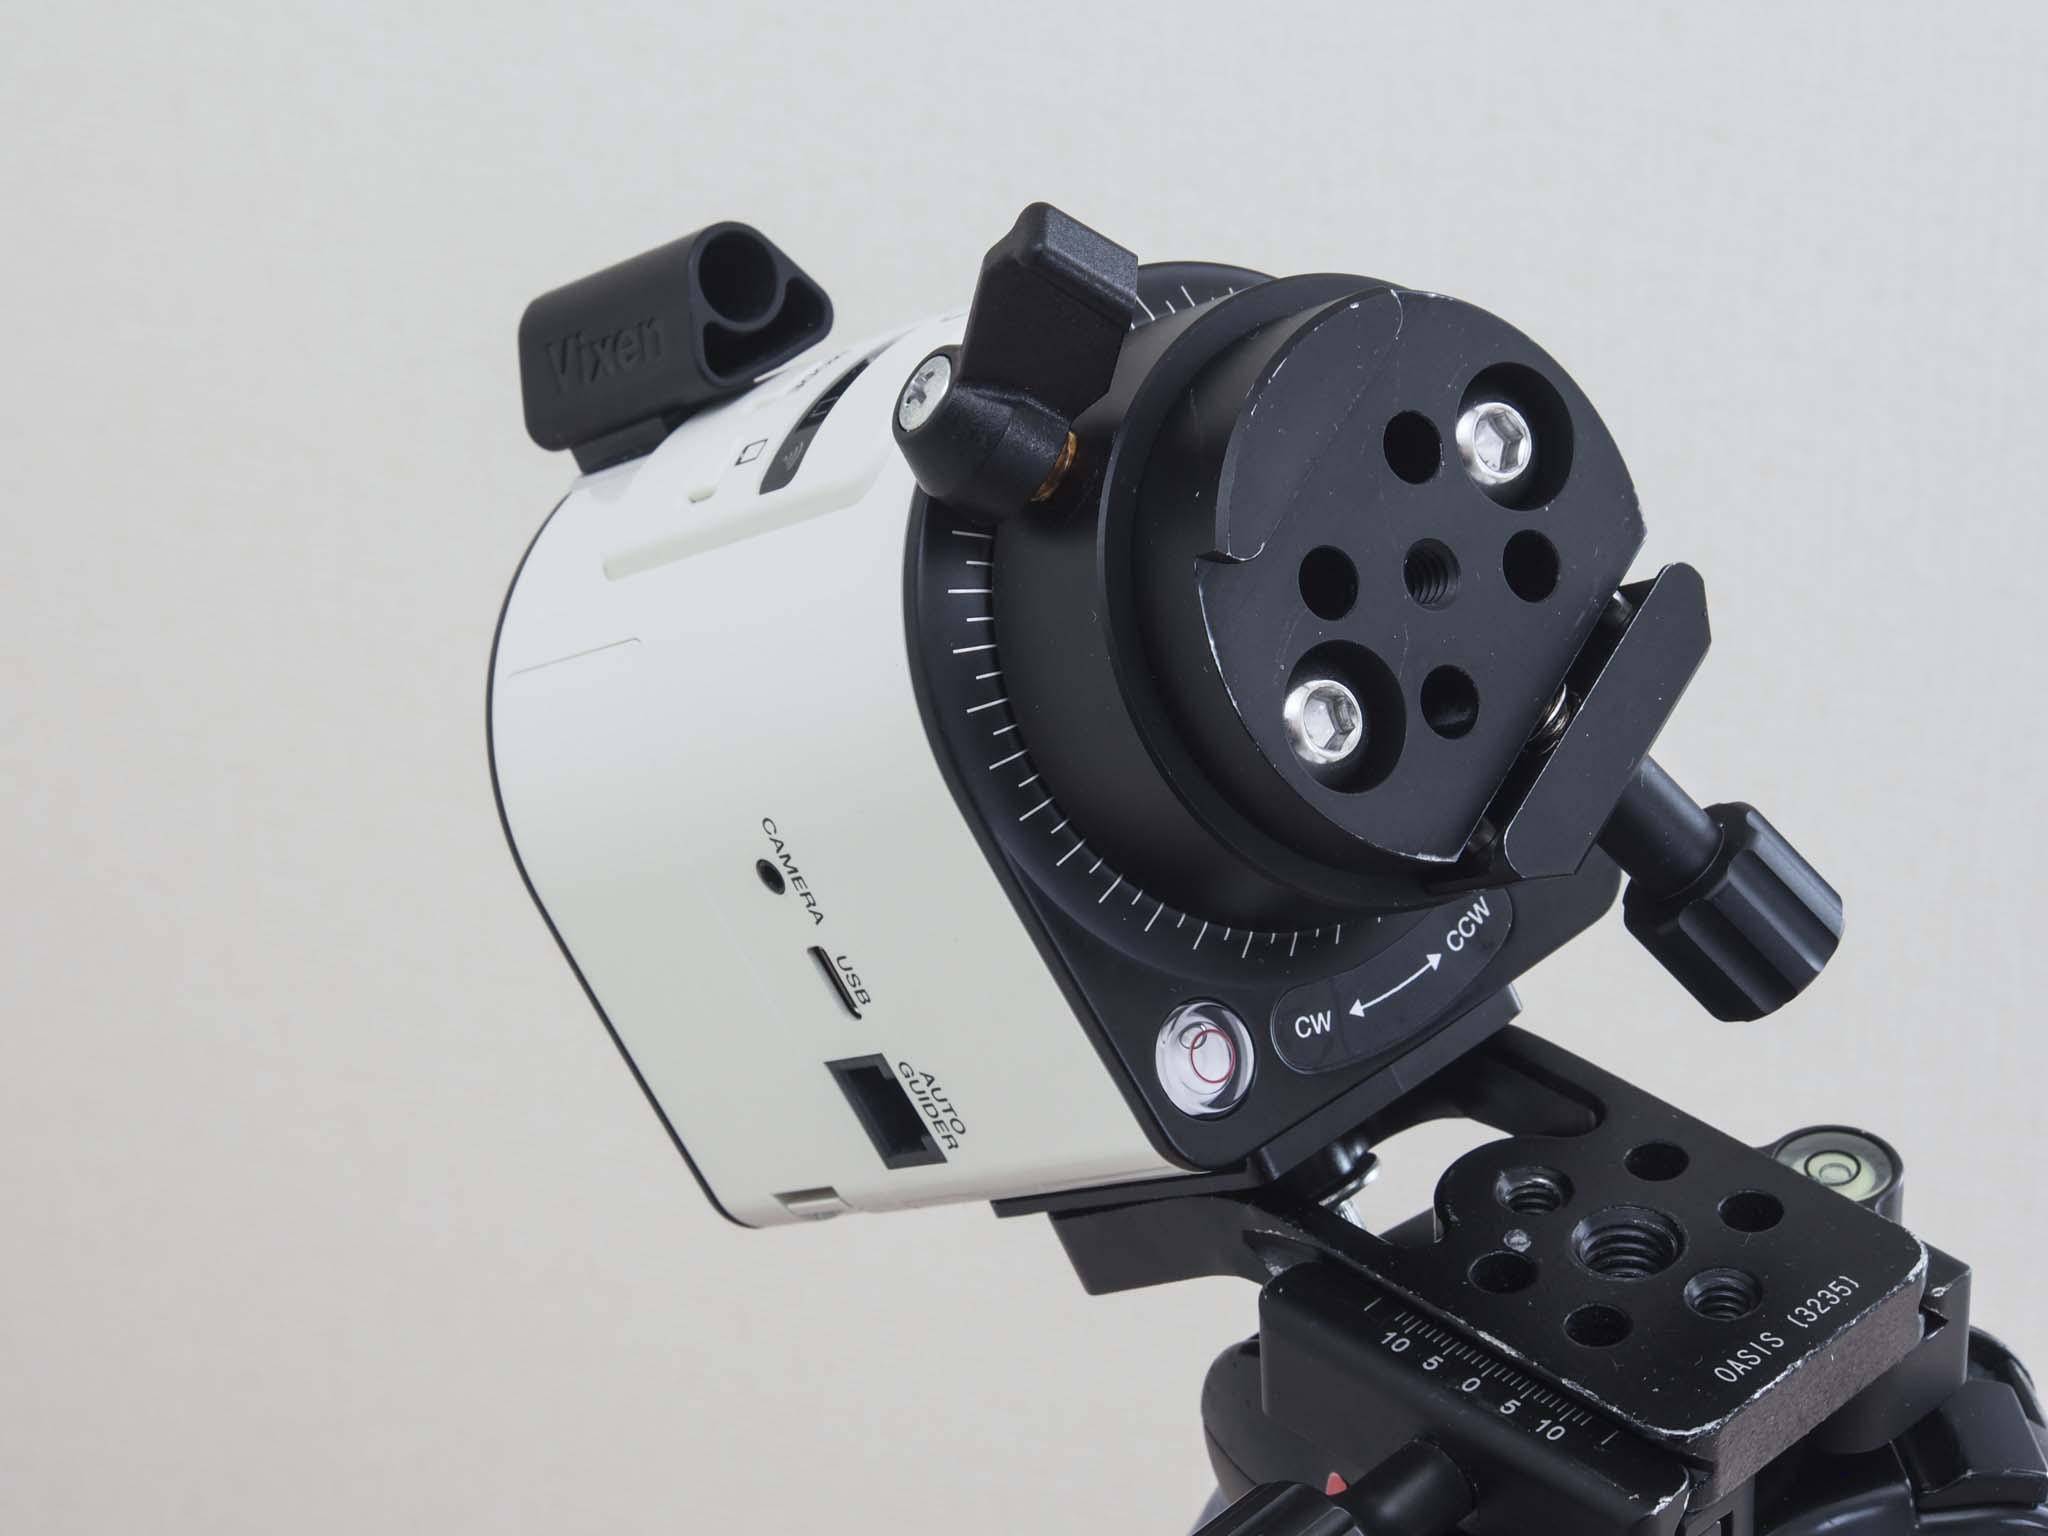
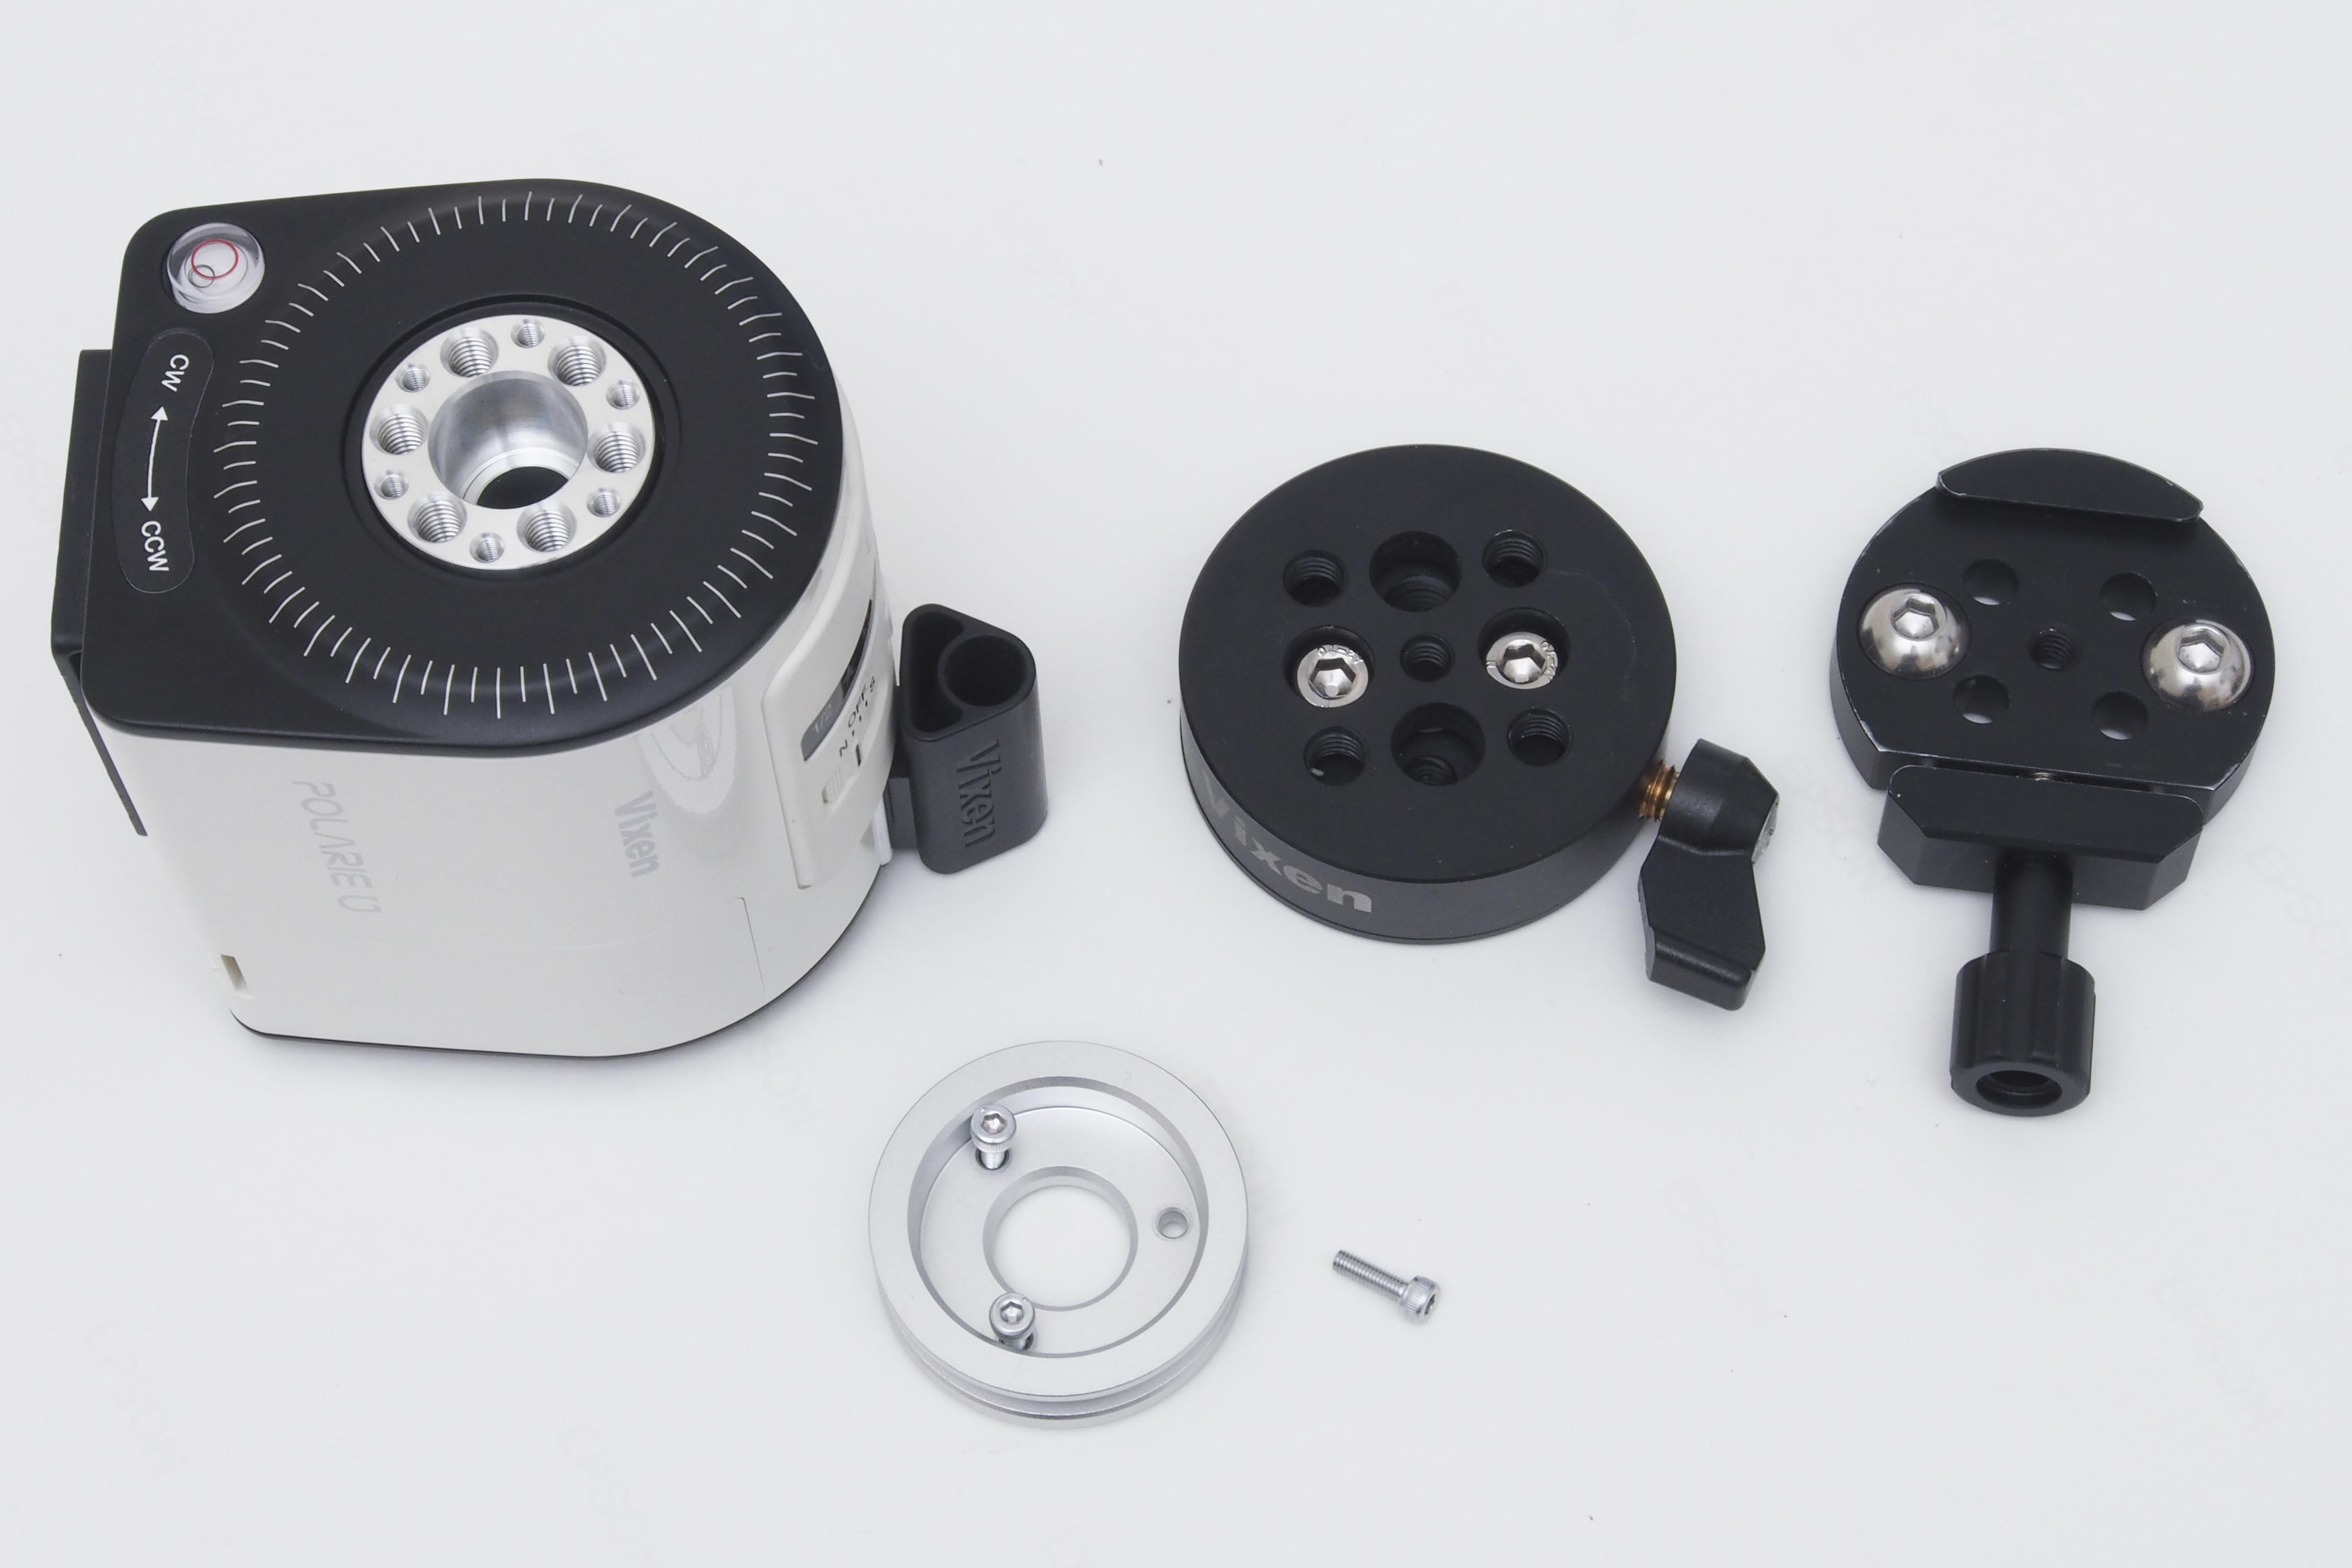 Back row left: Removing the clamps for the base of the head of Polarie II. Back row middle, right: quick release panoramic clamp. Front row: Connector for the base of the head of Polarie U
When you remove the three M4 screws on the head of the Polarie U, six M6 screw holes appear (*). This threaded hole can be fitted with a “quick-release panorama clamp (sold separately)” to make the overhead head ALCA Swiss compatible.
(*)The threaded hole spacing is not 35 mm.
 ” Quick Release Panorama Clamp” on the Polarie U.
Arca-Swiss compatible plate is not as strong as the Vixen style dovetail, but they have the advantage of being smaller , lighter and numerous compatible parts are available on the market. It’s a better match for the smaller and lighter Polarie U.
 Left: “Quick release panorama clamp (sold separately)” Middle: “Standard head base” and Panorama head (not included) Right: “Multi head base for Polarie” with Vixen style dovetail (sold separately)
As described later, the same thing can be done by attaching a general purpose panoramic head to the “Standard Head Base” of Polarie or by attaching the “Multi Head Base for Polarie” (sold separately). However, as you can see in the image above, using the quick release panoramic clamp is lighter and the installation is more solid with the M6 two point fastening. It can be said that it is a great evolution to be able to choose according to the use.
System Extension Examples
.
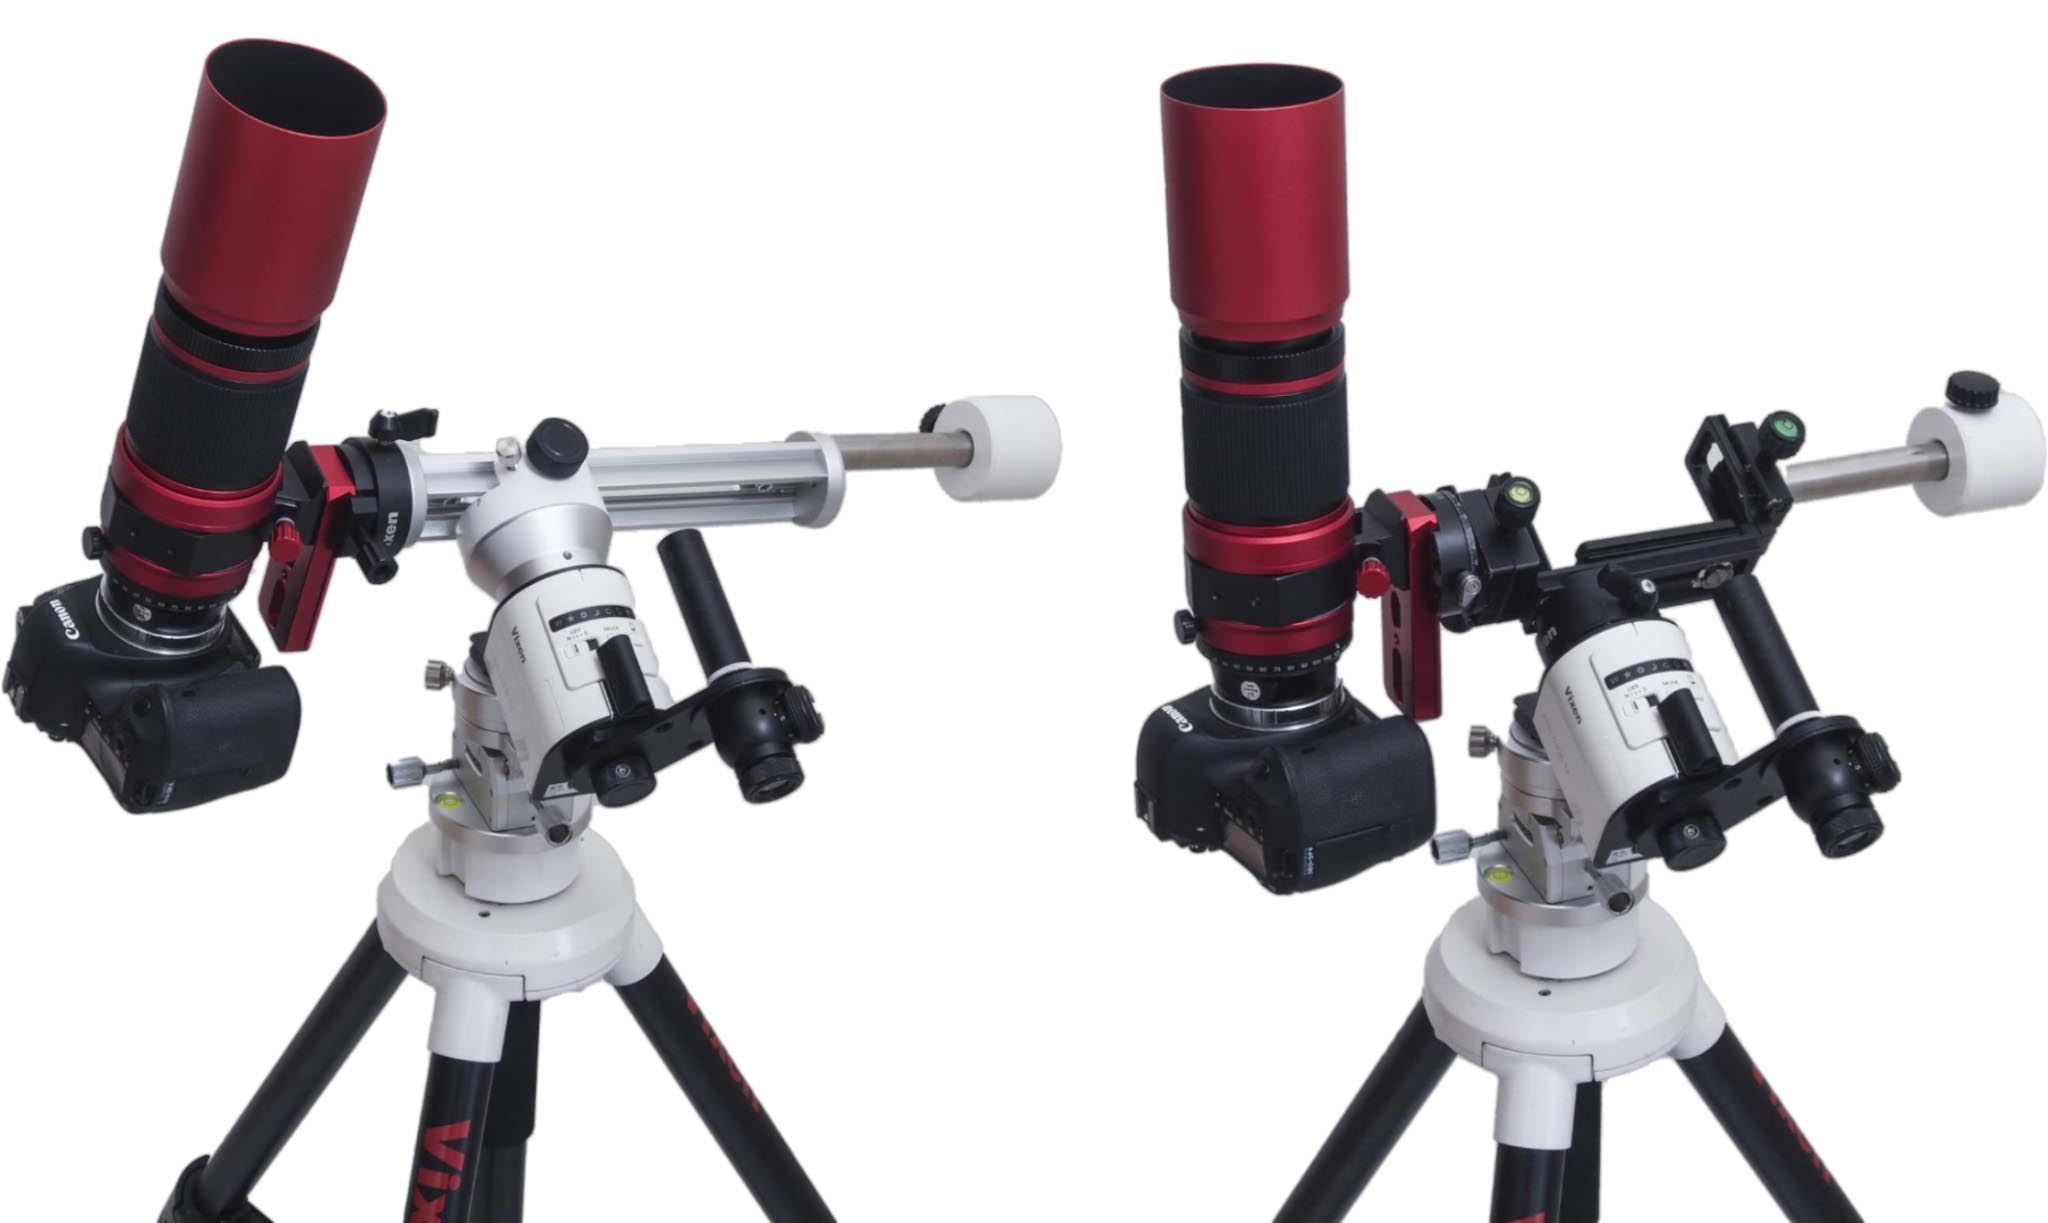 (left) German configuration using multi-head base for Polarie (right) German configuration using Quick Release Panorama Clamp and Quick Release Angle Plate
If Polarie U is configured with “German style equatorial mount” or “Cantilevered fork equatorial mount“, it will be possible to balance east and west exactly and the system will be more stable, and even astronomical photography using heavy telephoto lenses and small astronomical telescopes will be considered. In the above configuration, the camera and lens together weigh about 5-6 kg, but the rigidity of the camera is sufficient.
In the 1st. generation Polarie, the fixation of the head with the main body of Polarie was sometimes a bottleneck, but the Polarie U is more stable in this respect.
 This is an example of a bad configuration. It’s not a good way to use a free head in this way.
Incidentally, there is a caveat that must not be removed when constructing such a German-style configuration. In the image above, a free head is used on the declination side, but I don’t recommend this configuration. If you set the head free for composition, the balance of the head will be greatly disturbed and it will not be able to support the heavy equipment. When assembling in German style, a coarse movement mechanism is required to keep the declination at least balanced and movable.
 (left) Deformed German-style configuration with Quick Release Panorama Clamp and Quick Release Angle Plate. (Right) A fork-type configuration using an L-type general-purpose Arca Swiss plate. A free head is used, but this is not for compositional adjustment, but for switching between portrait and landscape. If you attach the L-shaped plate to the camera side, you won’t need a free head
Even if you don’t use a telephoto lens, it makes sense to extend it to the German or fork style. A well-balanced German or forked camera will not only provide more stable tracking, but will also make it easier to compose the image and reduce blind spots.
 The Vixen AP Photo Guider Weight Shaft used on the left side of the image has a UNC1/4 male thread, so it can be screwed into a camera head, etc.
By making the Polarie’s overhead head Arca-Swiss compatible, it is possible to combine a variety of Arca-Swiss compatible parts that are available on the market. It is possible to make a variety of forms, such as German style and fork style, with a little ingenuity. Trying out this kind of configuration is one of the pleasures of portable equatorial mount.
More convenient and advanced features with the app

The Polarie U is equipped with WiFi and can be used for motion timelapse and Hoshino shooting via a dedicated app. The key here is the “shutter control”. When the camera is set to bulb mode, the Polarie U automatically opens and closes the shutter for continuous shooting.
.
There are seven types of cables that connect the camera to the stereo mini-jack on the body of the Polarie U. compatible with each company’s cameras. It’s safe to say that it’s compatible with almost all DSLRs.
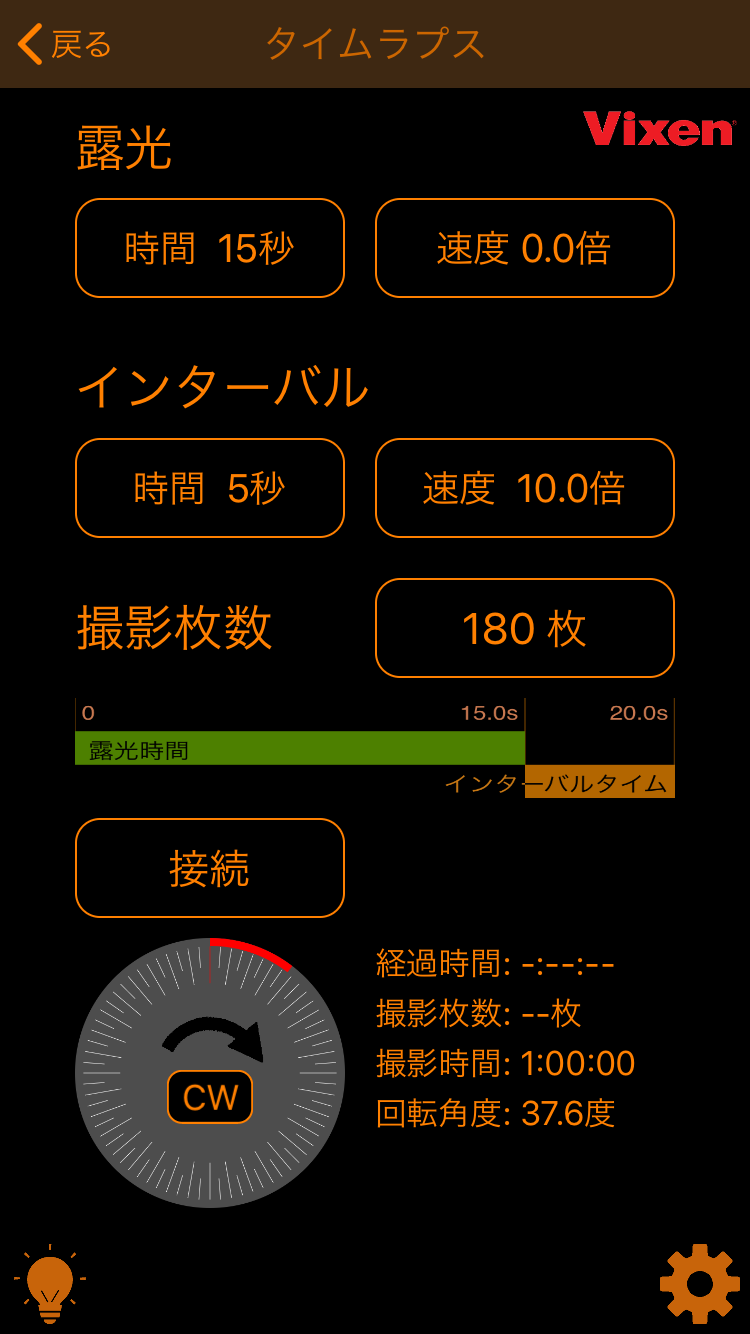
The time-lapse setting screen of the Polarie U app. Sets the exposure time and rotation speed, interval (standby) time and rotation speed, and the number of shots. What’s useful is that it shows the entire rotation angle and direction on the screen. This will allow you to tune the settings while simulating the rotation angle.

The application of time lapse is “Starscape and Astrophotography” mode. In this case, the tracking speed is constant at the set speed during shooting and interval. Set it to “1 minute, 60 sheets at 2 second intervals” (*).
(*)There is no “dithering” feature since it is also uniaxially driven.
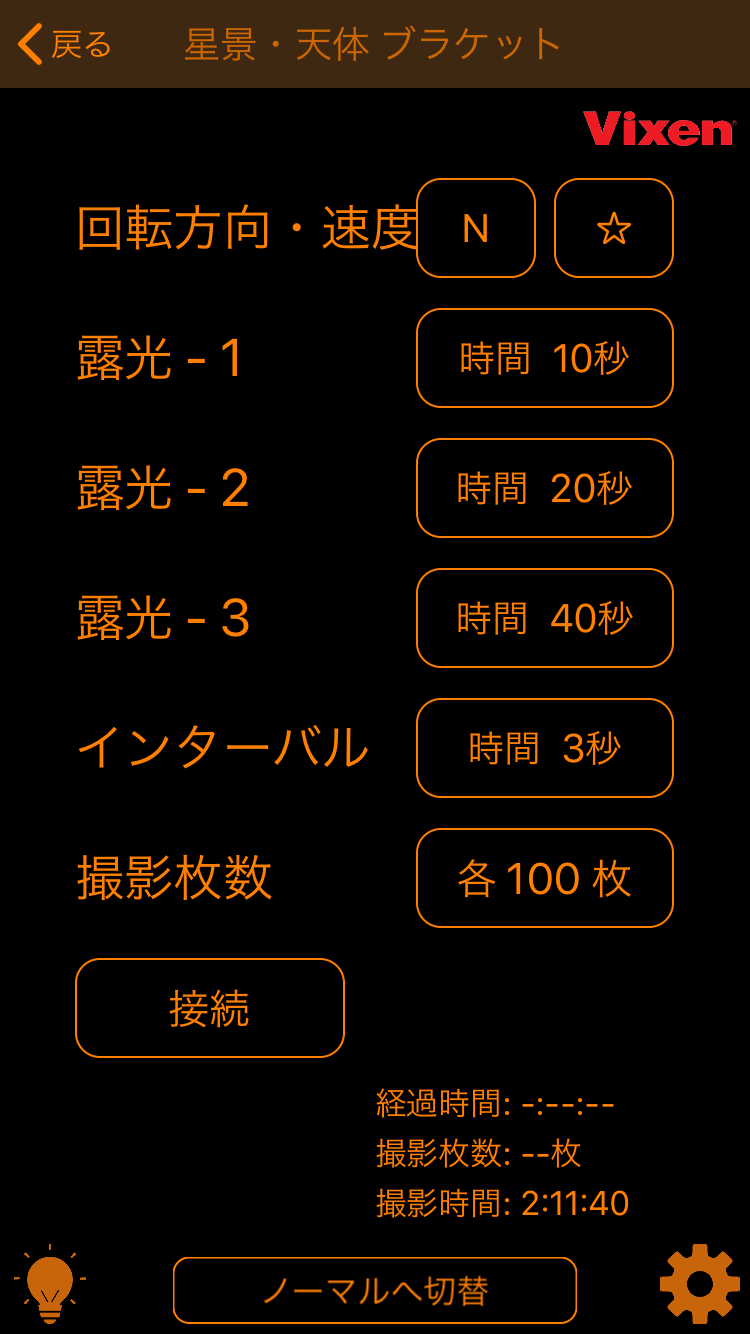
What’s more elaborate is the “bracket” mode. You can set three different exposure times (*) for “multi-step exposure”.
(*) There seems to be a restriction that the number of shots for each exposure time should be the same for all of them, so you need to think carefully about how to use it. The ISO value cannot be changed because it is controlled by the shutter cable. I would have liked to have been able to set the number of shots individually in two exposure steps.
.
It’s much more convenient than using the timer remote control for continuous shooting because you can check your current progress in the app(*), it’s easier to set the time and number of shots than the timer remote control, and the cables don’t blur together and it’s much more convenient than using the timer remote control for continuous shooting. This is a feature I really want to take advantage of.
(*)Incidentally, it was okay if I quit the app or the WiFi disconnected while it was running. As soon as the connection is restored, the status will be up to date.
Polarie’s Power
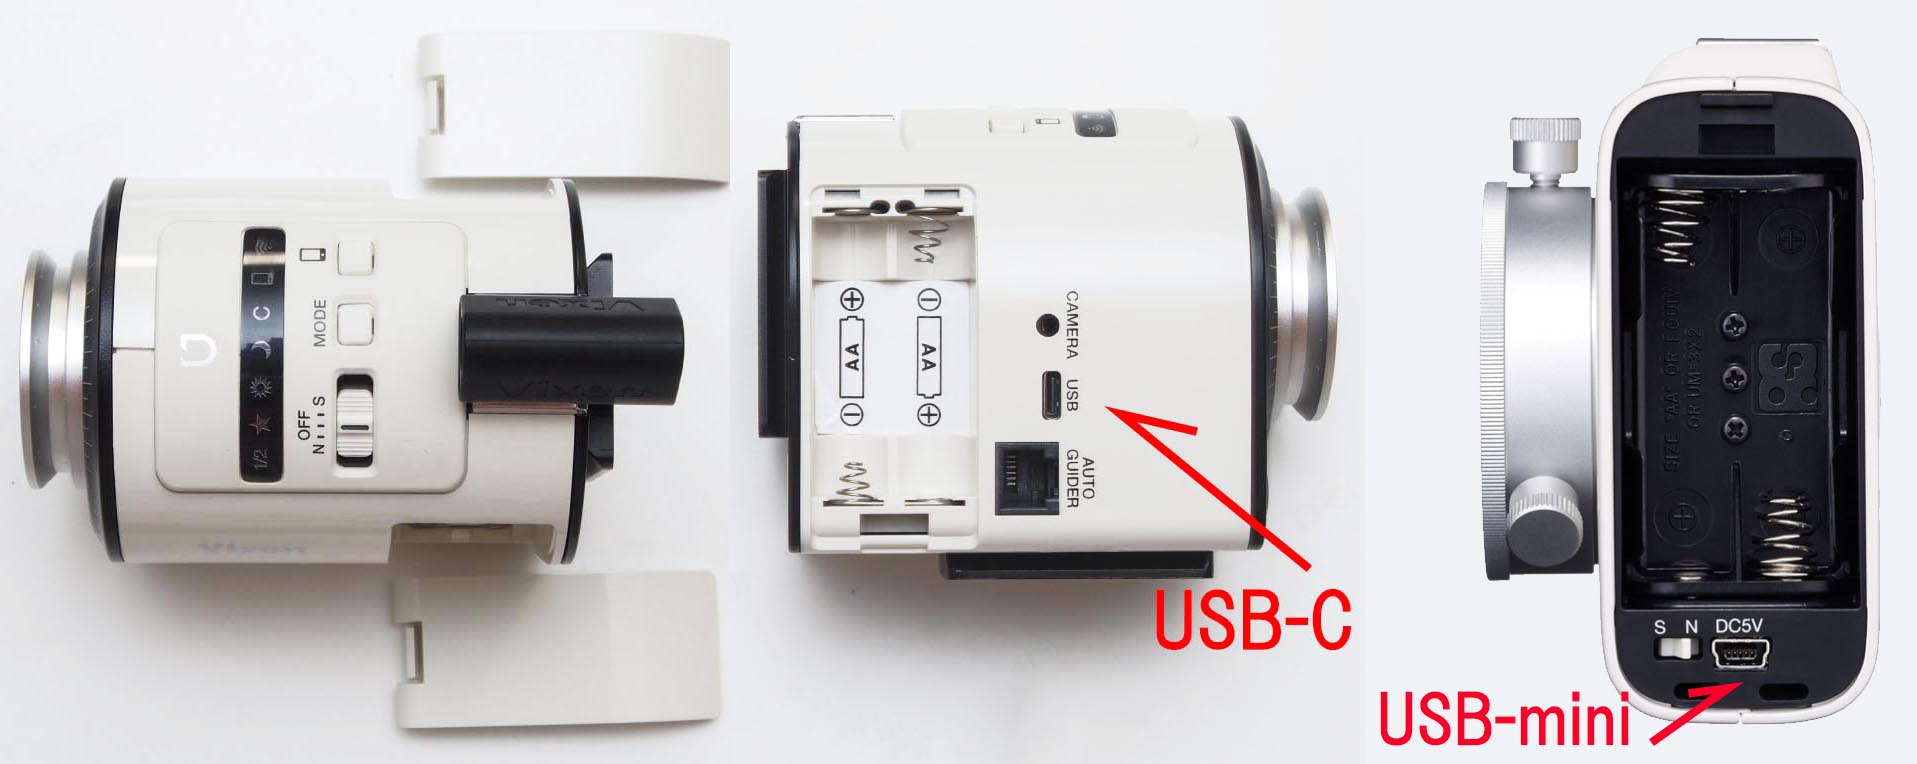 Left, center: Polarie U, right: Polarie (1st. generation), left of USB-mini jack is a switch for northern hemisphere and southern hemisphere.
Polarie U is powered by AA batteries or USB. The 1st. generation Polarie could run for 2 hours with 2 AA batteries, but Polarie U can run for 7 hours with 4 AA batteries(*) The USB power supply was also changed from USB-mini in the 1st. generation to USB-C. It’s a small but welcome improvement.
(*)It is my impression that the 1st. generation Polarie has a little more battery life as a real value, but it is still a little too much for one night. Polarie U should be able to keep the battery fully charged. It’s great that I don’t have to worry about running out of battery while shooting. It is said that the battery diminishes quickly when using WiFi in Polarie U, but I have not been able to confirm how much this actually is.
Polarie’s Storage
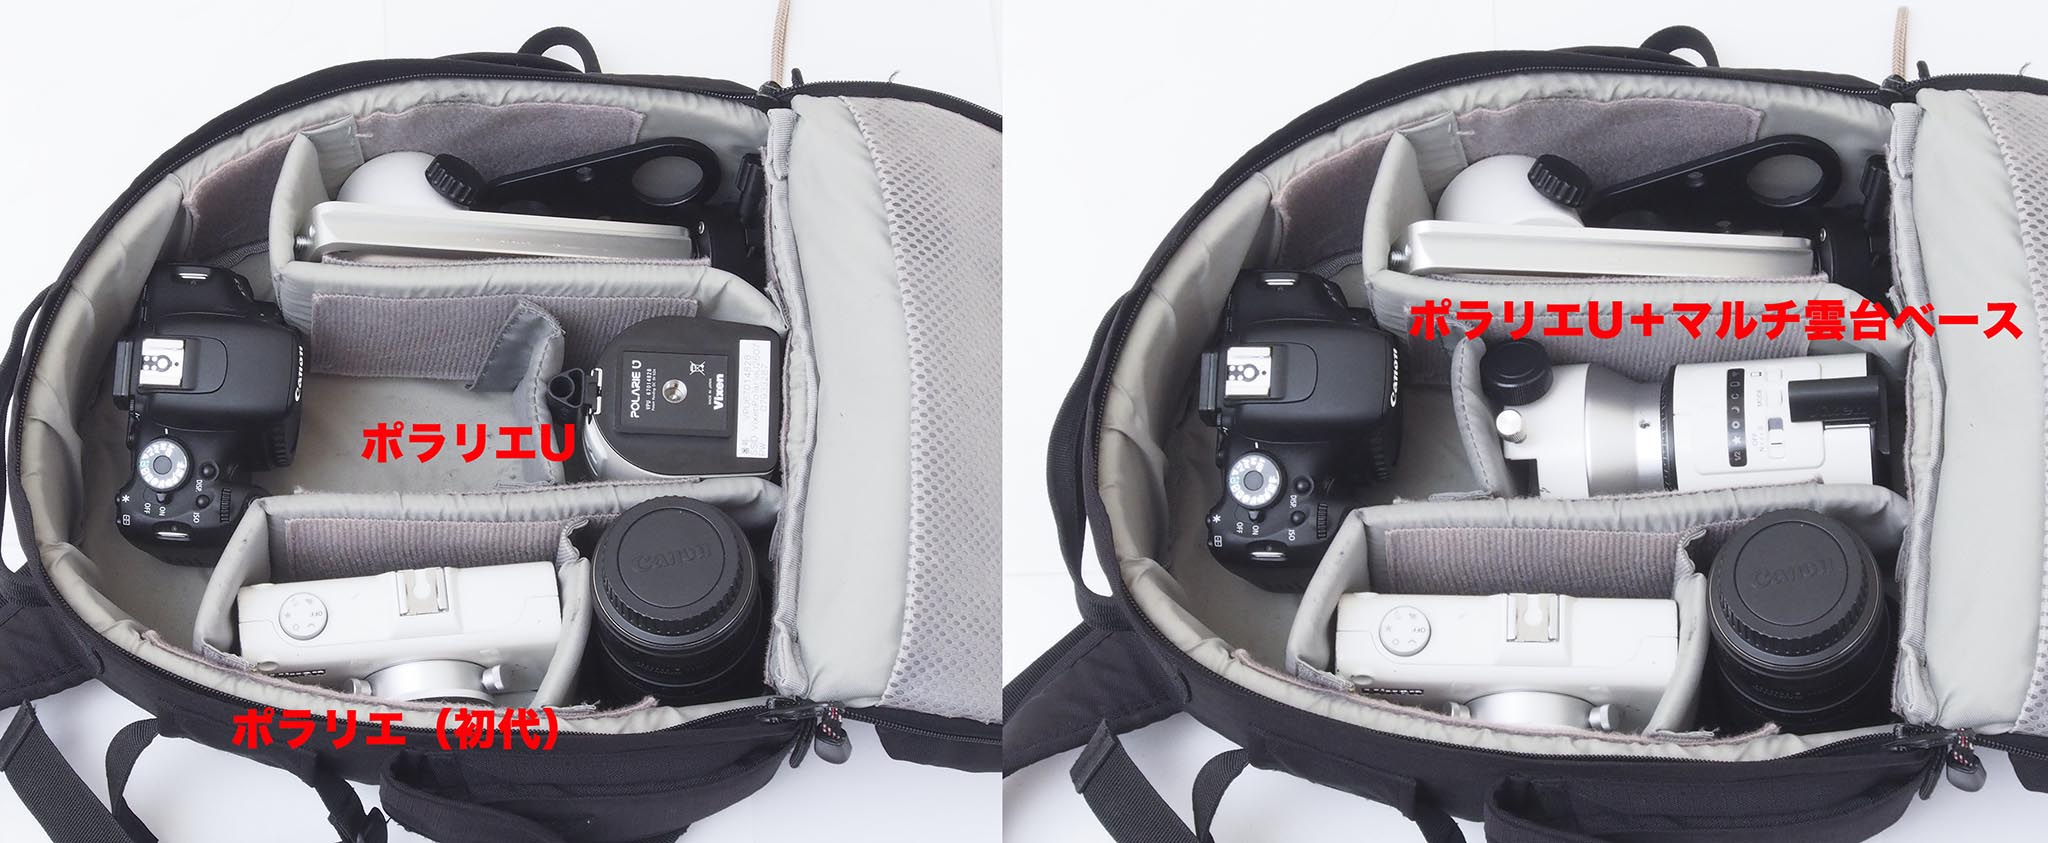
The compact Polarie can be stored in a camera bag just like a lens or camera. The 1st. generation of Polarie was rectangular, so it needed a divider as big as the camera body, but Polarie U can be stored for a single lens. This is clearly a compact. In addition, when “Multi Head Base” is attached, the storage efficiency is overwhelmingly superior to that of Polarie U(*).
Polarie’s polar axis alignment
When you use a portable equatorial mount, you can’t avoid the polar axis alignment. How easily and smartly this can be done, and how accurate it is for a given purpose, greatly influences the finished product in terms of ease of use.
Precision required for polar axis alignment
 The pattern near the North Star of Vixen’s polar axis telescope for Polarie. Age difference correction scale width is about 1 minute square.
How accurate is the polar axis alignment required for a single axis drive portable equatorial mount like the Polarie? The Polar Axis Telescope, which has been used for a long time as a tool for polar axis alignment, can recognize an error of about one minute angle, at least on the pattern. Because of this, the user also says, “We have to adjust with that much precision! I’m tempted to think, it actually matters if it’s more rough that’s.
Just to conclude wildly, Assuming that the periodic error in the direction of red longitude is ±27 arc seconds, if the number of gear teeth is 144, the accuracy of polar axis alignment is sufficient to have “40 arc minutes” regardless of the focal length of the equipment (*). With this accuracy, the error caused by the polar axis shift will not outweigh the error caused by the periodic error. In the short exposure range, the total tracking accuracy is not much improved even if the error caused by the polar axis shift is much smaller than the periodic error.
(*) If the exposure time is shorter than 2.5 minutes (1/4 turn of warm gear). The details of this hypothesis will be explained in more detail in a separate Tenrikh article.
The shorter focal length of the lens means that even rougher polar axis alignment is no longer a problem. In the case of a 24mm wide-angle lens, which is often used in stills photography, even if the polar axis is off by 3°, the flow of stars in a 4-minute exposure time is 22 μ(*). Four minutes of exposure time is quite a long time for stills, and usually 30 seconds to two minutes is enough. If so, the polar axis deviation is even greater than that, it doesn’t matter.
(*)See “The world of astrophotography, the precision needed for tracking, and the equatorial mount This value of 22μ is 1.5 times stricter than the “500 rule”.
However, there is no such thing as an exact match, and unless it is clear what kind of method can be used to achieve the desired level of accuracy, it is impossible to make use of this standard. Let’s look at the different methods of polar axis alignment, along with the target accuracy, below.
Polar axis alignment with a “peephole” (target accuracy 1° to 2°)
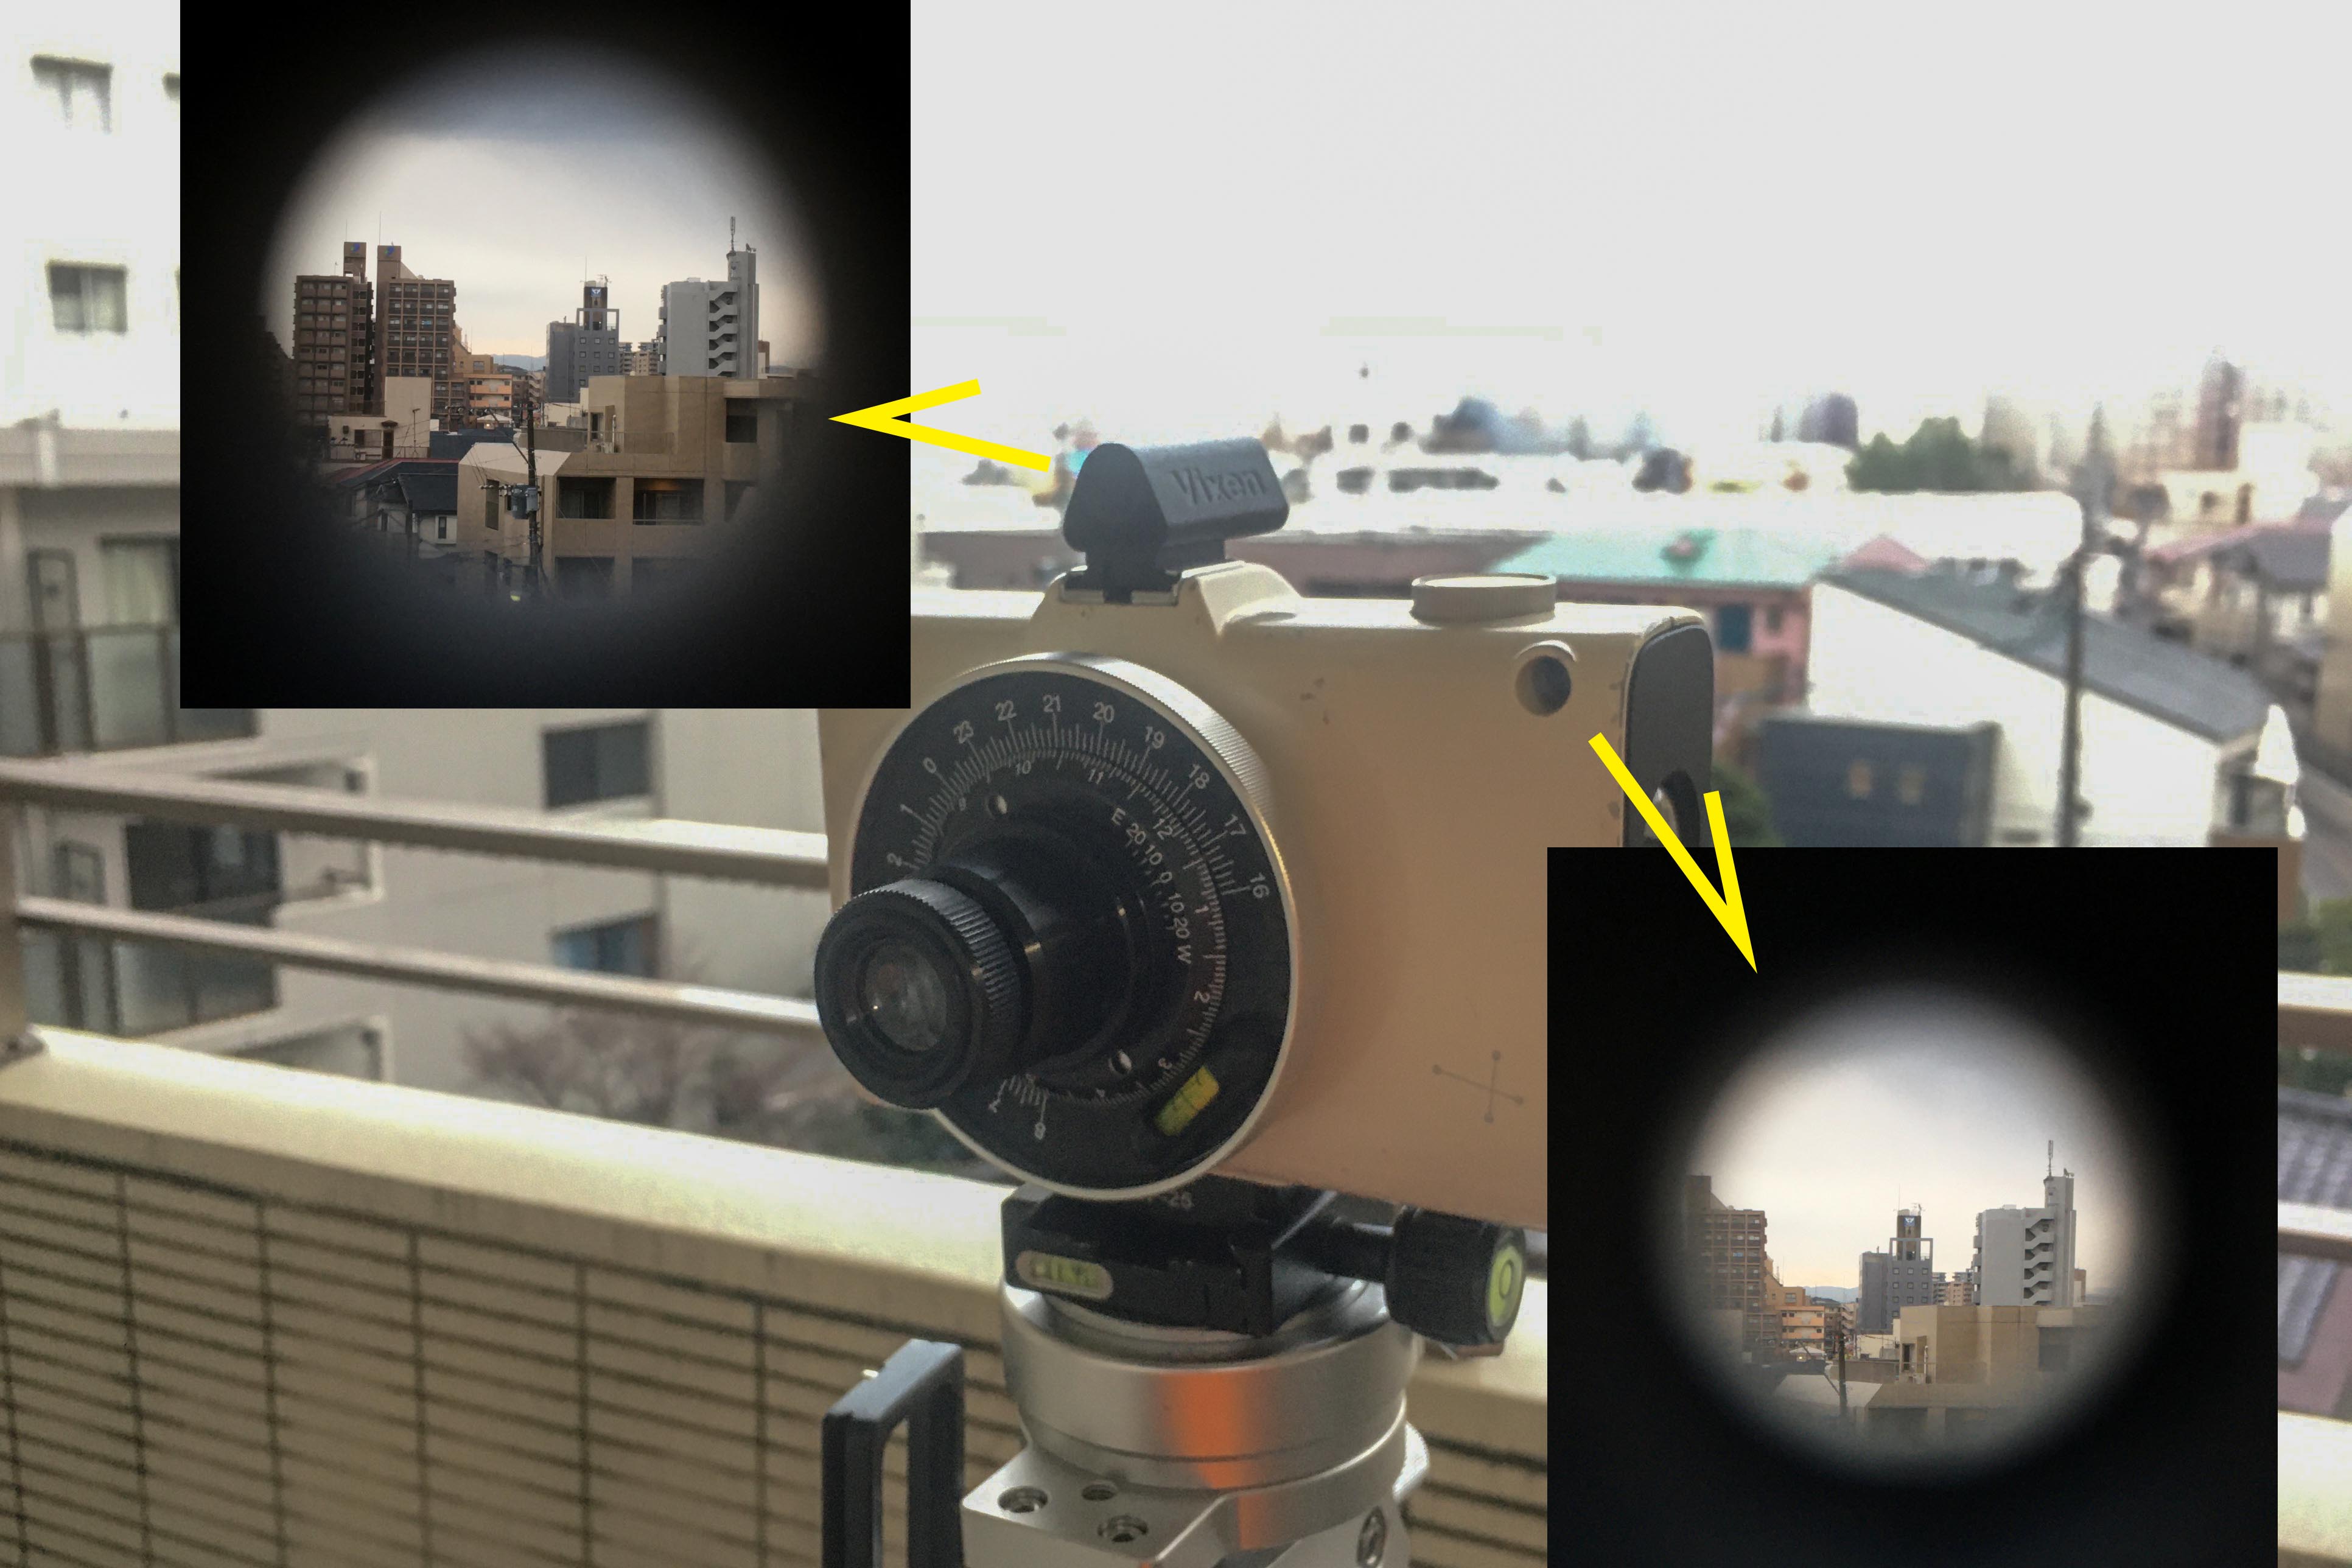 The Polarie U’s “through-finder” (left: attached to the accessory shoe) and the Polarie (first-generation) “peephole” (right). The nominal actual field of view is 8.9° for both of them, but I feel that Polarie U is wider.
If you want to use Polarie, you must master the method of polar axis alignment using the “peephole”. The actual field of view of the peephole is about 9 degrees, so If we put the North Star in the peephole, we can get the polar axis accuracy of 4.5 degrees . It will be practical enough for Hoshino photography with a wide angle lens.
However, it would be difficult to drive accuracy to within one degree with this method . Even more so in the dark. This is because even a slight wobble of the eye’s position up and down, left and right, would shift the center of the visual field circle.
In Polarie U, this peephole has been improved to make it slightly easier to use. In the 1st. generation of Polarie, it was a little difficult to put the North Star inside of the main body because the main body blocked the view of the naked eye, but in Polarie U, the outside of the hole can be seen to some extent as shown in the image.
(*)Conversely, in Polarie U, all around the hole is black, so it’s impossible to judge the bias of the eye position. In the case of the Polarie (1st. generation), the periphery of the hole around the eye is white, so if it is in a dimly lit area, it is possible to position the eye in the center of the eye precisely to some extent by making the empty circle visible through the hole and the white circle around the periphery concentric.
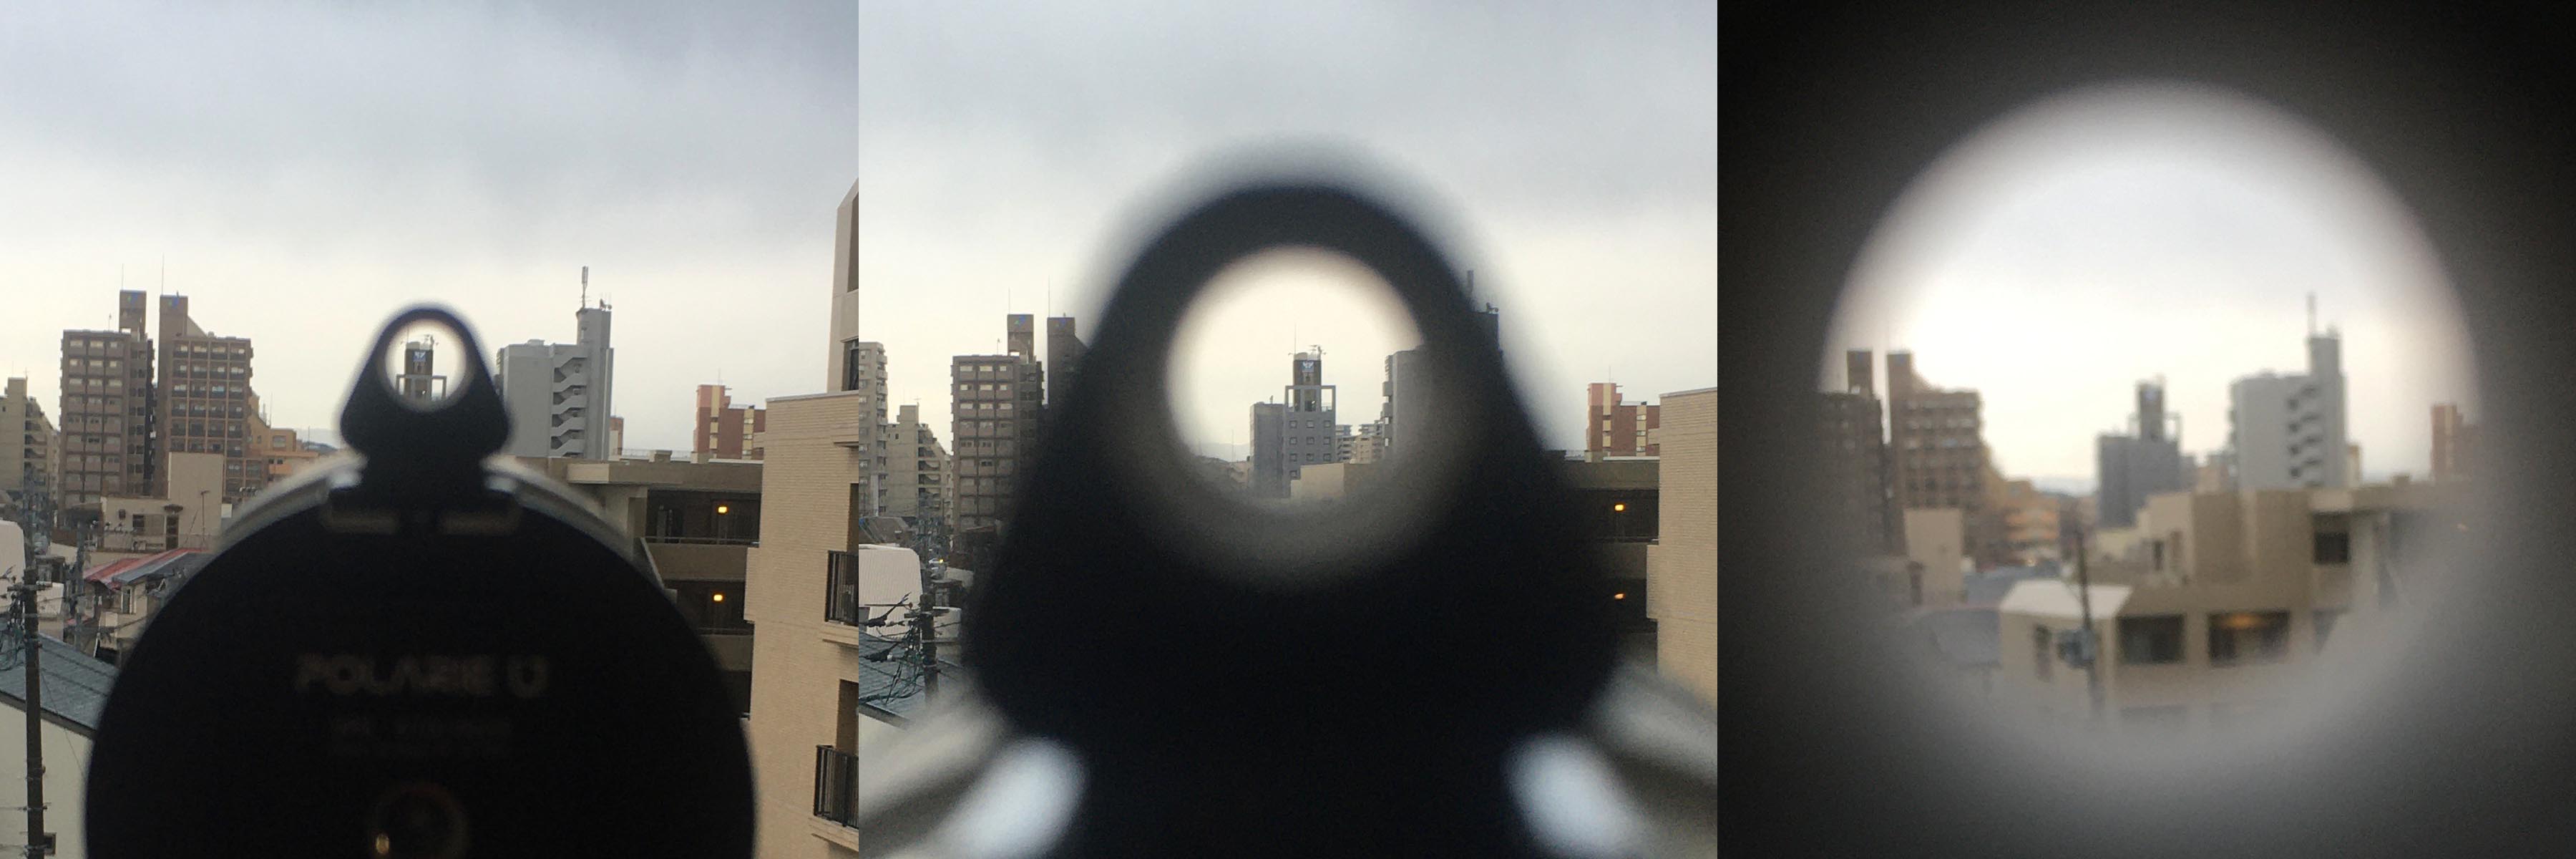 In the left state, the size of the viewing circle is about 2° square.
If you want a more precise alignment, you can make the hole narrower in view and less susceptible to the bias of the eye position by making the eye position farther apart as shown in the image above.
The peephole method seems to be rough, but if you get used to it to some extent, I think you can get a constant accuracy of about 2 degrees. This method is used to align the polar axis in all the stills in this article.
Alignment of the polar axis without using the North Star (target accuracy 2° to 5°)
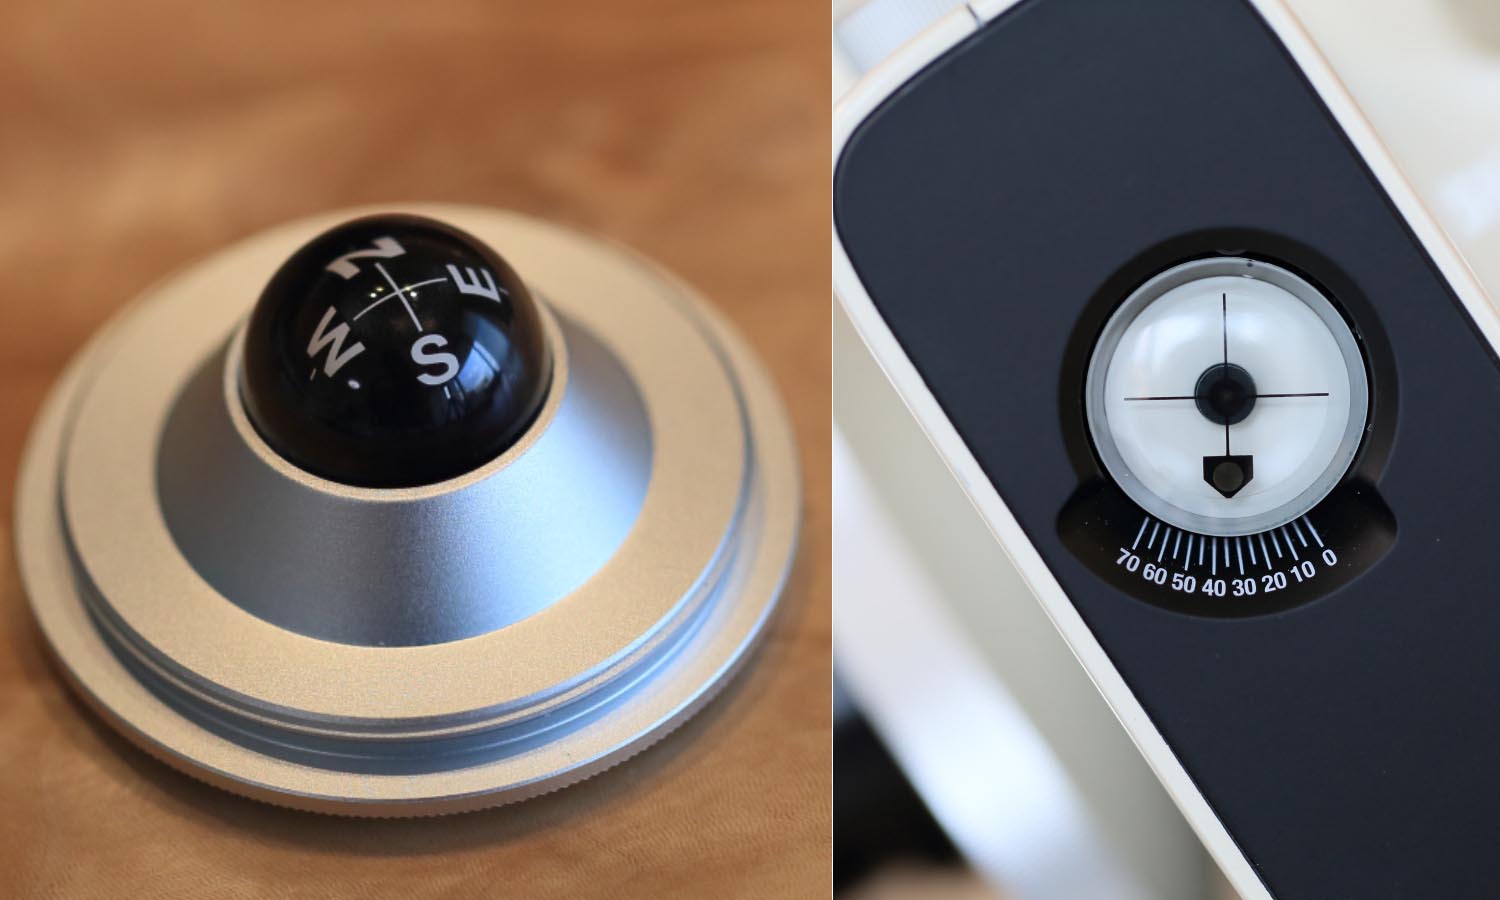 The azimuth magnet (left) and inclinometer built into the Polarie (1st. generation). It is difficult to precisely align the polar axis, but it is still worthwhile to use a wide angle lens.
It is difficult for a beginner to align the polar axis with the North Star, starting from “finding the North Star”.
In the 1st. generation Polarie, the main body has a magnet and an inclinometer built into it. The practicality of the azimuth magnet is not so good, but it can be used for “pointing in a general direction”(*).
(*)That’s still good enough for a wide angle lens up to about 1 minute exposure.
.
 An example of the use of a polar meter. It is very useful for low angle shooting where peephole is not available or where the North Star is not visible, as in this image
Another option is to use the polar meter, which is sold separately. It is not possible to use it in the vicinity of magnetic materials such as rebar, but the azimuth magnet is quite authentic, with the scale being swung in 1° increments. If you find the peephole alignment using the North Star difficult, you may want to try it.
Optical polar axis alignment with an optical polar axis telescope (target accuracy less than 10 arc minutes)
 The optical polar axis telescope (left) of the Polarie U, which has become a “horizontal attachment” type. Polarie with the “through the middle” method (1st. generation: right)
If you want to increase the accuracy of the polar axis more than 1°, such as shooting with a telephoto lens, you will need an optical polar axis telescope.
In Polarie U, the polar axis telescope is attached “horizontally” using the polar telescope arm(*) as shown in the image above. This is a major improvement from the Polarie (1st. generation), where the polar axis telescope could not be used without removing the on-board equipment (**) depending on the configuration.
(*) Mounting on the main unit is by UNC3/8 screw (thick screw). It would be nice to have a 3/8<->->M6 conversion adapter similar to the 3/8<->1/4, but I couldn’t find one.
(**)If the weight of the equipment is large, the equipment will be considerably misaligned when removed due to deflection or sinking into the ground.
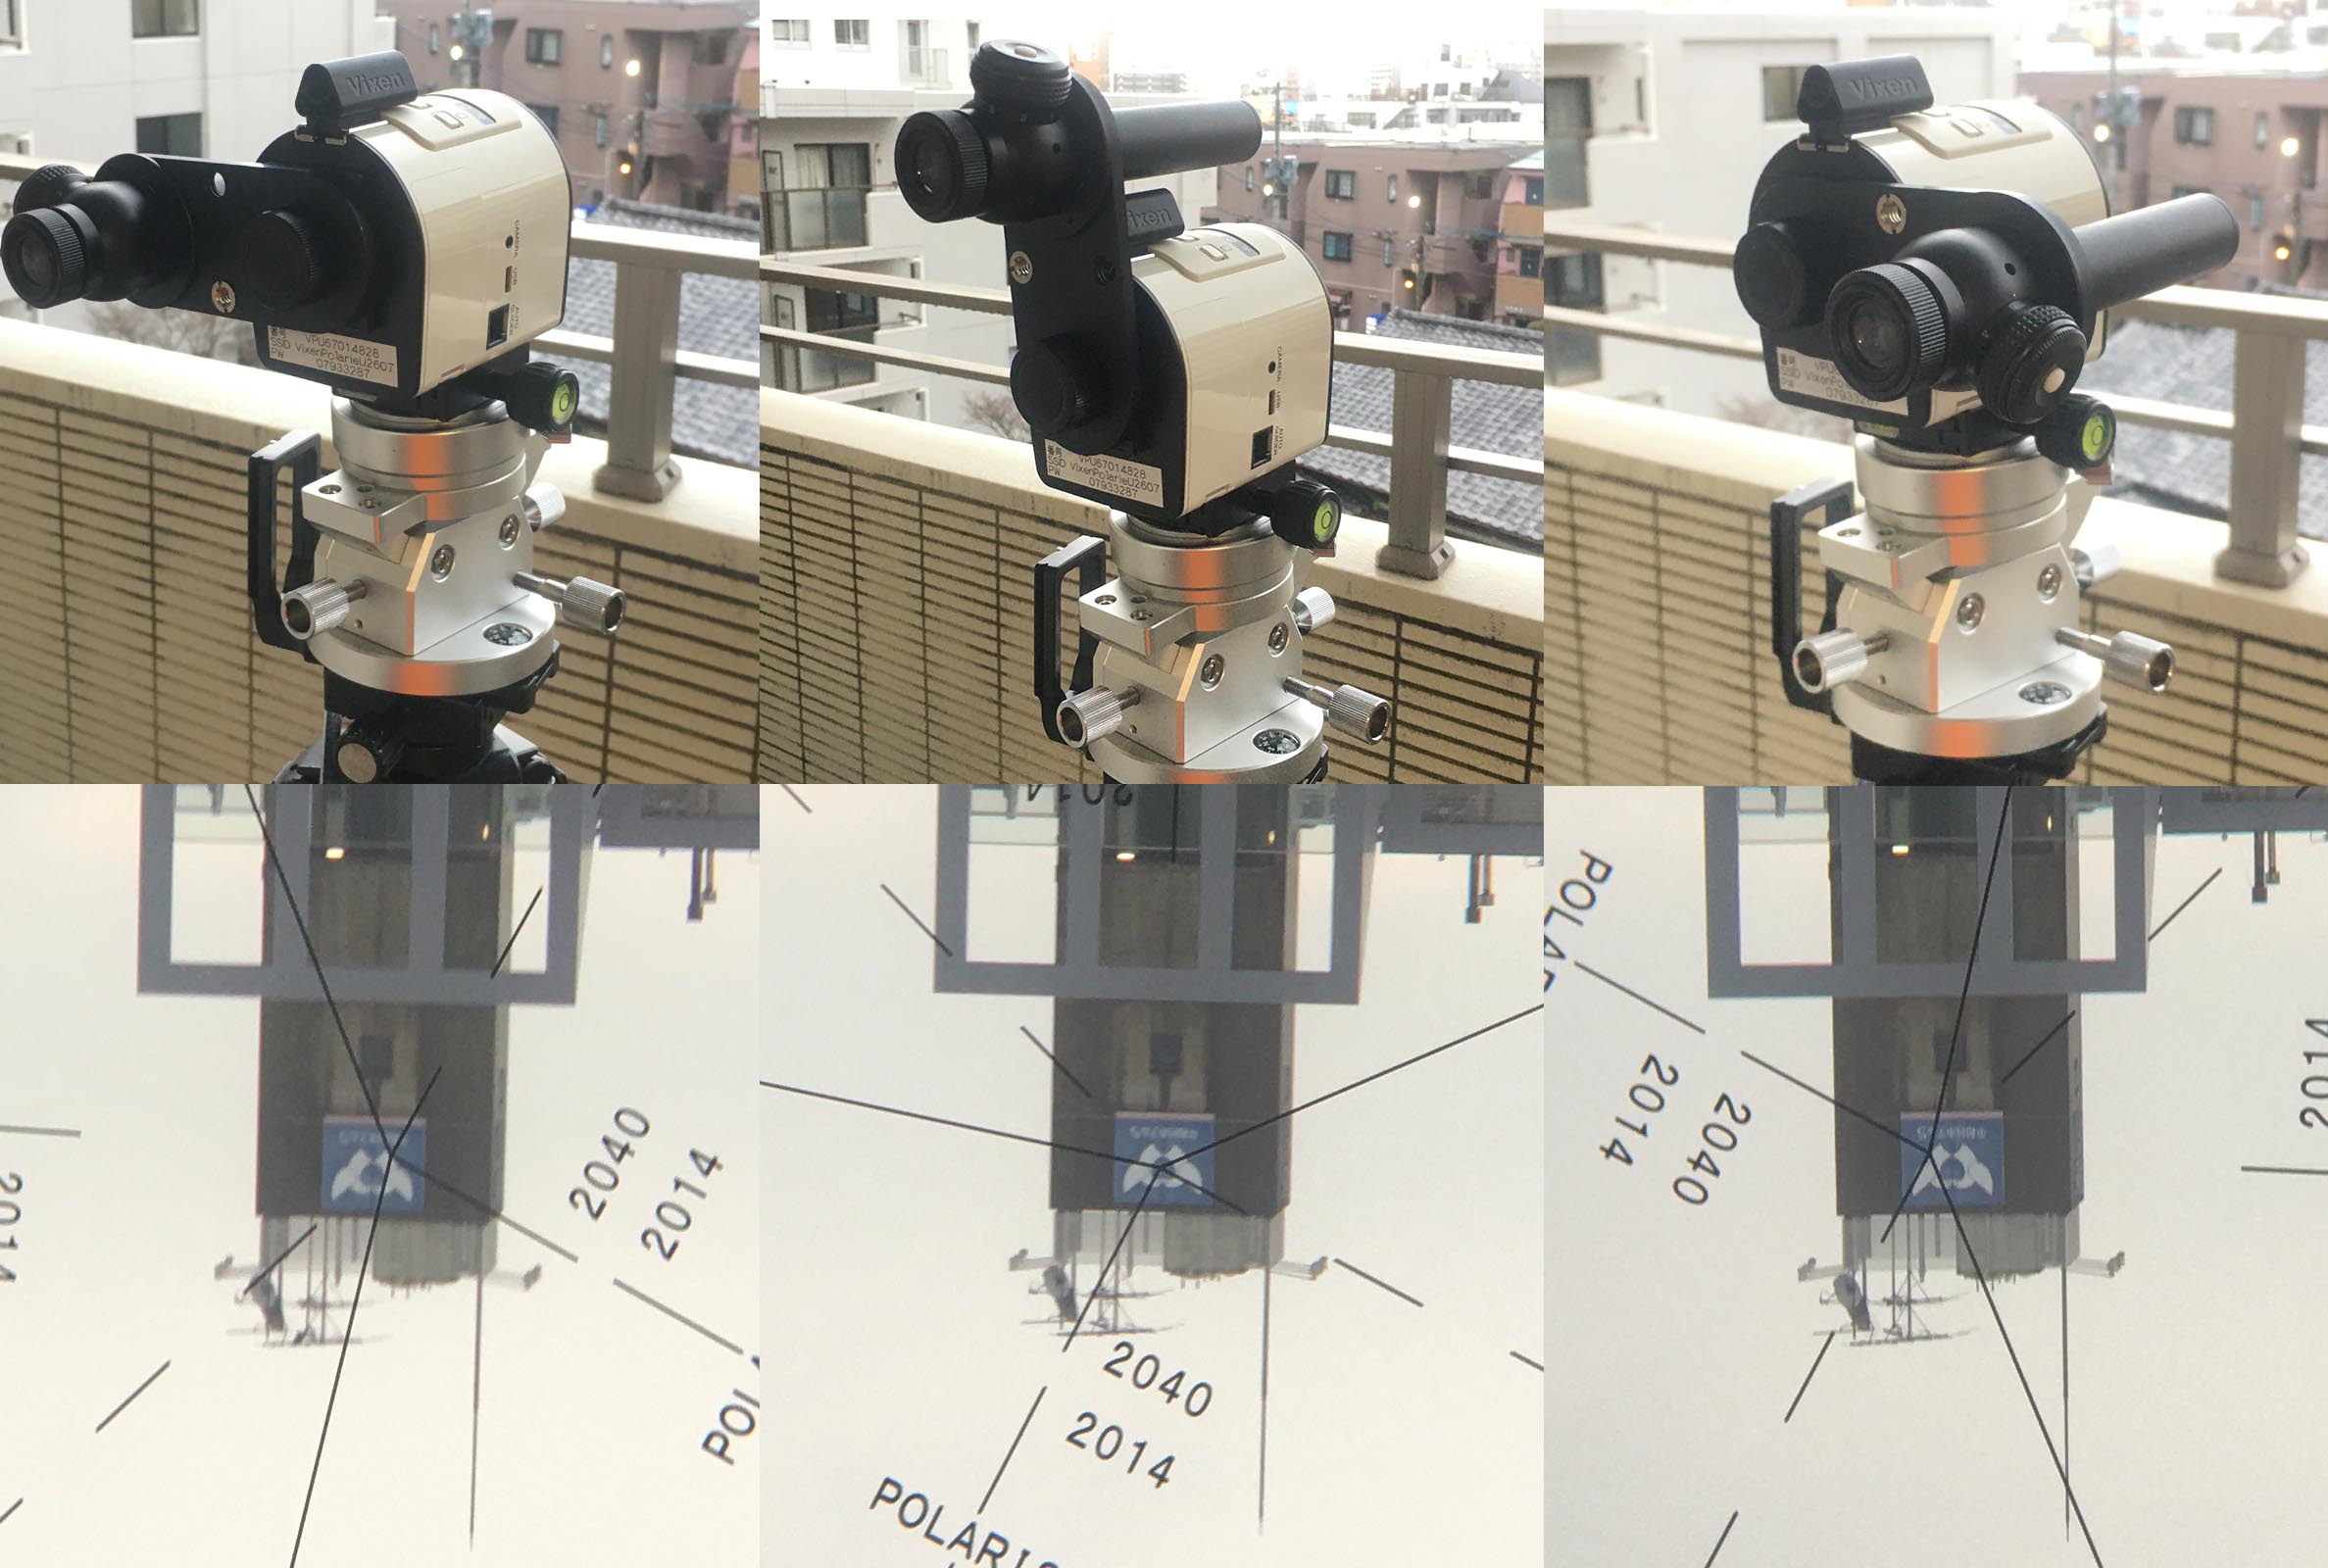 Center misalignment due to arm angle. The deviation of a fractional order of magnitude may be acceptable. Incidentally, the width of the line between 2014 and 2040 for the North Star on the pattern is about four minutes wide.
If you use an optical polar axis telescope, you can achieve an accuracy of about 10 arc minutes. On the other hand, due to various errors (optical axis of the polar axis telescope, pattern alignment, accuracy of the joint surface of the telescope arm, etc.), it is difficult to obtain a higher accuracy consistently(*).
(*)If the polar axis error is 10 arc minutes, according to the logic described above, the equatorial mount with a periodic motion of ±7 arc seconds is acceptable enough.
 Polar axis alignment tool weight comparison. Above and below is the latest Polar Axis Telescope PF-LII. This product is very easy to use with built-in dark field illumination. Above right is the old “Polarie Polar Axis Telescope” of Polarie (the 1st. generation). It was a little heavy and bulky, but the PF-LII is much more compact.
The polar axis telescope for Polarie (1st. generation) is not compatible with Polarie U, but it can be used with both by removing the adapter free removal service(*).
Alignment of the polar axis by the “electronic telescope” (target accuracy less than a few angular minutes)
 Aligning the polar axis with ASI AIR’s Polar Alignment feature. It takes longer than an optical polar axis telescope, but it’s a good enough method.
For more installation accuracy, this is where “electronic” polar axis alignment comes in, such as PoleMaster or ASI AIR’s “Polar Alignment”. This way you can get the error down to a few minutes or less.
However, I’m not sure if a lightweight portable equatorial mount like Polarie requires such precision or if it can be maintained even if it can be installed (*). Rather, the advantage of being able to use the method you’re used to is probably greater than the advantage of being able to use it as is even if the equipment is different.
(*)(*) There are various misalignment factors with small, lightweight equipment, such as sinking of the tripod and subtle misalignment of the joint and friction parts.
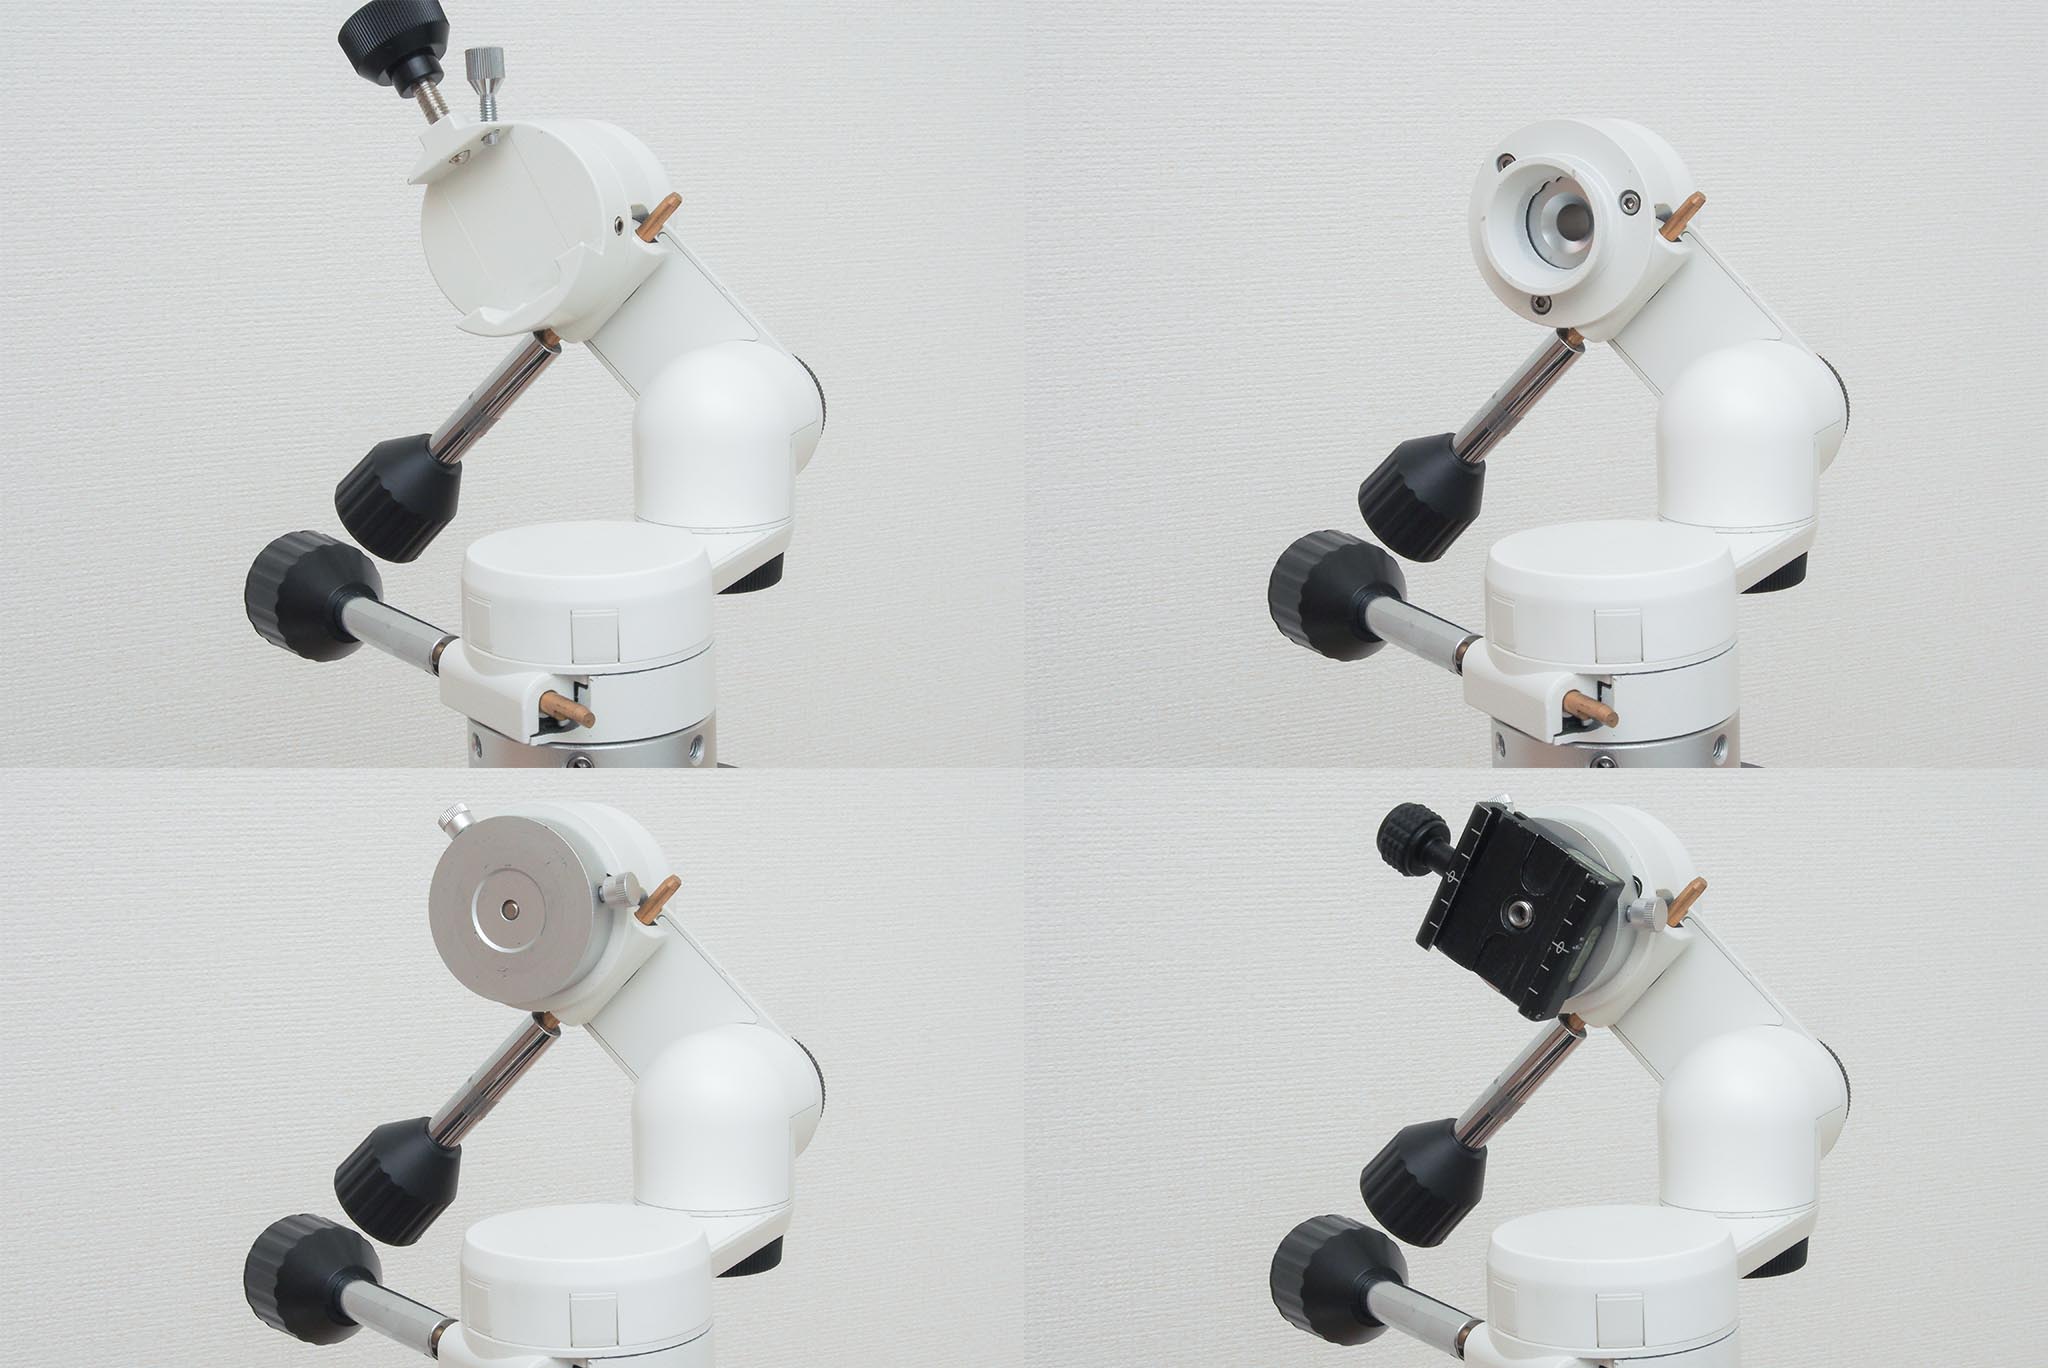
How to make the Polarie “tilt 35°”
 An example of the Polarie tilted by about 35° with the “free head”.
The biggest challenge in configuring the system for a small portable equatorial mount is to tilt the polar axis “to the latitude” by about 35° and to adjust it up, down, left and right for the polar axis alignment. In the case of Polarie, the easiest way is to use a camera head like “free head” as shown in the image above. However, it is difficult to make fine vertical and horizontal adjustments and the head itself has a certain weight(*).
(*)The head in the image above is 425g, not much different from Polarie U.
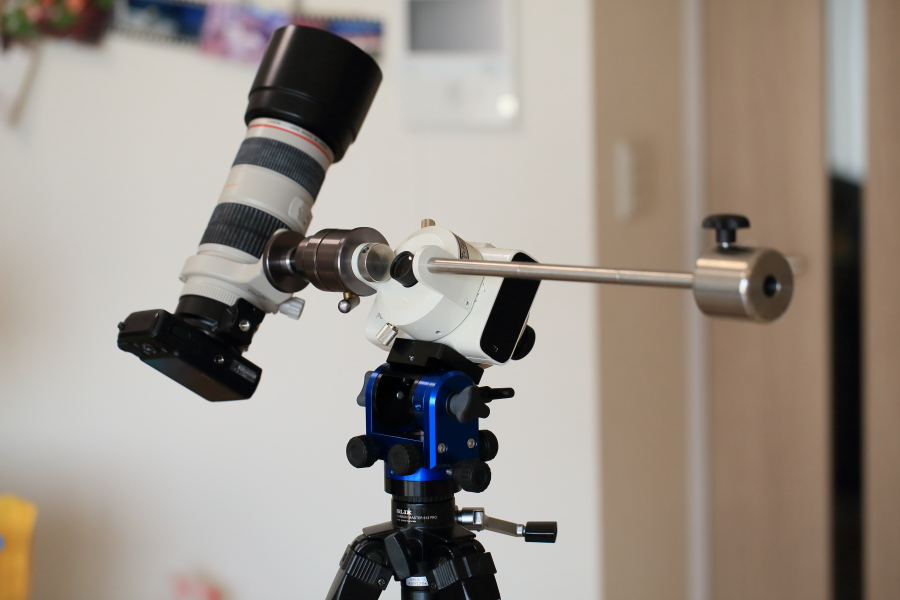
 I used BORG parts Angle Plate 35VP (Black)[3235].
This is the best configuration when you don’t use the polar axis telescope and use the peephole for rough polar axis alignment. It only weighs 63g, but it is a convenient part that can be used with both Polarie U and Polarie (1st. generation). I have been using it since Polarie (the 1st. generation).
.
For more accurate polar axis alignment, a dedicated polar axis fine movement head with vertical and horizontal fine movement devices is convenient. There are a variety of products from various companies, but this is the Polarizer head for Vixen’s original Polarizer. It is only for Polarie (1st. generation) due to the specifications of the coupling.
.
Vixen’s Vixen Polar Axis Micropositioning Head DX will be released soon, which is even more robust and can be used for heavy equipment (nominal load capacity: 8kg). Unfortunately, I was not able to try it out this time, but this product was also displayed at the Hoshi Matsuri last year, and the rigidity is quite good.
It also comes with an adapter to mount the Polarie U on a Vixen 45mm tripod (such as an AP tripod). Especially noteworthy is the variable tilt angle from 0° to 90°. You can also use it when you go out to low or high latitude areas for an overseas expedition such as a solar eclipse.
Great ! The Legend of Polarie (2)
Great ! Expedition System
 EOS 5DMarkIII (Normal) Sigma 24mm F1.4Art F3.5 3 minutes ISO1600 Polarie (first) stellar time tracking at Waddi Firms, Western Australia
The lightweight Polarie is perfect for expeditions abroad or on remote islands. You can capture the Milky Way with plenty of exposure in a dark place in the sky. The image above is of the Milky Way in the southern sky, taken in Western Australia using a Polarie (1st. generation). I used a 24mm wide angle lens to capture the star fields in the dark nebula.
 The north sky in the middle of the south is one of the weaknesses of the Polarie in the normal configuration, but it’s just barely clear^^;;;
Polarie (1st. generation) taking the image above. The main body and camera head are about 1kg (excluding camera and tripod). The Polarie U is even lighter, about 180 grams.
 EOS6D (mod.) TS-E17mmF4 released at Nagura Bay, Ishigaki Island.
On an expedition on a remote island. The Polarie’s mobility is at its best when it comes to using its footwork to travel to and from locations. The ability to carry two sets of photographic equipment on foot is an advantage that only a lightweight portable equatorial mount can offer.
Great ! Panoramic wide area Deep Sky
 EOS6D (mod.) Sigma 50mm F1.4Art F2.8 ISO3200 2min x 20 shots, top and bottom 2 mosaics tracked by Polarie (1st. generation) Koishiwara, Fukuoka
Even if it’s a “serious deep sky astrography”, the short focal length is the defensive range of the Polarie without reinforcement parts. If you use a good camera lens with a little bit of aperture, you can shoot pretty aggressively. The galaxies of Scorpius, Leonid and Pisces were photographed with a 50mm lens in a 2 frames panorama.
 EOS5D(Normal) Sigma 24mm F1.4Art F4ISO3200 2 minutes x 10 shots, 4 mosaics, Polarie (1st. generation) tracking. The brightest star is Jupiter.
I used a 24mm wide angle lens to mosaic four images vertically and horizontally, capturing everything from the Great Triangle in winter to the Spica in Virgo as “constellation photos”. Even with the Polarie without reinforcement parts, there are a lot of possibilities for “wide area” deep sky astrography.
 A no-name panoramic head was installed. The size is also perfect^^ If you use the genuine Quick Release Panorama Clamp for Polarie U, you can hold your equipment more stably.
Here’s one of the most expensive and lightest ways to enhance your cospa from a normally configured Polarie. Simply attach the panoramic head for your camera to the “standard head base”. This allows for smooth coarse movement in the direction of the red longitude and allows for mosaic photography using the angle scale of the panoramic head. The camera head is even easier to attach and detach (*).
(*) This system was used in the mosaic shot from Orion to Spica above.
Great ! Auto-guide
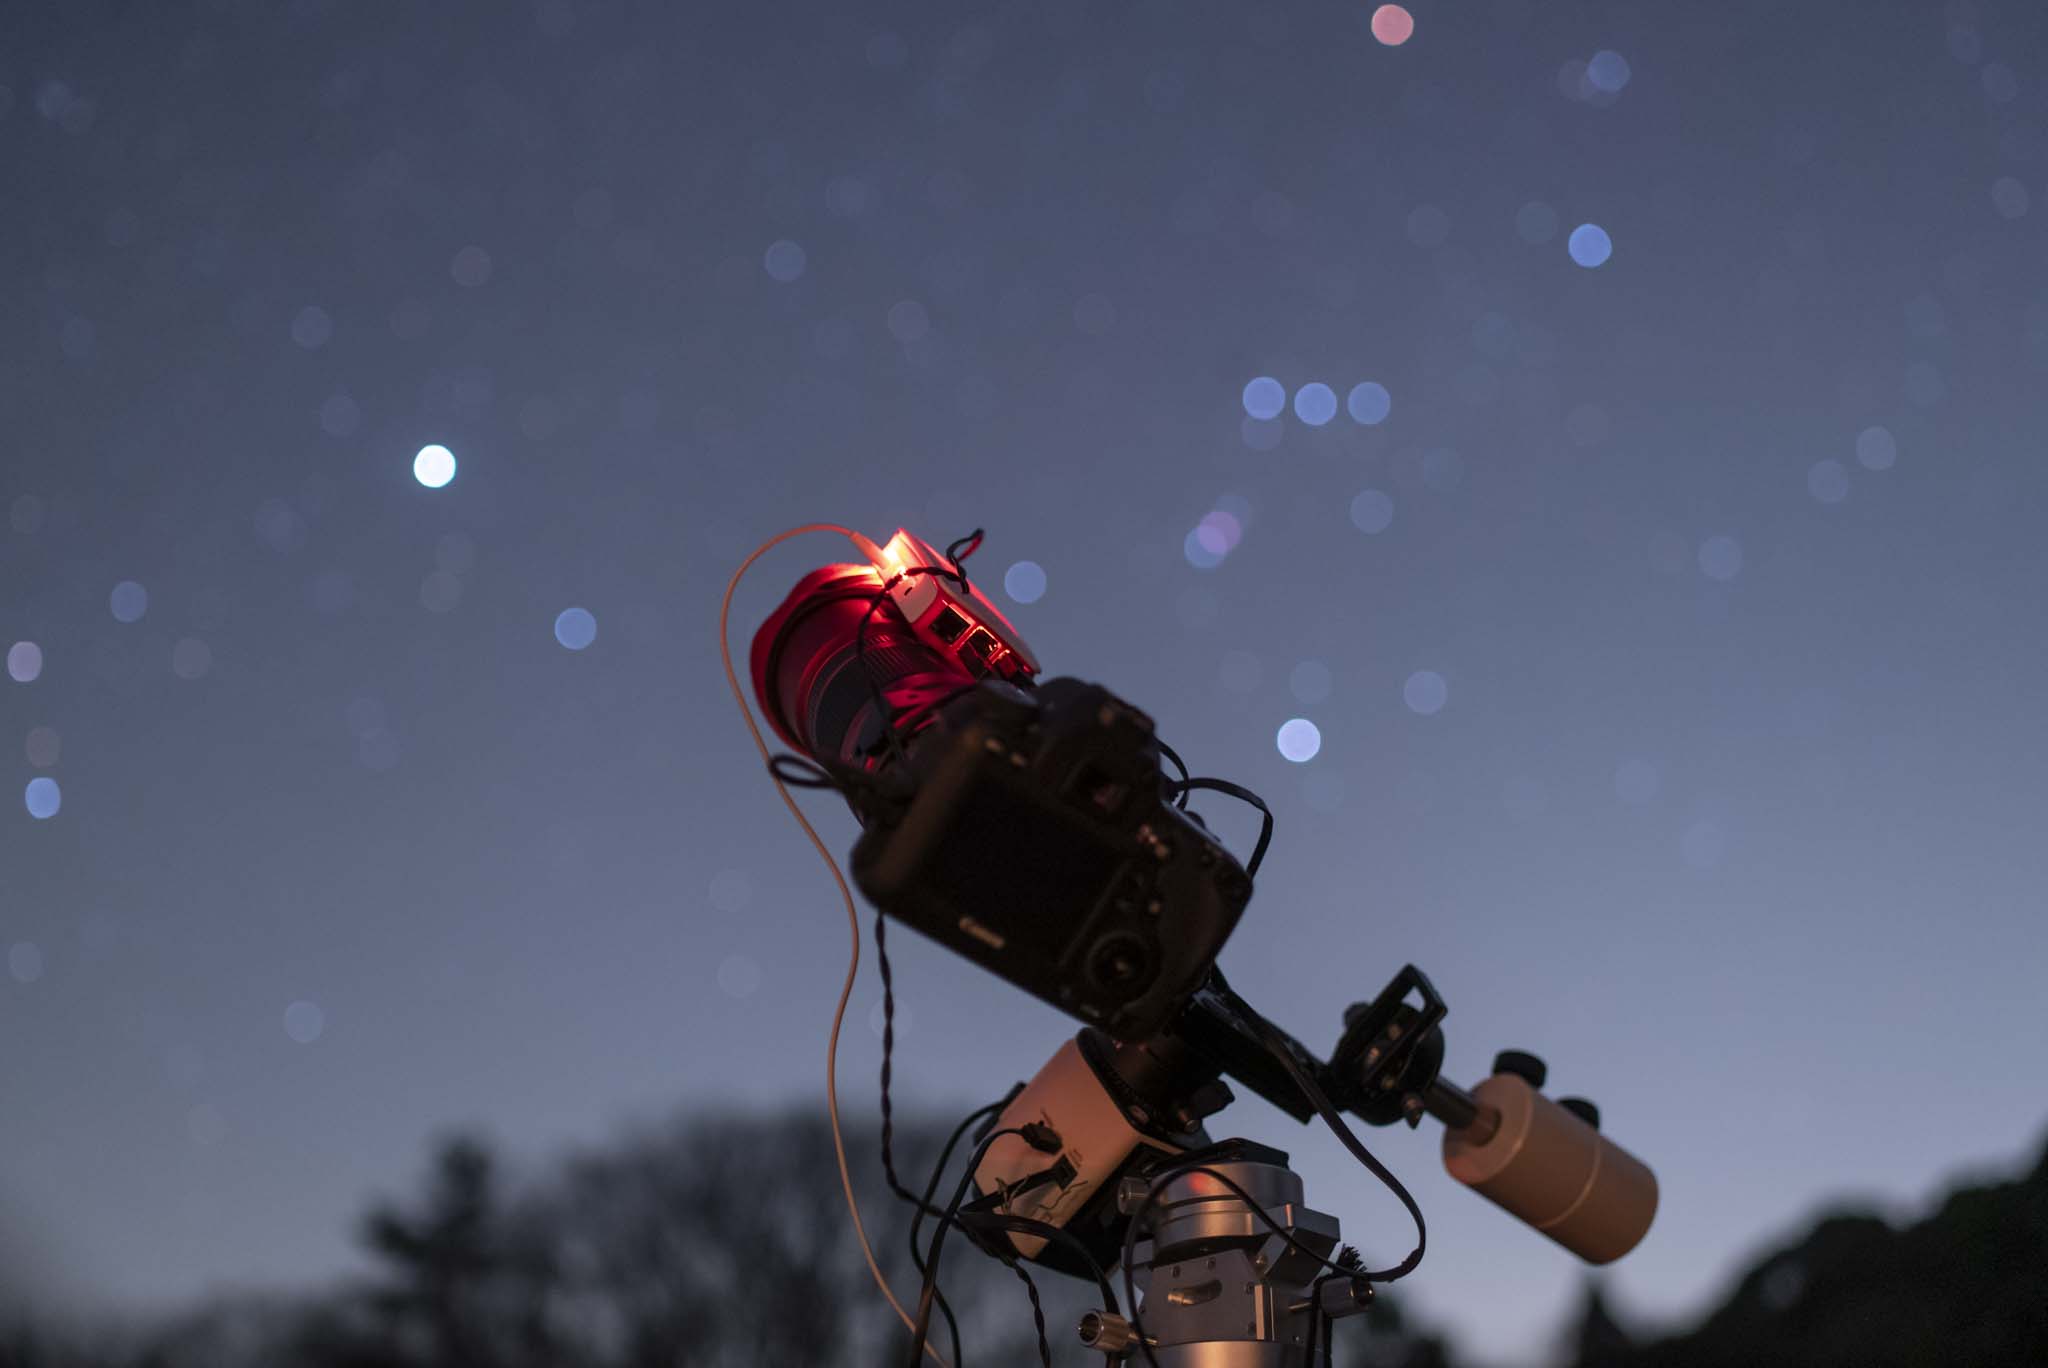 ASI AIR PRO-equipped auto-guide is being evaluated…
The Polarie U has an auto-guide terminal, which enables stable tracking even over long exposures, although it is a single-axis guide.
Unfortunately, time was running out and I couldn’t take any “unique” examples using the Auto Guide this time, but I’d like to use it properly if I get the chance.
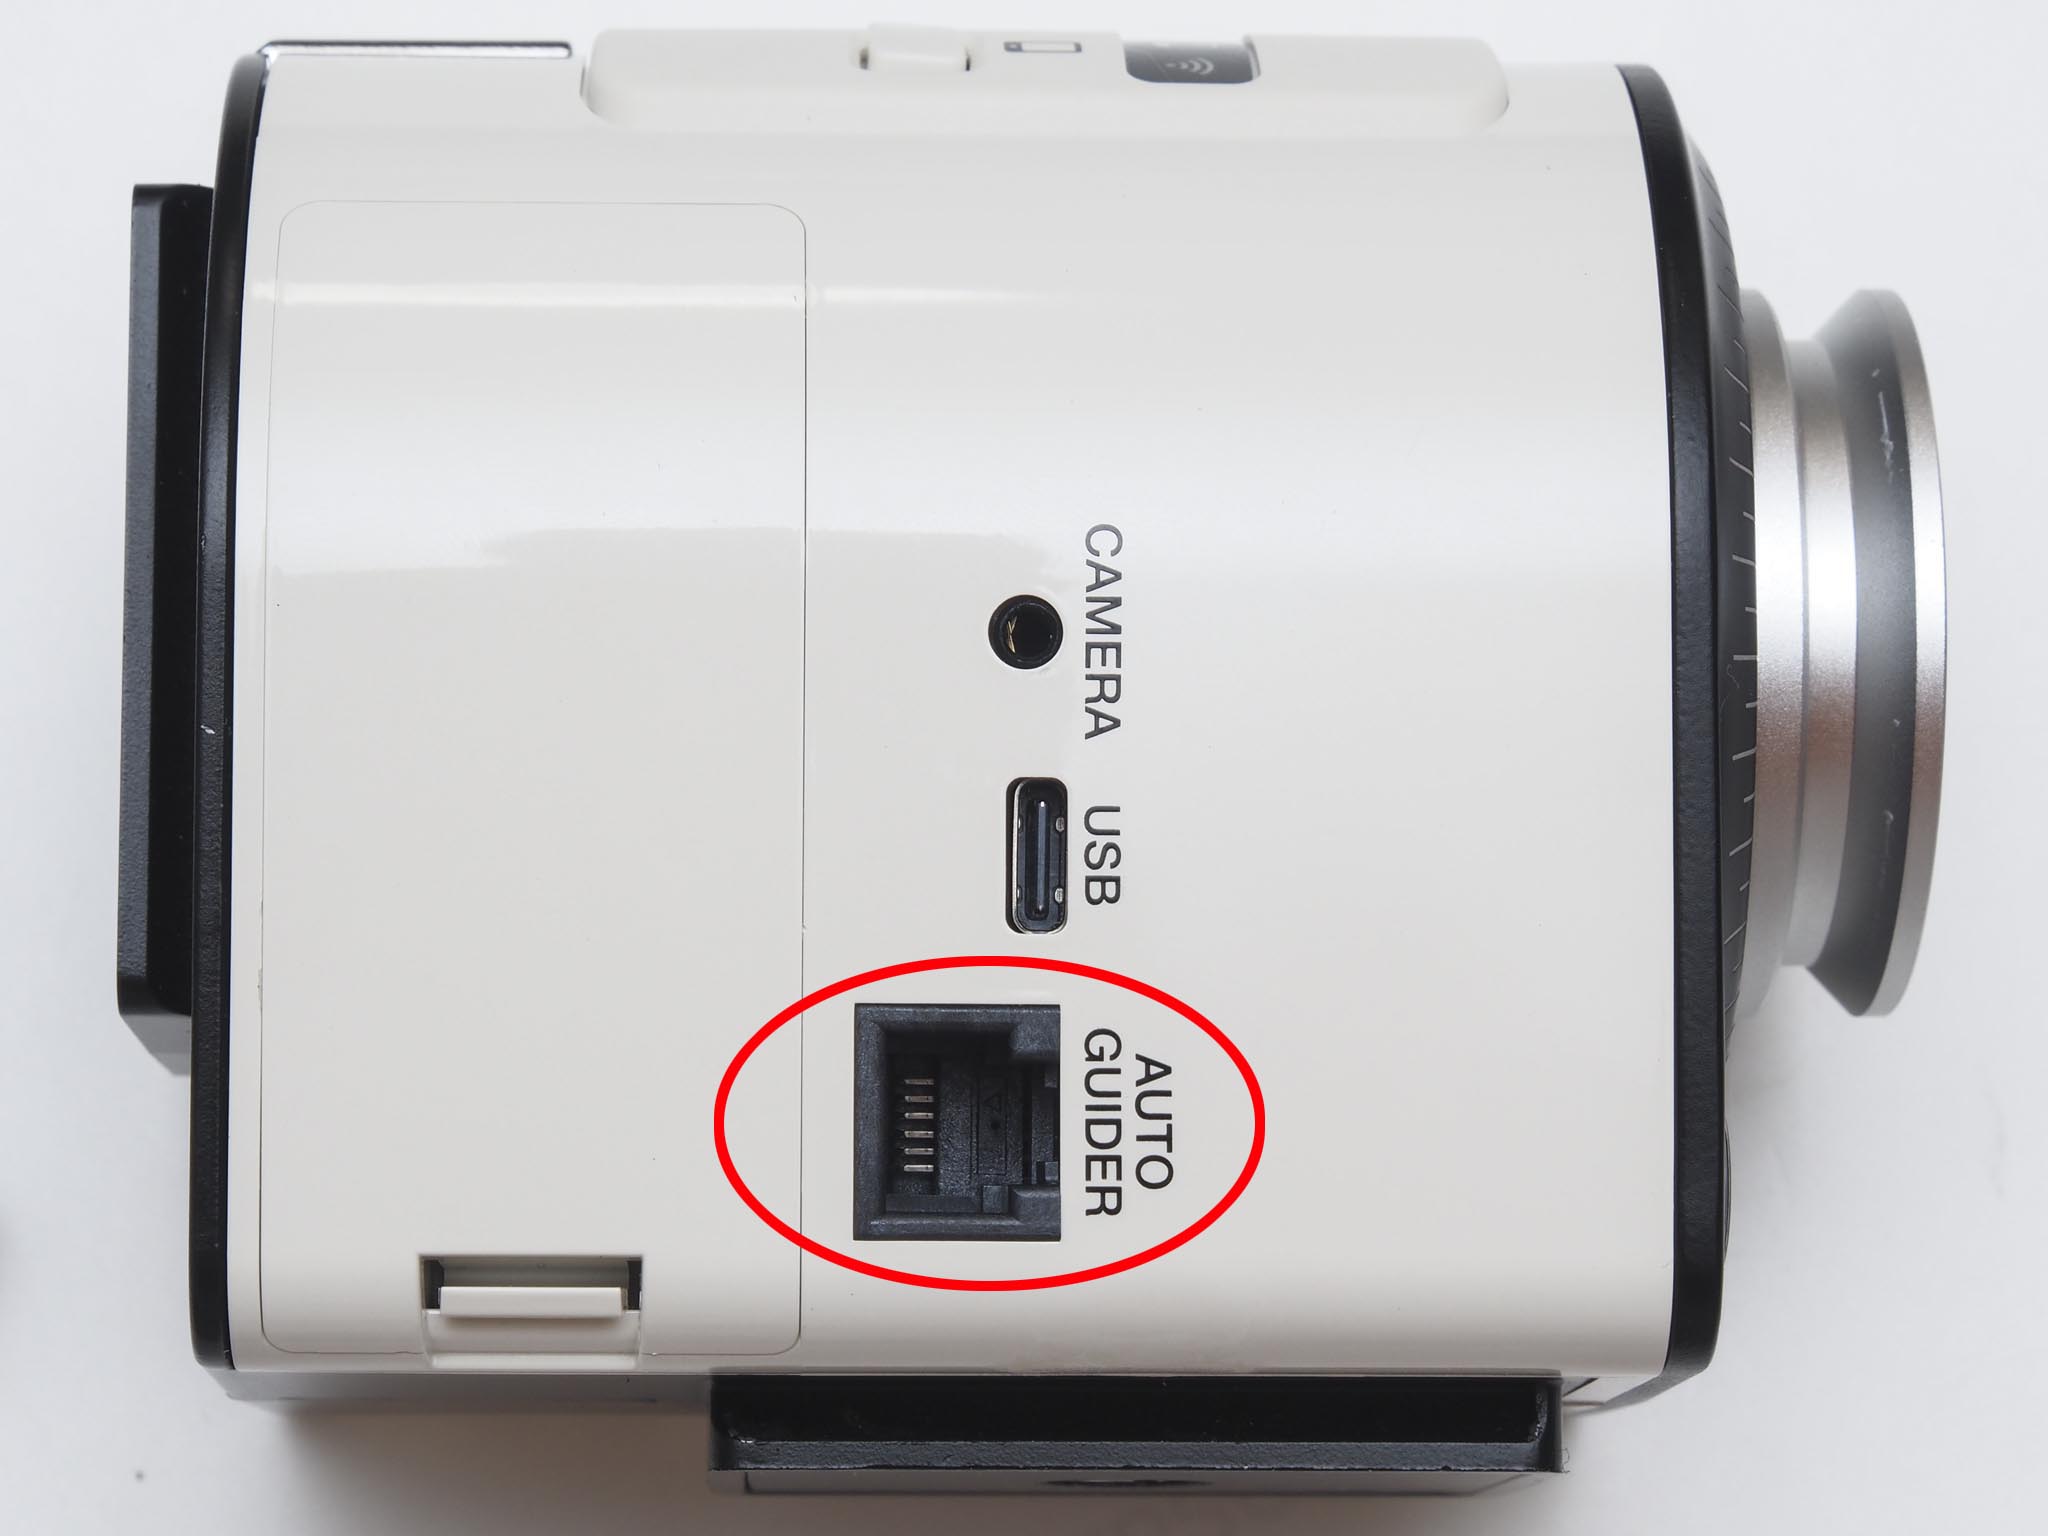 Auto-guide terminal with an added red circle.
By the way, what kind of scenes does the Autoguide come alive in Polarie U? If we want to take advantage of the light weight of the Polarie, it would be a bit unbalanced to bring in a PC and set up an autoguide configuration, since it is uniaxially driven and can’t be automatically installed, and we can’t take advantage of high performance software like Stellarhot. If you can extend the exposure time to 4 or 6 minutes with the autoguide, you will be able to use the lens barrel with a narrow band or a darker f-number.
tracking accuracy of Polarie U
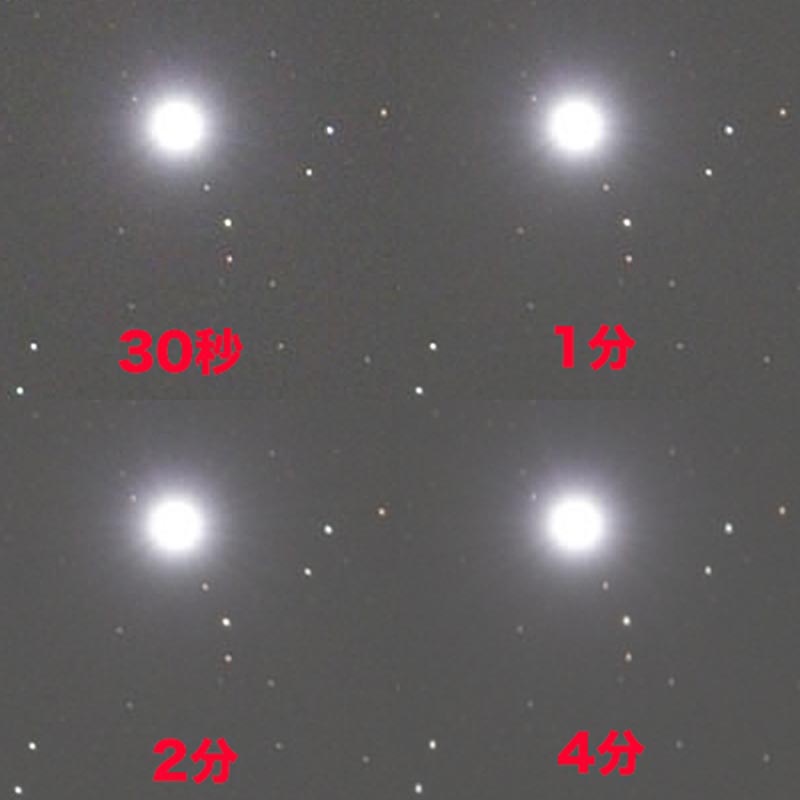
The Polarie (1st. generation) had a good reputation for tracking accuracy. This high accuracy seems to have been carried over to Polarie U. The actual image I took was at a level of no problem at all, even at a focal length of 250mm and an exposure time of 1 minute. I think it’s safe to say that this is accurate enough for a small portable equatorial mount of this size, but I tried to verify this a little more quantitatively.
Verification of tracking accuracy
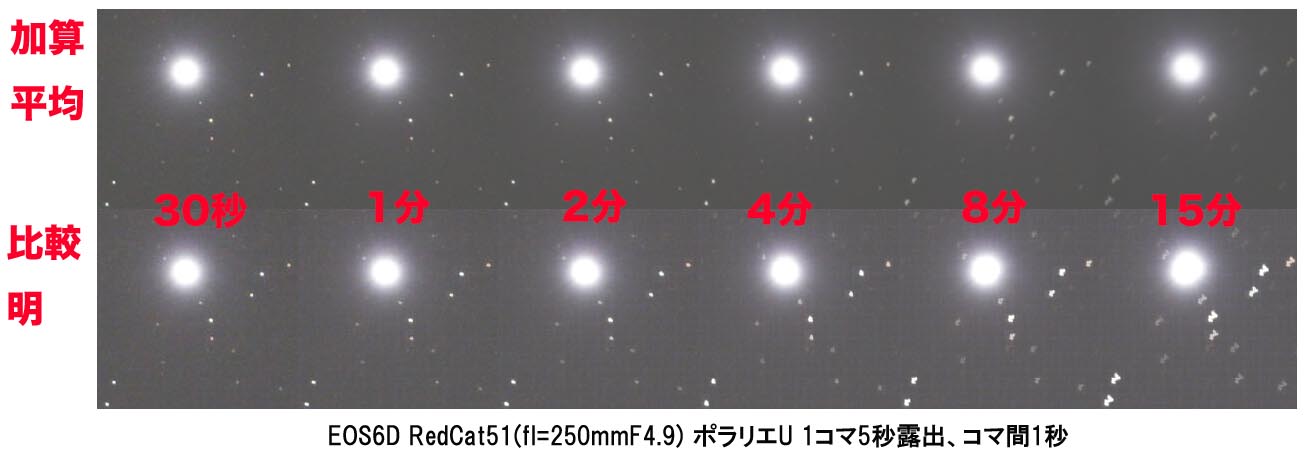 5-second exposure and 15-minute image comparison with Polarie U. The shaking width of the periodic error is roughly about 7px. The camera is an EOS6D at 6.5μ per pixel, with a focal length of 250mm, which roughly translates to a periodic error of about ±20 arc seconds.
A 250mm focal length lens barrel was mounted on the Polarie U, and the data was taken continuously for 15 minutes with a 5-second exposure, and the number of shots was changed to compose the image above (equalized cropping). Click to make it bigger, so check it out with your eyes like a dish^^
There is one thing to note here. When a certain amount of guide error is present, the impression of error varies roughly by a factor of two between composites with “adding average” and composites with “comparative clarity”, with comparative clarity being more sensitive to error. Since deep sky shooting usually involves an “additive average”, I’ll evaluate the results of the additive average below.
(*)Because the FWHM(full width at half maximum) is larger when the comparative light composition is done.
 Extraction of results by additive average
Obviously, 8 minutes of additive average (even at viewing distance) is flowing. So, let’s take a closer look at the results of the sub-4 minute additive average. I enlarged the same image twice and extracted it. If you look at it with your eyes like a dish, even at one minute the star image is slightly less than a perfect circle, but it doesn’t seem to be getting extremely bad at two or four minutes. From my point of view, 4 minutes is just above the passing line and 2 minutes is no problem(*).
(*)If you’re shooting in a “lucky imaging” kind of way that pushes the limits of resolution, you might get a minute’s worth of rejections. This will depend on the way the photographer thinks and feels. Incidentally, if you look at the comparison image, 4 minutes is failing and 2 minutes is just barely passing.
.
The estimated periodic error for the above measurements was about ±20 arc seconds. There are some products like Vixen’s AXD2 that claims ±2.8 arc seconds, so this accuracy is not perfect as an equatorial mount. However, even with the presence of a ±20-second angular periodic error, the flow of the star image is about this in reality. All that’s left is how to use it, assuming this error exists. To tell you the truth, take pictures with exposure times that without trails(*).
(*)In an actual shoot, it’s often difficult to evaluate the flow strictly by magnifying it by equal magnification. When I shoot with my first equipment, I try to take several shots with different exposure times and “half the exposure time that I feel is clearly fluid.
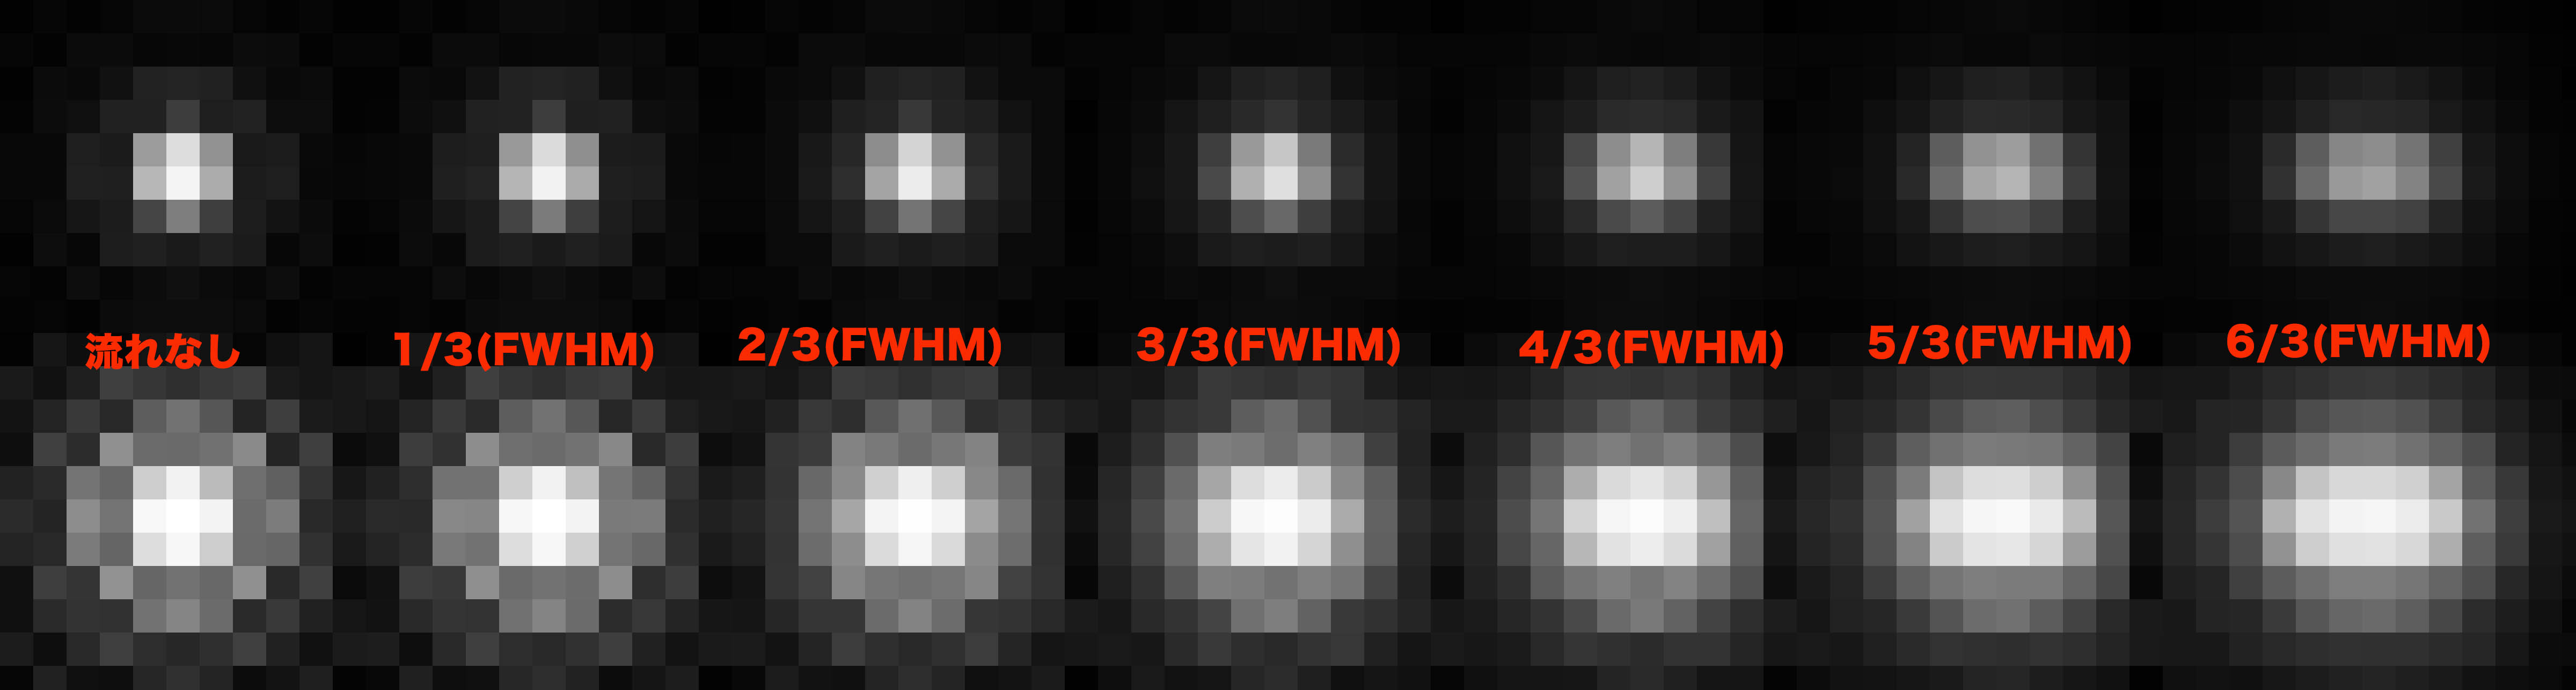 Simulation with pixel pitch of 6.5μ (equivalent to EOS 6D) and stellar diameter of FWHM 26μ (equivalent to 4px), the flow can hardly be seen even if there is a gap of 26μ. If you look at it from the viewing distance instead of equal magnification, it would be acceptable at 52μ, which is twice as much as FWHM.
Here’s one more simulation to look at. The image above is a composite of a theoretically calculated star image with an ideal optical system, which is gradually shifted. Looking at this image, which stream would you give a passing grade to?
The middle image “3/3(FWHM)” is a passing line for me. In other words, it’s acceptable up to the same flow as the minimum stellar diameter (FWHM)”(*). I have a feeling that this criterion is fairly generic.
.
The “equatorial tracking accuracy” is a difficult number in every respect for astronomical equipment. We hope you will not be swayed by the numbers, but will find it helpful in making effective use of your equipment.
Incidentally, I have not compared the tracking accuracy of Polarie (1st. generation) and Polarie U. I have no concrete evidence to say that Polarie U has higher tracking accuracy (crafting accuracy). However, I feel that there are significant differences between the Polarie (1st. generation) and Polarie U in error factors other than periodic error, such as rigidity of the equipment and stability during expansion configurations. It can be said clearly that the Polarie U has a structure that makes it easier to demonstrate its original tracking accuracy.
Using the 1/2 Sidereal Tracking
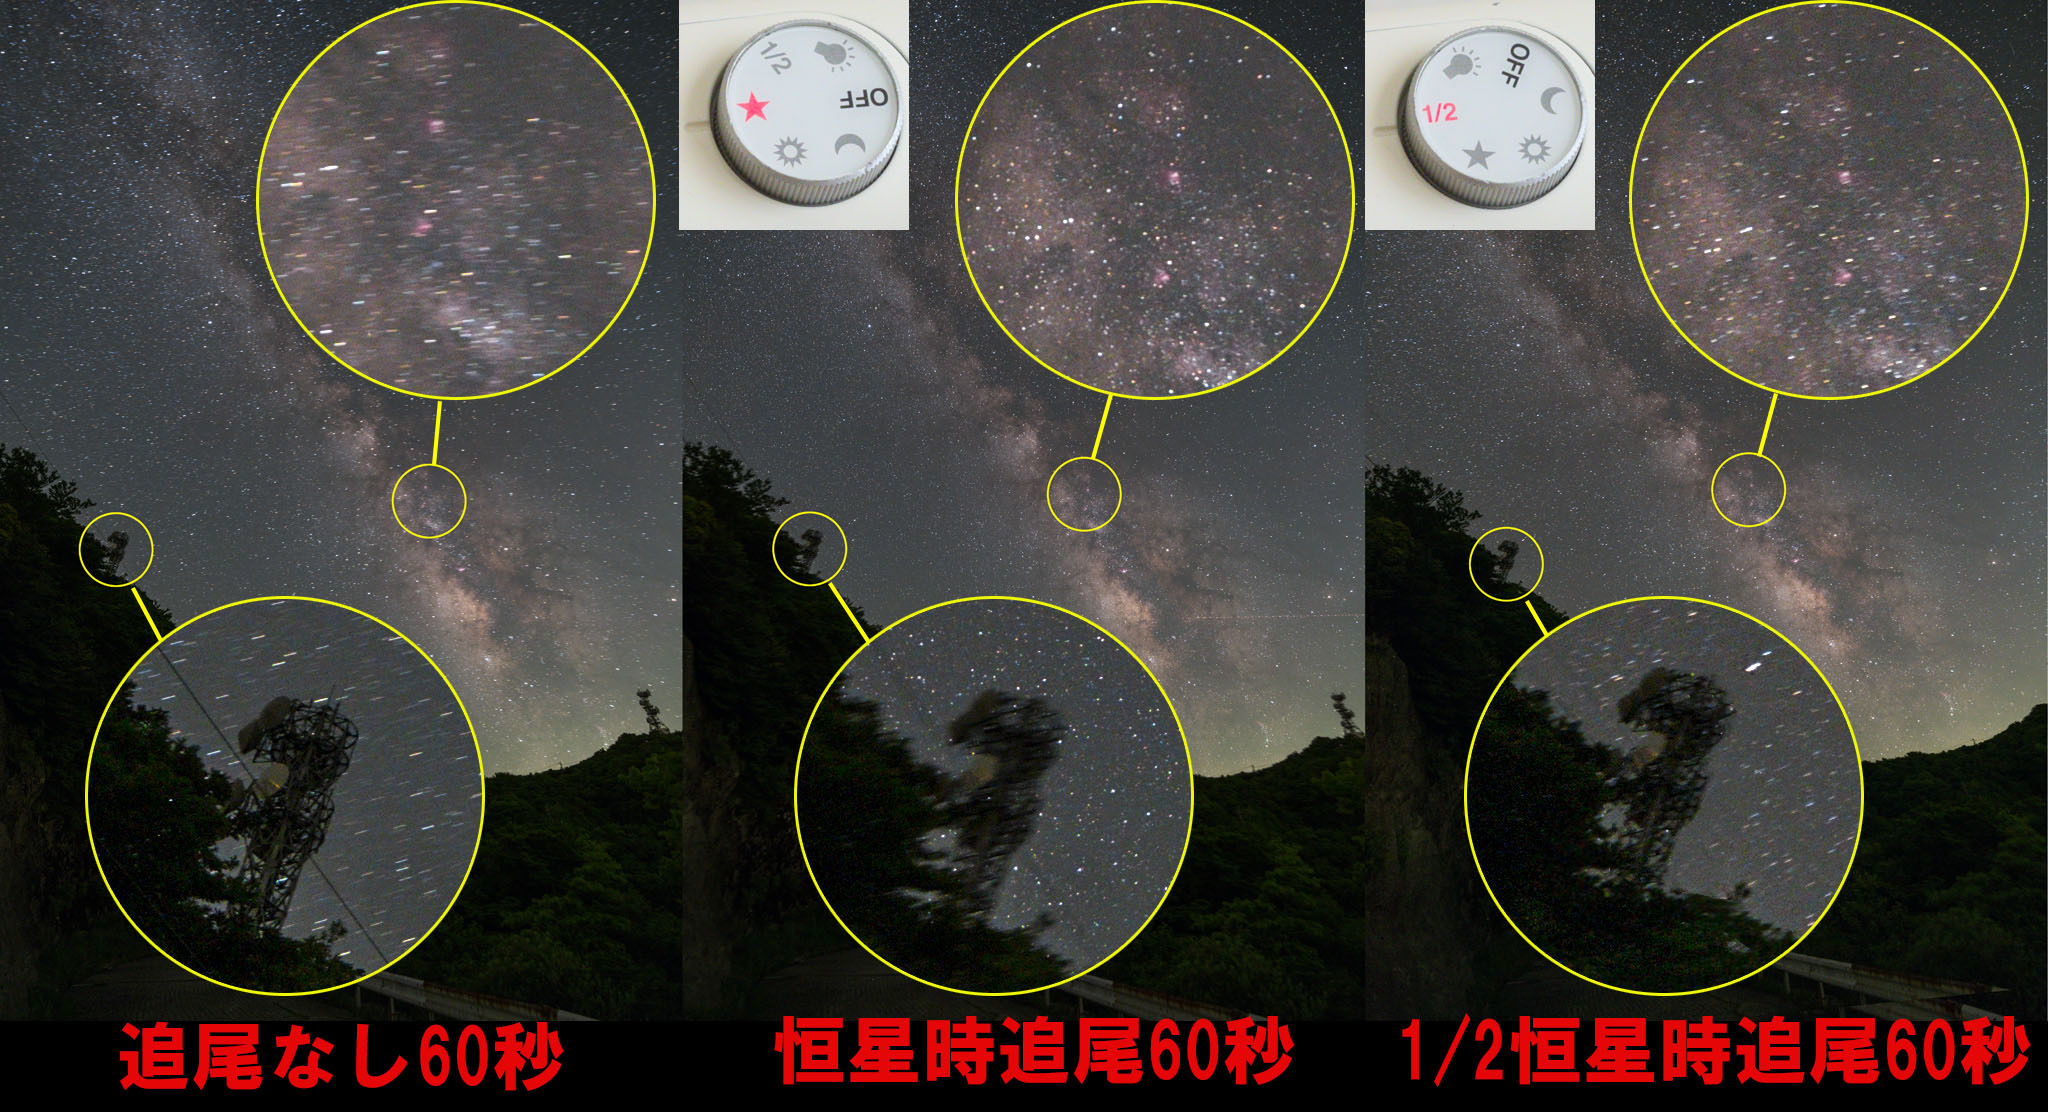 OLYMPUS EM-5 12mm (24mm equivalent) F3.5 ISO1600 fixed shooting
One more thing I would like to mention is the “1/2 Sidereal Time Tracking”.
Most portable equatorial instruments, including Polarie, have a “1/2 sidereal time tracking” feature. This feature is designed to alleviate the problem of “tracking a star causes the ground scenery to flow,” and by tracking at half the normal speed, you can double the exposure time by tracking both the ground and the star.
The image above is a comparative example. Sixty seconds without tracking would clearly flow the stars, while 60 seconds of normal stellar tracking would, conversely, clearly flow the ground. However, the 1/2 sidereal time tracking is within the acceptable range for both of them.
Using the 1/2 Sidereal Time Tracking feature allows you to double your exposure time, which can greatly improve image quality, especially with darker lenses. That’s something you’ll want to take advantage of!
What kind of user is it for?
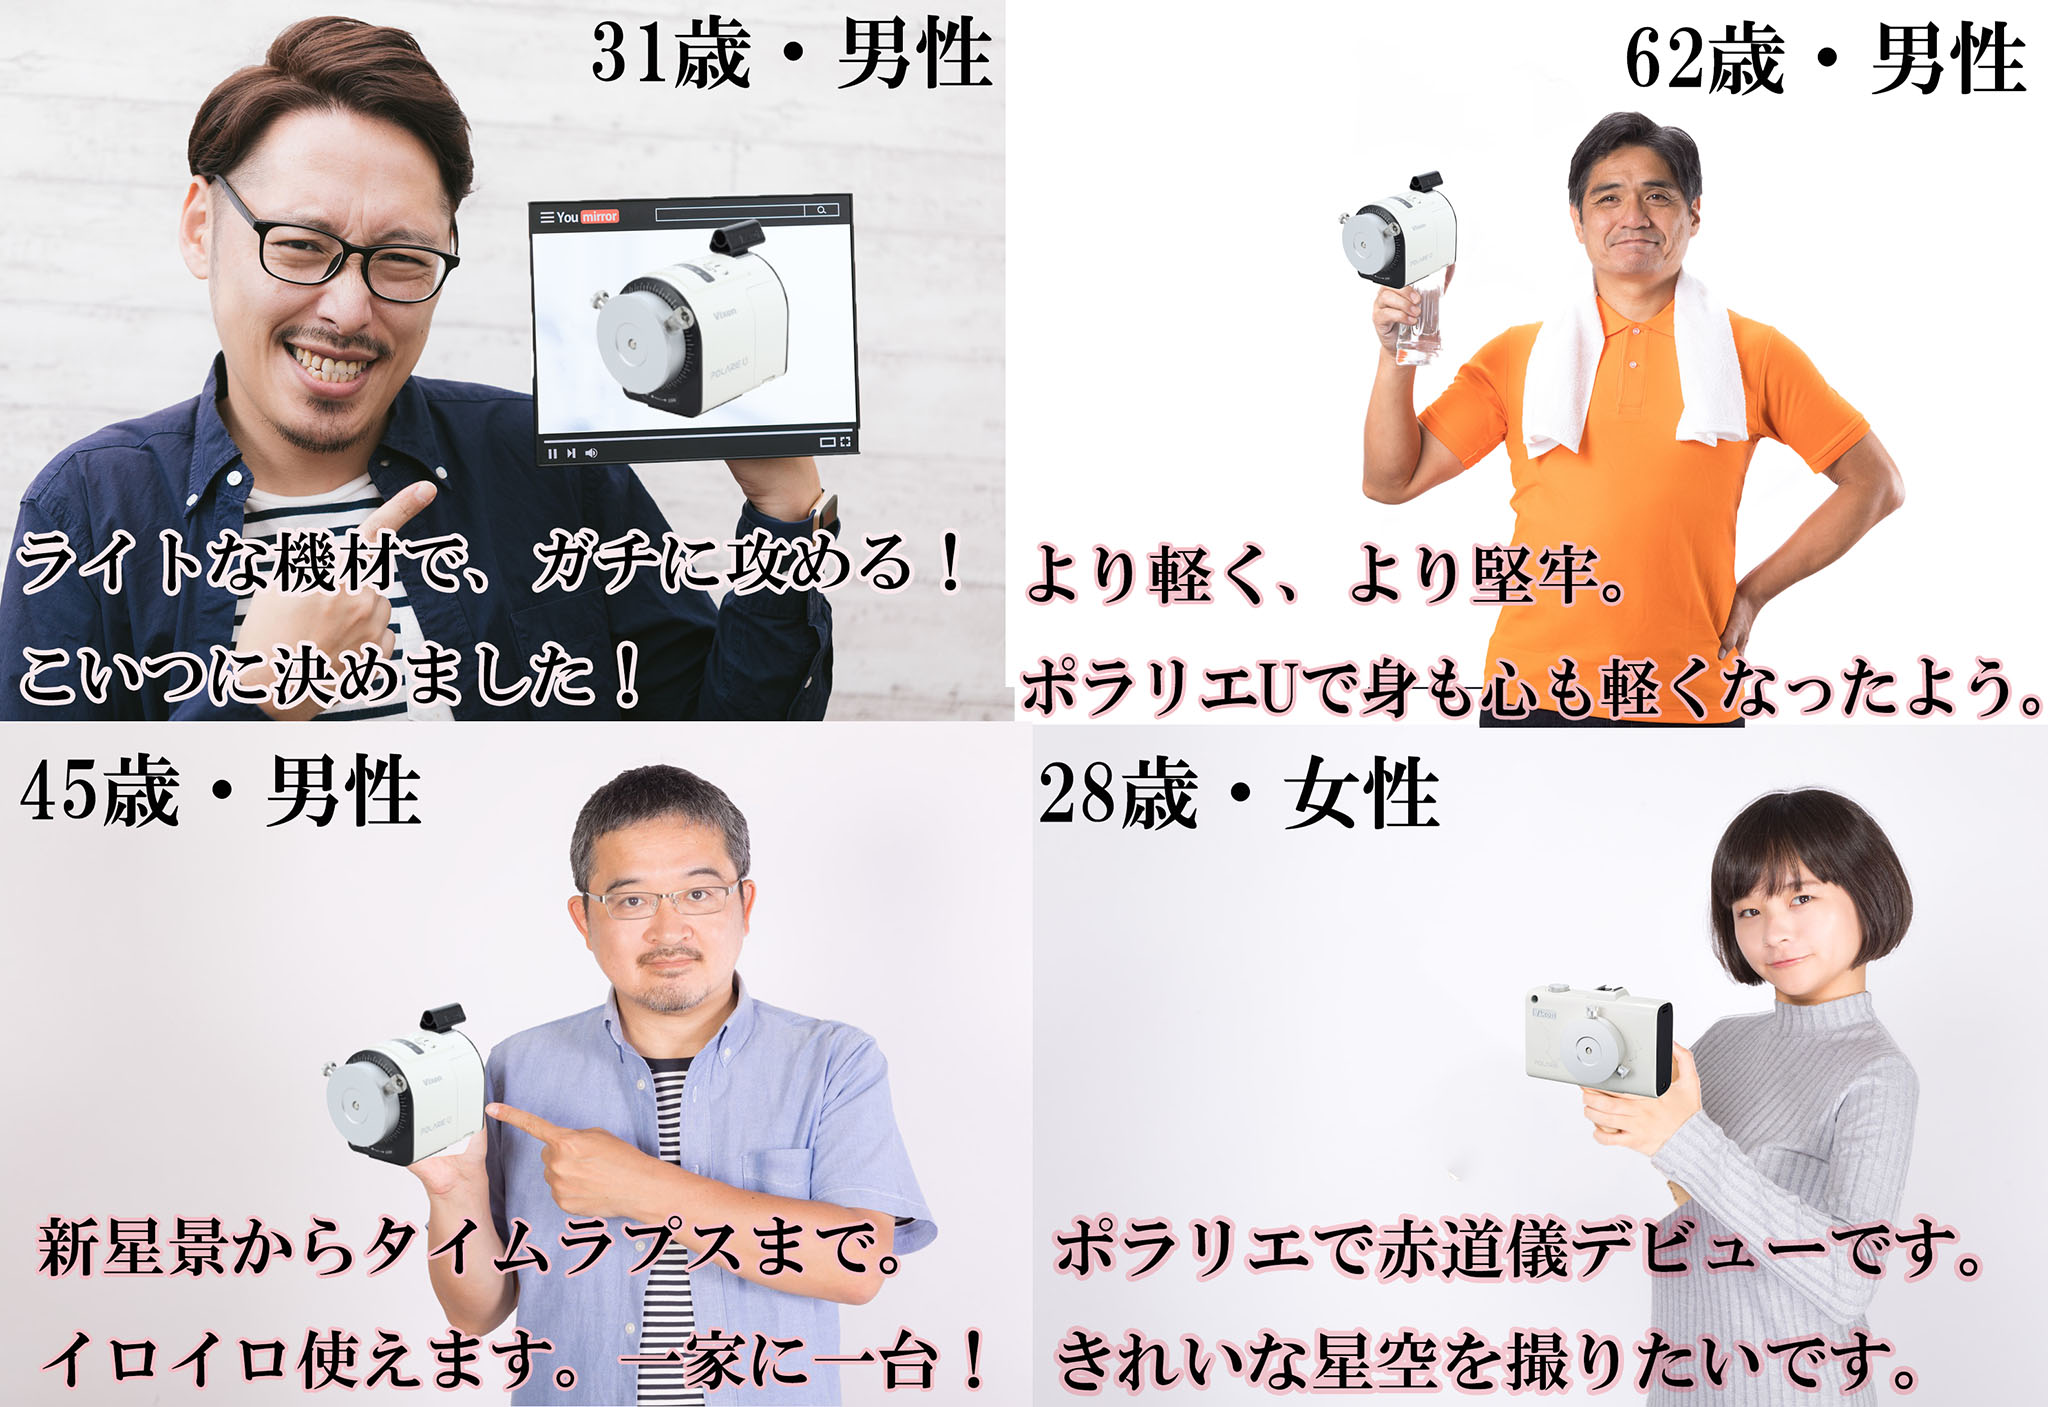 The annual Heavenly Refreshing View, the voice of a user in the brain. The age and comments are the creation of the editorial team and have no relation to the characters in the book. Free material “PAKUTASO” is used: https://www.pakutaso.com
as a debut equatorial mount
 Photographed in May 2014, my portable equatorial mount debut. EOS5DMarkIII (Normal) EF24mmF1,4 F2.8 120sec ISO1600 Polarie (1st. generation) sidereal time tracking, soft filter used, Sanshu-dai, Kumamoto
The Polarie (1st. generation) is an affordable and easy to use equatorial mount for people who start with fixed stills and want to take more beautiful starry skies.
If you’re a slightly more “geeky” minded maniacal prepper, and you’re on a budget, the debut machine would be a more developed Polarie U. Basically, it’s (almost) fully backward compatible, so there’s almost no room for regret once the Yukichi goes out of your wallet^^;;;
As an star tracker for starry sky photographer
Unlike deep sky photography where you have to sit back and relax, you want to keep your equipment as simple, small and lightweight as possible when you’re taking stills around a variety of locations. In this case, the fixed shooting with only a tripod will naturally become the focus.
However, if you have a small portable equatorial mount that can be used as a “head”, you will have more freedom in your shooting. If you want to increase the exposure time in a jet-black sky, you can use the “1/2 stellar tracking” method, or if you want to improve the quality of the starry sky in a perfect location, you can take a set of composite tracking shots.
With Polarie U, there are even more variations in motion time-lapse. The portable equatorial mount will also be a powerful utility player for stills photography.
As a sub-EQ for serious astrophotographers
 Four units in preparation. Polarie is in charge of wide-angle starry-sky. After this, the fog lifted and we were able to take a lot of photos one night. At Shirabiso-Kogen.
For most city-dwelling astronomy enthusiasts, the opportunity to take astrophotography under the stars is not often available. We want to get as much equipment up and running as possible for the few chances we have. A portable equatorial mount with a single axis drive is the best choice as a “light, hand-less sub-machine”.
With the Polarie U, which has high expansion and tracking accuracy, it is possible to build a relatively inexpensive system by using your own parts. The ability to record the location of the shot with motion time-lapse is also appealing.
What we want more
What I was dissatisfied with with Polarie (1st. generation) was mostly improved with Polarie U. Now it is possible to house Polarie U for more advanced shooting and Polarie (1st. generation) for easy shooting, and I have almost no complaints anymore. However, there are a few details that I would like to request.
Improvement of the “standard head base” of the Polarie (1st generation)
 Polarie (1st. generation) is on the left and Polarie U is on the right. Below are the respective “standard head bases”
The head (standard head base) has been improved with the Polarie U to allow for more stable tightening. There is almost no difference in weight, and I hope that Polarie (the 1st. generation) will use the same thing.
 Top left: Normal Mobile Porta Top right: Mobile Porta with the dovetail removed. Bottom left: Mobile Porta with Polarie’s “Standard Head Base” Bottom right: An additional Arca Swiss compatible clamp
As a matter of fact, the standard head base of Polarie U/Polarie is compatible with the dovetail mount of Vixen’s Mobile Porta. If this part is sold separately, the Mobile Porta’s dovetail could be replaced with a lighter “Arca Swiss Compatible”. We hope that you will consider selling these parts as standalone products.
App operability (Polarie U)
The smartphone and tablet applications used in the Polarie U have been quickly improved, with the addition of a “stargazing mode” in version 1.1 and a “bracketing mode” in version 1.2 soon after its release. There are some additional features that I would like to ask for at this momentum.

Anyway, it’s a function to release only one shutter. I think it would be even more convenient if there was a button for “Take only one shot with the same setting” or “Anyway, just press the camera release(*)” to check the composition and tracking before starting a series of shots.
Through-finder
The Polarie (1st. generation)’s “peephole” and Polarie U’s “bare viewfinder” for polar axis alignment are, as mentioned above, sufficiently practical, but in terms of usability, they have their shortcomings. The Polarie U’s “through-finder” is easier to use, at least for beginners, because it is easier to put the North Star in the hole. Couldn’t the Polarie (1st. generation), which is supposed to be less expensive and more suitable for beginners, also come with a “naked viewfinder”?
Rotation speed of motion time-lapse
The maximum speed of the Polarie U is 10x faster, which is a little slower than a dedicated SMS (shot move shot) device. If we can increase this speed more, we can shorten the interval time during motion time-lapse, and at the same rotation angle, we can increase the frame rate and increase the exposure time per frame. I don’t think it’s a high priority for time-lapse photography for stargazing, because it doesn’t need to move very fast, but I think just going up to 20x speed will give you more freedom.
conclusion
 “Profile of Bambi” shot by Polarie U. EOS6D (celestial modification) RedCat51(fl=250mmF4.9) 1 min. x 40 images ISO3200 Polarie U Stellar and Astrophotography mode. Koishiwara, Fukuoka , Japan.
Thanks for reading this far!!
Lightweight and compact body and easy to use at the touch of a button. The Polarie (1st generation), which held a steadfast position as an introductory model of the “equatorial mount. In addition to being lighter, the “Polarie U” has been strengthened and improved in various ways. As a small, star tracker , it is undoubtedly one of the most complete products I can recommend to anyone.
I’ve heard that the Polarie (1st generation) will continue to be sold in conjunction. Even after Polarie U is released, the charm of the 1st. generation Polarie is still the same(*). It’s very important and powerful to have these two units in place in terms of providing users with choices that are tailored to their needs. The two Polaries will open up more astronomy and stargazing fans and broaden their enjoyment! .
(*)I will continue to use “Polarie (1st generation)” in the future. But I want to upgrade to Polarie U…^^
“Great equatorial mounts” gets astronomy fans fired up! So I’ll see you next time!
- This article was prepared by Astronomical Reflections at its own expense and discretion, with equipment loaned by Vixen Corporation. All editorial responsibility rests with the Astronomical Reflections editorial department.
- Please contact the manufacturer or distributor for product purchases or inquiries.
- Astoronomial Reflexions assumes no responsibility whatsoever for any events that occur as a result of this article.
- Images not otherwise noted are original, with all rights reserved by Astoronomial Reflexions.
- The product specifications and prices in this article are correct at the time of writing (March 2020).
- The version of the app Polarie U used in the article is 1.2.
- We used DeepL for translation. Click here to read the original article in Japanese.